
Instruction Manual

3.4.2
M
ov
e
ink
c
artrid
g
e
s
t
abili
z
er
out
w
a
r
d
(P
r
e
p
a
r
e
f
or
ink
c
artrid
g
e
in
s
t
all
a
tion)
Please use
APP
to move
ink
cartridge s
t
abiliz
er
1
.
U
s
e
AP
P
-
>
Clic
k
‘
In
f
orm
a
tio
n
’
-
>
‘
Chec
k
th
e
prin
t
e
r
’
-
>
‘
Prin
t
e
r
main
t
enan
c
e
’
-
>
‘
R
epla
c
e
th
e
in
k
j
e
t
c
artrid
g
e
’
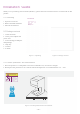
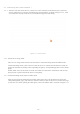
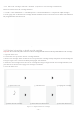
2. On this
page,
click on
th
e
“
Mo
v
e
ink
c
artridg
e
”
and
the stabilizer
will
move toward front cover. Please wait stabilizer
is
fully
stopped before open front
c
o
v
er
.
Figu
r
e
3.4.2
Mobile
s
t
abili
z
er
3.4.3
R
epla
c
e
ink
c
artrid
g
e
or
In
s
t
all
new
ink
c
artrid
g
e
Import
ant
:
Do
no
t
t
ouch
the
y
ello
w
contacts
on
the
ink
cartridge and
the
surface
of
the
chip
a
t
the
bottom
of ink
c
artridge.
1.
Open
the f
r
ont
c
o
v
e
r
.
2. Lift
the blue lever upward
on
the
ink
cartridge s
t
abiliz
er
.
3.
Remove
ink
cartridge:
When
the blue lever
is lift
upward, the cartridge
will flip
and please raised cartridge
at a
45
degree angle to the outward and finally disengaged with
s
t
abiliz
er
.
4.
Install new
ink
cartridge: Insert the new
ink
cartridge at
45
degree angle into the
ink
cartridge stabilizer,
and
press blue lever downward to engage
ink
cartridge
on
s
t
abiliz
er
.
5. Close
the front
c
o
v
er
.
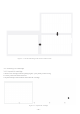
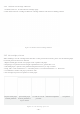
Figu
r
e
3.4.3
R
epla
c
e/In
s
t
all
ink
c
artrid
g
e
·
07
·
①
Open front cover
② Lift
blue lever
③
Unplug
ink
c
artridg
e
④
Insert new
ink
cartridge
⑤
Press blue lever downward
⑥ Close
the front
c
o
v
er