
Use and Care Manual


5
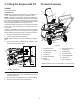
1. Unfolding the Handle
Procedure
1. Loosen the two handle knobs and pull out the two
handle bolts until you can move the handle freely and
rotate the handle to the operating position (Figure 2).
2. Tighten the handle knobs until they are snug (Figure 3).
Figure 3
1. Handle knobs 2. Handle bolt
Figure 2
2
1
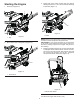
2. Installing the Discharge Chute
Procedure
1. Install the chute deflector to the discharge chute using
bolts and, washer, nut, deflector knob and cap plunger
(Figure 4).
2. Install the discharge chute to the chute base using
three screws and nuts.
IMPORTANT: Do not overtighten the flange nuts; other-
wise you may damage the discharge chute.
Figure 4
1. Deflector
2. Carriage bolts
3. Flange nuts 5/16-18
4. Washer
5. Knob
6. Discharge chute
7. Carriage Bolt
8. Shoulder Bolt
9. Flange nuts 1/4-20
10. Cap Plunger
2
2
7
6
3
3
8
4
9
5
10
1
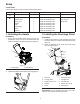
Setup
Loose Parts
Use the chart below to verify that all parts have been shipped.
Procedure Description Qty. Use Tools Required
1.
No parts required – Unfold the handle. –
2.
Carriage bolts
Shoulder Bolt
Flange nuts
Washer
Knob
Cap Plunger
Chute
Deflector
4
1
4
1
1
1
1
1
Install the discharge chute.
Install the discharge chute.
Install the discharge chute.
Install the discharge chute.
Install the discharge chute.
Install the discharge chute.
Install the discharge chute.
Install the discharge chute.
1/2" Wrench
7/16" Wrench
3/8" Wrench