
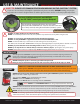
Use and Care Manual


CONNECT POWER ON ENJOY!
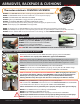
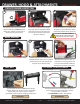
SETUP ABRASIVES
SECURE THE BASE
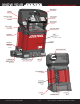
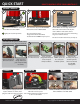
QUICK START
Connect power supply to the rear
of your Jooltool as shown, then
plug the cord into electrical outlet.
2
3
1
a
b
HOW TO QUICKLY SETUP YOUR JOOLTOOL™
Press EJECT BUTTON to release the
tool from the BASE/DOCK
Lightly tilt machine upwards
Slide machine away from ALIGNMENT
PINS to detach from BASE/DOCK
To re-attach after Step 3:
-Align and slide tool onto PINS.
-Push down until HOOK snaps in place.
Set the BASE close to edge of bench or
table and secure with screws of your
choice. Refer to 4 locations above.
Use non-slip pads at 4 corners if installing
on glass or similar surface.
Re-attach machine onto base (see Step 2)
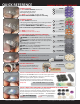
S
P
E
E
D
L
O
W
H
I
G
H
OFF ON
Turn switch clockwise to turn machine
ON and increase speed.
Turn counterclockwise to reduce speed
or turn machine OFF
GRIND, SHARPEN, RESTORE, POLISH & more
while SEEING it all in REAL-TIME!
Some Abrasives may need a Cushion Pad
Remove protective
lm from abrasive
Align See-Thru
design with Backpad
slots and press
rmly to adhere.
With abrasive side
DOWN, place the
disc onto your
Jooltool Spindle.
Twist the disc
assembly onto your
Jooltool Spindle.
Twist until locked,
but do NOT
overtighten.
1 3 42
Remove protective
lm from Cushion.
Align See-Thru
design with Back-
pad and press rmly
to adhere.
A B
Fine Grades such as Trizact or Diamond
a
b
Toll Free: 1-85-JOOLTOOL p.6 Buy supplies at WWW.JOOLTOOL.COM