COMPUTER SEWING MACHINE HZL-UX8 INSTRUCTION MANUAL EN Attention Please read this instruction manual before using the machine as it contains important operational and safety information. Keep this manual accessible so that you may refer to it at anytime while operating the machine.
“IMPORTANT SAFETY INSTRUCTIONS” When using an electrical appliance, basic safety precautions should always be followed, including the following: Read all instructions before using this sewing machine. “DANGER ____ To reduce the risk of electric shock:” 1. The appliance should never be left unattended when plugged in. 2. Always unplug this appliance from the electric outlet immediately after using and before cleaning.
Congratulations on your purchase of a JUKI sewing machine. Please be sure to read safety precautions in “To use the sewing machine safely” in the Instruction Manual before use to fully understand the functions and operating procedures of the sewing machine so as to use the sewing machine for a long time. After you have read the Instruction Manual, please be sure to keep it together with the warranty so that you can read it whenever necessary.
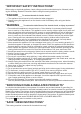
WARNING For the combination of the material and the thread and needle, in particular, refer to the explanation table in “Replacement of the needle”. If the needle or thread does not match the material used such as in the case that an extra heavyweight material (e.g., denim) is sewn with a thin needle (#11 or higher), the needle can break resulting in an unexpected personal injury. Other precautions ● Do not put the sewing machine under the direct sunlight or in a humid place.
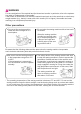
● Be sure to move the sewing machine by holding its handles. Do not hold portion A when you lift the sewing machine. A Basic screen operation method ● Tap Tap the screen with your fingertip once. ● Pinch the screen Pinch with two fingers. ・Pinch in Squeeze your fingers together. ・Pinch out Spread your fingers ● Swipe Tap the screen and slide your fingertip. 4 If the sewing machine is heavy, lift it by putting your arm through the arm section.
CAUTION For customers in the USA This device complies with Part 15 of the FCC Rules. Operation is subject to the following two conditions: (1) This device may not cause harmful interference, and (2) this device must accept any interference received, including interference that may cause undesired operation. NOTE: This equipment has been tested and found to comply with the limits for a Class B digital device, pursuant to Part 15 of the FCC Rules.
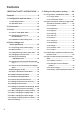
Contents “IMPORTANT SAFETY INSTRUCTIONS” .. 1 5. Setting for the pattern sewing .......... 44 Contents ...................................................6 5.1. Single mode / Combination mode......... 44 1. Configuration and functions .............. 8 1.1. Operating buttons .................................... 9 1.2. Operation panel ...................................... 10 2. Accessories .......................................12 5.1.1. Single mode ..................................... 44 5.1.2.
6. Sewing ................................................62 7. Operation of the operation panel ... 102 6.1. Straight stitch ......................................... 62 7.1. Support .................................................. 102 6.2. Inserting zippers ..................................... 67 7.2. Setting ................................................... 103 6.3. Patchwork piecing .................................. 68 ① Darning adjustment ............................ 104 6.4.
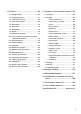
1.
1.1. Operating buttons Name ① ② ③ ③ ④ Thread trimming button Function After sewing, press this button to trim both threads automatically. The sewing machine stops with its needle up after thread trimming. In the case of 2-needle setting, this button will not operate even if the thread trimming button is pressed. Needle up/down When machine stops, press this button to change the needle position. When the needle is up, the needle moves down and vise versa.
1.2. Operation panel A Tap the screen with your fingers. Ⓐ ❶ ❹ ❺ ❻ Ⓓ ⒷⒸ ❷ ❼ ❸ ❽ ❾ When you have changed the setting, the color of the screen display changes. White: Initial value Blue: Changed value B Name Select the screen according to your purpose. Tab A Support Main usage of the sewing machine can be checked. (Refer to page 102) Setting Setting of the functions (17 kinds) can be changed. (Refer to page 103) Sewing Selection and adjustment of the pattern can be carried out.
Name Function Ⓐ Presser Foot Suitable presser foot for the stitch pattern is displayed. Ⓑ Needle Position Needle position is displayed. Type of Throat Plate The type of throat plate is displayed. : Standard throat plate Ⓒ : Throat plate for straight stitch Sewing Condition Stitch Pattern which is sewn currently or to be sewn is displayed. Sewing-start back tacking icon Automatic back tacking at the start of sewing can be set.
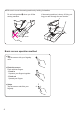
2. Accessories 7 14 E ❷ D B ❶ R C I S O P ❶ Q Auxiliary box Slightly draw the auxiliary bed cover toward ❶ side, then open it toward ❷ side. Accessories in the accessory box can also be stored in the auxiliary bed. Refer to the figure given below for the storage procedure (storage location).
● Supplied with the machine Bobbin (1) Standard presser foot (A) Spool cap (large) ● Inside the auxiliary box.
3. Set-up 3.1. How to install Wide Table 1 2 3 Draw the auxiliary bed out to the left. Open legs of Wide Table until they stop securely at the stopping position. Assemble Wide Table to sewing machine body. Attach it to free arm of sewing machine. 4 Adjust the height of legs so that the top surface of Wide Table is the same height of sewing machine body. * Don't put any heavy materials on the Wide Table. * Don't move sewing machine with Wide Table attached.
3.2. Changing the position of the foot switch The lateral position of the foot switch in reference to the pedal can be changed. Use the foot switch at your desired position. ❶ Attention 1 ❷ Remove pedal setscrew ❶ and block setscrew ❷ . ❹ 2 ❸ Unplug the controller before you change the position of the foot switch. Attach pedal ❸ and block ❹ to the opposite side while turning them in the other way around, and tighten the pedal setscrew and block setscrew. ❺ Foot switch ❺ ❶ ❷ 3.3.
4. Basic settings and basic operations 4.1. Connecting to the power supply WARNING • Disconnect the plug and turn off the power switch (turn to “O”) that always sewing machine is not to use. ■ Connecting the codes ① Turn OFF the power switch (turn to “O”) WARNING (For U.S.A.,Canada only) This appliance has a polarized plug (one blade wider than the other). To reduce the risk of electric shock, this plug is intended to fit in a polarized outlet only one way.
■ Turning the power ON Turn ON the power switch. (Turn to “I”) * Be aware that the presser foot goes up automatically when the power to the sewing machine is turned ON. The screen shown on the left is displayed when you turn ON the power to the sewing machine for the first time after the delivery. 1. Select the language for display. 2. Press [Start]. 3. Set the wireless LAN to which the sewing machine is connected. 4. Enter the password for the wireless LAN. 5. Press [CONNECT] .
4.2. Speed control ■ Speed controller ❶ ❷ ■ Foot controller ❷ Maximum sewing speed can be freely set by the speed controller. ❶ : Faster speed ❷ : Slower speed To run the machine, press the foot controller. The harder you press, the faster the machine sews. Speed controller will set the maximum sewing speed. ❶ Pressing harder → faster speed ❷ Pressing weaker → slower speed ❶ * Always clean the foot controller.
4.3. Lifting/lowering of the presser foot ■ Presser foot lifting lever ❸ The presser foot B is lifted/lowered with the presser foot lifting lever A. The presser foot can be lifted higher than the ordinary lift position. This feature is useful when placing a heavy-weight material on the sewing machine. ❷ Even after the presser foot has been lifted with the presser foot lifting lever, the presser foot can be lowered with the presser foot auto lift button.
4.4. Changing the presser foot ■ Removing and installing the presser foot Leave the machine in Lock mode ● Removing presser foot Raise the needle. Move up the presser foot lifting lever. Press the presser foot releasing button ❶ to remove the presser foot. ❶ ● Installing presser foot ❸ ❹ Align the pin ❷ of the presser foot and the groove ❸ in the presser foot holder. Move down the presser foot lifting lever. * Each presser foot has a marking ❹ .
■ The type and application of the presser foot Marking of presser foot ↓ Standard presser foot A This is used mainly for straight stitch and zigzag stitches. Use this presser foot especially when sewing heavy-weight materials. Zipper presser foot B This is used to attach zippers. Overcasting presser foot C This presser foot is used exclusively for overcasting to prevent the cut edge of fabrics from fraying.
4.5. Placing and releasing “JUKI Smart Feed” “JUKI Smart Feed” is used when sewing the materials (knit, jersey, vinyl cloth, artificial leather, etc.) that are generally hard to be fed, and the materials (quilt, etc.) that are likely to cause uneven material feed. “JUKI Smart Feed” can only be used for sewing limited types of patterns. Refer to “12. List of stitch patterns” for the patterns that can be sewn with the “JUKI Smart Feed”. ❶ ● Placing “JUKI Smart Feed” Raise the presser foot.
4.6. Changing the throat plate and the feed dog The normal throat plate and feed dog can be changed to the throat plate and feed dog for straight stitch. In the case of starting sewing from the edge of material, the material can be smoothly fed without being pulled into the needle hole by changing the throat plate and feed dog to those for straight stitch. Turn off the machine or leave the Machine in Lock Mode ❶ ● Removing the throat plate ❷ ❸ Remove the presser foot and needle.
4.7. How to use the throat plate for straight stitch The throat plate is provided with a useful guide for you to determine the sewing position of material. ● Guide lines Standard throat plate ❶ It is possible to sew the material from its edge by sewing the material while aligning its edge with the guide line on the throat plate. ❶ On center needle position basis ❷ 5 mm ❷ * Numbers on the guide line show the distance in mm and inches between the center needle position and the guide line.
4.8. Attaching the needle Turn off the machine or leave the Machine in Lock Mode ● Removing needle ❶ Turn the hand wheel towards you until the needle comes to the highest position and lower the presser foot. Turn the needle setscrew ❷ towards you 1-2 times and remove the needle. ❷ ❶ T-shape screwdriver ● Attaching the needle Hold the needle with its flat part facing away from you ( ❸ ), and insert it fully until it touches the stopper pin ❹ . Securely tighten the needle setscrew.
4.9. Fabric, thread and needle table Fabric Thread Needle HA×1 Light-weight materials Lawn Silk thread …………………………… No.80,90 Spun thread ………………………… No.80,90 No.11 Tricot Spun thread ………………………… No.60-90 Knit needle No.11 Wool and synthetic fabrics Silk thread ……………………………… No.80 Spun thread ………………………… No.60-90 No.11-14 Cotton and synthetic fabrics Spun thread ………………………… No.50, 60 No.11-14 Light jersey Silk thread ……………………………… No.50 Spun thread ………………………… No.50, 60 Knit needle No.
4.10. Bobbin thread preparation ■ Winding a bobbin ● In the case of using the spool pin A 1 Place the thread spool to the spool pin. There are three types of the spool caps A, large, medium and small. Select the size of spool cap according to the thread spool to be used and use it while changing its direction appropriately. A * Be aware that a spool with a small remaining amount of thread can cause tangling or slip-off of thread. ❶ 2 Thread the guide ❶ .
4 Set the bobbin on the bobbin winding shaft ❸ . ❸ 5 Wind the thread on the upper part of the bobbin by four to five turns in the clockwise direction while taking care not to allow the thread coming from the bobbin winding thread guide to loosen. Put the thread end into the guide ❹ at the bobbin winding shaft and pull it to the right side to cut it. ❹ 6 ❺ 7 Turn the power ON. Push the bobbin winding regulator ❺ towards the bobbin to start winding the bobbin.
■ Placing the bobbin Turn off the machine or leave the Machine in Lock Mode 1 Pull forward hook cover release button A and open the hook cover B. A B 2 Put the bobbin in the bobbin case. * Place the bobbin so that thread winds counterclockwise. counterclockwise 3 Thread groove and 1 by pulling the thread end. * It will be easier to thread grooves when you press the bobbin lightly with your finger. 1 2 4 Thread guide 2 by pulling the thread to left side.
5 Thread 3 . * When pulling bobbin thread, bobbin rotates counterclockwise. If bobbin rotates clockwise, put the bobbin upside down. 3 6 Cut the thread with the built-in cutter C. 7 Close the hook cover. C You can start to sew in this condition (without pulling up the bobbin thread), however, if you want to sew with the bobbin thread pulled out, refer to “Pulling up the bobbin thread” in the page 35.
4.11. Needle thread preparation ■ Preparation Turn off the machine 1 Make sure to push the needle to the top. If the needle is not attached appropriately, the needle cannot be threaded with the automatic needle threader. * Use the needle: No.11-16 and the thread: No.30-90. A 2 Align the marking A at the hand wheel with the one on the machine body. 3 Turn the power ON. 4 Lift the presser foot.
■ Threading the needle thread 1 2 3 4 B B 1 Place the thread spool to the spool pin. There are three types of the spool caps B, large, medium and small. Select the size of spool cap according to the thread spool to be used and use it while changing its direction appropriately. * Be aware that a spool with a small remaining amount of thread can cause tangling or slip-off of thread.
2 Thread to guide 1. 1 3 Hold the thread end and thread according to the arrow marking. * Check that the thread take-up C is correctly threaded. C 4 Thread the guide 6 from the right-hand side. Draw the needle thread out from the guide by approximately 10 cm.
■ Automatic needle threader Turn off the machine or leave the Machine in Lock Mode * When twin needle is used, the automatic needle threader can not be used. * Use the needle: No.11-16 and the thread: No.30-90. 8 * Be careful that the cutter is inside. 1 Lower the presser foot with the presser foot lifting lever. * The automatic needle threader sometimes fails to thread the needle when the presser foot is raised. 2 Thread to 7 and cut the thread with the thread cutter 8.
■ Pulling up the bobbin thread Basic operation: You can start to sew without pulling up the bobbin thread, however, if you want to sew with the bobbin thread pulled out, follow the directions below. 1 2 3 Lift the presser foot and lightly hold the end of the needle thread. Turn the hand wheel towards you to move the needle up and down. Loop of bobbin thread will be pulled out when you will pull the needle thread lightly. Pull out both needle and bobbin threads by approx.
4.12. How to adjust thread tension If the thread tension is not adjusted correctly, seam balance will be lost resulting in puckering or thread breakage. Default setting is suitable for most fabrics. Adjustment may be necessary according to fabrics and sewing applications. Thread tension can be changed even during sewing. Press . Adjust the thread tension by sliding your finger on the scale mark part. The thread tension can also be adjusted by turning the adjusting dial. (Setting range: -5.0 - 5.
■ Well-balanced thread tension ❶ The needle thread and the bobbin thread interlace with each other approximately at the middle of material thickness. ❸ ❺ ❶ Needle thread ❷ Bobbin thread ❸ Fabric (right side) ❹ Fabric (wrong side) ❺ Middle of the fabric thickness ❹ ❷ ❶ ❸ The needle thread is pulled a little bit to the wrong side of material.
4.13. Setting the presser foot pressure Presser foot pressure can be changed even during sewing. Set the presser foot pressure by turning the adjusting dial located below the indication [Presser foot pressure]. (Setting range: 0 - 5) Set the presser foot pressure to “3.6” (initial value) in the case of standard stitching.
4.15. Setting the automatic back tacking, thread trimming and presser foot lifting The back tacking at the beginning and end of sewing and the back tacking and thread trimming / presser foot lift after thread trimming at the end of sewing can be set. Select a pattern. Set operations of the sewing machine by pressing the relevant button on the screen. Setting for the back tacking at the beginning of sewing Select one from the three types of back tacking.
4.16. When changing the needle position The needle position can be changed even during sewing. Press . Change the needle position by sliding your finger on the scale mark part. The needle position can also be changed by turning the adjusting dial. The needle is moved to the left. The needle is moved to the right. White: Initial value Blue: Changed value 0.0 3.5 7.0 When you press most position. , the needle is brought to the left- When you press , the needle is brought to the rightmost position.
4.17. When changing the zigzag width Zigzag width can be changed even during sewing. Change zigzag width A by turning the adjusting dial located below the indication [Zigzag width]. Zigzag width is decreased. Zigzag width is increased. The displayed numeric value is decreased and the zigzag width is decreased by turning the dial counterclockwise. The displayed numeric value is increased and the zigzag width is increased by turning the dial clockwise. The zigzag width can be adjusted while sewing.
4.18. When changing the stitch length Stitch length can be changed even during sewing. Change the stitch length by turning the adjusting dial located below the indication [Stitch length]. Stitch length is decreased. Stitch length is increased. Change the stitch length with the adjusting dial (right). The displayed numeric value is decreased and the stitch length is decreased by turning the dial counterclockwise.
4.19. Setting the stop position of needle It is possible to set the position of the needle (upper or lower position) at the time of stopping the sewing machine. Select [Stop position of needle] from [Setting]. Select the “Lower stop position” or the “Upper stop position”. When you tap the portion outside the setting screen, the screen returns to the common setting screen.
5. Setting for the pattern sewing 5.1. Single mode / Combination mode Some of the patterns cannot be sewn depending on the mode selected. The list of patterns is shown on the inside of the top cover of the sewing machine. 5.1.1. Single mode Under the single mode, the sewing machine directly sews the pattern you have selected. ■ Selecting the pattern Press (Pattern selection icon).
5.1.2. Combination mode The combination stitching mode is used for sewing two or more patterns in combination. As many as 70 petterns can be combined in one combined pattern. As many as 10 combined in one combined pattern. ■ Selecting a pattern (letter) Press In the case 10 patterns have been saved, the message will be displayed when you press [Create new data]. Press to delete the combined patterns. (Pattern selection icon). Select [Combination]. Press [Create new data].
5.2. Types of patterns under the single mode, and how to selected a pattern ☆ There are 368 types of stitch patterns. ☆ When turning on the machine, the straight stitch of the center needle position is chosen automatically. ① Select the type of pattern. [Practical] [Buttonhole] [Appliqué] [Tapering] [Quilt line] [Scallop] [One-point] [Decorative] [Vintage] [Feather / Lace] [Combination] ② Press the pattern icon. Alternatively, ① Enter the pattern number. ・ The number is increased one by one by tapping it.
No. Pattern Application 017 Overcasting stitch 018 Overcasting stitch Used for lightweight material Refer to page No. 69 032 Pattern Application Bar tack Refer to page 74 Bar tack (Memory) 019 69 033 - 034 * Size of bartacking you have sewn once can be stored in memory.
5.2.2. Buttonhole No. Pattern Application Refer to page 110 84 111 84 Keyhole buttonholes 112 84 113 84 114 84 115 84 Select the pattern. No. 101 102 Pattern Application Refer to page For knit Standard buttonholes 84 2-step buttonhole 91 116 84 117 84 91 118 84 84 119 84 120 84 121 Basting stitch for buttonholing 90 84 122 Button sewing 93 2-step buttonhole (Memory) 103 * It is possible to store the size of buttonhole you have sewn once in memory.
5.2.3. Appliqué No. Select the pattern. Pattern No. Pattern No. Pattern No. Pattern No. 201 209 217 225 233 202 210 218 226 234 203 211 219 227 235 204 212 220 228 236 205 213 221 229 237 206 214 222 230 238 207 215 223 231 239 208 216 224 232 240 Pattern 5.2.4. Tapering No. Pattern No. Pattern No. 301 303 305 302 304 306 Pattern Select the pattern.
5.2.5. Quilt line No. Select the pattern. Pattern No. Pattern No. Pattern No. Pattern 401 406 411 416 421 402 407 412 417 422 403 408 413 418 404 409 414 419 405 410 415 420 6.2.6. Scallop No. Select the pattern. 50 No. Pattern No. Pattern No. Pattern No.
5.2.7. One-point No. Select the pattern. Pattern No. Pattern No. Pattern No. Pattern No.
5.2.8. Decorative No. Select the pattern. No. 52 Pattern No. Pattern Pattern No. Pattern No. Pattern No. Pattern No.
5.2.9. Vintage No. Select the pattern. Pattern No. Pattern No. Pattern No. Pattern No. 801 809 817 825 833 802 810 818 826 834 803 811 819 827 835 804 812 820 828 836 805 813 821 829 837 806 814 822 830 807 815 823 831 808 816 824 832 Pattern 5.2.10. Feather / Lace No. Pattern No. Pattern No. Pattern No. Pattern No. 901 904 907 910 913 902 905 908 911 914 903 906 909 912 915 Pattern Select the pattern.
5.2.11. Letters Press (Pattern se- lection icon). Select [Combination]. Press [Create new data]. Select the type of letter (font). Select the letter. Select the direction of letters between horizontal/vertical using .
5.3. Combination of patterns under the combination mode (1) Selecting and combining the patterns (letters) (Example: JUKI♥) Select the type of letter (font). Press the icon and enter “JUKI”. Select [One-point]. Press the pattern (No. 618). When you press , the combination of the patterns is saved and the swing screen is displayed.
(2) Selecting a space Combine a pattern (letter) with another pattern (letter) while inserting one of the following patterns between them. ・ Pattern No.683 ( ) ・ Pattern No.684 ( ) ・ (Small space) ・ (Large space) (3) Adding a pattern (letter) A pattern (letter) can be added to the colored vertical line portion. ● In the case of adding a pattern (letter) between the patterns (Example: J♥UKI ) Move the colored vertical line between “J” and “U” with . Press the pattern (No. 618).
(4) Deleting a pattern (letter) (Example: ♥JUKI♥ ⇒ ♥JUKI ) Move the colored vertical line with to the right side of the pattern you want to delete. Press . , all of the When you select [Clear all] by pressing combined patterns can be deleted. (5) Deleting/copying the combined patterns Press Press . of the combi- nation display you want to delete (copy). Select [Delete] or [Copy].
5.4. Types of edit functions and how to use them Types of editing functions that can be used differ with the pattern you have selected.
5.4.1. Pattern inversion ● Horizontal inversion ● Vertical inversion Press Press when you want to sew a horizontally-in- verted pattern. The horizontally inverted pattern is displayed. when you want to sew a vertically-inverted pattern. The vertically inverted pattern is displayed. * Horizontal inversion and vertical inversion are not applicable to some patterns. * It is also possible to “vertically invert the horizontally-inverted pattern” or “horizontally invert the vertically-inverted pattern”.
5.4.2. Setting the interval between patterns Combination mode From the sewing screen When you press , the interval between the patterns is decreased. When you press again, the pattern interval is restored to the standard setting. For the standard setting, the lock stitch is set at the end of patterns. If the stitch interval is decreased, the lock stitch will be omitted. 5.4.3.
5.4.4. Writing / capturing the pattern data It is possible to capture or write the pattern information by means of a USB thumb drive. ❶ ❷ Insert USB thumb drive ❷ into USB slot ❶ . Press . Select [Capture] or [Write]. ● In the case of [Capture] Select the file you want to capture. Press [Capture]. Do not turn the power OFF while capturing (saving) is in progress . When the backup data has been normally captured, the message “Turn OFF the power switch” is displayed.
6. Sewing 6.1. Straight stitch No. 001 Pattern Presser foot Leave the machine in Lock mode Standard presser foot (A) ■ Sewing start Pull the needle and bobbin threads under the presser foot to the rear of the machine and lower the presser foot to start sewing. Setting > Cancel safety Screen to set the functions while presser foot is up It is possible to start sewing even if the presser foot is lifted.
■ When changing the sewing direction ① Stop the sewing machine when the position for changing the direction of sewing is reached. ② If the needle is not penetrated into the material at that position, press the needle up/down button to allow the needle to penetrate into the material. Then, lift the presser foot. * The sewing machine has been factory-set at the time of shipment, so that the needle penetrates into the material when the sewing machine is stopped.
■ Sewing end Stop the sewing machine. ★ Thread trimming Press the thread trimming button to trim the thread. Lift the presser foot and remove the material from the sewing machine. Notes for thread trimming: 1. Do not use thread thicker than No.30. 2. After trimming, the stitch can be done without pulling up bobbin thread. 3.