HZL - 353Z, 355Z, 357Z Series INSTRUCTION MANUAL Attention Please read this instruction manual before using the machine as it contains important operational and safety information. Keep this manual accessible so that you may refer to it at anytime while operating the machine.
“IMPORTANT SAFETY INSTRUCTIONS” When using an electrical appliance, basic safety precautions should always be followed, including the following: Read all instructions before using this sewing machine. “DANGER ____ To reduce the risk of electric shock:” 1. The appliance should never be left unattended when plugged in. 2. Always unplug this appliance from the electric outlet immediately after using and before cleaning.
10. Always unplug the machine from the electrical outlet when removing covers, when lubricating or when making any other user servicing adjustments mentioned in the instruction manual. 11. Never drop or insert any object into any opening. 12. Do not use outdoors. 13. Do not operate where aerosol (spray) products are being used or where oxygen is being administered. 14. To disconnect, turn all controls to the off ("O") position, then remove plug from outlet. 15. Do not unplug by pulling on cord.
"SAVE THESE INSTRUCTIONS" "This sewing machine is intended for household use only." Congratulations on your purchase of a JUKI sewing machine. Please be sure to read safety precautions in "To use the sewing machine safely" in the Instruction Manual before use to fully understand the functions and operating procedures of the sewing machine so as to use the sewing machine for a long time.
WARNING For the combination of the material and the thread and needle, in particular, refer to the explanation table in "Replacement of the needle". If the needle or thread does not match the material used such as in the case that an extra heavyweight material (e.g., denim) is sewn with a thin needle (#11 or higher), the needle can break resulting in an unexpected personal injury. Other precautions Do not put the sewing machine under the direct sunlight or in a humid place.
" " " " 1. 2. " " 1. 8 2. 3. 4. 5. 6. 7. 8. 9. 10. 11. 12. 13. 14. 15. 16. 17.
18. ( / ) 19. 20. 21. (LED) 22. 23. KD-1902/FC-1902 (110-120V), KD-2902/FC-2902D (220-240V) 24. 25.
" " JUKI " "
" (11 * 5 ~ 40 " ) ( : ) ( )
" " " " 1. 2. " " 1. 8 2. 3. 4. 5. 6. 7. 8. 9. 10. 11. 12. 13. 14. 15. 16. 17.
18. ( / ) 19. 20. 21. (LED) 22. 23. KD-1902/FC-1902 (110-120V), KD-2902/FC-2902D (220-240V) 24. 25.
" " JUKI " " /
" (11 * 5 ~ 40 " ) ( : ) ( )
List of contents Details of the machine................................................................................................................................22 Fitting the snap-in sewing table..................................................................................................................24 Accessories................................................................................................................................................24 Connecting machine to power source.
.................................................................................................................................................23 ..............................................................................................................................................25 ........................................................................................................................................................25 ................................................................
................................................................................................................................................23 ............................................................................................................................................25 .......................................................................................................................................................25 ....................................................................
Details of the machine 1. Tension dial 2. Presser foot pressure 3. Thread take up lever 4. Thread cutter 5. One step buttonhole lever 6. Automatic threader 7. Presser foot 8. Needle plate cover 9. Sewing table and accessory box 10. Stitch width dial 11. Stitch length dial 12. Bobbin winder spindle 13. Bobbin winder stopper 14. Stitch display 15. Reverse lever 16. Handwheel 17. Patten selector dial 18. Buttonhole balance control dial 19. Main switch 20. Main plug socket 21. Hole for second spool pin 22.
1. 1. 2. 2. 3. 3. 4. 4. 5. 5. 6. 6. 7. 7. 8. 8. 9. 9. 10. 10. 11. 11. 12. 12. 13. 13. 14. 14. 15. 15. 16. 16. 17. 17. 18. 18. 19. 19. 20. 20. 21. 21. 22. 22. 23. 23. 24. 24. 25. 25. 26. 26. 27. 27.
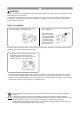
Fitting the snap-in sewing table Keep the snap-in sewing table horizontal, and push it in the direction of the arrow. (1) The inside of the snap-in sewing table can be utilized as an accessory box. To open, flip cover down as shown. (2) Accessories a b c e d g f h i l m Standard accessories a. Standard presser foot b. Zipper foot c. Buttonhole foot d. Button sewing foot e. Screwdriver (L & S) f. Spool pin felt g. Seam ripper/ brush h. Pack of needles (3x) i. Bobbin (3x) j. Quilt guide k.
(1) (1) (2) a. b. c. d. e. f. g. h. i. j. k. l. m. n. o. p. q. r. s. t. u. v. w. ( (3x) (3x) & ) (2) a. b. c. d. e. f. g. h. i. j. k. l. m. n. o. p. q. r. s. t. u. v. w.
Connecting machine to power source Connect the machine to a power source as illustrated. (1) The sewing machine is equipped with a polarized plug which must be used with an appropriate polarized outlet. Attention: Unplug the power cord when machine is not in use. Foot control The foot control pedal regulates the sewing speed. (2) Attention: Consult a qualified electrician if in doubt as to connect machine to power source. Unplug power cord when machine is not in use.
(1) (1) (2) (2) KD-1902/FC-1902(110-120V ) / KD-2902/FC-2902D (220-240V ) KD-1902/FC-1902(110-120V ) / KD-2902/FC-2902D (220-240V ) (1) (1)
Two-step presser foot lever When sewing several layers or thick fabrics, the presser foot can be raised a second stage for easy positioning of the work. (A) A Attaching the presser foot holder a a Raise the presser foot bar (a). (1) Attach the presser foot holder (b) as illustrated. e e b d Attaching the presser foot Lower the presser foot holder (b) until the cut-out (c) is directly above the pin (d). (2) Raise the lever (e).
(A) (A) (a) (a) (b) (b) (1) (1) (b) (c) (b) (d) (a) (b) (f) (2) (b) (f) (a) (e) (2) (a) (e) (3) (g) (c) (d) (a) (3) (g) (4) (4) : :
Winding the bobbin - Place the thread and spool cap onto the spool pin. For small thread spools, place small side of spool cap next to spool. (1) - Snap thread into thread guide. (2) - Wind thread clockwise around bobbin winder tension discs. (3) - Thread bobbin as illustrated and place on spindle. (4) - Push bobbin spindle to right. (5) - Hold thread end. (6) - Step on foot control pedal. (7) - Cut thread. (8) - Push bobbin spindle to left (9) and remove.
- (1) - (1) - (2) (2) - (3) (3) - (4) - (4) (5) - (6) - (5) - (6) (7) (7) - (8) (8) - (9) : (9) :
Inserting the bobbin When inserting or removing the bobbin, the needle must be fully raised. 1. Inserting the bobbin in the bobbin holder with the thread running counter clockwise direction (arrow). 2. Pull the thread through the slit (A). A 3. Draw the thread clockwise until it slips into the notch (B). 4. Pull out about 15 cm of thread and attached the bobbin cover plate. B A B Attention: Turn power switch to "O" before inserting or removing the bobbin.
1. 1. 2. (A) 3. (B) 4. ) : (A) 3. 15 (6 2. (B) 4.
Threading the upper thread This is a simple operation but it is important to carry out correctly as by not doing so several sewing problems could result. - Start by raising the needle to its highest point, and also raise the presser foot to release the tension discs. (1/2) - Lift up the spool pin. Place the thread and spool holder onto the spool pin. For small spools of thread, use the spool cap with the small end facing the spool of thread. (3) - Draw thread from spool to the upper thread guide.
(1/2) - (1/2) - - (4) - (5) - (4) - (5) - (6) (6) - (7) (7) (8) (8) 10 (9) 10 (9)
B A Automatic needle threader - Raise the needle to its highest position. - Press lever (A) right down. - The threader automatically swings to the threading position (B). - Take the thread round the hook (C). - Take the thread in front of the needle so that the thread will insert into the hook (D) from bottom to top C - Release lever (A). - Pull the thread through the needle eye. A D Attention: Turn power switch to "O"! Bringing up the lower thread Hold the upper thread with the left hand.
- - - (A) - (A) - - (B) (B) - - (C) (C) - - (D) (D) - - (A) - (A) - 10 10 : : (1) 10 (2/3) (1) 10 (2/3)
Reverse sewing A At the end of seam, press down the reverse sewing lever. Sew a few reverse stitches. Release the lever and the machine will sew forwards again. (A) Removing the work Turn the handwheel towards to bring the thread take up lever to its highest position, raise the presser foot and remove work towards the back. B Cutting the thread Hold the threads behind the presser foot with both hands, guide them to the slit (B) and press down. Changing sewing directions 1.
(A) (A) (B) (B) 1. 1. 2. 2. 3. 3.
Inserting the needle D Change the needle regularly, especially if it is showing signs of wear and causing problems. A Insert the needle as illustrated as follows: A. Loosen the needle clamp screw and tighten again after inserting the new needle. (1) B. The flat side of the shaft should be towards the back. C/D. Insert the needle as far up as it will go. B C B Attention: Turn power switch to "O" before inserting or removing the needle. C A Needles must be in perfect condition.
(1) (1) - - (A) (B) - - (C) (C) (D) (D) - (A) (B) - (A) (2) (2) A. B. C. A. B. C. "4" "4" A. B. C. (A) A. B. C.
Adjusting presser foot pressure The presser foot pressure of the machine has been pre-set and requires no particular readjustment according to the type of fabric (light-or-heavy weight). However, if you need to adjust the presser foot pressure, turn the presser adjusting screw with a coin. For sewing very thin fabric, loosen the pressure by turning the screw counter clockwise, and for heavy fabric, tighten by turning it clockwise.
" " " " "+" "+" (1) (1) (a) (a) (b) (2) (b) (2)
Matching needle / fabric / thread NEEDLE, FABRIC, THREAD SELECTION GUIDE NEEDLE SIZE FABRICS THREAD 9-11(65-75) Lightweight fabrics-thin cottons, voile, serge, silk , muslin, Qiana, interlocks, cotton knits, tricots, jerseys, crepes, woven polyester, shirt & blouse fabrics. Light-duty thread in cotton, nylon or polyester. 12(80) Medium weight fabrics-cotton, satin, kettleclote, sailcloth, double knits, lightweight woollens.
9-11(65-75) 12(80) 14(90) 16(100) 18(110) HA 1 15 1 9(70) 18(110) 15 1/705H (SIN) 9(70) 18(110) 15 1/705HS (SUK) ( 130 PCL : 1. 2. 3. 4. 5.
9-11(65-75) 12(80) 14(90) 16(100) 18(110) HA 1 15 1 9(70) 18(110) 15 1/705H (SIN) 9(70) 18(110) 15 1/705HS (SUK) ( 130 PCL : 1. 2. 3. 4. 5.
a How to choose your pattern b c d e HZL-353Z Series HZL-355Z Series For straight stitch select pattern "A" with pattern selector dial. Adjust the stitch length with the stitch length dial. You may choose any needle position, by turning the stitch width dial. For zigzag stitch, select pattern "B" with pattern selector dial. Adjust the stitch length and stitch width according to the fabric being used.
"A" "A" , "B" "B" "S" "S" "S" "S" (HZL(HZL- 355Z, HZL-357Z) 355Z, HZL-357Z) a. b. c. d. e. a. b. c. d. e.
Straight stitching and needle position Turn the stitch selection dial so that the pointer is set to the straight stitch. Generally speaking, the thicker the fabric, thread and needle, the longer the stitch should be. 7 3.5 Choose your needle position, from center position to left needle position by changing the stitch width dial from "0" to "7". 0 Zigzag stitching Turn the stitch selection dial to zigzag stitch. 7 6 5 4 3 2 1 0 4 3 2 1 0.
"0" ) "0" ) "7" ( "7" ( "0" "0" "7" "7" "4" (1) "4" (1) "0" "0" "2.5" ( (2) "0" "0" ) "2.
Sewing on buttons 5 Change presser foot to button sewing foot. 0 Move the drop feed control to "........" to lower the feed dogs. (1) b a a b Position the work under the foot. Place the button in the desired position, lower the foot. Set the pattern selector knob on zig zag stitch. Adjust the stitch width between "3" - "5" according to the distance between the two holes of the button. Turn the handwheel to check that the needle goes cleanly into the left and right holes of the button.
(1) (1) 10 10 3-4 (2) 3-4 (2) (3) (3) 4 4 (2) (2) (3) (3)
How to sew buttonholes 3~7 Buttonhole-making is a simple process that provides reliable results. 0.4~0.6 Making a Buttonhole - Using tailor's chalk, mark the position of the buttonhole on the fabric. - Attach the buttonhole foot and set the pattern selection dial to " ". - Lower the presser foot aligning the marks on foot with the marks on the fabric as shown in fig. (1). (The front bar tack will be sewn first.) - Open the button plate and insert the button.
- 0.3 ( (1/8 3 0.3 ( ) ) (1/8 3 ) ) (1) (1) - - (2) (2) - - " " "0.5" - "1" " " "0.
Left and right side balance for buttonhole Stitch density on right and left sides of buttonhole can be adjusted by button-hole balance control dial. This dial should usually be in a neutral position. (between "+" and " ") If the stitches on the left side of the buttonhole are too close together, turn the dial to the left (+). * Turning dial to the left opens left side. If the stitches on the left side of the buttonhole are too open, turn the dial to the right ( ).
( "+" " " ) ( "+" ) " " " " "+" "+" (1) "1" - "4" " " (2) (1) "1" - "4" (2)
Stitch selection 0 4,S Turn the stitch length dial to "4". (HZL-353Z) Turn the stitch length dial to "S". (HZL-355Z, HZL-357Z) Triple straight stitch: (1/2) For hardwearing seams. The machine sews two stitches forwards and one stitch backwards. This gives triple reinforcement. 3~7 4,S Triple zig-zag: (3/4) For hardwearing seams, hems and decorative seams. Adjust the stitch width dial to between "3" and "7". Triple zig-zag is suitable for firm fabrics like denim, corduroy, etc.
/ "4" "4" (HZL-353Z) (HZL-353Z) "S" (HZL-355Z, HZL-357Z) "S" (HZL-355Z, HZL-357Z) : (1/2) : (1/2) : (3/4) : (3/4) "3" - "7" "3" - "7" (1) 3 5 (2) (1) 3 5 (2)
Blind hem 3~7 1~3 For hems on curtains, trousers, skirts, etc. Blind hem for stretch fabrics. (HZL-355Z, HZL-357Z) Blind hem for firm fabrics. Turn up the hem to the desired width and press. Fold back (as shown in Fig. 1) against the right side of the fabric with the top edge of the hem extending about 7 mm (1/4") to the right side of the folded fabric. Start to sew slowly on the fold, making sure the needle touches slightly the folded top to catch one or two fabric threads.
(HZL-355Z, HZL-357Z) - (HZL-355Z, HZL-357Z) (1) (1) - - (2) (2) - - "4" "4" (HZL-353Z) (HZL-353Z) "S" (HZL-355Z, HZL-357Z) "S" (HZL-355Z, HZL-357Z) (1) 1 ) (2) (1) (1/4 1 ) (2) ( 1/4
Overlock stitches 3~7 4,S Turn the stitch length dial to "4". (HZL-353Z) Turn the stitch length dial to "S". (HZL-355Z, HZL-357Z) Seams, neatening, visible hems. Double overlock stitch (1): For fine knits, handknits, seams. Standard overlock (2): For fine knits, jerseys, neck edges, ribbing. (HZL-353Z, HZL-357Z) Stretch overlock (3): For fine knits, jerseys, neck edges, ribbing. All overlock stitches are suitable for sewing and neatening edges and visible seams in one operation.
"4" "4" (HZL-353Z) (HZL-353Z) "S" (HZL-355Z, HZL-357Z) "S" (HZL-355Z, HZL-357Z) (1) : (1): (2): (2): (HZL- 353Z, HZL-357Z) (HZL353Z, HZL-357Z) (3): : (3): :
Patch work 3~7 4,S Turn the stitch length dial to "4". (HZL-353Z) Turn the stitch length dial to "S". (HZL-355Z, HZL-357Z) These stitches are used to join two pieces of fabric while leaving a space between their edges. - Fold over the edges of the two pieces of fabric for the hem and baste the edges to a thin piece of paper leaving a small space between them. - Stitch along the edge, pulling both threads slightly when beginning to sew. * Use thicker than normal threads for sewing.
"4" "4" (HZL-353Z) (HZL-353Z) "S" (HZL-355Z, HZL-357Z) "S" (HZL-355Z, HZL-357Z) - 6 (1/4 - 6 ) ) - (1/4
Practical stitches 3~7 Set the machine as illustrated. Turn the stitch width dial and stitch length dial to suit the fabric. 1~2 Feather stitch (1) For decorative joining seam for a fagoted effect. (HZL-353Z, HZL-357Z) Bridging (2) For seams, place mats, tablecloths. Decorative joining seam for a fagotted effect. Gathering with cord or shirring elastic. 1 2 3 4 Rampart (3) For flat joining seams, sewing on elastic, visible hems. This stitch can be used for firm, thicker fabrics.
(1) (HZL-353Z, HZL-357Z) (2) (3) (4) (1) (HZL-353Z, HZL-357Z) (2) (3) (4)
Darning 0 1~4 - Turn stitch length dial to the desired length. - Turn stitch selector to straight stitch, center needle position. - Position the fabric to be darned under the presser foot together with the under laying fabric to be used. - Lower the presser foot and alternately sew forward or reverse using the lever. - Repeat this motion until the area to be darned is filled with rows of stitching. For reverse sewing instructions, see page 34. Applique 3~7 0.
- - * * 35 - 35
Monogramming and embroidering with embroidery hoop* 1~5 b 0 a Drop the feed dogs. (1) - Remove the presser foot and the presser foot holder. - Lower presser foot lever before starting to sew. - Adjust the stitch width according to the size of lettering or design. a b Preparation for Monogramming and Embroidering* - Draw the desired lettering or design on the right side of the fabric. - Stretch the fabric between embroidery hoop as firmly as possible. - Place the fabric under the needle.
* - * (1) (1) - : : -
Maintenance Disconnect the machine from the mains before carrying out any maintenance or changing the sewing light bulb. Cleaning If lint and bits of thread accumulate in the hook, this will interfere with the smooth operation of the machine. Check regularly and clean the stitching mechanism when necessary. Bobbin holder 1. Remove the bobbin cover plate and bobbin. 2. Clean the bobbin holder with a brush. a b Hook race and feed dog 3. Remove the needle, presser foot and holder.
1. 2. 1. 2. 3. 3. 4. 5. 4. 5. 6. (a) (b) 6.
Trouble shooting guide Problem Cause Correction Upper thread breaks 1. The machine is not threaded correctly 2. The thread tension is too tight 3. The thread is too thick for the needle 4. The needle is not inserted correctly 5. The thread is round wound the spool pin 6. The needle is damaged 1. Rethread the machine 2. Reduce the thread tension (lower number) 3. Select a larger needle 4. Remove and reinsert the needle (flat side towards the back) 5. Remove the reel and wind thread onto reel 6.
1. 2. 3. 4. 5. 6. 1. 2. 3. 4. 5. 6. 1. 2. 3. 4. 1. 1. 2. 3. 4. 1. 2. 1. 2. 3. 4. 1. 2. 3. 4. ( ) ( ) ( ) 2. 3. 4. ( ) 3. 4. / / 1. 2. 3. 4. 1. 2. 3. 4. 1. 2. 3. 1. 2. 3. 1. 2. 1. 2.
1. 2. 3. 4. 5. 6. 1. 2. 3. 4. 5. 6. 1. 2. 3. 4. 1. 1. 2. 3. 4. 1. 2. 1. 2. 3. 4. 1. 2. 3. 4. ( ) ( ) ( ) 2. 3. 4. ( ) 3. 4. / / 1. 2. 3. 4. 1. 2. 3. 4. 1. 2. 3. 1. 2. 3. 1. 2. 1. 2.
2-11-1, Tsurumaki, Tama-shi, Tokyo 206-8551, JAPAN PHONE : (81)42-357-2341 FAX : (81)42-357-2379 Copyright © 2014 JUKI CORPORATION. All rights reserved throughout the world. Reservados todos los derechos en todo el mundo. Tous les droits sont réservés à travers le monde. Tutti i diritti riservati in ogni paese del mondo. 40145544 000514 021Y4B0104(EN.TW.KO.