User Guide 10ft x 15ft Rectangle Trampoline & Enclosure Model: JK1015RC The trampoline / enclosure is designed for users weighing 100 kg (220 lbs) or less.
10 ft x 15 ft Rectangle Trampoline & Enclosure
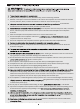
2. Must place the trampoline on lawn, bark wood chip, sand or cushioning materials. 3. Maintain a free space of minimum 2500mm on all sides of the trampoline. This area should not included concrete, bitumen, brick, or other hard surfaces as these can cause serious injuries. recommended. Provide clearance for wires, tree limbs, and other possible hazards. and trampoline enclosure away from walls, structures fences, and others play areas.
WARNING ADVERTENCIA Do not attempt or allow somersaults. Serious injuries, paralysis, or death may result. Do not allow more than one person on the trampoline at a time. No intente o permita volteretas. Aterrizando en la cabeza o cuello puede causar lesiones graves, parálisis, o muerte, incluso aterrizando al centro del trampolín. To reduce the chance of landing on your head or neck, do not do somersaults(flips). Use trampoline only with mature, knowledgeable supervision.
0 kg (220 lbs).
PARTS LIST Part A Description: L-Top tube with T-Connector + welded tube Quantity: 2 Part F Description: L-Top tube with T-Connector + welded tube Quantity: 2 Part K Description: Stitched bed Quantity: 1 Part P Part B Part C Description: Description: Top Tube Quantity: 4 Part G Part Description: Top Tube Quantity: 2 Part L H Description: L legs Quantity: 8 Part Description: Frame pad Quantity: 1 Part Top tube with T-connector + welded tube Quantity: 2 Q M Description: Bottom enclo
STEP 1 : ASSEMBLING THE FRAME A You will need the following parts to complete section 1a: 2 x L-Top tube with Welded connector - Part A 4 x Top tube - Part B L-Top tube A marking B 2 x Top tube with welded tube - Part C 2 x Top tube - Part D 2 x Top tube with welded tube - Part E 2 x L-Top tube with Welded connector - Part F 2 x Top tube - Part G 8 x L Leg - Part H 4 x Centre legs - Part I 16 x Self tapping screws & washers - Part Q Top tube B marking C Top tube C marking D Top tube D marking E T
Push down on the end of the centre leg to fully inset the leg extension into the T-connector+Welded tube. We will complete the two sections of the trampoline frame. Slot the narrow end of the top tube with T-connector+Welded tube. Repeat the last two steps until you have assembled the remaining sections of the trampolines frame. You have now completed step.
STEP 2 : ASSEMBLING THE FRAME This step will require 2 people who must be wearing gloves. Slot two of the frame section together as shown in the diagram. You will now need to slot the frame together, this will take some force. The easiest method is if the two people face each other. Hold the top tubes either side of the T-connector+Welded tube and push towards each other until the loose end of the frame can be inserted into the T-connector+ Welded tube.
STEP 3 : FITTING THE STITCHED BED K This step will require 2 people who must be wearing gloves and protective eye wear. Lay the stitched bed (with the V-Rings) out inside the frame of the trampoline with the warning labels facing upwards. Colored webbing Locate the 4 V-Rings with the colored webbing. These will be at 4 corners. J Slot one of the 7” springs onto one of the colored webbing V-Rings as shown. Important: springs must be slotted on the right way around.
Attach a spring to the diagonal colored stitched V-Ring. Important: You will now need to use the spring tool to attach the spring to the frame. Hook the spring tool onto end of spring, and pull until the spring can be slotted into the spring slot on the top of the frame. IMPORTANT: Ensure the spring is fully inserted into the slot on the top of the frame. Attach four more springs to the V-Rings then attach them to the frame next to the T-connector+welded tube.
STEP 4 : FITTING THE FRAME PAD L This step will require 2 people. Lay the frame pad - Part L out over the edge of the frame with the ties facing downwards. Align the openings in the frame pad with the T-connector+welded tube’s on the frame. B A Frame Pad Frame Pad D-ring C Frame Pad D-ring Top tube D-ring Top tube Top tube Look under the trampoline and locate the pairs of straps near the edge of bed and Double D-ring and webbing near the frame. See the inset drawing. A, B and C.
You will need the following parts to complete step 5: 8 x Bottom enclosure tubes - Part M 8 x Top enclosure tubes - Part N 8 x Self tapping screws - Part Q You will also need a cross-head screwdriver (not supplied).
Slot the bottom enclosure tube into the tubes in the T-connector+welded tubes visible through the slots in the frame pad. Assemble the seven enclosure tubes using the three self tapping screws and the cross-head screwdriver. Slot the eight enclosure tubes into the T-connector+welded tube's on the frame. The enclosure tubes are now completed step 5.
Black G3 poles - Part P 4 x Black G3 poles - Part O Find the sleeves that run along the top of the enclosure netting. Slot the thin sections on the two black G3 poles into the metal ends so the poles become two long sections. Slot one of the Black G3 poles through three of the sleeves on the top of the enclosure netting. Slot the remaining Black G3 poles through the three other sleeves on the top of the enclosure netting.
You will now join the two ends of the Black G3 will require two people. Both people hold two of the poles end sections and walk towards each other to bend the poles into a circle. As soon as the poles are bent enough, insert the connectors into the socket on the other pole (1 Push the pin inwards (2 connector. Ensure the pin is protruding through the slot in the socket.
8 S
USING THE TRAMPOLINE Before using your trampoline, check again that there is enough clearance around it. Maintain a clear space of 2.5 metres (8.2 feet) on all sides of the trampoline. Also check that the area is free from walls, structures, fences, tarmac and other hard surfaces and other play areas. 2.5m 8.2ft 7.3m 24ft Ensure that there is 7.3 metres (24 feet) clearance above the trampoline. Also check that there are no overhanging objects in the area above the trampoline.
100 kg (220 lbs)
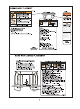
15 17 20 18 14 2 3 1 4 10 7 13 22 5 2 6 11 12 16 22 21 8 8 9 7 ft x 10 ft Rectangle Trampoline & Enclosure 22 1 2 3 4 5 6 7 8 9 10 11 12 2 4 2 2 2 2 2 8 4 108 1 1 17 L-top tube with T-connector+welded tube Top tube Top tube with T-connector+welded tube Top tube (curved) Top tube with T-connector+welded tube L-top tube with T-connector+welded tube Top tube L-legs V legs 7 inch length springs Stitched bed Frame pad 13 14 15 8 8 8 16 17 18 19 20 21 22 16 4 1 16 1 8 1 30 19 Bott