Gebruik‐ saanwijzing User Manual Notice d'utili‐ sation Benutzerin‐ formation Koelkast Refrigerator Réfrigérateur Kühlschrank JCF14024F9
INHOUDSOPGAVE Veiligheidsinformatie Veiligheidsvoorschriften Montage Bediening Dagelijks gebruik 2 3 5 6 9 Aanwijzingen en tips Onderhoud en reiniging Probleemoplossing Technische gegevens 13 14 15 18 Wijzigingen voorbehouden. VEILIGHEIDSINFORMATIE Lees zorgvuldig de meegeleverde instructies voor installatie en gebruik van het apparaat. De fabrikant is niet verantwoordelijk voor letsel of schade veroorzaakt door een verkeerde installatie of verkeerd gebruik.
Boerderijen, personeelskeukens in winkels, kantoren of andere werkomgevingen – Door gasten in hotels, motels, bed&breakfasts en andere woonomgevingen WAARSCHUWING: Houd de ventilatieopeningen altijd vrij van obstructies; dit geldt zowel voor losstaande als ingebouwde modellen. WAARSCHUWING: Gebruik geen mechanische of andere middelen om het ontdooiproces te versnellen, behalve die middelen die door de fabrikant zijn aanbevolen. WAARSCHUWING: Let op dat u het koelcircuit niet beschadigt.
• • • • • • • apparaat op de stroom aansluit. Hierdoor kan de olie terug in de compressor stromen. Trek de stekker uit het stopcontact voordat u handelingen aan het apparaat uitvoert (bijv. het omdraaien van de deur). Installeer het apparaat niet in de nabijheid van radiatoren, fornuizen, ovens of kookplaten. Stel het apparaat niet bloot aan regen. Installeer het apparaat niet op een plaats met direct zonlicht. Installeer dit apparaat niet in ruimtes die te vochtig of te koud zijn.
• Bewaar de voedingswaren volgens de instructies op de verpakking. Binnenverlichting WAARSCHUWING! Gevaar voor elektrische schokken. Servicedienst • Neem contact op met een erkende servicedienst voor reparatie van het apparaat. • Gebruik uitsluitend originele reserveonderdelen. • De soort lamp die in dit apparaat gebruikt wordt, is uitsluitend geschikt voor huishoudelijke apparaten. Gebruik deze niet voor andere doeleinden. Verwijdering Onderhoud en reiniging • Haal de stekker uit het stopcontact.
geldende regels, raadpleeg hiervoor een gekwalificeerd elektricien • De fabrikant kan niet aansprakelijk gesteld worden als bovenstaande veiligheidsvoorschriften niet opgevolgd worden. • Dit apparaat voldoet aan de EEGrichtlijnen. Bij bepaalde modeltypes kunnen er functionele problemen ontstaan als deze temperaturen niet worden gerespecteerd. De juiste werking van het apparaat kan enkel gegarandeerd worden als het opgegeven temperatuurbereik wordt gerespecteerd.
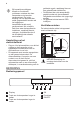
Het is mogelijk om het vooraf ingestelde geluid van toetsen te wijzigen door de Functions-toets en de toets om de temperatuur kouder te zetten, tegelijkertijd gedurende enkele seconden in te drukken. U kunt deze wijziging ongedaan maken. Scherm A B C D E F Off min I H G A. B. C. D. E. F. G. H. I.
2. Druk op de temperatuurknoppen op het bedieningspaneel om zo de gewenste instelling te selecteren. 3. Druk op OK om de instelling te bevestigen. De indicator gaat na een paar seconden terug naar de temperatuurweergave van de koelkast. Instel‐ ling Applicatie 1-3 Vlees en vis 4-5 Vlees, vis, groenten en fruit bij elkaar bewaard FastFreeze-functie De FastFreeze-functie versnelt het invriezen van vers voedsel en beschermt voedsel dat al wordt bewaard tegen ongewenste opwarming. 1.
Het alarm stop als de deur wordt gesloten. Tijdens het alarm kan het geluidssignaal worden uitgeschakeld door op een willekeurige knop te drukken. DAGELIJKS GEBRUIK WAARSCHUWING! Raadpleeg de hoofdstukken Veiligheid. De binnenkant schoonmaken Verplaatsbare legrekken De wanden van de koelkast zijn voorzien van een aantal glijschoenen zodat de schappen op de gewenste plaats gezet kunnen worden.
koelvak of op kamertemperatuur laten ontdooien, afhankelijk van de hoeveelheid tijd die hiervoor nodig is. 1. Trek de lade tot het maximum uit. 2. Til de lade op en trek hem naar buiten. Kleine stukken kunnen zelfs rechtstreeks vanuit de vriezer gekookt worden als ze nog bevroren zijn: in dat geval zal de bereiding iets langer duren. NaturaFresh Vak De bewaartemperatuur en de relatieve vochtigheidsgraad (tussen 45% en 90%) bieden optimale omstandigheden om verschillende soorten voedsel te bewaren.
Soort gerecht Gekookte zeevruchten Aanpassing luchtvochtig‐ heid "droog” Opslagtijd tot 2 dagen Salade, groenten Wortelen, kruiden, spruitjes, bleekselderij “vochtig” tot 1 maand Artisjokken, bloemkool, wit‐ lof, ijsbergsla, andijvie, veldsla, sla, prei, radijsjes “vochtig” tot 21 dagen Broccoli, Chinese kool, boerenkool, kool, radijsjes, savooiekool “vochtig” tot 14 dagen Erwtjes, koolraap “vochtig” tot 10 dagen Lente-uitjes, radijsjes, as‐ perges, spinazie “vochtig” tot 7 dagen Fruit
Het niveau van luchtvochtigheid in de laden hangt af van de hoeveelheid vocht in het opgeslagen voedsel, groenten en fruit en van de frequentie waarop de deur wordt geopend. Het NaturaFresh-vak is ook geschikt voor het langzaam ontdooien van voedsel. In dat geval kan het ontdooide voedsel maximaal twee dagen worden bewaard in het NaturaFresh-vak. • Let op de versheid van het voedsel, in het bijzonder op de vervaldatum. De kwaliteit en versheid hebben invloed op de bewaartijd.
Het maken van ijsblokjes Dit apparaat is uitgerust met een of meer bladen voor het maken van ijsblokjes Gebruik geen metalen instrumenten om de laden uit de vriezer te halen 1. Vul de bakjes met water. 2. Zet de ijsbakjes in het vriesvak. Het Ventilator-apparaat stopt als de deur open is en start onmiddellijk opnieuw nadat de deur is gesloten.
• Verdeel voor efficiënter invriezen en ontdooien het voedsel in kleine porties. • Wikkel het voedsel in aluminiumfolie of plastic. Zorg ervoor dat de verpakking luchtdicht is. • Om te voorkomen dat de temperatuur van al ingevroren voedsel toeneemt, dient u vers voedsel hier niet direct naast te plaatsen. • Smalle pakjes zijn makkelijker te bewaren dan dikke. Zout maakt voedsel minder lang houdbaar. • IJsblokjes, ingevroren water of waterijsjes niet meteen nadat ze uit de vriezer zijn gehaald opeten.
Het ontdooien van de koelkast Het ontdooien van de koelkast Rijp wordt elke keer als de compressormotor tijdens normale werking stopt, automatisch van de verdamper van het koelvak verwijderd. Het dooiwater loopt via een gootje in een speciale opvangbak aan de achterkant van het apparaat, boven de compressormotor, waar het verdampt. Het vriesvak wordt automatisch ontdooid. Het water loopt in een opvangbak op de compressor en verdampt. De opvangbak kan niet worden verwijderd.
Probleem Mogelijke oorzaak Oplossing Probleem met tempera‐ tuursensor. Neem contact op met de klan‐ tenservice (het koelsysteem blijft werken om uw levensmid‐ delen koud te houden, maar de temperatuur kan niet aan‐ gepast worden). Het lampje staat in de stand-by. Sluit en open de deur. Het lampje is stuk. Neem contact op met de dichtstbijzijnde klantenservice. De temperatuur is goed in‐ gesteld. Zie 'Bediening'. Er worden veel producten tegelijk geplaatst.
Probleem Mogelijke oorzaak Oplossing Temperatuur kan niet wor‐ den ingesteld. De "FastFreeze functie" of "Shopping functie" is inge‐ schakeld. Schakel "FastFreeze functie" of schakel de "Shopping func‐ tie" handmatig uit, of wacht tot de functie automatisch reset om de temperatuur in te stel‐ len. Zie "FastFreeze functie" of "Shopping functie". dEMo verschijnt op het dis‐ play. Het apparaat staat in de‐ monstratiemodus.
TECHNISCHE GEGEVENS Afmetingen van de inbouw In hoogte mm 1400 Breedte mm 560 Diepte mm 550 Maximale bewaartijd bij stroomuitval Uur 12 Spanning Volt 230 - 240 Frequentie Hz 50 De technische gegevens staan op het typeplaatje aan de binnen- of buitenkant van het apparaat en op het energielabel. MILIEUBESCHERMING Recycleer de materialen met het symbool . Gooi de verpakking in een geschikte afvalcontainer om het te recycleren.
CONTENTS Safety information Safety instructions Installation Operation Daily use 19 20 22 23 25 Hints and tips Care and cleaning Troubleshooting Technical data 30 31 32 34 Subject to change without notice. SAFETY INFORMATION Before the installation and use of the appliance, carefully read the supplied instructions. The manufacturer is not responsible for any injuries or damages that are the result of incorrect installation or usage.
Farm houses; staff kitchen areas in shops, offices and other working environments – By clients in hotels, motels, bed and breakfast and other residential type environments WARNING: Keep ventilation openings, in the appliance enclosure or in the built-in structure, clear of obstruction. WARNING: Do not use mechanical devices or other means to accelerate the defrosting process, other than those recommended by the manufacturer. WARNING: Do not damage the refrigerant circuit.
• When you move the appliance, lift it by the front edge to avoid scratching the floor. • The appliance contains a bag of desiccant. This is not a toy. This is not food. Please dispose of it immediately. Electrical connection WARNING! Risk of fire and electric shock. WARNING! When positioning the appliance, ensure the supply cord is not trapped or damaged. WARNING! Do not use multiplug adapters and extension cables. • The appliance must be earthed.
person must do the maintenance and the recharging of the unit. • Regularly examine the drain of the appliance and if necessary, clean it. If the drain is blocked, defrosted water collects in the bottom of the appliance. Service • To repair the appliance contact an Authorised Service Centre. • Use original spare parts only. Disposal WARNING! Risk of injury or suffocation. • Disconnect the appliance from the mains supply. • Cut off the mains cable and discard it.
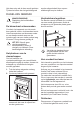
• This appliance complies with the E.E.C. Directives. CAUTION! Refer to the assembly instructions for the installation. Ventilation requirements The airflow behind the appliance must be sufficient. 5 cm min. 200 cm2 min.
Display A B C D E F Off min I H G Switching on 1. Connect the mains plug to the power socket. 2. Press the appliance ON/OFF if the display is off. The temperature indicators show the set default temperature. To select a different set temperature refer to "Temperature regulation". If "dEMo" appears on the display, refer to "Troubleshooting" . Switching off 1. Press the appliance ON/OFF for 5 seconds. The display switches off. 2. Disconnect the mains plug from the power socket.
Set‐ ting Application 1-3 Meat and fish 4-5 Meat, fish, vegetables and fruit stored together FastFreeze function The FastFreeze function accelerates the freezing of fresh food and, at the same time, protects foodstuffs already stored from undesirable warming. 1. To activate this function press the Functions button until the corresponding icon appears. The FastFreeze indicator flashes. 2. Press the OK button to confirm. TheFastFreeze indicator is shown.
Cleaning the interior Before using the appliance for the first time, the interior and all internal accessories should be washed with lukewarm water and some neutral soap to remove the typical smell of a brand-new product, then dried thoroughly. CAUTION! Do not use detergents, abrasive powders, chlorine or oil-based cleaners as they will damage the finish. Positioning the door shelves To permit storage of food packages of various sizes, the door shelves can be placed at different heights. 1.
optimal conditions for the storage of various kinds of food. To learn about the temperature settings in the NaturaFresh compartment please refer to the “NaturaFresh compartment setting” section. NaturaFresh compartment is suitable for the storage of a variety of fresh food as it preserves its high nutritional values as well as high humidity level much longer in comparison to the regular refrigerator. The NaturaFresh compartment is also suitable for defrosting food.
Type of food Air humidity adjustment Storage time Salad, vegetables Carrots, herbs, brussels sprouts, celery “humid” up to 1 month Artichokes, cauliflower, chicory, iceberg lettuce, en‐ dive, lamb’s lettuce, lettuce, leeks, radicchio “humid” up to 21 days Broccoli, Chinese leaves, kale, cabbage, radishes, Savoy cabbage “humid” up to 14 days Peas, kohlrabi “humid” up to 10 days Spring onions, radishes, as‐ paragus, spinach “humid” up to 7 days Fruit Pears, dates (fresh), straw‐ berries,
The NaturaFresh compartment is also suitable for slow thawing of food. In this case the thawed food can be stored in the NaturaFresh compartment for up to two days. • Pay attention to the freshness of the food, especially on the expiry date. Quality and freshness influence the storage time. • The whole storage cycle time will depend on the preservation conditions made prior to the final storage in the fridge. • Food, fruit or vegetables should always be packed or wrapped up before storage.
Do not use metallic instruments to remove the trays from the freezer. 1. Fill these trays with water 2. Put the ice trays in the freezer compartment. HINTS AND TIPS Normal operating sounds The following sounds are normal during operation: • A faint gurgling and bubbling sound from coils sound when refrigerant is pumped. • A whirring and pulsating sound from the compressor when refrigerant is pumped.
CARE AND CLEANING WARNING! Refer to Safety chapters. General warnings CAUTION! Unplug the appliance before carrying out any maintenance operation. This appliance contains hydrocarbons in its cooling unit; maintenance and recharging must therefore only be carried out by authorized technicians. during normal use. The defrost water drains out through a trough into a special container at the back of the appliance, over the motor compressor, where it evaporates.
TROUBLESHOOTING WARNING! Refer to Safety chapters. What to do if... Problem Possible cause Solution The appliance does not op‐ erate. The appliance is switched off. Switch on the appliance. The mains plug is not con‐ nected to the mains sock‐ et correctly. Connect the mains plug to the mains socket correctly. There is no voltage in the mains socket. Connect a different electrical appliance to the mains socket. Contact a qualified electrician. The door is left open. Close the door.
Problem Possible cause Solution The compressor does not start immediately after pressing the "FastFreeze" or "Shopping", or after chang‐ ing the temperature. This is normal, no error has occurred. The compressor starts after a period of time. Water flows inside the refrig‐ erator. Food products prevent the water to flow into the wa‐ ter collector. Make sure that food products do not touch the rear plate. The water outlet is clog‐ ged. Clean the water outlet. Water flows on the floor.
Closing the door If the advice does not lead to the desired result, contact the nearest Authorised Service Centre. 1. Clean the door gaskets. 2. If necessary, adjust the door. Refer to assembly instructions. 3. If necessary, replace the defective door gaskets. Contact the Authorised Service Centre. Replacing the lamp The appliance is equipped with a longlife LED interior light. Only service is allowed to replace the lighting device. Contact your Authorised Service Centre.
TABLE DES MATIÈRES Informations de sécurité Consignes de sécurité Installation Fonctionnement Utilisation quotidienne 35 37 38 40 42 Conseils Entretien et nettoyage Dépannage Caractéristiques techniques 47 48 49 52 Sous réserve de modifications. INFORMATIONS DE SÉCURITÉ Avant d'installer et d'utiliser cet appareil, lisez soigneusement les instructions fournies. Le fabricant ne pourra être tenu pour responsable des blessures et dégâts résultant d'une mauvaise installation ou utilisation.
Sécurité générale • • • • • • • • • Cet appareil est conçu uniquement pour un usage domestique et des situations telles que : – dans des fermes, des coins cuisines réservés au personnel dans des magasins, bureaux et autres – l'utilisation par les clients des hôtels, motels, des environnements du type chambres d’hôtes et autres environnements à caractère résidentiel AVERTISSEMENT : Veillez à ce que les orifices de ventilation, situés dans l'enceinte de l'appareil ou dans la structure intégrée, ne
CONSIGNES DE SÉCURITÉ Installation AVERTISSEMENT! L'appareil doit être installé uniquement par un professionnel qualifié. • Retirez l'intégralité de l'emballage et les boulons de transport. • N'installez pas et ne branchez pas un appareil endommagé. • Suivez scrupuleusement les instructions d'installation fournies avec l'appareil. • Soyez toujours vigilants lorsque vous déplacez l'appareil car il est lourd. Utilisez toujours des gants de sécurité et des chaussures fermées.
• • • • • • • • • environnementale. Ce gaz est inflammable. Si le circuit frigorifique est endommagé, assurez-vous de l'absence de flammes et de sources d'ignition dans la pièce. Aérez la pièce. Évitez tout contact d'éléments chauds avec les parties en plastique de l'appareil. Ne placez jamais de boissons gazeuses dans le congélateur. Cela engendrerait une pression sur le récipient de la boisson. Ne stockez jamais de gaz ou de liquide inflammable dans l'appareil.
Pour assurer des performances optimales, l'appareil ne doit pas être installé près d'une source de chaleur telle qu'un radiateur, une chaudière, la lumière directe du soleil, etc. Assurez-vous que l'air circule librement à l'arrière de l'appareil. Positionnement Installez cet appareil dans une pièce intérieure sèche et bien ventilée où la température ambiante correspond à la classe climatique indiquée sur la plaque signalétique de l'appareil.
FONCTIONNEMENT Bandeau de commande 1 Functions 6 5 4 3 2 1 Affichage 2 Touche d'augmentation de la température 3 Touche de diminution de la température 4 OK 5 Functions 6 ON/OFF Pour modifier la tonalité prédéfinie des touches, appuyez simultanément sur la touche Functions et la touche de diminution de la température pendant plusieurs secondes. Ce changement est réversible. Affichage A B C D E F Off min I H G Mise en marche 1.
Réglage de la température Réglez la température de l'appareil en appuyant sur les touches de température. Température par défaut : • +5 °C dans le réfrigérateur Les indicateurs de température affichent la température programmée. La température programmée sera atteinte sous 24 heures. Après une coupure de courant, la température programmée reste enregistrée.
L'indicateur ChildLock clignote. 2. Appuyez sur OK pour confirmer. L'indicateur ChildLock s'affiche. Pour désactiver la fonction ChildLock, répétez la procédure jusqu'à ce que le voyant ChildLock s'éteigne. Fonction DrinksChill La fonction DrinksChill doit être utilisée pour le réglage d'une alarme sonore à une heure souhaitée, ce qui est utile, par exemple, lorsque l'on souhaite refroidir une préparation pendant un certain temps dans le cadre d'une recette de cuisine.
2. Repositionnez-le selon les besoins. La quantité maximale d'aliments frais que vous pouvez congeler par tranche de 24 heures est indiquée sur la plaque signalétique (située à l'intérieur de l'appareil). Le processus de congélation demande 24 heures. Vous ne devez ajouter aucun autre aliment à congeler pendant cette période. Une fois le processus de congélation terminé, vous pouvez restaurer la température réglée précédemment (reportez-vous à la fonction FastFreeze).
Contrôle de l'humidité Le compartiment est équipé de butées empêchant les bacs de tomber lorsqu'ils sont tirés au maximum. Pour sortir le bac : 1. Tirez le bac au maximum. 2. Soulevez et sortez le bac. Les bacs portant le symbole d'une goutte d'eau : et peuvent s'utiliser suivant les conditions de conservation souhaitées indépendamment l'un de l'autre avec un niveau d'humidité plus ou moins élevé.
Type d'aliment Réglage de l'humidité dans l'air Durée de conservation Brocolis, chou chinois, chou frisé, chou, radis, chou de Milan « Humide » jusqu'à 14 jours Petits pois, chou-rave « Humide » jusqu'à 10 jours Ciboule, radis, asperges, épinards « Humide » jusqu'à 7 jours Fruits Poires, dattes (fraîches), fraises, pêches « Humide » jusqu'à 1 mois Prunes rhubarbe, groseilles à ma‐ quereau « Humide » jusqu'à 21 jours Pommes (qui ne craignent pas le froid), coings « Humide » jusqu'à 20
• • • • • la fraîcheur influencent la durée de conservation. La durée du cycle complet de stockage dépend des conditions de conservation observées avant le stockage final au réfrigérateur. Les aliments, les fruits ou les légumes doivent toujours être emballés ou enveloppés avant leur stockage. Nourriture pour animaux : elle doit toujours être conservée emballée et au sec. Les aliments riches en protéines se détériorent plus rapidement.
N'utilisez pas d'instruments métalliques pour décoller les bacs du congélateur. 1. Remplissez les bacs avec de l'eau 2. Placez les bacs dans le compartiment congélateur. CONSEILS Bruits normaux de fonctionnement Les bruits suivants sont normaux lorsque l'appareil est en cours de fonctionnement : • Un léger gargouillis lorsque le liquide réfrigérant est pompé. • Un ronronnement et un bruit de pulsation provenant du compresseur lorsque le liquide réfrigérant est pompé.
paquet afin de garder une trace du temps de conservation. Conseils pour le stockage des aliments surgelés • Assurez-vous que les denrées surgelées achetées dans le commerce ont été correctement entreposées par le revendeur. • Prévoyez un temps réduit au minimum pour le transport des denrées du magasin d'alimentation à votre domicile. • Une fois décongelés, les aliments se détériorent rapidement et ne peuvent être recongelés. • Ne dépassez pas la durée de conservation indiquée par le fabricant.
Dégivrage du réfrigérateur Le dégivrage du compartiment réfrigérateur est automatique. L'eau qui se forme s'écoule vers un réservoir situé sur le compresseur puis s'évapore. Le réservoir ne peut pas être retiré. 2. Retirez tous les aliments. 3. Nettoyez l'appareil et tous les accessoires. 4. Laissez la porte/les portes ouverte(s) pour éviter la formation d'odeurs désagréables.
Le problème Cause possible Solution L’éclairage ne fonctionne pas. L'éclairage est en mode veille. Fermez puis ouvrez la porte. La lampe est défectueuse. Contactez le service aprèsvente agréé le plus proche. Il y a une erreur dans le réglage de la température. Reportez-vous au chapitre « Fonctionnement ». Trop de produits ont été introduits simultanément. Attendez quelques heures et vérifiez de nouveau la tempé‐ rature. La température ambiante est trop élevée.
Le problème Cause possible Solution Il est impossible de régler la température. Le « FastFreeze Mode » ou « Shopping Mode » est activé. Éteignez le « FastFreeze Mo‐ de » ou « Shopping Mode » manuellement, ou attendez jusqu’à la réinitialisation auto‐ matique du Mode à la tempé‐ rature de réglage. Reportezvous au chapitre « FastFreeze Mode » ou « Shopping Mode". dEMo apparaisse sur l’écran. L'appareil est en mode dé‐ monstration.
CARACTÉRISTIQUES TECHNIQUES Dimensions de la niche d'encastrement Hauteur mm 1400 Largeur mm 560 Profondeur mm 550 Autonomie de fonctionnement Heures 12 Tension Volts 230 - 240 Fréquence Hz 50 Les caractéristiques techniques figurent sur la plaque signalétique située sur le côté intérieur ou extérieur de l'appareil et sur l'étiquette énergétique. EN MATIÈRE DE PROTECTION DE L'ENVIRONNEMENT Recyclez les matériaux portant le symbole .
INHALTSVERZEICHNIS Sicherheitshinweise Sicherheitsanweisungen Montage Betrieb Täglicher Gebrauch 53 55 57 58 60 Tipps und Hinweise Reinigung und Pflege Fehlersuche Technische Daten 65 66 67 70 Änderungen vorbehalten. SICHERHEITSHINWEISE Lesen Sie vor der Montage und dem Gebrauch des Geräts zuerst die Gebrauchsanleitung. Bei Verletzungen oder Schäden infolge nicht ordnungsgemäßer Montage oder Verwendung des Geräts übernimmt der Hersteller keine Haftung.
• Halten Sie sämtliches Verpackungsmaterial von Kindern fern und entsorgen Sie es auf angemessene Weise. Allgemeine Sicherheit • • • • • • • • • Dieses Gerät ist für die Verwendung im Haushalt und ähnliche Zwecke vorgesehen, wie z. B.
SICHERHEITSANWEISUNGEN Montage WARNUNG! Die Montage des Geräts darf nur von einer qualifizierten Fachkraft durchgeführt werden. • Entfernen Sie die Verpackungsmaterialien und die Transportschrauben. • Montieren Sie ein beschädigtes Gerät nicht und benutzen Sie es nicht. • Halten Sie sich an die mitgelieferte Montageanleitung. • Seien Sie beim Umsetzen des Gerätes vorsichtig, da es sehr schwer ist. Tragen Sie stets Sicherheitshandschuhe und festes Schuhwerk.
Verwendung WARNUNG! Es besteht Verletzungs-, Verbrennungs-, Stromschlag- oder Brandgefahr. • Nehmen Sie keine technischen Änderungen am Gerät vor. • Stellen Sie keine elektrischen Geräte (z. B. Eisbereiter) in das Gerät, wenn solche Geräte nicht ausdrücklich vom Hersteller für diesen Zweck zugelassen sind. • Achten Sie darauf, den Kältekreislauf nicht zu beschädigen. Er enthält Isobutan (R600a), ein Erdgas mit einem hohen Grad an Umweltverträglichkeit. Dieses Gas ist brennbar.
• Achten Sie darauf, dass die Kühleinheit in der Nähe des Wärmetauschers nicht beschädigt wird. MONTAGE WARNUNG! Siehe Kapitel Sicherheitshinweise. Standort Beachten Sie bei der Installation die Montageanleitung. Damit das Gerät die optimale Leistung bringen kann, sollte es weit entfernt von Wärmequellen wie Heizungskörpern, Boilern, direktem Sonnenlicht usw. aufgestellt werden. Die Luft muss frei an der Rückseite des Gerätes zirkulieren können.
VORSICHT! Beachten Sie bei der Installation die Montageanleitung. min. 200 cm2 5 cm min. 200 cm2 BETRIEB Bedienfeld 1 Functions 6 1 2 3 4 Display Taste zum Erhöhen der Temperatur Taste zum Senken der Temperatur OK Der voreingestellte Tastenton lässt sich ändern. Halten Sie dazu Functions und die Taste zum Senken der Temperatur 5 4 3 2 5 Functions 6 ON/OFF einige Sekunden gedrückt. Die Änderung lässt sich rückgängig machen. Anzeigen A B C D E Off min I H G F A. B. C. D. E. F. G. H.
Einschalten des Geräts 1. Stecken Sie den Netzstecker in die Netzsteckdose. 2. Drücken Sie ON/OFF, wenn das Display ausgeschaltet ist. Die Temperaturanzeigen zeigen die jeweils eingestellte Standardtemperatur an. Informationen zur Auswahl einer anderen Temperatur finden Sie unter „Temperaturregelung“. Wenn im Display "dEMo" angezeigt wird, siehe Abschnitt „Fehlersuche“. Ausschalten des Geräts 1. Halten Sie ON/OFF 5 Sekunden gedrückt. Das Display wird ausgeschaltet. 2.
2. Mit OK bestätigen. Die Anzeige FastFreeze erscheint. Diese Funktion endet automatisch nach 28 Stunden. Zum Ausschalten der Funktion vor ihrer automatischen Abschaltung, wiederholen Sie den Vorgang, bis die Anzeige FastFreeze erlischt. Die Funktion wird durch die Auswahl einer anderen Temperatur ausgeschaltet. Funktion ChildLock Schalten Sie die Funktion ChildLock ein, um die Tasten gegen eine unbeabsichtigte Betätigung zu verriegeln. 1.
Positionieren der Türablagen Einfrieren frischer Lebensmittel Die Türablagen können in verschiedener Höhe positioniert werden; damit ermöglichen sie das Lagern verschieden großer Lebensmittelpackungen. Der Gefrierraum eignet sich zum Einfrieren von frischen Lebensmitteln und zum längerfristigen Lagern von bereits gefrorenen und tiefgefrorenen Lebensmitteln. 1. Ziehen Sie die Ablage langsam nach oben, bis sie sich löst. 2. Setzen Sie die Ablage in gewünschter Höhe ein.
NaturaFresh -Fach eignet sich zum Lagern von verschiedenen frischen Lebensmitteln, da die Nährstoffe sowie der hohe Feuchtigkeitsgrad länger als im restlichen Kühlschrank beibehalten werden. Das NaturaFresh-Fach eignet sich auch zum Auftauen von Lebensmitteln. Die aufgetauten Lebensmittel können bis zu zwei Tage aufbewahrt werden. Feuchtigkeitsregulierung Die Anschläge im Fach verhindern ein Herausfallen der Schubladen, wenn diese vollständig herausgezogen werden. Entnehmen der Schublade: 1.
Lebensmittelart Einstellung der Luftfeuch‐ tigkeit Lagerzeit Artischocken, Blumenkohl, Chicorée, Eisbergsalat, En‐ divien, Feldsalat, Kopfsalat, Lauch, Radicchio „feucht“ bis zu 21 Tage Brokkoli, Chinakohl, Grün‐ kohl, Kohl, Rettich, Wirsing „feucht“ bis zu 14 Tage Erbsen, Kohlrabi „feucht“ bis zu 10 Tage Frühlingszwiebeln, Radies‐ chen, Spargel, Spinat „feucht“ bis zu 7 Tage Obst Birnen, (frische) Datteln, Erdbeeren, Pfirsiche „feucht“ bis zu 1 Monat Pflaumen Rhabarber, Stachelbeeren
Tage im NaturaFresh-Fach aufbewahrt werden. • Achten Sie auf die Frische der Lebensmittel, insbesondere auf das Haltbarkeitsdatum. Qualität und Frische wirken sich auf die Aufbewahrungsdauer aus. • Die Gesamtaufbewahrungsdauer hängt von den Aufbewahrungsbedingungen vor der endgültigen Lagerung im Kühlschrank ab. • Lebensmittel, Obst oder Gemüse müssen vor der Einlagerung immer in Behältern oder Folie verpackt werden. • Tiernahrung: immer verpackt und trocken lagern.
Herstellen von Eiswürfeln Dieses Gerät ist mit einer oder mehreren Schalen für die Herstellung von Eiswürfeln ausgestattet. 1. Füllen Sie die Schalen mit Wasser. 2. Stellen Sie die Eisschalen in das Gefrierfach. Verwenden Sie zum Entnehmen der Schalen aus dem Gefrierfach keine Gegenstände aus Metall.
• Um eine Erwärmung bereits eingefrorener Lebensmittel zu verhindern, legen Sie die frischen, nicht gefrorenen Lebensmittel nicht direkt neben sie. • Weniger fetthaltige Lebensmittel lassen sich besser lagern als fetthaltigere. Salz verkürzt die Lagerzeit von Lebensmitteln. • Essen Sie keine Eiswürfel, Wassereis oder Eis am Stiel, wenn sie direkt aus dem Gefriergerät genommen wurden. Gefahr von Erfrierungen.
Abtauen des Kühlschranks Bei normalem Betrieb wird Reif bei jedem Anhalten des Kompressors automatisch vom Verdampfer des Kühlschranks entfernt. Das Tauwasser sammelt sich in einer Auffangrinne und läuft durch eine Abflussöffnung in einen speziellen Behälter an der Rückseite des Geräts über dem Kompressor, wo es verdampft.
Störung In der Temperaturanzeige ist das Symbol oder Mögliche Ursache Abhilfe Es liegt keine Spannung an der Steckdose an. Testen Sie, ob ein anderes Gerät an dieser Steckdose funktioniert. Wenden Sie sich an eine Elektrofachkraft. Die Tür ist geöffnet. Schließen Sie die Tür. Siehe „Alarm Tür offen“ Problem mit dem Tempe‐ raturfühler.
Störung Mögliche Ursache Abhilfe Wasser fließt in den Kühl‐ schrank. Die eingelagerten Lebens‐ mittel verhindern, dass das Wasser zum Wasser‐ sammler fließt. Stellen Sie sicher, dass die Lebensmittel nicht die Rück‐ wand berühren. Der Wasserablauf ist ver‐ stopft. Reinigen Sie den Wasserab‐ lauf. Wasser läuft auf den Boden. Der Tauwasserablauf ist nicht mit der Verdampfer‐ schale über dem Kom‐ pressor verbunden. Verbinden Sie den Tauwas‐ serablauf mit der Verdampfer‐ schale.
Sie sich an Ihren autorisierten Kundendienst. Bitte wenden Sie sich an den nächsten autorisierten Kundendienst, wenn alle genannten Abhilfemaßnahmen nicht zum gewünschten Erfolg führen. Schließen der Tür 1. Reinigen Sie die Türdichtungen. 2. Stellen Sie die Tür nach Bedarf ein. Siehe die Montageanleitung. 3. Ersetzen Sie die defekten Türdichtungen, falls erforderlich. Wenden Sie sich an einen autorisierten Kundendienst.
222376613-A-102019