JGI 1423 GEBRAUCHSANWEISUNG OPERATING INSTRUCTIONS 2222 145-32
WARNINGS It is most important that this instruction book should be retained with the appliance for future reference. Should the appliance be sold or transferred to another owner, or should you move house and leave the appliance, always ensure that the book is supplied with the appliance in order that the new owner can be acquainted with the functioning of the appliance and the relevant warnings.
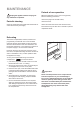
¥ There are working parts in this product which heat up. Always ensure that there is adequate ventilation as a failure to do this will result in component failure and possible food loss. See installation instructions. ¥ Parts which heat up should not be exposed. Wherever possible the back of the product should be against a wall. ¥ If the appliance has been transported horizontally, it is possible that the oil contained in the compressor ’lows in the refrigerant circuit.
USE Cleaning the interior Before using the appliance for the first time, wash the interior and all internal accessories with lukewarm water and some neutral soap so as to remove the typical smell of a brand-new product, then dry thoroughly. Do not use detergents or abrasive powders, as these will damage the finish. Contol Panel 4 3 2 S A A. B. C. D. E. Thermostat knob Normal/Super switch Super control light Pilot light Warning light Operation Insert the plug into the wall socket.
Thawing Important If there is a power failure when food is in the freezer, do not open the door of the freezer compartment. The frozen food will not be affected if the power cut is of short duration (up to 6-8 hours) and the freezer compartment is full, otherwise, it is recommended that the food should be used within a short time (a temperature increase of the frozen food shortens its safe storage period).
MAINTENANCE Periods of non-operation Unplug the appliance before carrying out any maintenance operation. When the appliance is not in use for long periods, take the following precautions: remove the plug from the wall socket; Periodic cleaning remove all food; Clean the inside with warm water and bicarbonate of soda. Rinse and dry thoroughly. defrost and clean the interior and all accessories; leave the door ajar to allow air to circulate to prevent unpleasant smells.
CUSTOMER SERVICE AND SPARE PARTS If the appliance is not functioning properly, check that: ¥ the plug is firmly in the wall socket and the mains power switch is on; ¥ there is an electricity supply (find out by plugging in another appliance); ¥ the thermostat knob is in the correct position. ¥ If there are water drops on the bottom of the cabinet, check that the defrost water drain opening is not obstructed (see ÒDefrostingÓ section).
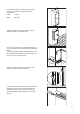
It is necessary that the niche is provided with a conduct of ventilation having the following dimensions: Depth 50 mm Width 50 540 B 540 mm T H PR01 A Slide the appliance into the recess, pushing it against the wall on the handle side. D022 Open the door and push the appliance against the side of the kitchen unit opposite to that of appliance hinges. Fasten the appliance with 4 screws provided in the kit included with the appliance. Snap vent grille (C) and hinge cover (D) into position.
Apply covers (B) on joint cover lugs and into hinge holes. B D726 Position the runners (A) at the top and bottom of the inside of the kitchen unit as shown in Fig. and mark the position of the external holes. After preparing the holes, screw the runners to the kitchen unit door using 3.5x16 mm screws. A 20m m PR33 Open both the appliance door and that of the kitchen unit to approx. 90¡. Place the little plates over the runners.