JGI 4424 GEBRAUCHSANWEISUNG OPERATING INSTRUCTION D t 2222736-13
t CONTENTS Instructions for the User Instructions for the Installer Important Safety Instructions 14 Technical specifications 20 Description of the Appliance 15 Installation 20 Use 16 Cleaning the interior Control panel Starting up Temperature regulation Quick freezing Warning light Acoustic alarm Cold accumulators Freezing calendar Freezing of fresh foods Storage of frozen food Thawing Ice-cube production Tips Tips for freezing Tips for storage of frozen food Maintenance Defrosting Periodic
IMPORTANT SAFETY INSTRUCTIONS It is most important that this instruction book should be retained with the appliance for future reference. Should the appliance be sold or transferred to another owner, or should you move house and leave the appliance, always ensure that the book is supplied with the appliance in order that the new owner can be acquainted with the functioning of the appliance and the relevant warnings. These warnings are provided in the interest of safety.
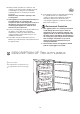
■ ■ ■ ■ t During normal operation, the condenser and compressor at the back of the appliance heat up considerably. For safety reasons, minimum ventilation must be as shown in the relevant paragraph. Attention: keep ventilation openings clear of obstruction. If the appliance is transported horizontally, it is possible that the oil contained in the compressor flows in the refrigerant circuit.
USE The freezer is marked with the symbol, which means that the compartment is suitable for freezing fresie food and long-term storage of frozen food. Cleaning the interior Before using the appliance for the first time, wash the interior and all internal accessories with lukewarm water and some neutral soap so as to remove the typical smell of a brand-new product, then dry thoroughly. Do not use detergents or abrasive powders, as these will damage the finish.
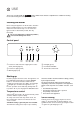
t Warning light ➂ This light warns when the temperature inside the appliance has increased so much as to jeopardize the preservation of food in the compartment. When the appliance is switched on for the first time or when food is placed in the compartment for freezing, this light remains on until the temperature has reached the level required for correct storage. Food to be frozen has to be placed in the appliance's two top compartments; if freezing only a small amount of food, use the top compartment.
TIPS Tips for freezing fresh foods Tips for storage of commercially frozen food To help you get the best out of the freezing process, here are a few hints: ■ Freeze only good-quality, fresh and well-cleaned foods. Split them into small portions to speed up freezing and avoid having to thaw more food than you require. It is in fact important to remember that once the foods have thawed out, they deteriorate fast. ■ Another point to remember is that lean foods keep better and longer than fatty foods.
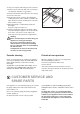
t To carry out complete defrosting proceed as follows: 1. Remove any stored food, wrap it in several layers of newspaper and put it in a cool place. 2. Turn the thermostat control to the «O» setting. 3. Leave the door open. 4. Introduce the plastic scraper in the appropriate seating at the base of the cabinet as shown in the figure and place a basin underneath to collect the defrost water (see fig.). 5. When defrosting is completed dry the interior thoroughly. Keep the scraper for future use. 6.
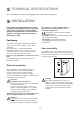
TECHNICAL SPECIFICATIONS The technical data is indicated in the rating plate on the left side inside the appliance. INSTALLATION lf this appliance featuring magnetic door seals is to replace an older appliance having a spring lock (latch) on the door or lid, be sure to make that spring lock unusable before you discard the old appliance. This will prevent it from becoming a death-trap for a child.
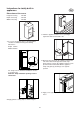
t Instructions for totally built-in appliances Dimensions of the recess Height of housing Depth of housing Width of housing A mm 880 mm 550 mm 560 50 540 0 56 55 0 880 D022 3. Slide the appliance into the recess, pushing it against the wall on the handle side. PR 32 50 mm min. 200 cm 2 1. It is necessary that the niche is provided with a conduct of ventilation having the following dimensions: Depth 50 mm Width 540 mm D C D727 4.
8mm B A C A D PR266 PR167 6. Separate parts A, B, C, D as shown in the figure. B 50mm 9. Open the appliance door and the furniture door at 90°. Insert the small square (B) into guide (A). Put together the appliance door and the furniture door and mark the holes as indicated in the figure. Remove the squares and drill holes with Ø 2 mm at 8 mm from the outer edge of the door. Place the small square on the guide again and fix it with the screws supplied. A 20m m PR166 7.