
User manual


4
INHALT
Warnungen und wichtige Hinweise . . . . . . . . . . . . . . . . . . . . . . . . . . . . . . . . . . . . . . . . . . . . . . . . . . 2
Hinweise zur Verpackungsentsorgung. . . . . . . . . . . . . . . . . . . . . . . . . . . . . . . . . . . . . . . . . . . . . . . . 3
Gebrauch - Reinigung der Innenteile - Inbetriebnahme - Temperaturregelung - Hinweise zum richtigen
Kühlen - Einfrieren von frischen Lebensmitteln - Aufbewahrung der Tiefkühlkost - Eiswürfelbereitung. 5
Gebrauch - Auftauen - Höhenverstellbare Abstellregale - Höhenverstellung der Türablage - Tips . . . .
Tips für das Kühlen - Tips für das Einfrieren. . . . . . . . . . . . . . . . . . . . . . . . . . . . . . . . . . . . . . . . . . . . . . 6
Tips - Tips für Tiefkühlkost - Wartung - Regelmäßige Reinigung - Stillstandzeiten - Innenbeleuchtung. . 7
Wartung - Abtauen - Störungen . . . . . . . . . . . . . . . . . . . . . . . . . . . . . . . . . . . . . . . . . . . . . . . . . . . . . . 8
Installation - Aufstellung - Elektrischer Anschluß - Türanschlagwechsel . . . . . . . . . . . . . . . . . . . . . . . 9
nstallation - Montageanleitungen für den integrierten Einbau. . . . . . . . . . . . . . . . . . . . . . . . . . . . . . . 10
HINWEISE ZUR VERPACKUNGSENTSORGUNG
Verpackungen und Packhilfsmittel unserer Elektro-
Großgeräte sind mit Ausnahme von Holzwerkstoffen
recyclingfähig und sollen grundsätzlich der
Wiederverwertung zugeführt werden.
Wir empfehlen Ihnen:
• Papier-, Pappe- und Wellpappeverpackungen
sollten in die entsprechenden Sammelbehälter
gegeben werden.
• Kunststoffverpackungsteile sollten ebenfalls in
die dafür vorgesehenen Sammelbehälter
gegeben werden. Solange solche in Ihrem
Wohngebiet noch nicht vorhanden sind, können
Sie diese Materialien zum Hausmüll geben.
Als Packhilfsmittel sind bei uns nur recyclingfähige
Kunststoffe zugelassen, z.B.:
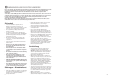
In den Beispielen steht
PE für Polyäthylen** 02 = ^ PE-HD; 04 = ^ PE-LD
PP für Polypropylen
PS für Polystyrol
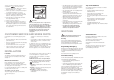
BESTANDTEILE AUS PLASTIK
Zur einfacheren Entsorgung und/oder Recycling ist
ein Großteil der Materialien dieses Gerätes
gekennzeichnet, um ihre Identifizierung zu
ermöglichen.
02**
PE
05
PP
06
PS
21
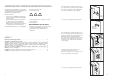
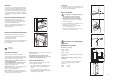
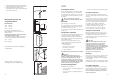
Place guide (A) on the inside part of the furniture
door, up and down as shown in the figure and mark
the position of external holes. After having drilled
holes, fix the guide with the screws supplied.
20 mm
A
50mm
PR166
PR33
C
A
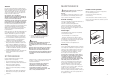
Fix cover (C) on guide (A) until it clips into place.
Open the appliance door and the furniture door at
90°. Insert the small square (B) into guide (A). Put
together the appliance door and the furniture door
and mark the holes as indicated in the figure.
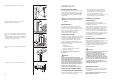
Remove the squares and drill holes with ø 2 mm at
8 mm from the outer edge of the door. Place the
small square on the guide again and fix it with the
screws supplied.
8mm
PR167
A
B
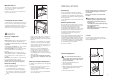
PR168
PR167/1
D
B
Should the lining up of the furniture door be
necessary, use the clearance of slots.
At the end of operations, it is necessary to check if
the door of the furniture closes properly.
Fix cover (D) on guide (B) until it clips into place.