iCharger Synchronous Balance Charger/Discharger 4010DUO 4010DUO User User''s Manual (V2.0) Index Use Notice...................................................................................................................- 3 Safety Notes...................................................................................................................................- 3 Copyright ...............................................................................................................................
iCharger Synchronous Balance Charger/Discharger 4010DUO LCD Setup ......................................................................................................................... - 21 Output Power Setup ...........................................................................................................- 21 Power Supply Setup ...........................................................................................................- 22 Save & Load Configuration Setup........................
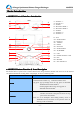
iCharger Synchronous Balance Charger/Discharger 4010DUO ice Use Not Notice ●Safety Notes Please read the entire Manual completely before using, to make sure you can use this device better and more safely safely.. 1. 4010DUO is a dual port charger, does not mean can charge/discharge for any configuration of the two sets of batteries! Must follow: two battery packs have not any external electrical connection, otherwise it will burn the charger or batteries.
iCharger Synchronous Balance Charger/Discharger 4010DUO ● 4010DUO Special Features 1. The 4010DUO uses advanced Synchronous buck-boost DC/DC converter technology, high power, and high current and high-performance power conversion circuit. The maximum charge power capacity up to 2000W, the maximum charge/discharge current of channel up to 40A, and two channels in Synchronous Mode up to 70A. 2. Channel Supports 10s LiPo, Lilo, LiFe, with maximum 1.
iCharger Synchronous Balance Charger/Discharger 4010DUO Device Introduction ● 4010DUO Parts & Interface Introduction 18 21 17 19 20 16 9 13 12 11 10 14 15 4 2 1 5 7 3 6 8 (1)OUTPUT-1﹣ (2)OUTPUT-1﹢ (3)TEMP-1 (4)BALANCE PORT-1 (5)BALANCE PORT-2 (6)TEMP-2 (7)OUTPUT-2﹢ (8)OUTPUT-2﹣ (9)LCD (10)STOP/START-1 (11)STATUS-1 (12)TAB/SYS (13)KNOB (14)STATUS-2 (15)STOP/START-2 (16)J1,J2 PORT (17)USB (18)POWER OUTPUT LINE (19)FAN (20)BUZZER (21)SD CARD SLOT ● 4010DUO Buttons Function & Icon Iconss Descri
iCharger Synchronous Balance Charger/Discharger 4010DUO STATUS-1 Long press: measure internal resistance of CH-1 via long press on initial interface, and to pop up the parameters setup interface via long press when running program Click: switch to the information display of CH-1 STATUS-2 Long press: measure internal resistance of CH-2 via long press on the initial interface, and to pop up the parameters setup interface via long press when running program Click: switch to the information display of CH-2
iCharger Synchronous Balance Charger/Discharger 4010DUO ● 4010DUO Standard Accessories USB data line #1 Power cable #1 m 700m 700mm m 600m 600mm Standard mini USB data line Power input cable Balance connector conversion board #2 Output cable #2 70X44mm m 320m 320mm Suit for Align/Dualshy battery etc. Banana gold plug power output cable (single channel) channel)) Balance wire for balance board #2 CD-ROM #1 mm 150 150mm Suit for Align/Dualshy battery etc.
iCharger Synchronous Balance Charger/Discharger 4010DUO iCharger Charge/Discharge Setup & Use 4010DUO iCharger can charge/discharge LiPo, Lilo, LiFe, NiHM, NiCd, Pb batteries, this manual divides into three parts to introduce features and use for LiXX, NiXX, Pb batteries. ● Power Supply Setup The charger boots automatically when power on and the initial interface will display LOGO, charger relevant information, power source and message etc.
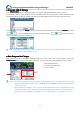
iCharger Synchronous Balance Charger/Discharger 4010DUO ● Program Add & Manage Click STOP/STARTSTOP/START-xx button on the initial interface to pop up the BATTERY MEMORY SELECT window. 4010DUO has 6 built-in programs before it enters to the market (shown in following picture), which cannot be deleted and limit for editing. The built-in program with underline is distinguished from the customized program by users.
iCharger Synchronous Balance Charger/Discharger 4010DUO After selecting the program to run, click confirmation to pop up RUN PROGRAM window, as below: Click Yes to run the program, click No to cancel.
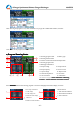
iCharger Synchronous Balance Charger/Discharger Cycle charge status 1: Cycle charge status Information page 1 3 5 2 1: Power 4 2: End voltage 4010DUO 1 3:Lowest input voltage 6 4: Safety time 5: Temp.
iCharger Synchronous Balance Charger/Discharger 4010DUO ● Program Edit After adding new program or editing saved program, system will enter MEMORY SETUP interface, users can set or modify the program on this interface. MEMORY SETUP Interface 1: Program name 2: Types of battery 3: Number of cells 4: Battery capacity 5: Available program 1 2 3 4 5 Note:1.
iCharger Synchronous Balance Charger/Discharger 4010DUO ① LiXX Battery Charge Setup Select Program→Charge to enter Charge setup interface. LiXX Battery Charge Program Setup Chg Current: 0.05A-40A; default:2A Chg Mode: Balance (default), Not Balance Chg End Current: 1%-50%; default: 10% Chg Cell Volt: 3.85V/Cell-4.35V/Cell; Default: 4.2V/Cell Note: 1.
iCharger Synchronous Balance Charger/Discharger 4010DUO Note: If Balance Diff value is smaller, the voltage difference between batteries will be smaller and time-consuming will be more when program ends. If Balance Set Point value is smaller, the battery will be closer to the setting cut-off voltage and time-consuming will be more when program ends. Balance Over Charge, the maximum overcharge compensation voltage acts as accelerated charge, and the larger the value, the more obvious of accelerated charge.
iCharger Synchronous Balance Charger/Discharger 4010DUO LiXX Battery Storage Setup ②LiXX This mode is for storaging LiXX battery that is not to be used for an extended period. The charger determines whether to charge or discharge the battery based on the configured target voltage. If the battery voltage exceeds the target storage voltage it will start to discharge, while lower than the target storage voltage it will start to charge. Select Program→Storage to enter Storage setup interface.
iCharger Synchronous Balance Charger/Discharger 4010DUO Click " " to enter LiXX DISCHARGE ADVANCED SETUP interface, after setting click" the previous interface. " to return to Note: 1.Tick Extra Discharge Enable to active extra discharge enable, see more details in Page33 Extra Discharge Discharge. 2. Tick Balance enable to active balance discharge; when discharge enters the CV phase, it starts to balance for the cell voltages.
iCharger Synchronous Balance Charger/Discharger 4010DUO ■ NiXX Battery Charge/Discharge Setup After adding program, it will switch to NiXX battery in Type option on the MEMORY SETUP interface, and set the capacity, the number of cells for NiXX battery cannot be set, and the charger sets Auto by default, after editing all parameters for program, click" " to save and return to the previous interface. As shown in above picture, the program of NiMH, NiCd have: Charge, Discharge and Cycle.
iCharger Synchronous Balance Charger/Discharger Click " Setup etup. 4010DUO " to enter CHARGE SAFETY SETU interface, see details about setting in Page13 LiXX Battery Charge ② NiXX Battery Discharge Setup Select Program→Discharge to enter Discharge setup interface. LiXX Battery Discharge Setup Discharge Current: 0.05A-40A; default: 2A Discharge Voltage: 0.1V-40V; default: 0.1V End Current: 1%-100%; default: 50% Regenerative Mode: OFF (default), To input, To channel ls Note: 1.
iCharger Synchronous Balance Charger/Discharger 4010DUO ■ Pb Battery Charge/Discharge Setup After adding program, it will switch to Pb battery in Type option on the MEMORY SETUP interface, and set the number of cells and capacity, after editing all parameters for program, click" interface. "to save and return to the previous As shown in above picture, the program of Pb battery has: Charge, Discharge and Cycle. ① Pb Battery Charge Setup Select Program→Charge to enter Charge setup interface.
iCharger Synchronous Balance Charger/Discharger 4010DUO 4010DUO Parameter Parameterss Setup ● 4010DUO Parameter Parameterss Setup Press TAB/SYS button for 2S on the initial interface to enter SYSTEM MENU interface, setting and testing of the system parameters, storage and servo can be completed on this interface. 1: Charger Setup Menu 1 9 2: Temp.
iCharger Synchronous Balance Charger/Discharger 4010DUO Beep Tone Setup ②Beep Select SYSTEM MENU→Charger Setup→Beep Tone to enter the setup interface.
iCharger Synchronous Balance Charger/Discharger 4010DUO Power Supply Set up ⑤Power Setup Select SYSTEM MENU→Charger Setup→Power Supply to enter the setup interface. After selecting input source, click the " set the parameters, after setting click “ " followed the option, enters the relevant power supply setting to ”to save and return to the previous interface.
iCharger Synchronous Balance Charger/Discharger 4010DUO ⑦ Calibration Select SYSTEM MENU→Charger Setup→Calibration to enter the setup interface. Calibration Setup Interface Manufacturers Default: Default value User Calibration: User calibration The user calibration may lead to large data deviation, and affecting the normal use; user calibration for charger is not recommended.
iCharger Synchronous Balance Charger/Discharger 4010DUO tra Function ■ Ex Extra ① Log Files Manage Select SYSTEM MENU→Extra Function→LOG FILES to enter the manage interface. First select and click the .TXT files when manage log files, and the system will pop up the LOG FILES OP dialog box. Log Files Manage Dialog Transmission: transmission to PC Delete: delete files The charger must be connected with computer when select Transmission, and the client software has identified to the charger.
iCharger Synchronous Balance Charger/Discharger 4010DUO Select the test mode and go to the following corresponding interface. Liner Test Fixed Point Test When turning the knob, the pointer deflects with step of 10us, and the servo responds accordingly. When turning the knob, the pointer deflects among each setting values, and the servo responds accordingly.
iCharger Synchronous Balance Charger/Discharger 4010DUO ● USB & SD Card Use 4010DUO is the HID device of USB, supported by windows system directly, dispense with installing additional drivers. The USB icon will light up on the lower right corner of the screen when the 4010DUO connects with computer normally. The SD icon will light up on the lower right corner of the screen when the SD card inserted.
iCharger Synchronous Balance Charger/Discharger 4010DUO 4010DUO Firmware Upgrades ① Landing to the website http://www.jun-si.com/UploadFiles/Upgrader.rar to download above VER1.9 version upgrader zip file " ", and extract to any disk on the PC. ② Open the extract directory X:\upgrader\upgrader.exe,double click" program interface. ③ Click " "to open firmware file, If not a firmware file on the PC, click " window, and find the corresponding device firmware of 4010DUO, click" the PC.
iCharger Synchronous Balance Charger/Discharger ⑤ Click the iron " 4010DUO " on the lower right corner, then the upgrade progress bar will appear on the lower left corner, a tone sounds for upgrade completion when the upgrade progress bar has completed. Note:1. Upgrade failed in the case of not power outages, click " " to upgrade again. 2.
iCharger Synchronous Balance Charger/Discharger 4010DUO Use Logview for 4010DUO First, gratitude to the development team of Logview, more details please see http://www.logview.info. Communication steps: � To install the software Logview, start the procedure of X:\ logview \ LogViewInstaller.exe (here X is the drive letter designator for the CD-ROM drive).
iCharger Synchronous Balance Charger/Discharger 4010DUO O in the following options of Device, and then choose the correct 3) Choose Junsi iCharger4010DU iCharger4010DUO communication Port; 4) Start iCharger charge/discharge mode, then click Start recording to record data. See other functions of this software on "Help".
iCharger Synchronous Balance Charger/Discharger 4010DUO Important Notes ● Channel Mode 1. Channel Asynchronous Mode: i.e. CH-1 and CH-2 work independently. Picture2: Correct Connection Picture1: Error Connection Go to MEMORY SETUP→Option→Channel Mode to select Asynchronous. Note: On this mode, the two channels must have not any external electrical connection; otherwise it will damage the charger. Cannot charge with connection as shown in picture 1, the correct connection is shown in picture2. 2.
iCharger Synchronous Balance Charger/Discharger ● The Power Input Ground cannot be Communicated With the Output Ground: 4010DUO Note: The power lead of the input cannot be connected directly to the output (see picture 4), and the voltage of input power supply cannot have too large instantaneous fluctuations, otherwise it will damage the charger. Picture 4 ● Reflex Charge Mode: Note: Reflex charge mode only supports NiMH battery, Pb battery, not support lithium battery.
iCharger Synchronous Balance Charger/Discharger 4010DUO ● Channel Regenerative Mode: 1 2 3 Channel Regenerative Mode Channel Regenerative Mode Display: 1: Regenerative Power 2: Regenerative Voltage Limit 3: Regenerative Current Limit Channel Regenerative Mode is for discharging from one channel to another channel, the current version only supports resistor and bulbs discharge, but the coming versions will realize the battery regenerative.
iCharger Synchronous Balance Charger/Discharger 4010DUO Appendix ●Status Indication of Running Channel Status No display STOPS Status Indication Status Trick charging status, keep small current No program, can select program to run TRICK Stop status, press “stop” button to stop the running program MONITO Monitor status, only monitor the data Float charge, support Pb battery Start the program FLOAT CHECK Check status before running program SYNCH.
iCharger Synchronous Balance Charger/Discharger 4010DUO ● Error Messages Error NO.
iCharger Synchronous Balance Charger/Discharger 4010DUO 29XX Balance port error, Ni-, Pb don't need "Balance not needed, Remove connection from balance balance port, but voltage of balance port" port is detected 30XX "Balance required!" 31XX "Auto detect the number of cells failed, please connect balance or set cells" 32XX "AD watchdog error" AD watchdog error "Synchronous mode: Channel outputs imbalance" Channel outputs are imbalance in Synchronous mode 33XX Balance port is out plugged 34XX