E8 (NAA) Instructions for Use For your safety: read and understand manual before use.
Table of contents Your E8 1 IMPORTANT SAFEGUARDS ���������������������������������������������������������������������������������������� 4 2 Control elements ��������������������������������������������������������������������������������������������������� 8 3 Preparing and using for the first time �����������������������������������������������������������������������10 Setting up the machine �������������������������������������������������������������������������������������������10 Filling t
Table of contents Descaling the machine ������������������������������������������������������������������������������������������ 28 Descaling the water tank � ���������������������������������������������������������������������������������������� 30 Cleaning the bean container ������������������������������������������������������������������������������������ 30 8 Display messages �������������������������������������������������������������������������������������������������� 31 9 Troubleshooti
1 1 IMPORTANT SAFEGUARDS IMPORTANT SAFEGUARDS Comply with the instructions for use Failure to observe the instructions for use may result in serious injuries or damage to property. Safety information is therefore indicated as follows: J J DANGER This is the safety alert symbol. lt is used to alert you to potential personal injury hazards. Obey all safety messages that follow this symbol to avoid possible injury or death.
1 Z Z Z Z Z Z IMPORTANT SAFEGUARDS appliance manufacturer may result in fire, electric shock, or injury to persons. Do not use outdoors. Do not let the cord hang over the edge of a table or counter, or touch hot surfaces. Do not place on or near a hot gas or electric burner, or in a heated oven. To disconnect, turn any control to ‘OFF’ then remove plug from wall outlet. Do not use appliance for other than intended use. Use extreme caution when dispensing hot steam, hot water or hot coffee.
1 IMPORTANT SAFEGUARDS Extension cords are available an may be used if care is exercised in their use.
1 IMPORTANT SAFEGUARDS NOTICE Z Z Z Never clean with scouring powders or hard implements. Ensure that the ventilation slots are not covered. Never pull out the drip tray during the brewing process. Only pull the drip tray when the display instructs you or when the appliance is ready for use. NEVER DO (or you will void your warranty protection): Z Never fill instant coffee, chocolate mix etc. into the bean container or ground coffee funnel (filler funnel for ground coffee).
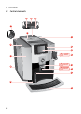
2 2 Control elements Control elements 15 16 max.
2 On/Off button Q Multi-function buttons (button function depends on what is shown in the display) Display Milk system with fine foam frother Height-adjustable coffee spout Hot-water nozzle Coffee grounds container Cup platform Drip tray Power cord (permanently connected or plug-in) (back of the machine) Water tank Water tank cover Bean container with aroma preservation cover Service socket for optionally available JURA WiFi Connect Filler funnel for ground coffee Filler funnel cover Grinder adjustment swi
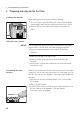
3 3 Preparing and using for the first time Preparing and using for the first time Setting up the machine When setting up your E8, please note the following: Choose a spot for your E8 which protects the machine against overheating. Ensure that the ventilation slots are not covered. Place the E8 on a horizontal surface that is not sensitive to water. U U Filling the bean container NOTICE Coffee beans which have been treated with additives (e.g.
3 Level Display German Degrees of general Degree (°dH) hardness (°dGH) Not active – – Very soft water <3 <3 Soft water >4 >4 Hard water > 8.4 > 8.4 Very hard water > 14 > 14 Preparing and using for the first time Parts per Indicator Strip number million (ppm) of ‘reddish’ fields – – < 53.4 None > 71 1 > 150 2 > 250 3 First-time use J WARNING NOTICE If the machine is operated with a defective power cord, there is a danger of potentially fatal electric shock. T Never use a machine which is damaged.
3 Preparing and using for the first time T Press the 0 or 9 button to change the setting for the water hardness. T Press the ‘Save’ button. ‘Saved’ ‘Filter operation’ / ‘Insert filter’ T Remove the water tank and rinse it with cold water. T Fit the filter cartridge extension supplied on top of the CLEARYL Smart filter cartridge. T Insert the filter cartridge with its extension into the water tank. T Turn the filter cartridge clockwise until it audibly clicks into place.
Managing your E8 – the JURA Cockpit c 4 Connecting milk 3 Preparing and using for the first time You can manage your E8 with the JURA Cockpit. Press the f button to enter the JURA Cockpit. Symbol Meaning c ‘Maintenance status’ section f ‘Machine setting’ section h ‘Smart mode’ active 4 (white) 4 (red) Your E8 is connected with the network via JURA WiFi Connect.
3 Preparing and using for the first time Connecting the machine to the WiFi network Your E8 can be connected with your JURA app (J.O.E.®). E The WiFi Connect can be protected against unauthorised access using a PIN. Activate the PIN function via the JURA app. You will find more information at jura.com/wifi. Precondition: J.O.E.® is installed on your mobile end device and you have logged into your home network. The JURA WiFi Connect is inserted into the service socket of your E8. T Press the f button.
4 4 Preparation Preparation J WARNING Hot coffee, hot steam and hot water can cause scalding. Scalding is a serious burn. T Use extreme care when handling hot liquid or steam. T Allow liquid to cool down before drinking. T In the event of scalding, rinse affected area with cold water and seek medical attention. T Keep children AWAY.
4 Preparation prewarming the cups. You can purchase a JURA Cup Warmer from your specialized dealer. Preparation with preselection (Specialty Selection) Press the f button for two seconds to initiate Specialty Selection: Specialty Selection Meaning The product is prepared with two ‘Extra Shot’ s (cappuccino, flat white, brewing operations, each with half the amount of water – for a specialty latte macchiato) coffee with a particularly intense taste.
4 E8 E8 Preparation T Place a glass under the fine foam frother. T Press the ‘Latte Macchiato’ button. The preset amount of milk foam flows into the glass. E There is a short interval while the hot milk separates from the milk foam. This allows the typical layers of a latte macchiato to form. The preset amount of water for espresso flows into the glass.
4 Preparation Example: Proceed as follows to prepare one espresso using ground coffee. T Place an espresso cup under the coffee spout. T Press the f button for two seconds to initiate Specialty Selection. T Press the ‘Ground coffee’ £ button. T Press the ‘Espresso’ button. ‘Ground coffee’ / ‘Please add ground coffee’ T Open the powder chute cover. T Place one level measuring spoon of ground coffee into the filler funnel. T Close the cover of the filler funnel. T Press the ‘Next’ button.
4 Preparation T Open the cover of the filler funnel for ground coffee. T Press the ‘Espresso’ button to start preparation. T Turn the grinder adjustment switch to the desired position while the grinder is in motion. The preset amount of water flows into the cup. T Close the filler funnel cover. max. 2X Adjusting the product settings Press the button of a product on the start screen for about two seconds to view the list of settings (‘Product settings’).
5 Daily operation 5 Daily operation Switching the machine on and off E8 E8 T Place one receptacle under the coffee spout and another under the fine foam frother. T Press the On/Off button Q. E When the machine is switched off, the system is only rinsed if a specialty coffee has been prepared. E If milk has been prepared before switching off, you will be prompted to perform milk system cleaning (‘Clean the milk system’). After 30 seconds the switch-off process continues automatically.
5 Maintenance action Clean the fine foam frother (if heavily soiled, also dismantle it) Daily If necessary x Daily operation Note (see chapter 7 ‘Maintenance – Dismantling and rinsing the fine foam frother’) Rinse the milk pipe x – Rinse the water tank x – Wipe the surface of the machine with a clean, soft, damp cloth (e.g. microfiber cloth) x – Change the milk pipe HP3 approx. every 3 months – Change the interchangeable milk spout CX3 approx.
6 Machine settings 6 Machine settings J WARNING Hot coffee, hot steam and hot water can cause scalding. Scalding is a serious burn. T Use extreme care when handling hot liquid or steam. T Allow liquid to cool down before drinking. T In the event of scalding, rinse affected area with cold water an seek medical attention. T Keep children AWAY. Press the f button to enter the Cockpit.
7 7 Maintenance Maintenance J WARNING Use of maintenance products that are harmful to health and discharge of liquids during maintenance program. Harmful if swallowed. Irritating to eyes and skin. T Keep children AWAY. T Keep children away from the machine while it is performing a maintenance program. T Avoid contact with skin and eyes. T Avoid generation of dust. Do not inhale dust. T When using do not eat or drink. T Keep maintenance products away from food, drink and animal food.
7 Maintenance Rinsing the milk system After each milk preparation, the E8 prompts you to perform a milk system rinse. In the machine settings, you can set whether the milk system rinsing is to be initiated manually or automatically 15 minutes after preparation (see chapter 6 ‘Machine settings’). Precondition: The start screen is displayed.. T Place a receptacle under the fine foam frother. T Press the f button. T Press the c button. T Press the ‘Rinse the milk system’ button to start the rinse operation.
7 Maintenance T Press the ‘Clean the milk system’ button. T Press the ‘Start’ button. ‘Clean the milk system’ / ‘Milk system cleaner’ T Remove the milk pipe from the milk container or milk cooler. T Pour one dosing unit of milk system cleaner into the container for milk system cleaning. 6 T Place the container under the hot-water spout and the fine foam frother and connect the milk pipe with the container.
7 Maintenance T Re-assemble the fine foam frother. E Ensure that all individual parts are correctly and firmly connected to ensure optimum operation. T Re-fit the fine foam frother on the milk system. E8 E8 Inserting/changing the filter Once the filter cartridge stops working (depending on the water hardness setting), the E8 will prompt you to change the filter. E Your E8 no longer has to be descaled if you are using the CLEARYL Smart filter cartridge.
7 Cleaning the machine Maintenance After 180 preparations or 80 switch-on rinses, the E8 will prompt you to clean it. J WARNING Non-recommended (e.g. liquid) cleaning agents may contain substances that could damage the machine or leave residues. T Use only original JURA cleaning tablets. These are specially formulated for your machine. J WARNING Harmful and irritating cleaning agent. Harmful if swallowed. Irritating to eyes and skin. T Keep children AWAY. T Avoid contact with skin and eyes.
7 Maintenance T Insert a JURA cleaning tablet into the filler funnel. T Close the filler funnel cover. T Press the ‘Next’ button. Water flows repeatedly out of the coffee spout and the fine foam frother. ‘Empty grounds’ T Empty the drip tray and coffee grounds container and put them back into the machine. max. 2X Descaling the machine The E8 builds up deposits of limescale over time and automatically prompts you to descale it when necessary.
7 Maintenance Precondition: ‘Descale’ is displayed in the Cockpit. T Press the ‘Descale’ button. T Press the ‘Start’ button. ‘Empty drip tray’ T Empty the drip tray and coffee grounds container and put them back into the machine. ‘Agent in tank’ T Remove and empty the water tank. T Completely dissolve 3 JURA descaling tablets in a receptacle holding 17 oz (500 ml) of water. This may take several minutes. T Pour the solution into the empty water tank and insert it into the machine.
7 Maintenance Descaling the water tank Limescale deposits may form in the water tank. To ensure correct function of the machine, descale the water tank from time to time. T Remove the water tank. T If you use a CLEARYL Smart filter cartridge, remove this. T Completely fill the water tank and dissolve 3 JURA descaling tablets in it. T Leave the water tank with the descaling solution for several hours (e.g. overnight). T Empty the water tank and rinse it thoroughly.
8 8 Display messages Display messages Messages on the start screen Message ‘Fill water tank’ Cause/Result The water tank is empty. You cannot prepare any products. Action ‘Empty grounds’ / ‘Empty drip tray’ The coffee grounds container is full. / The drip tray is full. You cannot prepare any products. T Empty the coffee grounds container and the drip tray (see chapter 5 ‘Daily operation – Maintenance actions’).
9 Troubleshooting 9 Troubleshooting Problem Insufficient foam is produced when the milk is frothed or milk sprays out of the fine foam frother. Cause/Result The fine foam frother is dirty. Action Coffee only comes out in drips when it is being prepared. The coffee is ground too finely and obstructs the system. The water hardness may not have been correctly set. T Set the grinder to a coarser setting (see chapter 4 ‘Preparation – Adjusting the grinder’).
10 10 Transport and environmentally friendly disposal Transport and environmentally friendly disposal Transport / Emptying the system Keep the packaging for your E8. It should be used to protect the machine during transport. In order to protect the E8 from frost during transport, the system must be emptied. E8 E8 Disposal Precondition: The start screen is displayed. T Place a receptacle under the hot-water nozzle. T Press the f button. T Press the f button again.
11 11 Technical data Technical data Voltage 120 V ~, 60 Hz Power 1450 W Conformity mark 34 Pump pressure static, max. 15 bar Holding capacity of water tank (without filter) 64 oz (1.9 l) Holding capacity of bean container 10 oz (280 g) Holding capacity of coffee grounds container max. 16 portions Cord length approx. 47 in. (approx. 1.2 m) Weight approx. 21.2 lb (approx. 9.6 kg) Dimensions (W × H × D) 11.0 × 13.8 × 17.6 in. (28.0 × 35.1 × 44.
12 12 A B C Index Index Addresses 40 Adjusting the product settings 19 Aroma preservation cover Bean container with aroma preservation cover 9 Bean container Bean container with aroma preservation cover 9 Cleaning 30 Filling 10 Bus bar Technical data 34 Button On/Off button 9 Bypass amount of water 17 Caffè Barista 17 Cappuccino 16 Cappuccino frother rinsing Rinsing the milk system 24 Cleaning Bean container 30 Machine 27 CLEARYL Smart filter cartridge Changing 26 Inserting 26 Cockpit 22, 23 Coffee 16
12 J L M P 36 Index JURA Contact details 40 Latte macchiato 16 Machine Cleaning 27 Descaling 28 Rinsing 23 Setting up 10 Machine settings 22 Maintenance 23 Maintenance actions 20 Measuring spoon for ground coffee 9 Messages, display 31 Milk Connecting milk 13 Milk system Clean 24 Fine foam frother 9 Rinsing 24 Power cord 9 Preparation 15, 16 Americano 17 Cappuccino 16 Coffee 16 Cortado 16 Espresso 16 Espresso doppio 17 Flat White 16 Ground coffee 17 Hot water 18 Latte macchiato 16 Macchiato 16 Specialt
J74564/E8(NAA)/US-en/202103 13 13 JURA contact details / Legal information JURA contact details / Legal information JURA Elektroapparate AG Kaffeeweltstrasse 10 CH-4626 Niederbuchsiten Switzerland USA: JURA Inc. Canada: FAEMA Phone E-Mail 1-800-220-5701 info@us.jura.com 1-(855)-544-8600 info@juracanada.