U E CAUTION CAUTION This section of instruction manual is specially edited for service purpose with modified contents. This section of instruction manual is specially edited for service purpose with modified contents.
U 1. 2. 3. 4. 5. 6. 7. 8. 9. 10. 11. 12. 13. 14. 15. 16. 17. 18. 19. 2 Read all of these instructions. Save these instructions for later use. All warnings on the product and in the operating instructions should be adhered to. Unplug this appliance system from the wall outlet before cleaning. Do not use liquid cleaners or aerosol cleaners. Use a damp cloth for cleaning. Do not use attachments not recommended by the appliance manufacturer as they may cause hazards.
U SAFETY PRECAUTIONS SAFETY PRECAUTIONS CAUTION CAUTION: TO REDUCE THE RISK OF ELECTRIC SHOCK, DO NOT REMOVE COVER (OR BACK). NO USER-SERVICEABLE PARTS INSIDE. REFER SERVICING TO QUALIFIED SERVICE PERSONNEL The lightning flash with arrowhead symbol, within an equilateral triangle, is intended to alert the user to the presence of uninsulated “dangerous voltage” within the product’s enclosure that may be of sufficient magnitude to constitute a risk of electric shock to persons.
TABLE OF CONTENTS Thank you for purchasing our DV Video Cassette Recorder BR-DV3000. As this is a DV-format video cassette recorder, video cassettes with the or logos can be used with it. DVCAM cassettes can be recorded in DV format. This VTR features dual support for NTSC and PAL. Certain functions however, are supported by only one signal system. They are indicated with (NTSC only) or (PAL only).
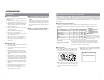
INTRODUCTION Precautions Place of storage and use Please avoid storing or using this VTR in the following places: ● Extremely hot or cold places beyond the allowable temperature for operation (5˚C – 40˚C) ● Humid or dry places beyond the allowable humidity range for operation (30% –80% RH) ● Dusty or sandy places ● Places exposed to oil, smoke or steam, such as the kitchen vicinity ● Intensely vibrating or unstable places Daily maintenance and regular inspection Maintaining the unit (Please turn off th
INTRODUCTION Precautions on the use of cleaning tape Please use cleaning tape produced by JVC. Please follow the instructions below when using the cleaning tape. 1. The tape will run for 10 seconds in the PLAY mode. (Thereafter, it stops automatically and enters the STOP mode.) • After loading the cleaning tape, press the PLAY button. 2. For a single cleaning session, use it up to 4 times. 3. Please refer to the following table as a guide for cleaning: Condensation Memo: 1.
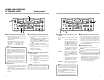
NAMES AND FUNCTIONS OF VARIOUS PARTS – Front panel – 2 OPERATE OPERATE EJECT EJECT 7 1 MENIU MENIU REC A.DUB Mini DVCAM NTSC PLAY PAUSE DVCAM NTSC CH-1/3 REMOTE SEL. INPUT SEL. SERIAL LINE 9PIN PLAY REW STOP WIRELESS DV Y/C 1 [OPERATE] Operate button/LED ● Press this button to turn on the power and operate the unit. (Operate ON) Press this button again to turn off the power. (Operate OFF) ● The OPERATE LED lights up as follows.
NAMES AND FUNCTIONS OF VARIOUS PARTS – Front panel – 8 (continued) % 9 $ ^ OPERATE OPERATE EJECT EJECT MENIU MENIU REC A.DUB Mini DVCAM NTSC PLAY PAUSE PAL REC INH. 0 DVCAM NTSC CH-1/3 REMOTE SEL. INPUT SEL. SERIAL LINE 9PIN PLAY REW STOP PAUSE PAL REC INH. WIRELESS DV Y/C CH-1/3 SET REW CH-2/4 STOP FF MIC ! # ● Hold down this button and press the 9 PLAY button to start recording. During recording, the LED lights up red.
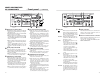
NAMES AND FUNCTIONS OF VARIOUS PARTS – Rear panel – ! DV IN/OUT DV IN/OUT VIDEO AUDIO Y/C CH 1/3 OUT SERIAL 4 This is used for DC12V input. It connects the DC power cord of the provided AC adapter. Memo ● When power is supplied to this terminal, the OPERATE indicator located at the front panel lights up. (The LED lights up red when the OPERATE indicator is OFF.
NAMES AND FUNCTIONS OF VARIOUS PARTS – Wireless remote controller – 4 STILL MODE button 245 1 DISPLAY 3 BARS MENU STILL MODE BLANK SEARCH+ 9 AUDIO MUTING OUT SEL. SET SET BUTTON 0 ! $ SEARCH– A.DUB PAUSE F.REV PLAY OUT LEV. REC F.ADV REW FF STOP ^ INDEX– 6 7 8 @ # & % INDEX+ REMOTE CONTROL UNIT RM-G3000 Use this button to select images in the STILL mode. When the unit is in the STILL mode, press this button to toggle images in the following sequence.
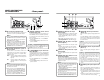
ON-SCREEN DISPLAY – Regarding on-screen display – ON-SCREEN DISPLAY – Status display – Besides E-E images and playback images, the monitor connected to the VIDEO LINE OUT terminal and Y/ C OUT terminal provides the following on-screen information. Status display: It displays the current settings and operating status. Wireless remote controller – – –D I SPLAY [ 1 / 2 ] – – – D I PLAY ON COUN T E R POS I .
ON-SCREEN DISPLAY – Status display – 3 2 K CH – 1 / 2 S P 000m i n (continued) 5 ON-SCREEN DISPLAY – Event display – Event display : When a specific function is in activation or when the operation status is changed with the remote controller, etc, the events will be displayed at the positions shown below.
ON-SCREEN DISPLAY – Alarm display – Alarm display : Alarm messages are displayed as shown below, when an operation error has occurred or when the unit is in a poor condition for operation. E.g., dirty head. 3 2 K CH – 1 / 2 A B S P 000 REC INHIBIT The user attempts to record on a write protected cassette tape. (The rear slide is pushed to SAVE.) A. DUB INHIBIT (REC TAB) The user attempts to perform audio dubbing on a write protected cassette tape. (The rear slide is pushed to SAVE.) A.
PREPARATION – Provided wireless remote controller – LOADING THE BATTERIES USING THE WIRELESS REMOTE CONTROLLER Before using the wireless remote controller, please load 2 batteries (AA) in. 1 Lift up the cover of the battery compartment. 2 Load in 2 batteries (AA). 3 Close the cover. OPERATE MENIU Before using the wireless remote controller, please set the REMOTE SEL. switch to “WIRELESS”. - A.DUB Mini DVCAM NTSC REC PLAY REW STOP PAUSE PAL REC INH.
PREPARATION Power – – Connecting to the AC adapter Switching on the power Connect the provided AC adapter to the main unit. OPERATE indicator OPERATE Screw Clamp DV IN/OUT AUDIO CH 1/3 CH 2/4 LINE VIDEO Provided AC adapter Y/C AC A.DUB Mini REC PLAY REW STO PAL REC INH. IN DVCAM NTSC PROFESSIONAL REMOTE Provided power cord DC12V OUT NTSC/PAL 9PIN SERIAL NTSC DC cord 1. OPERATE indicator Connect the DC cord of the AC adapter to the DC IN terminal of the main unit.
PREPARATION – Selecting the NTSC/PAL signal system – This unit supports both the NTSC and PAL signal system. Before inputting analogue signals (composite or YC separate video signals), please select the signal system. OPERATE button NTSC indicator NTSC/PAL switch – – – S Y S T EM [ 2 / 2 ] – – – D C I N MO D E OP E OF F OP E R A T I ON L OC K ON P AGE B ACK A.DUB REC PLAY REW STOP PAL REC INH. 2/4 LINE Y/C IN DVCAM NTSC VIDEO PROFESSIONAL REMOTE CH-1/3 REMOTE SEL. INPUT SEL.
PREPARATION – Loading/ejecting cassettes – Please use standard DV cassettes or mini DV cassettes. Guide PREPARATION – Setting/displaying date and time – This function sets up the date and time data of the built-in clock. With the built-in chargeable battery, the configured date and time data is maintained even after the main power is turned off. The data will be displayed on the monitor according to the menu setting. During tape recording, the time and date data is registered. 2.
PREPARATION – Setting/displaying date and time – (continued) 3. – 13, 4. 3. – 13, 4. 5. MENU button EJECT 3. – 4, 4. DISPLAY BARS STILL MODE MENU SEARCH+ 5. EJECT button SET button BLANK MENIU AUDIO MUTING DVCAM NTSC 3. – 2, 4. button OUT SEL. SET OUT LEV. SEARCH– SELECTING DATE/TIME DISPLAY PLAY button button REC PLAY REW STOP 3. – 4, 4. PAL REC INH. CH-1/3 3. – 2 PAUSE button SET CH-2/4 button PAUSE FF 3. – 2 BR-DV3000 FF button 3. – 13, 4. 3. – 2 , 4. button 3.
– Connection and setting – This chapter explains the connection, setting and operation methods required to use this unit as a recorder. This unit cannot be used as an editing system recorder. Connection Setting NTSC indicator PAL indicator Rear panel OPERATE When connected to a video device equipped with a DV terminal EJECT MENIU A.DUB DVCAM NTSC Images can be recorded with almost no deterioration of image quality. REC PLAY REW STOP MIC REMOTE SEL. INPUT SEL.
RECORDING – Setting time codes – Time code recording TOP MENU This unit has a built-in time code reader/ generator. It records time codes during recording. It does not record the user’s bit. Time codes are recorded according to the recording condition as follows: Time codes are recorded in the REC RUN mode. (REC RUN: time codes run only during recording.) Condition Time code recording Time code is preset with this unit. • Time codes preset in the built-in time code generator are recorded.
RECORDING – Recording method – RECORDING 2. 3. PAUSE button 2. 4. PLAY button F.REV PAUSE PLAY • For tapes recorded in the 48kHz audio mode, audio dubbing cannot be performed. • Audio dubbing cannot be performed for DV input signals. REC button OPERATE 2. 4. A.DUB Notes REC PLAY button button 2. EJECT REC 3. F.ADV A.DUB Mini REW FF STOP button DVCAM NTSC STOP REC PLAY REW STOP PAUSE 3. PAL REC INH.
Backup recording function – RECORDING By linking this unit to other DV devices, this unit can perform continuous, long-hour recording. This unit can be set as a backup unit connected to a DV camcorder (GY-DV300/DV500/DV550/ DV5000, etc.). When the recording tape of the source unit ends, this unit can start recording. This enables long-hour recording.
PLAYBACK – Connection/setting – This section explains the required connection, setting and operation method for using this unit as a player. Setting REMOTE SEL. switch on the front panel Connection OPERATE To use the wireless remote controller, set the switch to WIRELESS. Memo Using this unit as a standalone device A.DUB Mini DVCAM NTSC Monitor PAL REC PROFESSIONAL CH-1/3 MIC REMOTE SEL. INPUT SEL.
PLAYBACK – PLAYBACK Basic playback method – PAUSE button DV CAM indicator – Special playback function – Frame advance (reverse) playback PLAY button PLAY button A.DUB REC PAUSE F.REV OPERATE Use the remote controller. EJECT F.ADV PLAY Setting MENIU REW button REW FF STOP FF button A.DUB Mini DVCAM NTSC REC PLAY REW STOP PAUSE PAL REC INH. PROFESSIONAL INDEX– CH-1/3 INDEX+ MIC REMOTE CONTROL UNIT RM-G3000 REMOTE SEL. INPUT SEL.
PLAYBACK – Special playback – (continued) Variable speed playback SEARCH +/( ) button ( ) button BARS STILL MODE MENU SEARCH+ BLANK AUDIO MUTING OUT SEL. SET SEARCH– A.DUB PAUSE F.REV PLAY OUT LEV. The main unit button can also be used to set the unit to the search mode. Set the unit to the PLAYBACK or the STILL mode. Press the FF button to execute fast-forward playback. Press the REW button to execute reverse playback.
PLAYBACK – PLAYBACK Repeat playback – This unit is capable of 3 types of repeat playback. The repeat playback function is set via the REPEAT MODE item of the SYSTEM (1/2) menu. SYSTEM (1/2) menu – – – S Y S T EM [ 1 / 2 ] – – – ST L / F . ADV 2 ND B A C K U P R E C T I ME OF F L ONG P A U S E T I ME 5M I N L O N G P A U S E MO D E F .
EDIT – Using the unit in an editing system – Cut-edit system REMOTE (1/2) menu This unit can be used as a feeder (player) for an editing system that uses a RS-422A-compatible editing remote controller (RM-G820). Applicable model Editing remote controller : RM-G820 Recorder : VHS/S-VHS ....... BR-S800 (equipped with SA-K26 or SA-R50), BR-S822 * DV signals cannot be input. D9 (digital S) ..... BR-D80, BR-D85, BR-D750 * To input DV signals, please install SA-DV60 to D9VTR.
EDIT – Using the unit in an editing system – (continued) MENU SCREEN – Structure of the menu – Hierarchical menus are displayed on the monitor. Using the unit in a non-linear system SYSTEM (1/2) menu This is a system that captures the content of the source tape on a non-linear editing system and records the non-linear edited contents onto the main unit. – – – S Y S T EM [ 1 / 2 ] – – – ST L / F . ADV 2 ND B A C K U P R E C T I ME OF F L ONG P A U S E T I ME 5M I N L O N G P A U S E MO D E F .
MENU SCREEN – Setting the menu – The various functions of this unit can be set from the menu. The configured settings are saved in the unit's memory and are maintained even after the power is turned off. button 2. – 1 2. – 1 PLAY button button EJECT 1. 4. MENU button 1. EJECT 2. – 2 BARS STILL MODE MENU SEARCH+ REC A.DUB AUDIO MUTING DVCAM NTSC PLAY OUT SEL. SET OUT LEV. NPUT SEL. 2. – 2 LINE DV button Y/C PAUSE PAL REC INH.
MENU SCREEN – Contents of the menus – In the menu descriptions below, settings with “ ” marks are factory settings. TOP MENU Items The SYSTEM menu consists of the following 2 screens. (1/2 and 2/2 menu) Setting Contents SYSTEM Displays the menus related to the operation system of this unit. REMOTE Displays the menus related to the remote controller. AUDIO/VIDEO Displays the menus related to the audio and video. TIME CODE Displays the menu for setting time codes.
MENU SCREEN – Contents of the menus – (continued) SYSTEM Menu (continued) Items INDEX WRITE REPEAT MODE Setting OFF ON REMOTE menu Contents Use this setting to enable/disable index signal recording. OFF : No recording of index signal. ON : Use this setting to record index signals. An index signal is automatically registered at the position where recording starts. OFF Use this setting to enable/disable repeat playback.
MENU SCREEN – Contents of the menus – (continued) REMOTE menu Items AUDIO/VIDEO menu Setting Contents REM STOP SEL EE PB Use this menu item to set the action to be performed when a STANDBY ON command is received via the 9 PIN REMOTE terminal or DV terminal. EE: Sets the unit to the EE mode. (The unit will go into the STOP mode.) PB: Sets the unit to the PLAY mode. (The unit will go into the STILL mode.) PB START DELAY 0F | 15F Use this menu item to adjust the edit timing.
MENU SCREEN – Contents of the menus – (continued) TIME CODE menu Items DISPLAY menu Setting TC Contents Presets the time code. For details, please refer to Page 36 "Presetting Time Codes". CLEAR CANCEL EXECUTE Use this menu item to choose whether to clear the time code values. CANCEL : Do not clear EXECUTE : clear NDF/DF (NTSC ONLY) NDF DF Select the framing mode for the time code generator. NDF : Sets the unit to the non-drop mode.
MENU SCREEN – Contents of the menus – (continued) DISPLAY menu (continued) Items AUDIO INFO. Setting OFF ON Contents OTHERS – Placing the unit in an upright position – With the use of the provided stand, the main unit can be placed in an upright position as shown in the following diagram. The left side should be at the bottom. Use this setting to turn on/off the display of audio channel or sampling frequency on the monitor.
OTHERS – Warning display – When an anomaly occurs, this unit automatically identifies the cause and displays an errorcoded warning message on the monitor. If the unit is in a state needing rectification, or if an operation error has occurred, an alarm display will be shown on the monitor. Warning display (Displayed regardless of the DISPLAY mode) When a warning display appears, this unit stops operation and cease to accept any operation commands.
OTHERS – Troubleshooting – Symptom OTHERS Action The power does not come on. Is the AC adapter correctly connected? The cassette cannot be loaded. Is the cassette indicator lit? If so, a cassette is already loaded. Please unload the cassette first. Push the center of the cassette and make sure that the cassette enters levelly. Unable to record. Is the slide of the cassette set to "REC"? Please set it to "REC" if it is at the "SAVE" position.
– Specification – General Recording system : DV system (SP mode only) Signal system : NTSC/PAL Cassette : Standard/ mini DV cassette Tape width : 6.35mm Tape speed : 18.812mm/s (NTSC) 18.831mm/s (PAL) Recording/ playback time : 276 minutes (LA-DV276) 60 minutes (M-DV60) Fast forward/ rewind time : About 3 minutes (LA-DV276) About 1 minute (M-DV60) Power : DC12V (supplied via the provided AC adapter) Power consumption: 14W, 1.