00-00_Cover[B].fm Page 1 Tuesday, March 16, 2004 11:08 PM COMPACT COMPONENT SYSTEM CA-HXGD7 CA-HXGD8 For Customer Use: Enter below the Model No. and Serial No. which are located either on the rear, bottom or side of the cabinet. Retain this information for future reference. Model No. Serial No.
00-00_Safty[B].fm Page 1 Tuesday, March 16, 2004 11:08 PM Warnings, Cautions and Others IMPORTANT for the U.K. DO NOT cut off the mains plug from this equipment. If the plug fitted is not suitable for the power points in your home or the cable is too short to reach a power point, then obtain an appropriate safety approved extension lead or consult your dealer. BE SURE to replace the fuse only with an identical approved type, as originally fitted.
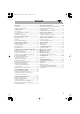
HX-GD8.book Page 1 Friday, March 19, 2004 11:27 AM Contents Introduction ............................................................ 2 Advanced Disc Operations ...................................28 Precautions ..........................................................................2 How to Read This Manual ..................................................2 Programming the Playing Order—Program Play..............28 Playing at Random—Random Play...................................29 Playing Repeatedly.
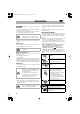
HX-GD8.book Page 2 Friday, March 19, 2004 11:27 AM Introduction Precautions Installation • Install in a place which is level, dry and neither too hot nor too cold—between 5°C and 35°C. • Install the System in a location with adequate ventilation to prevent internal heat buildup in the System. DO NOT install the System in a location near heat sources, or in a place subject to direct sunlight, excessive dust or vibration. • Leave sufficient distance between the System and the TV.
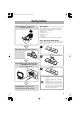
Intro.fm Page 3 Tuesday, March 30, 2004 2:00 PM Getting Started Step 1:Unpack the package and check the accessories. Step 1: Unpack After unpacking, check to be sure that you have all the following items. The number in parentheses indicates the quantity of each piece supplied. • FM antenna (1) • AM loop antenna (1) • Remote control (1) • Batteries (2) • Core filter (1) If any item is missing, consult your dealer immediately.
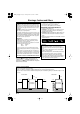
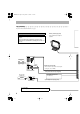
HX-GD8.book Page 4 Friday, March 19, 2004 11:27 AM Step 3: Hook Up If you need more detailed information, see page 6. Turn the power off to all components before connections. AM loop antenna (supplied) Turn it until the best reception is obtained. Illustrations of the input/output terminals below are typical examples. When you connect other components, refer also to their manuals since the terminal names actually printed on the rear may vary.
HX-GD8.book Page 5 Friday, March 19, 2004 11:27 AM For better FM/AM reception AM loop antenna Keep it connected. * This illustration uses SP-HXGD7 as speakers. Vinyl-covered wire (not supplied) Outdoor FM antenna (not supplied) Extend it horizontally. Disconnect the supplied FM antenna, and connect to an outdoor FM antenna using a 75 Ω wire with coaxial type connector (IEC or DIN45325). FM antenna (supplied) Extend it so that you can obtain the best reception.
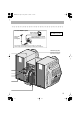
HX-GD8.book Page 6 Friday, March 19, 2004 11:27 AM To assemble and connect the AM loop antenna To connect the speaker cords To assemble the AM loop antenna 1 Hold 3 Release 2 Insert From right speaker From left speaker From right Subwoofer From left Subwoofer • When connecting the speaker cords, match the polarity of the speaker terminals: (+) to (+) and (–) to (–).
HX-GD8.book Page 7 Friday, March 19, 2004 11:27 AM To connect digital audio Selecting the Video Signal OPT DIGICAL OUTITAL PUT When connecting a TV, you can use either one of the video output terminals—COMPONENT or AV OUT. After connecting the TV, set the video signal type correctly for your TV. • Make sure the unit is not yet turned on. If it is already turned on, turn off then on again so that the selector setting becomes active.
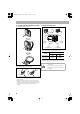
HX-GD8.book Page 8 Friday, March 19, 2004 11:27 AM Before Operating the System Playable Disc Types INFO This unit has been designed to play back the following discs: Disc Type Mark (Logo) DVD Video DVD Audio Video CD (VCD) Super Video CD (SVCD) Audio CD COMPACT DIGITAL AUDIO CD-R CD-RW DVD-R DVD-RW The System can play back CD-R or CD-RW recorded in the Audio CD, Video CD, SVCD, MP3, WMA, and JPEG formats. The System can play back DVD-R or DVDRW recorded in the video format.
HX-GD8.book Page 9 Friday, March 19, 2004 11:27 AM Parts Index Refer to the pages to see how to use the buttons and controls. Remote control DISC1 DISC2 DISC4 DISC5 DISC3 12 46 21 20 28, 29 23, 26 30 15 19, 22 15, 27, 29, 32, 33, 40, 44 – 46 32 13 – 15, 26, 28, 29, 33, 34, 44 – 46 PAGE 19, 22 27 22, 25 15 22, 23, 26 SET UP 40, 41, 44 REV.
HX-GD8.book Page 10 Friday, March 19, 2004 11:27 AM About the Display Indication The indications on the display teach you a lot of things while you are operating the System. Before operating the System, be familiar with when and how the indicator illuminates on the display. 1 2 3 4 5 TITLE GROUP CHAP. 6 7 TRACK SURROUND DVD AUDIO w LPCM e r D DTS t 8 RDS TA 9 NEWS INFO DVD LEVEL 123 REC MPEG PRGR. B.S.P.
HX-GD8.book Page 11 Friday, March 19, 2004 11:27 AM 1 BEEP ON indicator • Lights when key-touch tone is activated. 2 File type indicators • MP3: lights while playing back an MP3 track. • WMA: lights while playing back a WMA track. • JPEG: lights while playing back a JPEG file. 3 TITLE indicator • Lights to indicate the title number when the source is DVD Video. • Lights to indicate the group title or track title when the source is an MP3/WMA disc.
HX-GD8.book Page 12 Friday, March 19, 2004 11:27 AM Daily Operations—Playback In this manual, the operation using the remote control is mainly explained; however, you can use the buttons and controls on the main unit if they have the same (or similar) name and marks. ¥ Turn on the power. The STANDBY lamp on the main unit goes off. • Without pressing (STANDBY/ON), the System also turns on by pressing one of the source select buttons in the next step. ø Select the source.
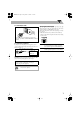
HX-GD8.book Page 13 Friday, March 19, 2004 11:27 AM Listening to the Radio INFO Main Unit ONLY To preset Stations To select the band (FM/AM) You can preset 30 FM and 15 AM stations. FM 1 Tune in to a station you want to preset, then enter into AM the presetting mode. SET /DISPLAY To tune in to a station While FM or AM is selected... 2 Select a preset number for the station you store. 1 sec. PRESET Increases the frequency. Decreases the frequency.
HX-GD8.book Page 14 Friday, March 19, 2004 11:27 AM Playing Back a Disc INFO Before operating a disc, be familiar how a disc is recorded. • DVD Video comprises of “Titles” which includes “Chapters,” DVD Audio/MP3/WMA comprise of “Groups” which includes “Tracks,” and CD/SVCD/VCD comprise of only “Tracks.” For JPEG playback, see “Operations on the CONTROL Screen” on page 34.
HX-GD8.book Page 15 Friday, March 19, 2004 11:27 AM To select an item directly Remote ONLY You can select a title/chapter/track directly and start playback. For DVD Video, you can select a title before starting playback, while you can select a chapter after starting playback. 7 For SVCD/VCD with PBC: While playing a disc with PBC, “PBC” appears on the display. When disc menu appears on the TV screen, select an item on the menu. Playback of the selected item starts. Examples: To select number 5, press 5.
HX-GD8.book Page 16 Friday, March 19, 2004 11:27 AM To reverse the tape automatically Playing Back a Tape To insert a tape REV.MODE You can play back type I tapes. • The use of C-120 or longer tape is not recommended. Push (holding then...) • You can also use REVERSE MODE button on the unit. Tape is automatically reversed, and playback repeats until you stop it. Tape will not be reversed. When the current side of the tape reaches its end, playback stops.
HX-GD8.book Page 17 Friday, March 19, 2004 11:27 AM Daily Operations—Sound&Other Adjustments Adjusting the Volume Remote Control INFO The volume level can be adjusted in 32 steps (VOLUME MIN, VOLUME 1 – VOLUME 30, VOLUME MAX). Remote control: Main unit: VOLUME SLEEP DIMMER PROGRESSIVE VFP 3/2/5/∞ ENTER 3D PHONIC SUBWFR LEVEL +/DVD LEVEL To drop the volume in a moment SOUND MODE BEEP ON/OFF RHYTHM AX FADE MUTING VOLUME -/+ Remote ONLY To restore the volume, press again, or adjust the volume level.
HX-GD8.book Page 18 Friday, March 19, 2004 11:27 AM Selecting the Sound Modes INFO You can select one of the preset Sound Modes. • If you want to add surround elements into your Sound Mode, select one of the Surround modes. 2 Enter into the SEA Control Mode. • You can enter the SEA Control Mode only while the Sound Mode appears on the display. Remote control: SET /DISPLAY Main unit: UND MODE SO 3 Adjust the SEA pattern. 1 Select one of the tone—BASS or TRE.
HX-GD8.book Page 19 Friday, March 19, 2004 11:27 AM Selecting 3D PHONIC Mode INFO While playing... 3D ACTION 3D OFF 3D PHONIC 3D DRAMA 3D THEATER Changing the Scanning Mode INFO This System supports progressive scanning. If you connect a progressive TV through the COMPONENT jacks, you can enjoy a high quality picture from the built-in DVD player by selecting “PROGRESSIV.” PROGRESSIV ACTION INTERLACE On the TV screen 3D ACTION Suitable for action movies and sports programs.
HX-GD8.book Page 20 Friday, March 19, 2004 11:27 AM To adjust the picture tone 1 Select “USER1” or “USER2.” 2 • Follow steps 1 and 2 explained on page 19. Select a parameter you want to adjust. Turning On or Off the Key-Touch Tone Main unit: Remote control: BEEP OFF 2 sec. GAMMA Adjust if the neutral color is bright or dark. The brightness of dark and bright portions is maintained (–3 to +3).
HX-GD8.book Page 21 Friday, March 19, 2004 11:27 AM Setting the Clock Main Unit ONLY INFO Turning Off the Power Remote ONLY Automatically Without setting the build-in clock, you cannot use Daily/ Recording Timers (see page 38) and Sleep Timer (see next column). • To exit from the clock setting, press CLOCK/TIMER as required. • To go back to the previous step, press CANCEL/DEMO. 1 Activate clock setting mode. INFO With Sleep Timer, you can fall asleep listening to music.
HX-GD8.book Page 22 Friday, March 19, 2004 11:27 AM Advanced Radio Operations To show the RDS information While listening to an FM station... Remote control DISP.MODE PROGRESSIVE PS Frequency PTY RT (Non-RDS signal) (holding then...) DISP.MODE PS Station names is displayed. “NO PS” will appear if no signal is sent. PTY The broadcast program type is displayed. “NO PTY” will appear if no signal is sent. RT Text messages the station sends is displayed. “NO RT” will appear if no signal is sent.
HX-GD8.book Page 23 Friday, March 19, 2004 11:27 AM 3 Start searching. PTY SEARCH SUB TITLE (holding then...) TA Traffic announcement in your area NEWS News INFO Program the purpose of which is to impart advice in the widest sense OFF The function is canceled. The PTY code indicator (TA/NEWS/INFO) goes off. ST How the Enhanced Other Networks function actually works: ST CASE 1 Ex.
HX-GD8.book Page 24 Friday, March 19, 2004 11:27 AM Description of the PTY codes NEWS News. PHONE IN AFFAIRS Topical program expanding or enlarging upon the news—debate, or analysis. Involving members of the public expressing their views either by phone or at a public forum. TRAVEL Travel information. LEISURE Programs about recreational activities. JAZZ Jazz music. COUNTRY Songs which originate from, or continue the musical tradition of the American Southern States.
HX-GD8.book Page 25 Friday, March 19, 2004 11:27 AM Unique DVD/VCD Operations 10 Keys Remote ONLY Selecting the Sound Track Remote Control PAGE ANGLE ZOOM AUDIO SUB TITLE INFO For DVD Video: While playing back a chapter containing audio languages, you can select the language to listen to. For DVD Audio: While playing back a track containing audio channels, you can select the audio channel to listen to. For SVCD/VCD: When playing back a track, you can select the audio channel to play.
HX-GD8.book Page 26 Friday, March 19, 2004 11:27 AM Remote ONLY Selecting the Subtitle Language For DVD Video: While playing back a chapter (of DVD Video) containing subtitles in different languages, you can select the subtitle language to display on the TV screen. For SVCD: While playing, you can select the subtitles even if no subtitles are recorded on the disc. • You can also select the subtitle language using the onscreen bar (see page 31).
HX-GD8.book Page 27 Friday, March 19, 2004 11:27 AM Playing Back a Bonus Group Slow-motion playback Remote ONLY on a DVD Audio INFO Some DVD Audios have a special group called “bonus group” whose contents are not open to the public. • To play back a bonus group, you have to enter the specific “key number” (a kind of password) for the bonus group. The way of getting the key number depends on the disc. 1 While playing... Still picture playback starts. 2 Select slow motion speed.
HX-GD8.book Page 28 Friday, March 19, 2004 11:27 AM Advanced Disc Operations Programming the Playing Order Remote Control Remote ONLY —Program Play INFO You can arrange the playing order of the tracks (up to 99) before you start playback. 1 Before starting playback, activate Program Play. 10 Keys CANCEL PROGRAM RANDOM Canceled PLAY MODE REPEAT 5/∞ 4/¢ DVD/CD 3 7,8 On the display PROGRAM No 1 2 3 4 5 6 7 8 9 10 SHIFT Disc Group/Title Track/Chapter USE NUMERIC KEYS TO PROGRAM TRACKS.
HX-GD8.book Page 29 Friday, March 19, 2004 11:27 AM To skip a track: To pause: To stop: Playing at Random Remote ONLY —Random Play INFO You can play the contents of all tracks at random. 1 Before starting playback, activate Random Play. To release, press DVD/ CD 3. To check the programmed contents PROGRAM RANDOM Canceled Remote ONLY Before or after playback... in the reverse order 2 Start playback. Playback starts in a random order. Random Play ends when all chapters/tracks are played.
HX-GD8.book Page 30 Friday, March 19, 2004 11:27 AM Remote ONLY Playing Repeatedly • You can also select the repeat mode using the on-screen bar (see page 32). CHAP Repeats the current chapter. TITLE Repeats the current title. ALL Repeats all discs or all programmed tracks. Repeat Play TRACK Repeats the current track. You can repeat playback. GROUP Repeats the current group. • For DVD Video: While playing... DISC Repeats the current disc. STEP Repeats the current track.
HX-GD8.book Page 31 Friday, March 19, 2004 11:27 AM On-Screen Disc Operations About the On-screen Bar Remote control You can check the information on disc (except for MP3/ WMA/JPEG disc) and use some functions through the onscreen bar. 10 keys On-screen bar Ex.: While playing a DVD Video ZOOM 1 2 3 REPEAT DVD-VIDEO 8.5Mbps TIME TIME 3/2/5/∞ ENTER OFF OFF ON SCREEN DVD/CD 3 8 7 CHAP 3 GROUP 1 TRACK 14 TOTAL 1:25:58 1 2 3 DVD-VIDEO 8.
HX-GD8.book Page 32 Friday, March 19, 2004 11:27 AM Changing the time information Remote ONLY Operations Using the On-screen Bar INFO Basic operation procedure through the on-screen bar is as follows: Ex.: Selecting a subtitle (French) for DVD Video While a disc is selected as the source... 1 Display the on-screen bar with the pull-down menu. DVD-VIDEO 8.5Mbps DVD-VIDEO 8.5Mbps TIME TIME OFF OFF You can change the time information in the on-screen bar and the display window on the main unit.
HX-GD8.book Page 33 Friday, March 19, 2004 11:27 AM Time Search 5 Finish the setting. You can move to a particular point by specifying the elapsed playing time from the beginning. Pop-up window goes off. 1 While playing (without PBC for SVCD/VCD), display the on-screen bar with the pull-down menu. • Except for DVD: Time Search can be used before starting playback. 2 Select . 3 Display the pop-up window. To cancel Repeat Play, select “OFF” in step 4. To erase the on-screen bar DVD-VIDEO 8.
HX-GD8.book Page 34 Friday, March 19, 2004 11:27 AM Chapter/Track Search You can search for the chapter (DVD Video) or track (DVD Audio) number to play. 1 While playing, display the on-screen bar with the pulldown menu. 2 Select CHAP. or TRACK . 3 Display the pop-up window. DVD-VIDEO 8.5Mbps TOTAL 1:25:58 1:01:58 CHAP233 TOTAL DISC TITLE 2 TITLE 14 2CHAP TIME TIME CHAP. OFF OFF 1/3 1/3 CHAPTER 1/1/3 3 Examples: To select chapter/track 5, press 5. To select chapter/track 15, press 1, then 5.
HX-GD8.book Page 35 Friday, March 19, 2004 11:27 AM To move the highlight bar between group list and track list To repeat slide-show for JPEG Before starting playback... Moves the bar to the track list. Moves the bar to the group list. To select a group/track in the list Move the highlight bar to a desired item. • If you move the highlight bar while playing back an MP3/ WMA disc, the selected track starts playback automatically.
HX-GD8.book Page 36 Friday, March 19, 2004 11:27 AM Advanced Tape Operations IMPORTANT It may be unlawful to record or play back copyrighted material without the consent of the copyright owner. Remote Control Recording on a Tape INFO You can use type I tapes for recording. • To play a tape, see page 16. 1 Insert a recordable cassette. REV.MODE, TAPE 2 3 REC START/STOP Push Insert Close 7 2 Check the tape running direction and Reverse Mode settings on the display.
HX-GD8.book Page 37 Friday, March 19, 2004 11:27 AM 3 Start playing the source—“FM,” “AM,” “DVD/CD,” or “AUX.” • When recording a disc, you can also use “Synchronized Disc Recording” (see the next column). 4 Start recording. DISC REC START The System automatically creates 4-second blanks between the tunes recorded on the tapes. 4 Start recording. 1 sec. REC START/STOP • When either disc play or recording ends, both disc player and the cassette deck stop at the same time. To stop recording 1 sec.
HX-GD8.book Page 38 Friday, March 19, 2004 11:27 AM Timer Operations Setting the Timer Main unit 4/¢ CLOCK /TIMER SET /DISPLAY CANCEL /DEMO INFO Main Unit ONLY Using Daily Timer, you can wake up with your favorite song. On the other hand, with Recording Timer, you can make a tape of a radio broadcast automatically. • To correct a misentry during the process, press CANCEL/DEMO. You can return to the previous step.
HX-GD8.book Page 39 Friday, March 19, 2004 11:27 AM 5 For Daily Timers: • You can select the volume level (“VOLUME 5,” “VOLUME 10,” “VOLUME 15” and “VOLUME --”). If you select “VOLUME --,” the volume is set to the last level when the system has been turned off. To turn off the Timer after its setting is done You can turn off the timer after it has been set. • Since Daily Timer is activated at the same time everyday, you may need to cancel it on some particular days.
HX-GD8.book Page 40 Friday, March 19, 2004 11:27 AM Set up Menu Operations Operating Procedure Remote control Remote ONLY You can use the Set up Menus only when a disc is selected as the source and its playback is not yet started. Ex.: Selecting “STILL PICTURE” for “FILE TYPE”: 10 keys 1 Show the set up menu. LANGUAGE 3/2/5/∞ ENTER SET UP MENU LANGUAGE ENGLISH AUDIO LANGUAGE ENGLISH SUBTITLE ENGLISH ON SCREEN LANGUAGE ENGLISH SELECT ENTER USE TO SELECT.
HX-GD8.book Page 41 Friday, March 19, 2004 11:27 AM 7 Repeat steps 3 to 4 to set other items on the same Set up Menu. Repeat steps 2 to 4 to set other items on another Set up Menu. 7 PICTURE Set up Menu INFO You can select the desired options concerning a picture or monitor screen. PICTURE To finish the Set up Menu MONITOR TYPE 4:3 LB PICTURE SOURCE AUTO SCREEN SAVER ON FILE TYPE AUDIO SELECT ENTER 7 LANGUAGE Set up Menu INFO You can select the initial languages for disc playback.
HX-GD8.book Page 42 Friday, March 19, 2004 11:27 AM PICTURE SOURCE 7 AUDIO Set up Menu You can obtain optimal picture quality by selecting an appropriate option—picture source type (either video source or film source). You can adjust the sound settings of the System. INFO AUDIO Select one of the following: AUTO: Normally select this.
HX-GD8.book Page 43 Friday, March 19, 2004 11:27 AM D. RANGE COMPRESSION AV COMPULINK MODE You can compress the dynamic range (the difference between the loudest sound and the softest sound) to enjoy a powerful sound even at a low volume level when listening to Dolby Digital software. This is useful at night. • The effectiveness varies depends on a software. This function is equipped for future use. • Keep this setting to the initial setting (DVD1) for this System.
HX-GD8.book Page 44 Friday, March 19, 2004 11:27 AM 5 Select “COUNTRY CODE,” then display the pop-up Restricting the Review —Parental Lock window. Remote ONLY PARENTAL LOCK You can restrict playback of DVD Video containing violent scenes and those unsuitable for your family members. Once you have set the rating level, such violent scenes (for which a higher level than you set is assigned) may be skipped or changed to another scene (depending on how the disc is programmed).
HX-GD8.book Page 45 Friday, March 19, 2004 11:27 AM To change the setting To release Parental Lock temporarily 1 Display the PARENTAL LOCK sub menu. When you set a strict rating level, some discs may not be played back at all. When you try to play such a disc, the following screen appears on the TV screen. • Follow steps 1 to 4 of “To set Parental Lock” .
HX-GD8.book Page 46 Friday, March 19, 2004 11:27 AM Operating the TV Operating TV Remote control Remote ONLY You can operate the JVC’s or other manufacturers’ TV using this remote control. 1 Keep pressing the button until the following steps are complete. 10 Keys TV 2 Enter the code setting mode. TV/VIDEO ENTER TV CHANNEL -/+ 3 Enter the 2-digit manufacture’s code number. TV VOLUME -/+ SHIFT 4 Release TV .
HX-GD8.book Page 47 Friday, March 19, 2004 11:27 AM Additional Information Learning More about This System Before Operating the System (see pages 8 to 11) Playable Disc Types: • About audio format – Linear PCM: Uncompressed digital audio, the same format used for CDs and most studio masters. – Dolby Digital: Compressed digital audio, developed by Dolby Laboratories, which enables multi-channel encode to create the realistic surround sound.
HX-GD8.book Page 48 Friday, March 19, 2004 11:27 AM Setting the Clock: • “0:00” will flash on the display until you set the clock. • The clock may gain or lose 1 to 2 minutes per month. If this happens, reset the clock. Turning Off the Power Automatically: • If you turn off the System, Sleep Timer is canceled. Advanced Radio Operations (see pages 22 to 24) Receiving FM Stations with RDS: • If the System takes time to show the RDS information— PS, PTY, RT signals, “WAIT” will appear while searching.
HX-GD8.book Page 49 Friday, March 19, 2004 11:27 AM Timer Operations (see pages 38 to 39) Setting the Timer: • If you do not specify the preset station or track number correctly while setting a timer, the currently selected station or the first track will be played when timer is activated. • When you unplug the AC power cord or if a power failure occurs, the timer will be canceled. You need to set the clock first, then the timer again.
HX-GD8.book Page 50 Friday, March 19, 2004 11:27 AM Troubleshooting If you are having a problem with your System, check this list for a possible solution before calling for service. General: Adjustments or settings are suddenly canceled before you finish. ] There is a time limit. Repeat procedure again. Operations are disabled. ] The built-in microprocessor may malfunction due to external electrical interference. Unplug the AC power cord and then plug it back in.
HX-GD8.book Page 51 Friday, March 19, 2004 11:27 AM Maintenance To get the best performance of the System, keep your discs, tapes, and mechanism clean. Handling discs • Remove the disc from its case by holding it at the edge while pressing the center hole lightly. • Do not touch the shiny surface of the disc, or bend the disc. • Put the disc back in its case after use to prevent warping. • Be careful not to scratch the surface of the disc when placing it back in its case.
HX-GD8.
HX-GD8.
HX-GD8.
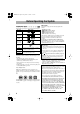
INDEX&SPEC.fm Page 55 Monday, March 22, 2004 8:59 PM Specifications CA-HXGD7 Cassette deck section Amplifier section Frequency response Normal (type I): Wow and flutter: Output Power: SUBWOOFERS: MAIN SPEAKERS: 100 W per channel, min. RMS, driven into 6 Ω at 63 Hz with no more than 10% total harmonic distortion. 40 W per channel, min. RMS, driven into 6 Ω at 1 kHz with no more than 10% total harmonic distortion.
INDEX&SPEC.fm Page 56 Monday, March 22, 2004 8:59 PM CA-HXGD8 Amplifier section Cassette deck section Output Power: SUBWOOFERS: Frequency response Normal (type I): Wow and flutter: MAIN SPEAKERS: 140 W per channel, min. RMS, driven into 6 Ω at 63 Hz with no more than 10% total harmonic distortion. 60 W per channel, min. RMS, driven into 6 Ω at 1 kHz with no more than 10% total harmonic distortion.
Safty[B2].fm Page 2 Tuesday, March 16, 2004 11:09 PM SAFETY INSTRUCTIONS “SOME DOS AND DON’TS ON THE SAFE USE OF EQUIPMENT” This equipment has been designed and manufactured to meet international safety standards but, like any electrical equipment, care must be taken if you are to obtain the best results and safety is to be assured. ✮✮✮✮✮✮✮✮✮✮✮✮✮✮✮✮✮✮✮✮✮✮✮✮✮✮✮✮✮✮✮✮✮✮✮✮✮✮✮✮✮✮✮✮✮✮✮ Do read the operating instructions before you attempt to use the equipment.
00-00_Cover[B].