Still having trouble?? USA ONLY Call 1-800-252-5722 ENGLISH RECEPTOR DVD CON MONITOR KW-ADV792/KW-AVX720 ESPAÑOL DVD RECEIVER WITH MONITOR Refer to page of How to reset your unit KW-ADV792/KW-AVX720 RÉCEPTEUR DVD ET MONITEUR KW-ADV792/KW-AVX720 FRANÇAIS Instructions Having TROUBLE with operation? Please reset your unit DVD RECEIVER WITH MONITOR http://www.jvc.com We can help you! CoverRear_KW-ADV792[J]f.
ENGLISH Thank you for purchasing a JVC product. Please read all instructions carefully before operation, to ensure your complete understanding and to obtain the best possible performance from the unit. INFORMATION (For U.S.A.) This equipment has been tested and found to comply with the limits for a Class B digital device, pursuant to Part 15 of the FCC Rules. These limits are designed to provide reasonable protection against harmful interference in a residential installation.
How to read this manual This product has a fluorescent lamp that contains mercury. Disposal of these materials may be regulated in your community due to environmental considerations. For disposal or recycling information, please contact your local authorities or for USA, the Electronic Industries Alliance: • < > is used to indicate the variable screens/ menus/operations/settings that appear on the touch panel. • [ ] is used to indicate the buttons on the touch panel.
ENGLISH Playable disc type Disc type DVD • DTS sound cannot be reproduced.
How to read this manual .............................. How to reset your unit ................................. How to forcibly eject a disc........................... Playable disc type ........................................ 3 3 3 4 INTRODUCTIONS Basic operations ................................................. • Using the monitor panel/touch panel ......... • Using the remote controller (RM-RK252).... 6 6 9 Preparation ..................................................
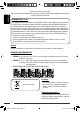
ENGLISH Basic operations Using the monitor panel/touch panel Display screen, ( USB cable from the rear of the unit, ( 13) Display the screen, ( 37) 7) Display/exit the Short Cut icons, ( 8) SOURCE CD 01 MP3 FLAT 3:00 AM 5 6 0:02:26 Folder Name File Name Track Title Artist Name Disc Title 1 Resets the unit ( 3). 2 • Turns on the power. 3 4 01 • Attenuates the sound (if the power is on). • Turns off the power. (Hold) Changes the display information.
[Open] : Opens the monitor panel. [Eject] : Ejects the disc. [Close] : Closes the monitor panel. [Tilt +] : Tilts open the monitor panel. [Tilt –] : Tilts close the monitor panel. • Ejects the disc and display screen. (Hold) • Closes the monitor panel when the panel is opened. w Monitor panel *1 Available display information varies among the playback sources. ( 53) *2 This adjustment does not affect the volume level of other sources.
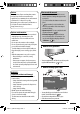
ENGLISH Short Cut icons You can easily access some frequently used functions by using the Short Cut icons. Available icons vary among the sources. SOURCE TUNER FM1 1 87. 5 MHz Displays menu. ABC Radio FLAT ST ( 18) Changes the sound mode. ( 3:00 19) AM BAND Short Cut window appears. • To exit from the window, press the button again. Turns on or off Track/Chapter Repeat. ( 22) Displays menu. ( 15) SOURCE TUNER FM1 1 Activates function. 87.
Using the remote controller (RM-RK252) ENGLISH Installing the batteries R03/LR03/AAA Insert the batteries into the remote controller by matching the polarity (+ and –) correctly. Caution: • Danger of explosion if battery is incorrectly replaced. Replace only with the same or equivalent type. • Battery shall not be exposed to excessive heat such as sunshine, fire, or the like. If the effectiveness of the remote controller decreases, replace the batteries.
ENGLISH • DISC/USB: – DVD-Video: Selects the title. – DVD-VR: Selects the program/Playlist. – USB/CD-CH/MP3/WMA/WAV: Selects the folders if included. • iPod: – 5 : Enters the main menu (then 5 / ∞ / 4 / ¢ work as menu selecting buttons.) 5 : Returns to the previous menu. ∞ : Confirms the selection. – ∞ : Pauses or resumes playback. 4 / ¢ buttons • TUNER/HD Radio: – Searches for stations automatically if pressed briefly. – Searches for stations manually if pressed and held.
• Selects the source. e 3 (play) / 8 (pause) button • DISC/USB/ iPod: Starts playback/pauses. • Bluetooth PHONE: Answers incoming calls. • Bluetooth AUDIO: Starts playback. r (end call) button • Bluetooth PHONE: Ends the call. BAND button • TUNER/HD Radio/SAT: Selects the bands. 7 (stop) button • DISC/USB/ iPod: Stops playback. • Bluetooth AUDIO: Pauses. t * RETURN button • VCD: Returns to the PBC menu.
ENGLISH Preparation Canceling the display demonstration and setting the clock ~ Turn on the power. @ Set the clock. Setup Demonstration Wall Paper Color Scroll Dimmer Ÿ Display screen. Bright Blue Once Auto 6 PM Dimmer Time Set Auto 7 AM Back Setup or BAND ! Display screen.
You can use the for most of the operations and settings. The available menu items shown on the touch panel, depends on the selected source. • Non-available items will be shaded. The following steps are one of the fundamental procedures. • You can perform the operations/change the settings by following these steps unless mentioned otherwise. ! Press the desired icon/item to perform the desired operations/settings.
ENGLISH Initial: Underlined Menu item Demonstration Wall Paper Selectable setting/item ♦ Off ♦ On : Cancels. : Activates the demonstration on the screen. To stop it temporarily, touch the screen. ( 12) You can select the background picture of the screen. ♦ Bright, Future, Horizon, Plain You can select the color of the background picture. ♦ Blue, Light-Blue, Red, Orange, Yellow, Green, Purple, Dark-Blue, Dark-Green, Brown, Light-Brown, Black Scroll ♦ Off ♦ Once ♦ Auto : Cancels.
Menu item You can change the aspect ratio of the picture. ENGLISH Aspect *3 Selectable setting/item Aspect ratio of the incoming signal 4:3 16:9 Regular: For 4:3 original pictures Full: For 16:9 original pictures Display Panorama: For viewing 4:3 pictures naturally on the wide screen Auto: • For “DISC”: Aspect ratio is automatically selected to match the incoming signals. • For the other video sources: Aspect ratio is fixed to .
ENGLISH Menu item Selectable setting/item Menu Language *7 Select the menu language; Initial English ( 54) 7 Select the audio language; Initial English ( 54) Audio Language * Subtitle *7 Select the subtitle language or erase the subtitle .; Initial Off ( 54) Monitor Type *7 16:9 4:3PS 4:3LB Select the monitor type to watch a wide screen picture on the external monitor. ♦ 16:9 : Select when the aspect ratio of the external monitor is 16:9.
Disc Selectable setting/item Down Mix *9 When playing back a multi-channel disc, this setting affects the signals reproduced through the LINE OUT jacks. ♦ Dolby Surr. : Select this to enjoy multi-channel surround audio by connecting an amplifier compatible with Dolby Surround. ♦ Stereo : Normally select this. D. (Dynamic) Range Compres. (Compression) *9 You can enjoy a powerful sound at a low volume level while playing Dolby Digital software.
Input ENGLISH Menu item Selectable setting/item External Input *13, *14 For connecting an external component to the CD changer jack on the rear. ♦ Changer/iPod *15 : CD changer, ( 41), iPod, ( 45). ♦ External : Any other than the above, ( 48). Beep ♦ Off ♦ On : Cancels. : Activates the key-touch tone. Telephone Muting *16 ♦ Off ♦ Muting1, : Cancels. : Select either one which mutes the sounds while using the cellular phone.
1 2 ENGLISH Selects a preset sound mode suitable to the music genre. ♦ Flat (Initial), Hard Rock, R&B, Pop, Jazz, Dance, Country, Reggae, Classic, User1, User2, User3 Adjust the settings, then store. Equalizer Display screen. Back Edit or Make adjustments by moving each bar directly. BAND User Store 2 User1 User2 User3 Display screen. AV Menu Back Ex.: When storing into Preset equalizing values Flat Back Edit Moves to the other 6 sound modes. Ex.
ENGLISH Initial: Underlined Menu item Fader/Balance Selectable setting/item Fader : Adjust the front and rear speaker output balance. • When using a two-speaker system, set the fader level to “0.” ♦ F6 to R6; Initial 0 Balance : Adjust the left and right speaker output balance. ♦ L6 to R6; Initial 0 Press [ 5/∞/2/3 ] to adjust.
ENGLISH Initial: Underlined Selectable items when the source is: • TUNER : Mono, SSM, Title Entry • HD Radio : Mono, SSM, DX/Local, Blend Hold • DISC, USB, CD-CH, iPod : Repeat, Random • iPod *1 : Repeat, Random, Audiobooks • AV-IN, EXT-IN : Title Entry Menu item 2 Mono * DX/Local Selectable setting/item When an FM stereo broadcast is hard to receive, activate monaural mode for better reception. The MONO indicator lights up.
ENGLISH Menu item Title Entry *5 Selectable setting/item You can assign titles (up to 16 characters) to 30 station frequencies (FM and AM), AV-IN, and EXT-IN. (For available characters, 52.) Press [Enter] to show the
screen. @ ; / Back [Store] [2/3] [BS] [Del] [Cap] [A = 0 = Ä] [Space] Repeat *6 : : : : : : : Confirm the entry. Move the cursor. Erase the character before the cursor. Erase the character on the cursor. Change the letter case (upper/lower). Change the character set.</p></li><li><h6><a class="text-decoration-none text-link fw-bold" href=/manual/jvc/get0602-001a/dvd-receiver-with-monitor-instruction-manual/page-23.html>PAGE 23</a></h6><p>Random *7 Selectable setting/item Available items depend on the loaded disc type and playback file. DISC Source USB CD-CH iPod *8 iPod Disc/file type Random MPEG/MP3/ WMA/WAV VCD/CD MPEG/MP3/ WMA/WAV CD — MP3 — ENGLISH Menu item Folder Disc/USB (All) All Song Album Off ♦ Folder : Randomly plays all tracks of the current folder, then tracks of the next folders. ♦ Disc/USB (All) : Randomly plays all tracks. (For VCD: When PBC is not in used.</p></li><li><h6><a class="text-decoration-none text-link fw-bold" href=/manual/jvc/get0602-001a/dvd-receiver-with-monitor-instruction-manual/page-24.html>PAGE 24</a></h6><p>ENGLISH Source TUNER/ HD Radio Operation/setting • Storing a preset station manually 1 Press [BAND], then [ / ] to tune in to the station you want to preset. 2 Select <list> from the <av menu>. 3 Press and hold a preset number. List FM1 FM2 FM3 The station selected in step 1 is now stored in preset number 4. Back • Selecting a preset station on the list List FM1 FM2 FM3 Back SAT • Storing a preset channel manually 1 Press [BAND], then [5 CATEGORY / ∞ CATEGORY], then [ channel you want to preset.</p></li><li><h6><a class="text-decoration-none text-link fw-bold" href=/manual/jvc/get0602-001a/dvd-receiver-with-monitor-instruction-manual/page-25.html>PAGE 25</a></h6><p>DISC/USB Operation/setting Selecting a track on the list If the device contains folders, you can display the Folder/Track (File) Lists, then start playback. 0005/0035 List 0003/0099 Folder 01 Folder 02 Folder 03 Folder 04 Folder 05 Folder 06 Track001.mp3 Track002.mp3 Track003.mp3 Track004.mp3 Track005.mp3 Track006.</p></li><li><h6><a class="text-decoration-none text-link fw-bold" href=/manual/jvc/get0602-001a/dvd-receiver-with-monitor-instruction-manual/page-26.html>PAGE 26</a></h6><p>ENGLISH Select “Bluetooth PHONE” or “Bluetooth AUDIO” as the source for operations. • Firstly, use <open> or <search> to register and establish the connection with a device. Menu item Dial Menu *1 Selectable setting/item Select the method to make a call. ♦ Redial : Shows the list of the phone numbers you have dialed. ♦ Received Calls : Shows the list of the received calls. ♦ Phonebook : Shows the phone book of the connected cellular phone. ♦ Missed Calls : Shows the list of the missed calls.</p></li><li><h6><a class="text-decoration-none text-link fw-bold" href=/manual/jvc/get0602-001a/dvd-receiver-with-monitor-instruction-manual/page-27.html>PAGE 27</a></h6><p>Menu item Preparation: • Operate the Bluetooth device to turn on its Bluetooth function. • Make sure “NEW DEVICE” is selected. If not, press [ 5 ] or [ ∞ ] to select it. ENGLISH Open Selectable setting/item 1 Press <open> on the <bluetooth> menu. 2 Enter a PIN (Personal Identification Number) *3. • You can enter any number you like (1-digit to 16-digit number). PIN Code Back You can enter [0] – [9] only. [BS] : Erases the character before the cursor. [Del] : Erases the character on the cursor.</p></li><li><h6><a class="text-decoration-none text-link fw-bold" href=/manual/jvc/get0602-001a/dvd-receiver-with-monitor-instruction-manual/page-28.html>PAGE 28</a></h6><p>ENGLISH Menu item Selectable setting/item Special Device Only for “NEW DEVICE.” Select a device you want to connect from the list of Bluetooth devices which require some special procedure to establish the Bluetooth connection. Then, use <open> or <search> to connect. • Once the connection is established, it is registered in the unit. You can connect the unit and the device by using <connect> the next time. Connect Only for the registered devices.</p></li><li><h6><a class="text-decoration-none text-link fw-bold" href=/manual/jvc/get0602-001a/dvd-receiver-with-monitor-instruction-manual/page-29.html>PAGE 29</a></h6><p>ENGLISH Listening to the radio Preset number SOURCE TUNER Band Sound mode FM1 1 87. 5 MHz Assigned station name ABC Radio FLAT ST ( 3:00 22) • If no name is assigned, “No Name” appears. Tuner indicator AM BAND ~ Press [SOURCE], then press [TUNER]. Ÿ Press [BAND]. ! Press [ ] or [ ] to search for a station—Auto Search. • Manual Search: Hold either [ ]or [ ] until “Manual Search” appears on the screen, then press it repeatedly.</p></li><li><h6><a class="text-decoration-none text-link fw-bold" href=/manual/jvc/get0602-001a/dvd-receiver-with-monitor-instruction-manual/page-30.html>PAGE 30</a></h6><p>ENGLISH Disc operations The disc type is automatically detected, then playback starts (for some discs, the top menu of the disc appears). If a disc does not have any disc menu, all tracks on it will be played repeatedly until you change the source or eject the disc. If “ ” appears on the screen, the unit cannot accept the operation you have tried to do. • In some cases, without showing “ ,” operations will not be accepted. ~ Open the monitor panel. ! Insert a disc.</p></li><li><h6><a class="text-decoration-none text-link fw-bold" href=/manual/jvc/get0602-001a/dvd-receiver-with-monitor-instruction-manual/page-31.html>PAGE 31</a></h6><p>Changing the display information ENGLISH Each time you press the button, the display changes to show the different information. ( 53) Ex.: While playing a DVD Video SOURCE DVD FLAT CHAP. RPT 3:00 AM 1 Audio format—Dolby Digital, MP3, WMA, WAV 2 Disc type—DVD, DVD-VR, VCD, CD 3 Video format—MPEG, VR-PRG (program), VR- PLAY (playlist), PBC 4 [5 / ∞] 5 6 7 8 9 • DVD Video/DVD-VR: Selects title/program/ playlist.</p></li><li><h6><a class="text-decoration-none text-link fw-bold" href=/manual/jvc/get0602-001a/dvd-receiver-with-monitor-instruction-manual/page-32.html>PAGE 32</a></h6><p>ENGLISH Operation buttons on the screen You can display the following operation buttons while watching the playback pictures on the screen. • If no operation is done after awhile, the operation buttons disappear (except when a disc menu is displayed). A [SOURCE] [5 ∞] [3 / 8] [4 ¢] Touch the screen (center portion).</p></li><li><h6><a class="text-decoration-none text-link fw-bold" href=/manual/jvc/get0602-001a/dvd-receiver-with-monitor-instruction-manual/page-33.html>PAGE 33</a></h6><p>Operations using the remote controller (RM-RK252) ENGLISH / Button Stop play Stop play Start play/Pause (if pressed during play) • MPEG: Start play/Pause (if pressed during play) • JPEG: • Start play (Slide show: Each file is shown for a few seconds.) • Pause (if pressed during play). • MPEG: Reverse/forward track search *4 (No sound can be heard.) • Reverse/forward chapter search *1 (No sound can be heard.) • Slow motion *2 during pause (No sound can be heard.</p></li><li><h6><a class="text-decoration-none text-link fw-bold" href=/manual/jvc/get0602-001a/dvd-receiver-with-monitor-instruction-manual/page-34.html>PAGE 34</a></h6><p>ENGLISH Button Stop play Stop play Stop play Start play/Pause (if pressed during play) Start play/Pause (if pressed during play) Start play/Pause (if pressed during play) Reverse/forward track search *6 Reverse/forward track search *6 Reverse/forward track search *6 • Forward slow motion *7 during pause. (No sound can be heard.) – Reverse slow motion does not work. • Select track • Reverse/fast-forward track search *8 (No sound can be heard.</p></li><li><h6><a class="text-decoration-none text-link fw-bold" href=/manual/jvc/get0602-001a/dvd-receiver-with-monitor-instruction-manual/page-35.html>PAGE 35</a></h6><p>Operations using the on-screen bar 1 Display the Original Program screen. Display the Playlist screen. 2 Select an item you want to start play. (DVD/DVD-VR/MPEG/JPEG/VCD) These operations are possible on the monitor using the remote controller. 1 Show the on-screen bar ( ENGLISH Using the list screens... (DVD-VR) 36). (twice) 2 Select an item. 3 Make a selection. Original Program/Playlist screen • Original Program If pop-up menu appears... • To cancel pop-up menu, press RETURN.</p></li><li><h6><a class="text-decoration-none text-link fw-bold" href=/manual/jvc/get0602-001a/dvd-receiver-with-monitor-instruction-manual/page-36.html>PAGE 36</a></h6><p>ENGLISH On-screen bar Ex.: DVD-Video Information Operation 1 Disc type 2 • DVD-Video: Audio signal format type and channel • VCD: PBC 3 Playback mode *1 DVD-Video: T. RPT: Title repeat C. RPT: Chapter repeat DVD-VR: C. RPT: Chapter repeat PG. RPT: Program repeat MPEG Video: T. RPT: Track repeat F. RPT: Folder repeat A. RND: All (Disc) random F. RND: Folder random JPEG: F. RPT: Folder repeat VCD *2: T. RPT: Track repeat A.</p></li><li><h6><a class="text-decoration-none text-link fw-bold" href=/manual/jvc/get0602-001a/dvd-receiver-with-monitor-instruction-manual/page-37.html>PAGE 37</a></h6><p>You can connect a USB mass storage class device such as a USB memory, Digital Audio Player, portable HDD, etc. to the unit. • You can also connect the iPod to the USB terminal of the unit. For details of the operations, 45 – 46. ENGLISH USB operations USB cable from the rear of the unit This unit can play JPEG/MPEG1/MPEG2/MP3/WMA/ WAV files stored in USB mass storage class device. • You can operate the USB device in the same way you operate the files on discs.</p></li><li><h6><a class="text-decoration-none text-link fw-bold" href=/manual/jvc/get0602-001a/dvd-receiver-with-monitor-instruction-manual/page-38.html>PAGE 38</a></h6><p>ENGLISH Using the Bluetooth® devices For Bluetooth operations, it is required to connect the Bluetooth adapter, KS-BTA200 (not supplied) to the CD changer jack on the rear of this unit. • Refer also to the instructions supplied with the Bluetooth adapter and the Bluetooth device. • Refer to the list (included in the box) to check the countries where you may use the Bluetooth ® function.</p></li><li><h6><a class="text-decoration-none text-link fw-bold" href=/manual/jvc/get0602-001a/dvd-receiver-with-monitor-instruction-manual/page-39.html>PAGE 39</a></h6><p>Status of the device • Signal strength/Battery remainder (only when the information comes from the device). [5 / ∞]: Selects the other registered device. Connected device name • When a cellular phone with audio function is registered/connected, appears. SOURCE Connected Device Name FLAT 3:00 Activates <voice dialing> function. (Hold) ENGLISH Using the Bluetooth cellular phone AM Display <dial menu> screen. • Appears on any source information screen when the Bluetooth adapter is connected.</p></li><li><h6><a class="text-decoration-none text-link fw-bold" href=/manual/jvc/get0602-001a/dvd-receiver-with-monitor-instruction-manual/page-40.html>PAGE 40</a></h6><p>ENGLISH When an SMS comes in... If the cellular phone is compatible with SMS (Short Message Service), you can read the messages on the screen. • You cannot edit or send a message through the unit. Presetting the phone numbers You can preset up to 6 phone numbers. 1 When <message info> is set to <auto>... The unit rings and the following screen is displayed to inform you of a message arrival.</p></li><li><h6><a class="text-decoration-none text-link fw-bold" href=/manual/jvc/get0602-001a/dvd-receiver-with-monitor-instruction-manual/page-41.html>PAGE 41</a></h6><p>Indicates the button pressed. • It may be different from the operation status. Starts playback/pause SOURCE Connected Device Name FLAT 3:00 ENGLISH Using the Bluetooth audio player AM [4 / ¢]: Reverse/forward search [5 / ∞]: Selects the other registered device. Stops playback ~ Press [SOURCE], then press [Bluetooth AUDIO]. Ÿ Start playback. If playback does not start automatically, operate the Bluetooth audio player to start playback.</p></li><li><h6><a class="text-decoration-none text-link fw-bold" href=/manual/jvc/get0602-001a/dvd-receiver-with-monitor-instruction-manual/page-42.html>PAGE 42</a></h6><p>ENGLISH Listening to the satellite radio Before operating, connect either one of the following (not supplied) to the CD changer jack on the rear of this unit. • JVC SIRIUS satellite radio System, SC-C1 and KS-SRA100, PnP, SC-VDOC1 and KS-SRA100, for listening to the SIRIUS Satellite radio. • XM satellite radio System, JVC Smart Digital Adapter–XMDJVC100, CNP2000UC and CNPJVC1 for listening to the XM Satellite radio.</p></li><li><h6><a class="text-decoration-none text-link fw-bold" href=/manual/jvc/get0602-001a/dvd-receiver-with-monitor-instruction-manual/page-43.html>PAGE 43</a></h6><p>Tuning in to a channel you want SOURCE Band CATEGORY SAT Sound mode Signal Reception indicator ENGLISH Preset number SR1 C A T FLAT LEVEL 3:00 AM 1 01 Channel number Category Name Channel Name Song Title Artist Name Composer Name Only for SIRIUS CATEGORY BAND For SIRIUS Radio For XM Radio ~ Press [SOURCE], then press [SAT]. Ÿ Press [BAND]. ! Press [5 CATEGORY] or [CATEGORY ∞] to ~ Press [SOURCE], then press [SAT]. Ÿ Press [BAND].</p></li><li><h6><a class="text-decoration-none text-link fw-bold" href=/manual/jvc/get0602-001a/dvd-receiver-with-monitor-instruction-manual/page-44.html>PAGE 44</a></h6><p>ENGLISH Listening to the HD Radio™ Broadcast Before operating, connect HD Radio tuner box, KT-HD300 (separately purchased) to the CD changer jack on the rear of the unit. What is HD Radio Technology? HD Radio Technology can deliver high-quality digital sound—AM digital will have FM-like quality (in stereo) and FM digital will have CD-like quality—with static-free and clear reception. Furthermore, stations can offer text and data, such as artist names and song titles.</p></li><li><h6><a class="text-decoration-none text-link fw-bold" href=/manual/jvc/get0602-001a/dvd-receiver-with-monitor-instruction-manual/page-45.html>PAGE 45</a></h6><p>ENGLISH Listening to the iPod/iPhone You can connect the iPod/iPhone using the following cable or adapter: To Cable/adapter Listen to the music Watch the video To operate USB 2.0 cable (accessory of the iPod/iPhone) to the USB cable from the rear of the unit. See “When connected with the USB cable” below. Interface Adapter for iPod, KS-PD100 (not supplied) to the CD changer jack on the rear of the unit. See “When connected with the interface adapter” on page 46.</p></li><li><h6><a class="text-decoration-none text-link fw-bold" href=/manual/jvc/get0602-001a/dvd-receiver-with-monitor-instruction-manual/page-46.html>PAGE 46</a></h6><p>ENGLISH The following operations/settings are only available in “HEAD MODE.” • To display the <ipod artwork>, 16. • To select track/video from <search mode>, 25. • To select the playback mode, 22, 23. • To change the play speed of the audio books, 23. When connected with the interface adapter Enters main menu Track no.</p></li><li><h6><a class="text-decoration-none text-link fw-bold" href=/manual/jvc/get0602-001a/dvd-receiver-with-monitor-instruction-manual/page-47.html>PAGE 47</a></h6><p>ENGLISH Using other external components AV-INPUT You can connect an external component to the LINE IN/VIDEO IN jacks. Assigned title ( 22) SOURCE AV-IN FLAT 3:00 AM ~ Press [SOURCE], then press [AV-IN]. Ÿ Turn on the connected component and start playing the source. To display the operation buttons while watching the playback picture, 32. Navigation screen You can also connect a Navigation System to the LINEIN/VIDEO IN jack so that you can watch the navigation screen.</p></li><li><h6><a class="text-decoration-none text-link fw-bold" href=/manual/jvc/get0602-001a/dvd-receiver-with-monitor-instruction-manual/page-48.html>PAGE 48</a></h6><p>ENGLISH EXT-INPUT You can connect an external component to the CD changer jack on the rear using the Line Input Adapter, KS-U57 (not supplied) or AUX Input Adapter, KS-U58 (not supplied). Assigned title ( 22) Preparation: Make sure <external> is selected for <external input>. ( 18) SOURCE EXT-IN FLAT 3:00 AM ~ Press [SOURCE], then press [EXT-IN]. Ÿ Turn on the connected component and Changing the display information ( 53) start playing the source.</p></li><li><h6><a class="text-decoration-none text-link fw-bold" href=/manual/jvc/get0602-001a/dvd-receiver-with-monitor-instruction-manual/page-49.html>PAGE 49</a></h6><p>Playing DVD-VR • For details about DVD-VR format and playlist, refer to the instructions supplied with the recording equipment. File playback Playing MPEG1/MPEG2 files • This unit can play back MPEG1/MPEG2 files with the extension code <.mpg>, <.mpeg>, or <.mod>*. * <.mod> is an extension code used for the MPEG2 files recorded by JVC Everio camcorders. The MPEG2 files with the <.mod> extension code cannot be played back when stored on a USB mass storage class device.</p></li><li><h6><a class="text-decoration-none text-link fw-bold" href=/manual/jvc/get0602-001a/dvd-receiver-with-monitor-instruction-manual/page-50.html>PAGE 50</a></h6><p>ENGLISH 1 2 3 4 Selected playback mode Elapsed playing time of the current track Operation status Current track number/total number of tracks on the disc 5 Track information 6 Track list 7 Current track (highlighted bar) • MPEG1/MPEG2/JPEG/MP3/WMA/WAV * If tag data includes “Jacket Picture” (baseline JPEG), it will be displayed.</p></li><li><h6><a class="text-decoration-none text-link fw-bold" href=/manual/jvc/get0602-001a/dvd-receiver-with-monitor-instruction-manual/page-51.html>PAGE 51</a></h6><p>Warning messages for Bluetooth operations • Connection Error: The device is registered but the connection has failed. Use <connect> to connect the device again. ( 28) • Error: Try the operation again. If “Error” appears again, check if the device supports the function you have tried. • Device Unfound: No available Bluetooth device is detected by <search>. • Loading: The unit is updating the phone book or SMS. • Please Wait...: The unit is preparing to use the Bluetooth function.</p></li><li><h6><a class="text-decoration-none text-link fw-bold" href=/manual/jvc/get0602-001a/dvd-receiver-with-monitor-instruction-manual/page-52.html>PAGE 52</a></h6><p>ENGLISH • If the iPod does not play correctly, update your iPod software to the latest version. For details about updating your iPod, visit <http: www.apple.com>. • When you turn on this unit, the iPod is charged through the unit. • The text information may not be displayed correctly. • The text information scrolls on the monitor. This unit can display up to 40 characters when using the interface adapter and up to 128 characters when using the USB 2.0 cable or USB Audio and Video cable (KS-U30).</p></li><li><h6><a class="text-decoration-none text-link fw-bold" href=/manual/jvc/get0602-001a/dvd-receiver-with-monitor-instruction-manual/page-53.html>PAGE 53</a></h6><p>Sound signals emitted through the rear terminals ENGLISH Through the analog terminals (Speaker out/LINE OUT) 2-channel signal is emitted. When playing multi-channel encoded disc, multi-channel signals are downmixed. • DTS sound cannot be reproduced. Through the DIGITAL OUT terminal Digital signals (Linear PCM, Dolby Digital, MPEG Audio) are emitted. • DTS sound cannot be emitted.</p></li><li><h6><a class="text-decoration-none text-link fw-bold" href=/manual/jvc/get0602-001a/dvd-receiver-with-monitor-instruction-manual/page-54.html>PAGE 54</a></h6><p>ENGLISH Language codes (for DVD language selection) Code Language Code Language Code Language Code Language Code Language AA AB AF AM AR AS AY AZ BA BE BG BH BI BN BO BR CA CO CS CY DZ EL EO ET EU • • • • • • • • • • • • • • Afar Abkhazian Afrikaans Ameharic Arabic Assamese Aymara Azerbaijani Bashkir Byelorussian Bulgarian Bihari Bislama Bengali, Bangla Tibetan Breton Catalan Corsican Czech Welsh Bhutani Greek Esperanto Estonian Basque FA FI FJ FO FY GA GD GL GN GU HA HI HR HU HY IA IE IK IN IS IW JA JI</p></li><li><h6><a class="text-decoration-none text-link fw-bold" href=/manual/jvc/get0602-001a/dvd-receiver-with-monitor-instruction-manual/page-55.html>PAGE 55</a></h6><p>Caution on cleaning the unit Do not use any solvent (for example, thinner, benzine, etc.), detergent, or insecticide. This may damage the monitor or the unit. To keep discs clean A dirty disc may not play correctly. If a disc does become dirty, wipe it with a soft cloth in a straight line from center to edge. • Do not use any solvents (for example, conventional record cleaner, spray, thinner, benzine, etc.) to clean discs.</p></li><li><h6><a class="text-decoration-none text-link fw-bold" href=/manual/jvc/get0602-001a/dvd-receiver-with-monitor-instruction-manual/page-56.html>PAGE 56</a></h6><p>ENGLISH Troubleshooting What appears to be trouble is not always serious. Check the following points before calling a service center. • For operations with the external components, refer also to the instructions supplied with the adapters used for the connections (as well as the instructions supplied with the external components). • Messages (enclosed in “ ”) in the tables below are shown in the language selected on <language>. ( 15) Messages described here are in the language of this manual.</p></li><li><h6><a class="text-decoration-none text-link fw-bold" href=/manual/jvc/get0602-001a/dvd-receiver-with-monitor-instruction-manual/page-57.html>PAGE 57</a></h6><p>Disc in general • • • • • • MPEG1/MPEG2/MP3/WMA/WAV • • • • • Remedy/Cause Eject the disc forcibly. ( 3) ENGLISH Symptom • Disc can be neither recognized nor played back. • Disc cannot be ejected. • Recordable/Rewritable discs cannot be played back. • Tracks on the Recordable/Rewritable discs cannot be skipped. • Playback does not start. Unlock the disc. ( 30) • Insert a finalized disc. • Finalize the discs with the component which you used for recording. • Insert the disc correctly again.</p></li><li><h6><a class="text-decoration-none text-link fw-bold" href=/manual/jvc/get0602-001a/dvd-receiver-with-monitor-instruction-manual/page-58.html>PAGE 58</a></h6><p>Symptom ENGLISH • Noise is generated. USB • Tracks cannot play back as you have intended them to play. • “Now Reading...” keeps flashing on the screen. Bluetooth • “Cannot play this device Check the device” appears on the screen. • Correct characters are not displayed (e.g. album name). • While playing a track, sound is sometimes interrupted. • Bluetooth device does not detect the unit. Remedy/Cause The track played back is not a playable file format. Skip to another file.</p></li><li><h6><a class="text-decoration-none text-link fw-bold" href=/manual/jvc/get0602-001a/dvd-receiver-with-monitor-instruction-manual/page-59.html>PAGE 59</a></h6><p>• • • • • • Satellite radio Remedy/Cause • • • • • • • Insert a disc into the magazine. Insert the magazine. Current disc does not include playable files. Replace the disc with one including playable files. Connect this unit and the CD changer correctly and press the reset button of the CD changer. “Reset01” – “Reset07” appears on the screen. Press the reset button of the CD changer. The CD changer does not work at all. Reset the unit.</p></li><li><h6><a class="text-decoration-none text-link fw-bold" href=/manual/jvc/get0602-001a/dvd-receiver-with-monitor-instruction-manual/page-60.html>PAGE 60</a></h6><p>HD Radio reception iPod /iPhone ENGLISH Symptom Remedy/Cause • Sound quality changes when receiving HD Radio stations. Fix the reception mode either to <digital> or <analog>. ( 21) • No sound can be heard. • “Analog” is selected when receiving all digital broadcast of HD Radio station. Select <digital> or 21) <auto>. ( • <digital> is selected when receiving weak digital signals or receiving conventional radio broadcast. Select <analog> or <auto>. ( 21) • “Reset08” appears on the screen.</p></li><li><h6><a class="text-decoration-none text-link fw-bold" href=/manual/jvc/get0602-001a/dvd-receiver-with-monitor-instruction-manual/page-61.html>PAGE 61</a></h6><p>Power Output: Signal-to-Noise Ratio: 20 W RMS × 4 Channels at 4 Ω and ≤ 1% THD+N 80 dBA (reference: 1 W into 4 Ω) AMPLIFIER Load Impedance: Equalizer Control Range: TUNER SECTION FM Tuner: AM Tuner: Signal Detection System: Frequency Response: DVD/CD Frequencies: Audio Output Level: • LINE OUT (REAR) • SUBWOOFER Color System: Video Output (composite): Other Terminals: Input: Frequency Range: Dynamic Range: Signal-to-Noise Ratio: Wow and Flutter: ENGLISH Specifications Level: Line-Out Level/Imp</p></li><li><h6><a class="text-decoration-none text-link fw-bold" href=/manual/jvc/get0602-001a/dvd-receiver-with-monitor-instruction-manual/page-62.html>PAGE 62</a></h6><p>USB GENERAL MONITOR ENGLISH USB Standards: Data Transfer Rate USB 2.0 Full Speed Full Speed: Maximum 12 Mbps Low Speed: Maximum 1.5 Mbps Compatible Device: Mass storage class Compatible File System: FAT 32/16/12 Max.</p></li><li><h6><a class="text-decoration-none text-link fw-bold" href=/manual/jvc/get0602-001a/dvd-receiver-with-monitor-instruction-manual/page-63.html>PAGE 63</a></h6><p>General Reset ..................................................................3, 6 Volume ................................................6, 7, 10, 20 AV Menu ........................................................ 6, 13 Source..................................................6, 7, 11, 32 Short Cut ...................................................6, 8, 32 RM-RK252 ................................... 9 – 11, 33 – 36 Clock .............................................................</p></li><li><h6><a class="text-decoration-none text-link fw-bold" href=/manual/jvc/get0602-001a/dvd-receiver-with-monitor-instruction-manual/page-64.html>PAGE 64</a></h6><p>Still having trouble?? USA ONLY Call 1-800-252-5722 ENGLISH RECEPTOR DVD CON MONITOR KW-ADV792/KW-AVX720 ESPAÑOL DVD RECEIVER WITH MONITOR Refer to page of How to reset your unit KW-ADV792/KW-AVX720 RÉCEPTEUR DVD ET MONITEUR KW-ADV792/KW-AVX720 FRANÇAIS Instructions Having TROUBLE with operation? Please reset your unit DVD RECEIVER WITH MONITOR http://www.jvc.com We can help you! CoverRear_KW-ADV792[J]f.</p></li><li><h6><a class="text-decoration-none text-link fw-bold" href=/manual/jvc/get0602-001a/dvd-receiver-with-monitor-instruction-manual/page-65.html>PAGE 65</a></h6><p>KW-ADV792/KW-AVX720 Installation/Connection Manual Manual de instalación/conexión Manuel d’installation/raccordement GET0602-002A 0109DTSMDTJEIN [J] EN, SP, FR © 2009 Victor Company of Japan, Limited ENGLISH ESPAÑOL FRANÇAIS This unit is designed to operate on 12 V DC, NEGATIVE ground electrical systems. If your vehicle does not have this system, a voltage inverter is required, which can be purchased at JVC car audio dealers.</p></li><li><h6><a class="text-decoration-none text-link fw-bold" href=/manual/jvc/get0602-001a/dvd-receiver-with-monitor-instruction-manual/page-66.html>PAGE 66</a></h6><p>INSTALLATION (IN-DASH MOUNTING) INSTALACION (MONTAJE EN EL TABLERO DE INSTRUMENTOS) INSTALLATION (MONTAGE DANS LE TABLEAU DE BORD) The following illustration shows a typical installation. However, you should make adjustments corresponding to your specific car. If you have any questions or require information regarding installation kits, consult your JVC car audio dealer or a company supplying kits. • If you are not sure how to install this unit correctly, have it installed by a qualified technician.</p></li><li><h6><a class="text-decoration-none text-link fw-bold" href=/manual/jvc/get0602-001a/dvd-receiver-with-monitor-instruction-manual/page-67.html>PAGE 67</a></h6><p>CONEXIONES ELECTRICAS ELECTRICAL CONNECTIONS RACCORDEMENTS ELECTRIQUES Typical connections / Conexiones tipicas / Raccordements typiques Before connecting: Check the wiring in the vehicle carefully. Incorrect connection may cause serious damage to this unit. The leads of the power cord and those of the connector from the car body may be different in color. 1 2 3 Connect the colored leads of the power cord in the order specified in the illustration below.</p></li><li><h6><a class="text-decoration-none text-link fw-bold" href=/manual/jvc/get0602-001a/dvd-receiver-with-monitor-instruction-manual/page-68.html>PAGE 68</a></h6><p>ENGLISH ESPAÑOL PRECAUTIONS on power supply and speaker connections: • DO NOT connect the speaker leads of the power cord to the car battery; otherwise, the unit will be seriously damaged. • BEFORE connecting the speaker leads of the power cord to the speakers, check the speaker wiring in your car. A FRANÇAIS PRECAUTIONS sur l’alimentation et la connexion des enceintes: • NE CONNECTEZ PAS les fils d’enceintes du cordon d’alimentation à la batterie; sinon, l’appareil serait sérieusement endommagé.</p></li><li><h6><a class="text-decoration-none text-link fw-bold" href=/manual/jvc/get0602-001a/dvd-receiver-with-monitor-instruction-manual/page-69.html>PAGE 69</a></h6><p>C Connecting the external amplifier and/or subwoofer / Conexión del amplificador y/o subwoofer exterior / Connexion d’amplificateurs extérieurs et/ou d’un caisson de grave You can connect an amplifier to upgrade your car stereo system. • Connect the remote lead (blue with white stripe) to the remote lead of the other equipment so that it can be controlled through this unit. • For amplifier only: – Disconnect the speakers from this unit, connect them to the amplifier.</p></li><li><h6><a class="text-decoration-none text-link fw-bold" href=/manual/jvc/get0602-001a/dvd-receiver-with-monitor-instruction-manual/page-70.html>PAGE 70</a></h6><p>E Connecting the external components to the CD changer jack / Conexión de los componentes externos al jack del cambiador de CD / Connexion des appareils extérieurs au changeur de CD When connecting the external components, refer also to the manuals supplied for the components and adapter. Cuando conecte componentes externos, consulte, también, los manuales suministrados con los componentes y el adaptador.</p></li><li><h6><a class="text-decoration-none text-link fw-bold" href=/manual/jvc/get0602-001a/dvd-receiver-with-monitor-instruction-manual/page-71.html>PAGE 71</a></h6><p>DVD RECEIVER WITH MONITOR KW-AVX726/KW-AVX725/KW-AVX724/ KW-AVX626/KW-AVX625/KW-AVX624 Having TROUBLE with operation? Please reset your unit Refer to page of How to reset your unit For canceling the display demonstration, see page 10. For installation and connections, refer to the separate manual. INSTRUCTIONS EN © 2009 Victor Company of Japan, Limited CoverRear_KW-AVX726_001A_f.</p></li><li><h6><a class="text-decoration-none text-link fw-bold" href=/manual/jvc/get0602-001a/dvd-receiver-with-monitor-instruction-manual/page-72.html>PAGE 72</a></h6><p>Thank you for purchasing a JVC product. Please read all instructions carefully before operation, to ensure your complete understanding and to obtain the best possible performance from the unit. IMPORTANT FOR LASER PRODUCTS 1. CLASS 1 LASER PRODUCT 2. CAUTION: Do not open the top cover. There are no user serviceable parts inside the unit; leave all servicing to qualified service personnel. 3. CAUTION: Visible and/or invisible class 1M laser radiation when open. Do not view directly with optical instruments.</p></li><li><h6><a class="text-decoration-none text-link fw-bold" href=/manual/jvc/get0602-001a/dvd-receiver-with-monitor-instruction-manual/page-73.html>PAGE 73</a></h6><p>How to reset your unit • Your preset adjustments will also be erased (except the registered Bluetooth device). ( 24, 35) How to forcibly eject a disc Back • You can forcibly eject the loaded disc even if the disc is locked. To lock/unlock the disc, 27. • Be careful not to drop the disc when it ejects. • If this does not work, reset your unit.</p></li><li><h6><a class="text-decoration-none text-link fw-bold" href=/manual/jvc/get0602-001a/dvd-receiver-with-monitor-instruction-manual/page-74.html>PAGE 74</a></h6><p>Playable disc type Disc type DVD • DTS sound cannot be reproduced. Recording format, file type, etc Playable DVD-Video *1 Region Code: South East Asia, Hong Kong region: 3 Australia: 4 India: 5 Ex.</p></li><li><h6><a class="text-decoration-none text-link fw-bold" href=/manual/jvc/get0602-001a/dvd-receiver-with-monitor-instruction-manual/page-75.html>PAGE 75</a></h6><p>Basic operations Using the monitor panel/touch panel Display <av menu> screen, ( USB cable from the rear of the unit, ( 11) Display the <source menu> screen, ( 34) *1 6) Display/exit the Short Cut icons, ( 7) SOURCE CD 01 MP3 FLAT 3:00 AM 5 6 7 8 0:02:26 Folder Name File Name Track Title Artist Name Disc Title 1 Resets the unit ( 3). 2 • Turns on the power. 3 4 01 • Attenuates the sound (if the power is on). • Turns off the power. (Hold) Changes the display information.</p></li><li><h6><a class="text-decoration-none text-link fw-bold" href=/manual/jvc/get0602-001a/dvd-receiver-with-monitor-instruction-manual/page-76.html>PAGE 76</a></h6><p>q • Displays <open tilt> screen. *6 [Open] : Opens the monitor panel. [Eject] : Ejects the disc. [Close] : Closes the monitor panel. [Tilt +] : Tilts open the monitor panel. [Tilt –] : Tilts close the monitor panel. • Ejects the disc and display <open tilt> screen. (Hold) • Closes the monitor panel when the panel is opened. w Monitor panel *1 For KW-AVX726/KW-AVX725/KW-AVX724. *2 Available display information varies among the 50) playback sources.</p></li><li><h6><a class="text-decoration-none text-link fw-bold" href=/manual/jvc/get0602-001a/dvd-receiver-with-monitor-instruction-manual/page-77.html>PAGE 77</a></h6><p>Using the remote controller (RM-RK252) Short Cut icons You can easily access some frequently used functions by using the Short Cut icons. Installing the batteries SOURCE TUNER FM1 3:00 1 87. 5 MHz ABC Radio FLAT ST AM BAND R03/LR03/AAA Short Cut window appears. • To exit from the window, press the button again. SOURCE TUNER FM1 1 87. 5 MHz FLAT ST 3:00 Insert the batteries into the remote controller by matching the polarity (+ and –) correctly. AM BAND Caution: Press a Short Cut icon.</p></li><li><h6><a class="text-decoration-none text-link fw-bold" href=/manual/jvc/get0602-001a/dvd-receiver-with-monitor-instruction-manual/page-78.html>PAGE 78</a></h6><p>• iPod: – 5 : Enters the main menu (then 5 / ∞ / 4 / ¢ work as menu selecting buttons.) 5 : Returns to the previous menu. ∞ : Confirms the selection. – ∞ : Pauses or resumes playback. 1 button • Turns the power on if pressed briefly or attenuates the sound when the power is on. • Turns the power off if pressed and held. 2 5/∞ buttons • TUNER: Selects the preset stations. • DISC/USB: – DVD-Video: Selects the title. – DVD-VR: Selects the program/Playlist.</p></li><li><h6><a class="text-decoration-none text-link fw-bold" href=/manual/jvc/get0602-001a/dvd-receiver-with-monitor-instruction-manual/page-79.html>PAGE 79</a></h6><p>5 PHONE button Applicable only when a Bluetooth phone is connected. • Displays <dial menu> screen. • Displays <redial> menu if pressed and held. • Answers incoming calls. 6 * SETUP button • Not applicable for this unit. 7 * TOP M (menu) button • DVD-Video: Shows the disc menu. • DVD-VR: Shows the Original Program screen. • VCD: Resumes PBC playback. 8 OSD (on-screen display) button • Shows the on-screen bar. • Does not function as “*.” 9 SHIFT button • Functions with other buttons.</p></li><li><h6><a class="text-decoration-none text-link fw-bold" href=/manual/jvc/get0602-001a/dvd-receiver-with-monitor-instruction-manual/page-80.html>PAGE 80</a></h6><p>Preparation Canceling the display demonstration and setting the clock ~ Turn on the power. @ Set the clock. Setup Demonstration Wall Paper Color Scroll Dimmer Ÿ Display <av menu> screen. Bright Blue Once Auto 6 PM Dimmer Time Set Auto 7 AM Back Setup or Time Set Time Format OSD Clock 1 12Hours Off : 00 AM 24Hours 3 : 45 PM BAND Back ! Display <setup> screen. Setup AV Menu Time Set Time Format OSD Clock Back ¤ Finish the procedure. ⁄ Cancel the demonstration. Select [Off].</p></li><li><h6><a class="text-decoration-none text-link fw-bold" href=/manual/jvc/get0602-001a/dvd-receiver-with-monitor-instruction-manual/page-81.html>PAGE 81</a></h6><p>AV Menu operations You can use the <av menu> for most of the operations and settings. The available menu items shown on the touch panel, depends on the selected source. • Non-available items will be shaded. The following steps are one of the fundamental procedures. • You can perform the operations/change the settings by following these steps unless mentioned otherwise. ! Press the desired icon/item to perform the desired operations/settings.</p></li><li><h6><a class="text-decoration-none text-link fw-bold" href=/manual/jvc/get0602-001a/dvd-receiver-with-monitor-instruction-manual/page-82.html>PAGE 82</a></h6><p>Initial: Underlined Menu item Demonstration Wall Paper Selectable setting/item ♦ Off ♦ On : Cancels. : Activates the demonstration on the screen. To stop it temporarily, touch the screen. ( 10) You can select the background picture of the screen. Display ♦ Bright, Future, Horizon, Plain Color You can select the color of the background picture. ♦ Blue, Light-Blue, Red, Orange, Yellow, Green, Purple, Dark-Blue, Dark-Green, Brown, Light-Brown, Black Scroll ♦ Off ♦ Once ♦ Auto : Cancels.</p></li><li><h6><a class="text-decoration-none text-link fw-bold" href=/manual/jvc/get0602-001a/dvd-receiver-with-monitor-instruction-manual/page-83.html>PAGE 83</a></h6><p>Menu item Selectable setting/item Aspect *3 You can change the aspect ratio of the picture. Aspect ratio of the incoming signal 4:3 16:9 Regular: For 4:3 original pictures Full: For 16:9 original pictures Clock Display Panorama: For viewing 4:3 pictures naturally on the wide screen Auto: • For “DISC”: Aspect ratio is automatically selected to match the incoming signals. • For the other video sources: Aspect ratio is fixed to <regular>.</p></li><li><h6><a class="text-decoration-none text-link fw-bold" href=/manual/jvc/get0602-001a/dvd-receiver-with-monitor-instruction-manual/page-84.html>PAGE 84</a></h6><p>Menu item Selectable setting/item Monitor Type *6 16:9 4:3LB Disc 4:3PS Select the monitor type to watch a wide screen picture on the external monitor. ♦ 16:9 : Select when the aspect ratio of the external monitor is 16:9. ♦ 4:3LB : Select when the aspect ratio of the external (Letterbox)/ monitor is 4:3. 4:3PS (Pan Scan) OSD Position *6 Select the position of the on-screen bar. ( ♦1 : Higher position. ♦2 : Lower position.</p></li><li><h6><a class="text-decoration-none text-link fw-bold" href=/manual/jvc/get0602-001a/dvd-receiver-with-monitor-instruction-manual/page-85.html>PAGE 85</a></h6><p>Menu item Selectable setting/item When playing back a multi-channel disc, this setting affects the signals reproduced through the LINE OUT jacks. ♦ Dolby Surr. : Select this to enjoy multi-channel surround audio by connecting an amplifier compatible with Dolby Surround. ♦ Stereo : Normally select this. D. (Dynamic) Range Compres. (Compression) *9 You can enjoy a powerful sound at a low volume level while playing Dolby Digital software.</p></li><li><h6><a class="text-decoration-none text-link fw-bold" href=/manual/jvc/get0602-001a/dvd-receiver-with-monitor-instruction-manual/page-86.html>PAGE 86</a></h6><p>Menu item Selectable setting/item External Input *13, *14 For connecting an external component to the CD changer jack on the rear. ♦ Changer/iPod *15 38), iPod, ( 40). : CD changer, ( : Any other than the above, ( 42). Beep ♦ Off ♦ On : Cancels. : Activates the key-touch tone. Telephone Muting *16 ♦ Off ♦ Muting1, : Cancels. : Select either one which mutes the sounds while using the cellular phone.</p></li><li><h6><a class="text-decoration-none text-link fw-bold" href=/manual/jvc/get0602-001a/dvd-receiver-with-monitor-instruction-manual/page-87.html>PAGE 87</a></h6><p>Selects a preset sound mode suitable to the music genre. ♦ Flat (Initial), Hard Rock, R&B, Pop, Jazz, Dance, Country, Reggae, Classic, User1, User2, User3 1 2 Adjust the settings, then store. Equalizer Display <av menu> screen. Back Edit or Makes adjustments by moving each bar directly. BAND User Store 2 Display <equalizer> screen. User1 User2 User3 AV Menu Back Ex.: When storing into <user2>.</p></li><li><h6><a class="text-decoration-none text-link fw-bold" href=/manual/jvc/get0602-001a/dvd-receiver-with-monitor-instruction-manual/page-88.html>PAGE 88</a></h6><p>Initial: Underlined Menu item Fader/Balance Selectable setting/item Fader : Adjust the front and rear speaker output balance. • When using a two-speaker system, set the fader level to “0.” ♦ F6 to R6; Initial 0 Balance : Adjust the left and right speaker output balance. ♦ L6 to R6; Initial 0 Press [ 5/∞/2/3 ] to adjust. Fader/Balance Reset Fader 0 Balance 0 Back Volume Adjust *1 Adjust and store the auto-adjustment volume level for each source, comparing to the FM volume level.</p></li><li><h6><a class="text-decoration-none text-link fw-bold" href=/manual/jvc/get0602-001a/dvd-receiver-with-monitor-instruction-manual/page-89.html>PAGE 89</a></h6><p>Initial: Underlined Selectable items when the source is: • TUNER : Mono, SSM, Title Entry • DISC, USB, CD-CH, iPod : Repeat, Random • iPod *1, *2 : Repeat, Random, Audiobooks • AV-IN, EXT-IN : Title Entry Menu item Selectable setting/item Mono When an FM stereo broadcast is hard to receive, activate monaural mode for better reception. The MONO indicator lights up. ♦ ON : Activate monaural mode to improve FM reception, but stereo effect will be lost. The MONO indicator lights up.</p></li><li><h6><a class="text-decoration-none text-link fw-bold" href=/manual/jvc/get0602-001a/dvd-receiver-with-monitor-instruction-manual/page-90.html>PAGE 90</a></h6><p>Menu item Available items depend on the loaded disc type and playback file. iPod *4 — iPod MP3 CD MPEG/MP3/ WMA/WAV VCD/CD JPEG DVD-VR DVD-Video Repeat CD-CH — USB *4 DISC Disc/file type JPEG Source DivX/MPEG/ MP3/WMA/ WAV Repeat*3 Selectable setting/item Chapter Title Program Disc Folder Track One All Off ♦ Chapter ♦ Title ♦ Program ♦ Disc ♦ Folder ♦ Track ♦ One ♦ All ♦ Off Repeats current chapter. Repeats current title.</p></li><li><h6><a class="text-decoration-none text-link fw-bold" href=/manual/jvc/get0602-001a/dvd-receiver-with-monitor-instruction-manual/page-91.html>PAGE 91</a></h6><p>Menu item Selectable setting/item Audiobooks*7, *8 You can select the playback speed of the “Audiobook” audio file in your iPod. ♦ Normal : Plays at normal speed. ♦ Faster : Plays faster. ♦ Slower : Plays slower. *7 For KW-AVX726/KW-AVX725/KW-AVX724. *8 Not applicable in “iPod MODE.” ( 39) Source TUNER Operation/setting • Storing a preset station manually 1 Press [BAND], then [ / ] to tune in to the station you want to preset. 2 Select <list> from the <av menu>. 3 Press and hold a preset number.</p></li><li><h6><a class="text-decoration-none text-link fw-bold" href=/manual/jvc/get0602-001a/dvd-receiver-with-monitor-instruction-manual/page-92.html>PAGE 92</a></h6><p>Source Bluetooth PHONE Operation/setting Selecting a preset phone number on the list to make a call List Phone Number Back CD-CH Selecting a disc on the list Disc List Disc 01 Disc 04 Disc 02 MP3 Disc Disc 03 Disc 06 If an MP3 disc is selected, Folder/ Track List appear. Select a track to start playback.</p></li><li><h6><a class="text-decoration-none text-link fw-bold" href=/manual/jvc/get0602-001a/dvd-receiver-with-monitor-instruction-manual/page-93.html>PAGE 93</a></h6><p>Select “Bluetooth PHONE” or “Bluetooth AUDIO” as the source for operations. • Firstly, use <open> or <search> to register and establish the connection with a device. Menu item Dial Menu *1 Selectable setting/item Select the method to make a call. ♦ Redial : Shows the list of the phone numbers you have dialed. ♦ Received Calls : Shows the list of the received calls. ♦ Phonebook : Shows the phone book of the connected cellular phone. ♦ Missed Calls : Shows the list of the missed calls.</p></li><li><h6><a class="text-decoration-none text-link fw-bold" href=/manual/jvc/get0602-001a/dvd-receiver-with-monitor-instruction-manual/page-94.html>PAGE 94</a></h6><p>Menu item Open Selectable setting/item Preparation: • Operate the Bluetooth device to turn on its Bluetooth function. • Make sure “NEW DEVICE” is selected. If not, press [ 5 ] or [ ∞ ] to select it. 1 Press <open> on the <bluetooth> menu. 2 Enter a PIN (Personal Identification Number) *3. • You can enter any number you like (1-digit to 16-digit number). PIN Code Back You can enter [0] – [9] only. [BS] : Erases the character before the cursor. [Del] : Erases the character on the cursor.</p></li><li><h6><a class="text-decoration-none text-link fw-bold" href=/manual/jvc/get0602-001a/dvd-receiver-with-monitor-instruction-manual/page-95.html>PAGE 95</a></h6><p>Menu item Selectable setting/item Special Device Only for “NEW DEVICE.” Select a device you want to connect from the list of Bluetooth devices which require some special procedure to establish the Bluetooth connection. Then, use <open> or <search> to connect. • Once the connection is established, it is registered in the unit. You can connect the unit and the device by using <connect> the next time. Connect Only for the registered devices.</p></li><li><h6><a class="text-decoration-none text-link fw-bold" href=/manual/jvc/get0602-001a/dvd-receiver-with-monitor-instruction-manual/page-96.html>PAGE 96</a></h6><p>Listening to the radio Preset number SOURCE TUNER Band Sound mode FM1 1 87. 5 MHz Assigned station name ABC Radio FLAT ST ( 3:00 19) • If no name is assigned, “No Name” appears. Tuner indicator AM BAND ~ Press [SOURCE], then press [TUNER]. Ÿ Press [BAND]. ! Press [ ] or [ ] to search for a station—Auto Search. • Manual Search: Hold either [ ]or [ ] until “Manual Search” appears on the screen, then press it repeatedly.</p></li><li><h6><a class="text-decoration-none text-link fw-bold" href=/manual/jvc/get0602-001a/dvd-receiver-with-monitor-instruction-manual/page-97.html>PAGE 97</a></h6><p>Disc operations The disc type is automatically detected, then playback starts (for some discs, the top menu of the disc appears). If a disc does not have any disc menu, all tracks on it will be played repeatedly until you change the source or eject the disc. If “ ” appears on the screen, the unit cannot accept the operation you have tried to do. • In some cases, without showing “ ,” operations will not be accepted. ~ Open the monitor panel. ! Insert a disc. Label side <open tilt> menu is displayed.</p></li><li><h6><a class="text-decoration-none text-link fw-bold" href=/manual/jvc/get0602-001a/dvd-receiver-with-monitor-instruction-manual/page-98.html>PAGE 98</a></h6><p>Changing the display information Each time you press the button, the display changes to show the different information. ( 50) Ex.: While playing a DVD Video SOURCE DVD FLAT CHAP. RPT 3:00 AM 1 Audio format—Dolby Digital, MP3, WMA, WAV 2 Disc type—DVD, DVD-VR, VCD, CD 3 Video format—DivX, MPEG, VR-PRG (program), VR-PLAY (playlist), PBC 4 [5 / ∞] 5 6 7 8 9 • DVD Video/DVD-VR: Selects title/program/ playlist.</p></li><li><h6><a class="text-decoration-none text-link fw-bold" href=/manual/jvc/get0602-001a/dvd-receiver-with-monitor-instruction-manual/page-99.html>PAGE 99</a></h6><p>Operation buttons on the screen You can display the following operation buttons while watching the playback pictures on the screen. • If no operation is done for about 5 seconds, the operation buttons disappear (except when a disc menu is displayed). A [SOURCE] [5 ∞] [3 / 8 ] [4 ¢] Touch the screen (center portion).</p></li><li><h6><a class="text-decoration-none text-link fw-bold" href=/manual/jvc/get0602-001a/dvd-receiver-with-monitor-instruction-manual/page-100.html>PAGE 100</a></h6><p>Operations using the remote controller (RM-RK252) / Button Stop play Stop play Start play/Pause (if pressed during play) • DivX/MPEG: Start play/Pause (if pressed during play) • JPEG: • Start play (Slide show: Each file is shown for a few seconds.) • Pause (if pressed during play). • Reverse/forward chapter search *1 (No sound • DivX/MPEG: Reverse/forward track search *4 can be heard.) (No sound can be heard.) • Slow motion *2 during pause (No sound can be heard.</p></li><li><h6><a class="text-decoration-none text-link fw-bold" href=/manual/jvc/get0602-001a/dvd-receiver-with-monitor-instruction-manual/page-101.html>PAGE 101</a></h6><p>Button Stop play Stop play Stop play Start play/Pause (if pressed during play) Reverse/forward track search *6 • Forward slow motion *7 during pause. (No sound can be heard.) – Reverse slow motion does not work. • Select track • Reverse/fast-forward track search *8 (No sound can be heard.</p></li><li><h6><a class="text-decoration-none text-link fw-bold" href=/manual/jvc/get0602-001a/dvd-receiver-with-monitor-instruction-manual/page-102.html>PAGE 102</a></h6><p>Using the list screens... (DVD-VR) Operations using the on-screen bar 1 Display the Original Program screen. Display the Playlist screen. 2 Select an item you want to start play. (DVD/DVD-VR/DivX/MPEG/JPEG/VCD) These operations are possible on the monitor using the remote controller. 1 Show the on-screen bar ( 33). (twice) 2 Select an item. Original Program/Playlist screen • Original Program 3 Make a selection. If pop-up menu appears... • To cancel pop-up menu, press RETURN.</p></li><li><h6><a class="text-decoration-none text-link fw-bold" href=/manual/jvc/get0602-001a/dvd-receiver-with-monitor-instruction-manual/page-103.html>PAGE 103</a></h6><p>On-screen bar Ex.: DVD-Video Information Operation 1 Disc type 2 • DVD-Video: Audio signal format type and channel • VCD: PBC 3 Playback mode *1 DVD-Video: T. RPT: Title repeat C. RPT: Chapter repeat DVD-VR: C. RPT: Chapter repeat PG. RPT: Program repeat DivX/MPEG Video: T. RPT: Track repeat F. RPT: Folder repeat A. RND: All (Disc) random F. RND: Folder random JPEG: F. RPT: Folder repeat VCD *2: T. RPT: Track repeat A.</p></li><li><h6><a class="text-decoration-none text-link fw-bold" href=/manual/jvc/get0602-001a/dvd-receiver-with-monitor-instruction-manual/page-104.html>PAGE 104</a></h6><p>USB operations (for KW-AVX726/KW-AVX725/KW-AVX724) You can connect a USB mass storage class device such as a USB memory, Digital Audio Player, portable HDD, etc. to the unit. • You can also connect the iPod to the USB terminal of the unit. For details of the operations, 39, 40. USB cable from the rear of the unit This unit can play JPEG/MPEG1/MPEG2/MP3/WMA/ WAV files stored in USB mass storage class device. • You can operate the USB device in the same way you operate the files on discs.</p></li><li><h6><a class="text-decoration-none text-link fw-bold" href=/manual/jvc/get0602-001a/dvd-receiver-with-monitor-instruction-manual/page-105.html>PAGE 105</a></h6><p>Using the Bluetooth® devices For Bluetooth operations, it is required to connect the Bluetooth adapter, KS-BTA200 (not supplied) to the CD changer jack on the rear of this unit. • Refer also to the instructions supplied with the Bluetooth adapter and the Bluetooth device. • Refer to the list (included in the box) to check the countries where you may use the Bluetooth ® function.</p></li><li><h6><a class="text-decoration-none text-link fw-bold" href=/manual/jvc/get0602-001a/dvd-receiver-with-monitor-instruction-manual/page-106.html>PAGE 106</a></h6><p>Using the Bluetooth cellular phone Status of the device • Signal strength/Battery remainder (only when the information comes from the device). [5 / ∞]: Selects the other registered device. Connected device name • When a cellular phone with audio function is registered/connected, appears. SOURCE Connected Device Name FLAT 3:00 Activates <voice dialing> function. (Hold) AM Display <dial menu> screen. • Appears on any source information screen when the Bluetooth adapter is connected.</p></li><li><h6><a class="text-decoration-none text-link fw-bold" href=/manual/jvc/get0602-001a/dvd-receiver-with-monitor-instruction-manual/page-107.html>PAGE 107</a></h6><p>When an SMS comes in... If the cellular phone is compatible with SMS (Short Message Service), you can read the messages on the screen. • You cannot edit or send a message through the unit. Presetting the phone numbers You can preset up to 6 phone numbers. 1 When <message info> is set to <auto>... The unit rings and the following screen is displayed to inform you of a message arrival. ( 25) Select the phone number you want to preset from <phonebook>, <redial>, <received calls>, or <missed calls>.</p></li><li><h6><a class="text-decoration-none text-link fw-bold" href=/manual/jvc/get0602-001a/dvd-receiver-with-monitor-instruction-manual/page-108.html>PAGE 108</a></h6><p>Using the Bluetooth audio player Indicates the button pressed. • It may be different from the operation status. Starts playback/pause SOURCE Connected Device Name FLAT 3:00 [4 / ¢]: Reverse/forward search AM [5 / ∞]: Selects the other registered device. Stops playback ~ Press [SOURCE], then press [Bluetooth AUDIO]. Ÿ Start playback. If playback does not start automatically, operate the Bluetooth audio player to start playback.</p></li><li><h6><a class="text-decoration-none text-link fw-bold" href=/manual/jvc/get0602-001a/dvd-receiver-with-monitor-instruction-manual/page-109.html>PAGE 109</a></h6><p>Listening to the iPod/iPhone You can connect the iPod/iPhone using the following cable or adapter: To Listen to the music Cable/adapter To operate KW-AVX726/KW-AVX725/KW-AVX724: USB 2.0 cable (accessory of the iPod/iPhone) to the USB cable from the rear of the unit. See “When connected with the USB cable” below. Interface Adapter for iPod, KS-PD100 (not supplied) to See “When connected with the the CD changer jack on the rear of the unit. interface adapter” on page 40.</p></li><li><h6><a class="text-decoration-none text-link fw-bold" href=/manual/jvc/get0602-001a/dvd-receiver-with-monitor-instruction-manual/page-110.html>PAGE 110</a></h6><p>~ Press [SOURCE], then press [iPod The following operations/settings are only available in “HEAD MODE.” 14. • To display the <ipod artwork>, • To select track/video from <search mode>, 22. • To select the playback mode, 20. • To change the play speed of the audio books, 21. ]. Playback starts automatically. • When you connect the iPod to the USB terminal, “ iPod” is selected as the source and playback starts automatically. Ÿ Press [4] or [¢] to select a track/ video.</p></li><li><h6><a class="text-decoration-none text-link fw-bold" href=/manual/jvc/get0602-001a/dvd-receiver-with-monitor-instruction-manual/page-111.html>PAGE 111</a></h6><p>Selecting a track from the main menu 1 Press [4] or [¢] to select the desired item. Press [3 / 8] to confirm the selection. Repeat steps 2 and 3 to select a track. • When a track is selected finally, playback starts. • To return to the previous menu, press [SEARCH]. Press [SEARCH] to enter the main menu. “SEARCH” flashes on the screen during menu operations. • This mode will be canceled if no operations are done for about 5 seconds. 2 3 4 20.</p></li><li><h6><a class="text-decoration-none text-link fw-bold" href=/manual/jvc/get0602-001a/dvd-receiver-with-monitor-instruction-manual/page-112.html>PAGE 112</a></h6><p>Navigation screen You can also connect a Navigation System to the VIDEO IN jack so that you can watch the navigation screen. Preparation: Make sure <navigation> is selected for <av input>. ( 15) To view the navigation screen Press DISP on the monitor panel repeatedly. ( 50) • The aspect ratio of the navigation screen is fixed to <full> regardless of the <aspect> setting.</p></li><li><h6><a class="text-decoration-none text-link fw-bold" href=/manual/jvc/get0602-001a/dvd-receiver-with-monitor-instruction-manual/page-113.html>PAGE 113</a></h6><p>Maintenance Caution on cleaning the unit Do not use any solvent (for example, thinner, benzine, etc.), detergent, or insecticide. This may damage the monitor or the unit. To keep discs clean A dirty disc may not play correctly. If a disc does become dirty, wipe it with a soft cloth in a straight line from center to edge. • Do not use any solvents (for example, conventional record cleaner, spray, thinner, benzine, etc.) to clean discs.</p></li><li><h6><a class="text-decoration-none text-link fw-bold" href=/manual/jvc/get0602-001a/dvd-receiver-with-monitor-instruction-manual/page-114.html>PAGE 114</a></h6><p>More about this unit General Turning on the power • By pressing SOURCE on the monitor panel, you can also turn on the power. If the source is ready, playback starts. Tuner (FM only) Storing stations in memory • When SSM is over, received stations are preset in no. 1 (lowest frequency) to no. 6 (highest frequency). Disc General • In this manual, words “track” and “file” are interchangeably used.</p></li><li><h6><a class="text-decoration-none text-link fw-bold" href=/manual/jvc/get0602-001a/dvd-receiver-with-monitor-instruction-manual/page-115.html>PAGE 115</a></h6><p>Playing JPEG files • This unit can play back JPEG files with the extension code <.jpg>, or <.jpeg>. • This unit can play back JPEG files that are at 32 × 32 to 8 192 × 7 680 resolution. It may take time to display the file depending on its resolution. • This unit can play back baseline JPEG files. Progressive JPEG files or lossless JPEG files cannot be played. Disc/file information shown on the external monitor The following screens appear only on the external monitor. • CD T.</p></li><li><h6><a class="text-decoration-none text-link fw-bold" href=/manual/jvc/get0602-001a/dvd-receiver-with-monitor-instruction-manual/page-116.html>PAGE 116</a></h6><p>• DivX/MPEG1/MPEG2/JPEG/MP3/WMA/WAV 1 2 3 4 5 6 7 8 9 p Current folder (highlighted bar) Current folder number/total folder number Folder list Selected playback mode Elapsed playing time of the current track (not displayed for JPEG) Operation status Current track number/total number of tracks in the current folder (total number of tracks on the disc) Track information (only for MP3/WMA/WAV) Track list Current track (highlighted) * If tag data includes “Jacket Picture” (baseline JPEG), it will be displaye</p></li><li><h6><a class="text-decoration-none text-link fw-bold" href=/manual/jvc/get0602-001a/dvd-receiver-with-monitor-instruction-manual/page-117.html>PAGE 117</a></h6><p>Warning messages for Bluetooth operations • Connection Error: The device is registered but the connection has failed. Use <connect> to connect the device again. ( 25) • Error: Try the operation again. If “Error” appears again, check if the device supports the function you have tried. • Device Unfound: No available Bluetooth device is detected by <search>. • Loading: The unit is updating the phone book or SMS. • Please Wait...: The unit is preparing to use the Bluetooth function.</p></li><li><h6><a class="text-decoration-none text-link fw-bold" href=/manual/jvc/get0602-001a/dvd-receiver-with-monitor-instruction-manual/page-118.html>PAGE 118</a></h6><p>• The text information scrolls on the monitor. This unit can display up to 40 characters when using the interface adapter and up to 128 characters when using the USB 2.0 cable or USB Audio and Video cable, KS-U30. Notice: When operating an iPod/iPhone, some operations may not be performed correctly or as intended. In this case, visit the following JVC web site: <http: www.jvc.co.< p></li><li><h6><a class="text-decoration-none text-link fw-bold" href=/manual/jvc/get0602-001a/dvd-receiver-with-monitor-instruction-manual/page-119.html>PAGE 119</a></h6><p>Sound signals emitted through the rear terminals Through the analog terminals (Speaker out/LINE OUT) 2-channel signal is emitted. When playing multi-channel encoded disc, multi-channel signals are downmixed. • DTS sound cannot be reproduced. Through the DIGITAL OUT terminal Digital signals (Linear PCM, Dolby Digital, MPEG Audio) are emitted. • DTS sound cannot be emitted.</p></li><li><h6><a class="text-decoration-none text-link fw-bold" href=/manual/jvc/get0602-001a/dvd-receiver-with-monitor-instruction-manual/page-120.html>PAGE 120</a></h6><p>Language codes (for DVD/DivX language selection) Code Language Code Language Code Language Code Language Code Language AA AB AF AM AR AS AY AZ BA BE BG BH BI BN BO BR CA CO CS CY DZ EL EO ET EU Afar Abkhazian Afrikaans Ameharic Arabic Assamese Aymara Azerbaijani Bashkir Byelorussian Bulgarian Bihari Bislama Bengali, Bangla Tibetan Breton Catalan Corsican Czech Welsh Bhutani Greek Esperanto Estonian Basque FA FI FJ FO FY GA GD GL GN GU HA HI HR HU HY IA IE IK IN IS IW JA JI JW KA Persian Finnish Fiji Faro</p></li><li><h6><a class="text-decoration-none text-link fw-bold" href=/manual/jvc/get0602-001a/dvd-receiver-with-monitor-instruction-manual/page-121.html>PAGE 121</a></h6><p>• Manufactured under license from Dolby Laboratories. Dolby and the double-D symbol are trademarks of Dolby Laboratories. • “DVD Logo” is a trademark of DVD Format/Logo Licensing Corporation registered in the US, Japan and other countries. • DivX® is a registered trademark of DivX, Inc., and is used under license. • Plays DivX® video: • ABOUT DIVX VIDEO: DivX® is a digital video format created by DivX, Inc. This is an official DivX Certified or DivX Ultra Certified device that plays DivX video.</p></li><li><h6><a class="text-decoration-none text-link fw-bold" href=/manual/jvc/get0602-001a/dvd-receiver-with-monitor-instruction-manual/page-122.html>PAGE 122</a></h6><p>Troubleshooting What appears to be trouble is not always serious. Check the following points before calling a service center. • For operations with the external components, refer also to the instructions supplied with the adapters used for the connections (as well as the instructions supplied with the external components). • Messages (enclosed in “ ”) in the tables below are shown in the language selected on <language>. ( 13) Messages described here are in the language of this manual.</p></li><li><h6><a class="text-decoration-none text-link fw-bold" href=/manual/jvc/get0602-001a/dvd-receiver-with-monitor-instruction-manual/page-123.html>PAGE 123</a></h6><p>Symptom Remedy/Cause • Disc can be neither recognized nor played back. Eject the disc forcibly. ( • Disc cannot be ejected. Unlock the disc. ( 3) 27) • Recordable/Rewritable discs cannot • Insert a finalized disc. be played back. • Finalize the discs with the component which you used for • Tracks on the Recordable/Rewritable recording. discs cannot be skipped. Disc in general • Playback does not start. • Insert the disc correctly again. • The format of files is not supported by the unit.</p></li><li><h6><a class="text-decoration-none text-link fw-bold" href=/manual/jvc/get0602-001a/dvd-receiver-with-monitor-instruction-manual/page-124.html>PAGE 124</a></h6><p>Bluetooth USB (for KW-AVX726/KW-AVX725/KW-AVX724) Symptom Remedy/Cause • Noise is generated. The track played back is not a playable file format. Skip to another file. • Tracks cannot play back as you have intended them to play. Playback order may differ from the one played back using other players. • “Now Reading...” keeps flashing on the screen. • Readout time varies depending on the USB device. • Do not use too many hierarchy and folders. • Turn off the power then on again.</p></li><li><h6><a class="text-decoration-none text-link fw-bold" href=/manual/jvc/get0602-001a/dvd-receiver-with-monitor-instruction-manual/page-125.html>PAGE 125</a></h6><p>CD changer Symptom Remedy/Cause • “No Disc” appears on the screen. Insert a disc into the magazine. • “No Magazine” appears on the screen. Insert the magazine. • “Cannot play this disc Check the disc” appears Current disc does not include playable files. Replace on the screen. the disc with one including playable files. • “Reset08” appears on the screen. Connect this unit and the CD changer correctly and press the reset button of the CD changer.</p></li><li><h6><a class="text-decoration-none text-link fw-bold" href=/manual/jvc/get0602-001a/dvd-receiver-with-monitor-instruction-manual/page-126.html>PAGE 126</a></h6><p>Specifications AMPLIFIER Maximum Power Output: Front/Rear: 50 W per channel Continuous Power Output (RMS): Front/Rear: 20 W per channel into 4 Ω, 40 Hz to 20 000 Hz at no more than 1.0% total harmonic distortion Load Impedance: Equalizer Control Range: 4 Ω (4 Ω to 8 Ω allowance) Frequencies: 60 Hz, 150 Hz, 400 Hz, 1 kHz, 2.5 kHz, 6.</p></li><li><h6><a class="text-decoration-none text-link fw-bold" href=/manual/jvc/get0602-001a/dvd-receiver-with-monitor-instruction-manual/page-127.html>PAGE 127</a></h6><p>FM/AM TUNER Frequency Range: FM Tuner: FM: 87.5 MHz to 108.0 MHz AM: 531 kHz to 1 602 kHz Usable Sensitivity: 9.3 dBf (0.8 μV/75 Ω) 50 dB Quieting Sensitivity: 16.3 dBf (1.</p></li><li><h6><a class="text-decoration-none text-link fw-bold" href=/manual/jvc/get0602-001a/dvd-receiver-with-monitor-instruction-manual/page-128.html>PAGE 128</a></h6><p>MONITOR Screen Size: 7 inch wide liquid crystal display Number of Pixel: 336 960 pixels: 480 × 3 (horizontal) × 234 (vertical) Drive Method: TFT (Thin Film Transistor) active matrix format Color System: NTSC/PAL Aspect Ratio: 16:9 (wide) GENERAL Power Requirement: Operating Voltage: DC 14.</p></li><li><h6><a class="text-decoration-none text-link fw-bold" href=/manual/jvc/get0602-001a/dvd-receiver-with-monitor-instruction-manual/page-129.html>PAGE 129</a></h6><p>Operation index General Reset ..................................................................3, 5 Volume ..............................................................5, 6 AV Menu ........................................................ 5, 11 Source................................................................5, 6 Short Cut .............................................................. 7 RM-RK252 ...................................... 7, 8, 9, 30, 31 Clock ..............................................</p></li><li><h6><a class="text-decoration-none text-link fw-bold" href=/manual/jvc/get0602-001a/dvd-receiver-with-monitor-instruction-manual/page-130.html>PAGE 130</a></h6><p>DVD RECEIVER WITH MONITOR KW-AVX726/KW-AVX725/KW-AVX724/ KW-AVX626/KW-AVX625/KW-AVX624 Having TROUBLE with operation? Please reset your unit Refer to page of How to reset your unit For canceling the display demonstration, see page 10. For installation and connections, refer to the separate manual. INSTRUCTIONS EN © 2009 Victor Company of Japan, Limited CoverRear_KW-AVX726_001A_f.</p></li><li><h6><a class="text-decoration-none text-link fw-bold" href=/manual/jvc/get0602-001a/dvd-receiver-with-monitor-instruction-manual/page-131.html>PAGE 131</a></h6><p>KW-AVX726/KW-AVX725/ KW-AVX626/KW-AVX625 GET0605-007A Installation/Connection Manual 安裝/連接手冊 0109DTSMDTJEIN EN, CT © 2009 Victor Company of Japan, Limited [U/UT] ENGLISH 中文 This unit is designed to operate on 12 V DC, NEGATIVE ground electrical systems. If your vehicle does not have this system, a voltage inverter is required, which can be purchased at JVC car audio dealers. 本機僅可使用直流 12 V 、負極接地的電源系統。如果您的車輛沒有這一電源系統,則需要一個電 壓變換器,可以在 JVC 汽車音響分銷商處買到。.</p></li><li><h6><a class="text-decoration-none text-link fw-bold" href=/manual/jvc/get0602-001a/dvd-receiver-with-monitor-instruction-manual/page-132.html>PAGE 132</a></h6><p>INSTALLATION (IN-DASH MOUNTING) 安裝(裝設、固定在儀表板內) The following illustration shows a typical installation. However, you should make adjustments corresponding to your specific car. If you have any questions or require information regarding installation kits, consult your JVC car audio dealer or a company supplying kits. • If you are not sure how to install this unit correctly, have it installed by a qualified technician.</p></li><li><h6><a class="text-decoration-none text-link fw-bold" href=/manual/jvc/get0602-001a/dvd-receiver-with-monitor-instruction-manual/page-133.html>PAGE 133</a></h6><p>電路連接 ELECTRICAL CONNECTIONS Typical connections / 典型的接線方法 接線前:仔細檢查汽車內的線路。不正確的接線會導致本機嚴重損壞。 電力線的引線和車身的連接器引線在顏色上可能有所不同。 Before connecting: Check the wiring in the vehicle carefully. Incorrect connection may cause serious damage to this unit. The leads of the power cord and those of the connector from the car body may be different in color. 1 2 3 1 2 3 Connect the colored leads of the power cord in the order specified in the illustration below. Connect the antenna cord.</p></li><li><h6><a class="text-decoration-none text-link fw-bold" href=/manual/jvc/get0602-001a/dvd-receiver-with-monitor-instruction-manual/page-134.html>PAGE 134</a></h6><p>ENGLISH 中文 電源和揚聲器接線注意事項: • 切勿把揚聲器導線接頭接至電池,否則本機將會嚴重損壞。 • 在把揚聲器導線接頭接至揚聲器之前,檢查您汽車上的揚聲器線路。 PRECAUTIONS on power supply and speaker connections: • DO NOT connect the speaker leads of the power cord to the car battery; otherwise, the unit will be seriously damaged. • BEFORE connecting the speaker leads of the power cord to the speakers, check the speaker wiring in your car.</p></li><li><h6><a class="text-decoration-none text-link fw-bold" href=/manual/jvc/get0602-001a/dvd-receiver-with-monitor-instruction-manual/page-135.html>PAGE 135</a></h6><p>C Connecting the external amplifier and/or subwoofer / 連接至外接功率放大器和 / 或重低音揚聲器 You can connect an amplifier to upgrade your car stereo system. • Connect the remote lead (blue with white stripe) to the remote lead of the other equipment so that it can be controlled through this unit. • Disconnect the speakers from this unit, connect them to the amplifier. Leave the speaker leads of this unit unused.</p></li><li><h6><a class="text-decoration-none text-link fw-bold" href=/manual/jvc/get0602-001a/dvd-receiver-with-monitor-instruction-manual/page-136.html>PAGE 136</a></h6><p>E Connecting the external components to the CD changer jack / 連接外接裝置至 CD 換碟器插孔 When connecting the external components, refer also to the manuals supplied for the components and adapter. 連接外接裝置時,另請參閱裝置及轉換器之使用手冊。 CAUTION: Before connecting the external components, make sure that the unit is turned off. 小心: 連接外接裝置之前,請確定關閉本機。 You can connect the following JVC components to the CD changer jack. 您可以將以下 JVC 裝置連接到 CD 換碟器插孔。 JVC component Model name JVC 裝置 型號名稱 CD changer (CD-CH) CH-X1500, etc.</p></li><li><h6><a class="text-decoration-none text-link fw-bold" href=/manual/jvc/get0602-001a/dvd-receiver-with-monitor-instruction-manual/page-137.html>PAGE 137</a></h6><p>KW-AVX726/KW-AVX725/ KW-AVX626/KW-AVX625 GET0605-009A Installation/Connection Manual Manual Pemasangan/Penyambungan 0109DTSMDTJEIN EN, IN © 2009 Victor Company of Japan, Limited [UN] ENGLISH INDONESIA This unit is designed to operate on 12 V DC, NEGATIVE ground electrical systems. If your vehicle does not have this system, a voltage inverter is required, which can be purchased at JVC car audio dealers. Unit ini didesain untuk beroperasi hanya pada sistem listrik 12 V DC yang di-ground NEGATIVE.</p></li><li><h6><a class="text-decoration-none text-link fw-bold" href=/manual/jvc/get0602-001a/dvd-receiver-with-monitor-instruction-manual/page-138.html>PAGE 138</a></h6><p>INSTALLATION (IN-DASH MOUNTING) PEMASANGAN (DALAM BINGKAI TEMPATNYA) The following illustration shows a typical installation. However, you should make adjustments corresponding to your specific car. If you have any questions or require information regarding installation kits, consult your JVC car audio dealer or a company supplying kits. • If you are not sure how to install this unit correctly, have it installed by a qualified technician. Ilustrasi berikut menunjukkan pemasangan yang khas.</p></li><li><h6><a class="text-decoration-none text-link fw-bold" href=/manual/jvc/get0602-001a/dvd-receiver-with-monitor-instruction-manual/page-139.html>PAGE 139</a></h6><p>ELECTRICAL CONNECTIONS SAMBUNGAN-SAMBUNGAN LISTRIK Typical connections / Ciri khas sambungan-sambungan Before connecting: Check the wiring in the vehicle carefully. Incorrect connection may cause serious damage to this unit. The leads of the power cord and those of the connector from the car body may be different in color. Sebelum penyambungan: Cek perkabelan dalam mobil dengan hati-hati. Penyambungan yang tidak benar mungkin menyebabkan kerusakan serius pada unit.</p></li><li><h6><a class="text-decoration-none text-link fw-bold" href=/manual/jvc/get0602-001a/dvd-receiver-with-monitor-instruction-manual/page-140.html>PAGE 140</a></h6><p>ENGLISH INDONESIA TINDAKAN-TINDAKAN PENCEGAHAN pada suplai power dan sambungan-sambungan speaker: • JANGAN sambungkan ujung-ujung speaker dari kabel power ke baterai mobil; sebaliknya, unit tersebut akan secara serius rusak. • SEBELUM menyambung ujung-ujung speaker dari kabel power ke speaker-speaker, cek perkabelan speaker dalam mobil Anda.</p></li><li><h6><a class="text-decoration-none text-link fw-bold" href=/manual/jvc/get0602-001a/dvd-receiver-with-monitor-instruction-manual/page-141.html>PAGE 141</a></h6><p>C Connecting the external amplifier and/or subwoofer / Penyambungan penguat eksternal dan/atau subwoofer Anda dapat menyambungkan penguat untuk meningkatkan sistem stereo mobil anda. • Sambungkan ujung jauh (biru dengan strip putih) ke ujung jauh dari peralatan lain sehingga dapat dikontrol melalui unit ini. • Putuskan sambungan speaker-speaker dari unit ini, sambungkan ini ke penguat. Biarkan ujung speaker dari unit ini tidak digunakan. You can connect an amplifier to upgrade your car stereo system.</p></li><li><h6><a class="text-decoration-none text-link fw-bold" href=/manual/jvc/get0602-001a/dvd-receiver-with-monitor-instruction-manual/page-142.html>PAGE 142</a></h6><p>E Connecting the external components to the CD changer jack / Menghubungkan komponen eksternal ke jack CD changer When connecting the external components, refer also to the manuals supplied for the components and adapter. Bila menghubungkan komponen eksternal, rujuk juga buku petunjuk yang dibekalkan untuk komponen dan adaptor. CAUTION: Before connecting the external components, make sure that the unit is turned off.</p></li><li><h6><a class="text-decoration-none text-link fw-bold" href=/manual/jvc/get0602-001a/dvd-receiver-with-monitor-instruction-manual/page-143.html>PAGE 143</a></h6><p>KW-AVX726/KW-AVX724/ KW-AVX626/KW-AVX624 Installation/Connection Manual GET0605-010A 0109DTSMDTJEIN [A/UI] EN © 2009 Victor Company of Japan, Limited This unit is designed to operate on 12 V DC, NEGATIVE ground electrical systems. If your vehicle does not have this system, a voltage inverter is required, which can be purchased at JVC car audio dealers.</p></li><li><h6><a class="text-decoration-none text-link fw-bold" href=/manual/jvc/get0602-001a/dvd-receiver-with-monitor-instruction-manual/page-144.html>PAGE 144</a></h6><p>ELECTRICAL CONNECTIONS PRECAUTIONS on power supply and speaker connections: • DO NOT connect the speaker leads of the power cord to the car battery; otherwise, the unit will be seriously damaged. • BEFORE connecting the speaker leads of the power cord to the speakers, check the speaker wiring in your car. Typical connections Before connecting: Check the wiring in the vehicle carefully. Incorrect connection may cause serious damage to this unit.</p></li><li><h6><a class="text-decoration-none text-link fw-bold" href=/manual/jvc/get0602-001a/dvd-receiver-with-monitor-instruction-manual/page-145.html>PAGE 145</a></h6><p>A Connecting the parking brake lead Parking brake lead (light green) Crimp connector Parking brake To metallic body or chassis of the car Parking brake switch (inside the car) B Connecting the reverse gear signal lead (for rear view camera) Locate the reverse lamp lead in the trunk.</p></li><li><h6><a class="text-decoration-none text-link fw-bold" href=/manual/jvc/get0602-001a/dvd-receiver-with-monitor-instruction-manual/page-146.html>PAGE 146</a></h6><p>D Connecting the external components AV amplifier or decoder Digital optical cable *3 Video cord *3 External monitor External component Signal cord *3 KV-CM1 *3 Video cord *3 Rear view camera Only for KW-AVX726/KW-AVX724 Connecting the USB devices Connecting the iPod/iPhone to the USB terminal You can connect the iPod/iPhone to the USB terminal using the following cables: • To listen to the music: USB 2.</p></li><li><h6><a class="text-decoration-none text-link fw-bold" href=/manual/jvc/get0602-001a/dvd-receiver-with-monitor-instruction-manual/page-147.html>PAGE 147</a></h6><p>Refer to page of How to reset your unit Vous avez des PROBLÈMES de fonctionnement? Réinitialisez votre appareil Référez-vous à la page intitulée Comment réinitialiser votre appareil Пожалуйста, перезагрузите Ваше устройство Для получения информации о перезагрузке Вашего устройства обратитесь на соответствующую страницу EN, FR, RU © 2009 Victor Company of Japan, Limited CoverRear_KW-AVX726_005A_f.</p></li><li><h6><a class="text-decoration-none text-link fw-bold" href=/manual/jvc/get0602-001a/dvd-receiver-with-monitor-instruction-manual/page-148.html>PAGE 148</a></h6><p>ENGLISH Thank you for purchasing a JVC product. Please read all instructions carefully before operation, to ensure your complete understanding and to obtain the best possible performance from the unit. IMPORTANT FOR LASER PRODUCTS 1. CLASS 1 LASER PRODUCT 2. CAUTION: Do not open the top cover. There are no user serviceable parts inside the unit; leave all servicing to qualified service personnel. 3. CAUTION: Visible and/or invisible class 1M laser radiation when open.</p></li><li><h6><a class="text-decoration-none text-link fw-bold" href=/manual/jvc/get0602-001a/dvd-receiver-with-monitor-instruction-manual/page-149.html>PAGE 149</a></h6><p>• Your preset adjustments will also be erased (except the registered Bluetooth device). ( 28, 40) How to forcibly eject a disc How to read this manual • < > is used to indicate the variable screens/ menus/operations/settings that appear on the touch panel. • [ ] is used to indicate the buttons on the touch panel. page number) is used to indicate the •( reference page number of the related topics/ operations/settings.</p></li><li><h6><a class="text-decoration-none text-link fw-bold" href=/manual/jvc/get0602-001a/dvd-receiver-with-monitor-instruction-manual/page-150.html>PAGE 150</a></h6><p>ENGLISH Playable disc type Disc type DVD • DTS sound cannot be reproduced.</p></li><li><h6><a class="text-decoration-none text-link fw-bold" href=/manual/jvc/get0602-001a/dvd-receiver-with-monitor-instruction-manual/page-151.html>PAGE 151</a></h6><p>How to read this manual .................................................................................................................... How to reset your unit ....................................................................................................................... How to forcibly eject a disc................................................................................................................. Playable disc type ...................................................................</p></li><li><h6><a class="text-decoration-none text-link fw-bold" href=/manual/jvc/get0602-001a/dvd-receiver-with-monitor-instruction-manual/page-152.html>PAGE 152</a></h6><p>ENGLISH Basic operations Using the monitor panel/touch panel Display <av menu> screen, ( USB cable from the rear of the unit, ( 13) Display the <source menu> screen, ( 39) *1 8) Display/exit the Short Cut icons, ( 8) SOURCE CD 01 MP3 FLAT 3:00 AM 5 6 7 0:02:26 Folder Name File Name Track Title Artist Name Disc Title 1 Resets the unit ( 3). 2 • Turns on the power. 3 4 01 • Attenuates the sound (if the power is on). • Turns off the power. (Hold) Changes the display information.</p></li><li><h6><a class="text-decoration-none text-link fw-bold" href=/manual/jvc/get0602-001a/dvd-receiver-with-monitor-instruction-manual/page-153.html>PAGE 153</a></h6><p>p • KW-AVX726/KW-AVX725: *1 For KW-AVX726/KW-AVX725. *2 Available display information varies among the 56) playback sources. ( *3 This adjustment does not affect the volume level of other sources. *4 The TP indicator lights up when activated; flashes when the unit tune into another station providing Radio Data System signals. When a DAB tuner is connected, TA Standby Reception also searches for DAB services.</p></li><li><h6><a class="text-decoration-none text-link fw-bold" href=/manual/jvc/get0602-001a/dvd-receiver-with-monitor-instruction-manual/page-154.html>PAGE 154</a></h6><p>ENGLISH <source menu> screen You can also select the source using the touch panel. SOURCE Source Menu TUNER FM1 1 87. 5 MHz Bayern Radio FLAT ST Pop Music 3:00 AM BAND Current source Exit Short Cut icons You can easily access some frequently used functions by using the Short Cut icons. Available icons vary among the sources. SOURCE TUNER FM1 1 87. 5 MHz Displays <illumination> menu. Bayern Radio FLAT ST ( Pop Music 3:00 19) Changes the sound mode.</p></li><li><h6><a class="text-decoration-none text-link fw-bold" href=/manual/jvc/get0602-001a/dvd-receiver-with-monitor-instruction-manual/page-155.html>PAGE 155</a></h6><p>Using the remote controller (RM-RK252) ENGLISH Installing the batteries R03/LR03/AAA Insert the batteries into the remote controller by matching the polarity (+ and –) correctly. Caution: • Danger of explosion if battery is incorrectly replaced. Replace only with the same or equivalent type. • Battery shall not be exposed to excessive heat such as sunshine, fire, or the like. If the effectiveness of the remote controller decreases, replace the batteries.</p></li><li><h6><a class="text-decoration-none text-link fw-bold" href=/manual/jvc/get0602-001a/dvd-receiver-with-monitor-instruction-manual/page-156.html>PAGE 156</a></h6><p>ENGLISH • DISC/USB: – DVD-Video: Selects the title. – DVD-VR: Selects the program/Playlist. – USB/other discs (except VCD/CD): Selects the folders if included. • CD-CH: – Selects the folders if included. • iPod: – 5 : Enters the main menu (then 5 / ∞ / 4 / ¢ work as menu selecting buttons.) 5 : Returns to the previous menu. ∞ : Confirms the selection. – ∞ : Pauses or resumes playback. 4 / ¢ buttons • TUNER/DAB: – Searches for stations/ensembles automatically if pressed briefly.</p></li><li><h6><a class="text-decoration-none text-link fw-bold" href=/manual/jvc/get0602-001a/dvd-receiver-with-monitor-instruction-manual/page-157.html>PAGE 157</a></h6><p>• Selects the source. e 3 (play) / 8 (pause) button • DISC/USB/ iPod : Starts playback/pauses. • Bluetooth PHONE: Answers incoming calls. • Bluetooth AUDIO: Starts playback. r (end call) button • Bluetooth PHONE: Ends the call. BAND button • TUNER/DAB: Selects the bands. 7 (stop) button • DISC/USB/ iPod : Stops playback. • Bluetooth AUDIO: Pauses. t * RETURN button • VCD: Returns to the PBC menu.</p></li><li><h6><a class="text-decoration-none text-link fw-bold" href=/manual/jvc/get0602-001a/dvd-receiver-with-monitor-instruction-manual/page-158.html>PAGE 158</a></h6><p>ENGLISH Preparation Canceling the display demonstration and setting the clock ~ Turn on the power. @ Set the clock. Setup Demonstration Wall Paper Color Scroll Dimmer Ÿ Display <av menu> screen. Bright Blue Once Auto 6 PM Dimmer Time Set (For KW-AVX626/ KW-AVX625) Auto 7 AM Back Setup or BAND Time Set Time Format OSD Clock Clock Adjust 1 12Hours Off Off : 00 AM 24Hours Auto Back ! Display <setup> screen.</p></li><li><h6><a class="text-decoration-none text-link fw-bold" href=/manual/jvc/get0602-001a/dvd-receiver-with-monitor-instruction-manual/page-159.html>PAGE 159</a></h6><p>You can use the <av menu> for most of the operations and settings. The available menu items shown on the touch panel, depends on the selected source. • Non-available items will be shaded. ! Press the desired icon/item to perform the desired operations/settings. Moves to the preceding menu page ENGLISH AV Menu operations Indicates the next hierarchy level/setting item exists Setup The following steps are one of the fundamental procedures.</p></li><li><h6><a class="text-decoration-none text-link fw-bold" href=/manual/jvc/get0602-001a/dvd-receiver-with-monitor-instruction-manual/page-160.html>PAGE 160</a></h6><p>ENGLISH Initial: Underlined Menu item Demonstration Wall Paper Selectable setting/item ♦ Off ♦ On : Cancels. : Activates the demonstration on the screen. To stop it temporarily, touch the screen. ( 12) You can select the background picture of the screen. Display ♦ Bright, Future, Horizon, Plain Color You can select the color of the background picture. ♦ Blue, Light-Blue, Red, Orange, Yellow, Green, Purple, Dark-Blue, Dark-Green, Brown, Light-Brown, Black Scroll ♦ Off ♦ Once ♦ Auto : Cancels.</p></li><li><h6><a class="text-decoration-none text-link fw-bold" href=/manual/jvc/get0602-001a/dvd-receiver-with-monitor-instruction-manual/page-161.html>PAGE 161</a></h6><p>Menu item You can change the aspect ratio of the picture. ENGLISH Aspect *3 Selectable setting/item Aspect ratio of the incoming signal 4:3 16:9 Regular: For 4:3 original pictures Full: For 16:9 original pictures Display Panorama: For viewing 4:3 pictures naturally on the wide screen Auto: • For “DISC”: Aspect ratio is automatically selected to match the incoming signals. • For the other video sources: Aspect ratio is fixed to <regular>.</p></li><li><h6><a class="text-decoration-none text-link fw-bold" href=/manual/jvc/get0602-001a/dvd-receiver-with-monitor-instruction-manual/page-162.html>PAGE 162</a></h6><p>ENGLISH Menu item Selectable setting/item Menu Language *7 Select the menu language; Initial English ( 57) 7 Select the audio language; Initial English ( 57) Audio Language * Subtitle *7 Select the subtitle language or erase the subtitle <off>.; Initial English ( 57) Monitor Type *7 16:9 4:3LB Disc 4:3PS Select the monitor type to watch a wide screen picture on the external monitor. ♦ 16:9 : Select when the aspect ratio of the external monitor is 16:9.</p></li><li><h6><a class="text-decoration-none text-link fw-bold" href=/manual/jvc/get0602-001a/dvd-receiver-with-monitor-instruction-manual/page-163.html>PAGE 163</a></h6><p>Disc Selectable setting/item D. (Digital) Audio Output *10 Select the signal format emitted through the DIGITAL OUT (optical) terminal. ( 55) ♦ PCM : Select this when connecting an amplifier or a decoder incompatible with Dolby Digital or MPEG Audio, or when connecting to a recording device. ♦ Dolby D : Select this when connecting an amplifier or a decoder compatible with Dolby Digital. ♦ Stream : Select this when connecting an amplifier or a decoder compatible with Dolby Digital or MPEG Audio.</p></li><li><h6><a class="text-decoration-none text-link fw-bold" href=/manual/jvc/get0602-001a/dvd-receiver-with-monitor-instruction-manual/page-164.html>PAGE 164</a></h6><p>Selectable setting/item TA Volume *12 When you activate TA Standby Reception ( 6), the unit will temporarily switch to Traffic Announcement (TA) if available, from any source other than AM. You can preset the TA volume level. • The volume changes to the preset TA volume level if the current volume level is lower than the preset level. ♦ VOL 00 to 30 (or 50) *13; Initial VOL 15 Program Search *12, *14 Usually when you select preset stations, the preset station is tuned in.</p></li><li><h6><a class="text-decoration-none text-link fw-bold" href=/manual/jvc/get0602-001a/dvd-receiver-with-monitor-instruction-manual/page-165.html>PAGE 165</a></h6><p>Menu item Selectable setting/item ♦ Changer/iPod *20 ENGLISH External Input *18, *19 For connecting an external component to the CD changer jack on the rear. 43), iPod, ( 45). : CD changer, ( : Any other than the above, ( 47). Beep ♦ Off ♦ On : Cancels. : Activates the key-touch tone. Telephone Muting *21 ♦ Off ♦ Muting1, : Cancels. : Select either one which mutes the sounds while using the cellular phone.</p></li><li><h6><a class="text-decoration-none text-link fw-bold" href=/manual/jvc/get0602-001a/dvd-receiver-with-monitor-instruction-manual/page-166.html>PAGE 166</a></h6><p>ENGLISH Selects a preset sound mode suitable to the music genre. ♦ Flat (Initial), Hard Rock, R&B, Pop, Jazz, Dance, Country, Reggae, Classic, User1, User2, User3 1 2 Adjust the settings, then store. Equalizer Display <av menu> screen. (For KW-AVX626/ KW-AVX625) Back Edit or Make adjustments by moving each bar directly. BAND User Store 2 User1 User2 User3 Display <equalizer> screen. AV Menu Back Ex.: When storing into <user2>.</p></li><li><h6><a class="text-decoration-none text-link fw-bold" href=/manual/jvc/get0602-001a/dvd-receiver-with-monitor-instruction-manual/page-167.html>PAGE 167</a></h6><p>Menu item Fader/Balance ENGLISH Initial: Underlined Selectable setting/item Fader : Adjust the front and rear speaker output balance. • When using a two-speaker system, set the fader level to “0.” ♦ F6 to R6; Initial 0 Balance : Adjust the left and right speaker output balance. ♦ L6 to R6; Initial 0 Press [ 5/∞/2/3 ] to adjust. Fader/Balance Reset Fader 0 Balance 0 Back Volume Adjust *1 Adjust and store the auto-adjustment volume level for each source, comparing to the FM volume level.</p></li><li><h6><a class="text-decoration-none text-link fw-bold" href=/manual/jvc/get0602-001a/dvd-receiver-with-monitor-instruction-manual/page-168.html>PAGE 168</a></h6><p>ENGLISH Initial: Underlined Selectable items when the source is: • TUNER : Mono, SSM, Title Entry, PTy Standby *2, PTy Code *2 • DAB *2 : D. (Dynamic) Range Control, Announce Standby, Announce Code, PTy Standby, PTy Code • DISC, USB *2, CD-CH, iPod : Repeat, Random • iPod *2, *3 : Repeat, Random, Audiobooks • AV-IN, EXT-IN : Title Entry Menu item Selectable setting/item Mono When an FM stereo broadcast is hard to receive, activate monaural mode for better reception.</p></li><li><h6><a class="text-decoration-none text-link fw-bold" href=/manual/jvc/get0602-001a/dvd-receiver-with-monitor-instruction-manual/page-169.html>PAGE 169</a></h6><p>Selectable setting/item PTy Standby *4, *5 PTY Standby Reception allows the unit to switch temporarily to your favorite PTY programme from any source other than AM. ♦ ON : Activate PTY Standby Reception. (The PTY indicator lights up; flashes when the unit tune in to another station providing the Radio Data System signals.) ♦ OFF : Cancels. PTy Code *4 You can change the PTY code ( ENGLISH Menu item 50) for PTY Standby Reception. Mode Back D.</p></li><li><h6><a class="text-decoration-none text-link fw-bold" href=/manual/jvc/get0602-001a/dvd-receiver-with-monitor-instruction-manual/page-170.html>PAGE 170</a></h6><p>Available items depend on the loaded disc type and playback file. iPod *7 — iPod MP3 CD JPEG VCD/CD JPEG DVD-VR Repeat CD-CH — USB *7 DISC Disc/file type MPEG/MP3/ WMA/WAV Source DivX/MPEG/ MP3/WMA/ WAV Repeat*6 Selectable setting/item DVD-Video ENGLISH Menu item Chapter Title Program Disc Folder Track One All Off ♦ Chapter ♦ Title ♦ Program ♦ Disc ♦ Folder ♦ Track ♦ One ♦ All ♦ Off Repeats current chapter. Repeats current title.</p></li><li><h6><a class="text-decoration-none text-link fw-bold" href=/manual/jvc/get0602-001a/dvd-receiver-with-monitor-instruction-manual/page-171.html>PAGE 171</a></h6><p>Menu item Selectable setting/item *10 For KW-AVX726/KW-AVX725. *11 Not applicable in “iPod MODE.” ( 45) Source TUNER/DAB* ENGLISH Audiobooks*10, *11 You can select the playback speed of the “Audiobook” audio file in your iPod. ♦ Normal : Plays at normal speed. ♦ Faster : Plays faster. ♦ Slower : Plays slower. Operation/setting 1 • Storing a preset station/service manually 1 Press [BAND], then [ / ] to tune in to the station you want to preset. 2 Select <list> from the <av menu>.</p></li><li><h6><a class="text-decoration-none text-link fw-bold" href=/manual/jvc/get0602-001a/dvd-receiver-with-monitor-instruction-manual/page-172.html>PAGE 172</a></h6><p>ENGLISH Source Bluetooth PHONE Operation/setting Selecting a preset phone number on the list to make a call List Phone Number Back CD-CH Selecting a disc on the list Disc List Disc 01 Disc 04 Disc 02 MP3 Disc Disc 03 Disc 06 If an MP3 disc is selected, Folder/ Track List appear. Select a track to start playback.</p></li><li><h6><a class="text-decoration-none text-link fw-bold" href=/manual/jvc/get0602-001a/dvd-receiver-with-monitor-instruction-manual/page-173.html>PAGE 173</a></h6><p>ENGLISH Select “Bluetooth PHONE” or “Bluetooth AUDIO” as the source for operations. • Firstly, use <open> or <search> to register and establish the connection with a device. Menu item Dial Menu *1 Selectable setting/item Select the method to make a call. ♦ Redial : Shows the list of the phone numbers you have dialed. ♦ Received Calls : Shows the list of the received calls. ♦ Phonebook : Shows the phone book of the connected cellular phone. ♦ Missed Calls : Shows the list of the missed calls.</p></li><li><h6><a class="text-decoration-none text-link fw-bold" href=/manual/jvc/get0602-001a/dvd-receiver-with-monitor-instruction-manual/page-174.html>PAGE 174</a></h6><p>ENGLISH Menu item Open Selectable setting/item Preparation: • Operate the Bluetooth device to turn on its Bluetooth function. • Make sure “NEW DEVICE” is selected. If not, press [ 5 ] or [ ∞ ] to select it. 1 Press <open> on the <bluetooth> menu. 2 Enter a PIN (Personal Identification Number) *3. • You can enter any number you like (1-digit to 16-digit number). PIN Code Back You can enter [0] – [9] only. [BS] : Erases the character before the cursor. [Del] : Erases the character on the cursor.</p></li><li><h6><a class="text-decoration-none text-link fw-bold" href=/manual/jvc/get0602-001a/dvd-receiver-with-monitor-instruction-manual/page-175.html>PAGE 175</a></h6><p>Selectable setting/item Special Device Only for “NEW DEVICE.” Select a device you want to connect from the list of Bluetooth devices which require some special procedure to establish the Bluetooth connection. Then, use <open> or <search> to connect. • Once the connection is established, it is registered in the unit. You can connect the unit and the device by using <connect> the next time. Connect Only for the registered devices.</p></li><li><h6><a class="text-decoration-none text-link fw-bold" href=/manual/jvc/get0602-001a/dvd-receiver-with-monitor-instruction-manual/page-176.html>PAGE 176</a></h6><p>ENGLISH Listening to the radio Preset number SOURCE TUNER Band Sound mode FM1 1 KW-AVX726/KW-AVX725: PS (station name) for FM Radio Data System. * KW-AVX626/KW-AVX625: Assigned station name ( 22) * 87. 5 MHz Bayern Radio FLAT ST Pop Music Tuner/Standby Reception indicator 3:00 AM PTY code for FM Radio Data System BAND ~ Press [SOURCE], then press [TUNER]. Ÿ Press [BAND]. ! Press [ ] or [ ] to search for a station—Auto Search.</p></li><li><h6><a class="text-decoration-none text-link fw-bold" href=/manual/jvc/get0602-001a/dvd-receiver-with-monitor-instruction-manual/page-177.html>PAGE 177</a></h6><p>The following features are available only for FM Radio Data System stations. Searching for FM Radio Data System programme—PTY Search Storing your favorite programme types You can store your favorite PTY codes into the PTY Preset List. Ex.: Storing <drama> into <preset 1> 1 You can search for your favorite programmes being broadcast by selecting the PTY code of your favorite programmes. 1 ENGLISH For KW-AVX726/KW-AVX725: PTy Search Preset PTy Code Enter Enter Display <pty search> menu.</p></li><li><h6><a class="text-decoration-none text-link fw-bold" href=/manual/jvc/get0602-001a/dvd-receiver-with-monitor-instruction-manual/page-178.html>PAGE 178</a></h6><p>ENGLISH Disc operations The disc type is automatically detected, then playback starts (for some discs, the top menu of the disc appears). If a disc does not have any disc menu, all tracks on it will be played repeatedly until you change the source or eject the disc. If “ ” appears on the screen, the unit cannot accept the operation you have tried to do. • In some cases, without showing “ ,” operations will not be accepted. ~ Open the monitor panel. ! Insert a disc.</p></li><li><h6><a class="text-decoration-none text-link fw-bold" href=/manual/jvc/get0602-001a/dvd-receiver-with-monitor-instruction-manual/page-179.html>PAGE 179</a></h6><p>Changing the display information ENGLISH Each time you press the button, the display changes to show the different information. ( 56) Ex.: While playing a DVD Video SOURCE DVD FLAT CHAP. RPT 3:00 AM 1 Audio format—Dolby Digital, MP3, WMA, WAV 2 Disc type—DVD, DVD-VR, VCD, CD 3 Video format—DivX, MPEG, VR-PRG (program), VR-PLAY (playlist), PBC 4 [5 / ∞] 5 6 7 8 9 • DVD Video/DVD-VR: Selects title/program/ playlist.</p></li><li><h6><a class="text-decoration-none text-link fw-bold" href=/manual/jvc/get0602-001a/dvd-receiver-with-monitor-instruction-manual/page-180.html>PAGE 180</a></h6><p>ENGLISH Operation buttons on the screen You can display the following operation buttons while watching the playback pictures on the screen. • If no operation is done for about 5 seconds, the operation buttons disappear (except when a disc menu is displayed). A [SOURCE] [5 ∞] [3 / 8] [4 ¢] Touch the screen (center portion).</p></li><li><h6><a class="text-decoration-none text-link fw-bold" href=/manual/jvc/get0602-001a/dvd-receiver-with-monitor-instruction-manual/page-181.html>PAGE 181</a></h6><p>Operations using the remote controller (RM-RK252) Stop play ENGLISH / Button Stop play Start play/Pause (if pressed during play) • DivX/MPEG: Start play/Pause (if pressed during play) • JPEG: • Start play (Slide show: Each file is shown for a few seconds.) • Pause (if pressed during play). • Reverse/forward chapter search *1 (No sound can • DivX/MPEG: Reverse/forward track be heard.) search *4 (No sound can be heard.) • Slow motion *2 during pause (No sound can be heard.</p></li><li><h6><a class="text-decoration-none text-link fw-bold" href=/manual/jvc/get0602-001a/dvd-receiver-with-monitor-instruction-manual/page-182.html>PAGE 182</a></h6><p>ENGLISH Button Stop play Stop play Stop play Start play/Pause (if pressed during play) Reverse/forward track search *6 • Forward slow motion *7 during pause. (No sound can be heard.) – Reverse slow motion does not work. • Select track • Reverse/fast-forward track search *8 (No sound can be heard.</p></li><li><h6><a class="text-decoration-none text-link fw-bold" href=/manual/jvc/get0602-001a/dvd-receiver-with-monitor-instruction-manual/page-183.html>PAGE 183</a></h6><p>Operations using the on-screen bar 1 Display the Original Program screen. Display the Playlist screen. 2 Select an item you want to start play. (DVD/DVD-VR/DivX/MPEG/JPEG/VCD) These operations are possible on the monitor using the remote controller. 1 Show the on-screen bar ( ENGLISH Using the list screens... (DVD-VR) 38). (twice) 2 Select an item. 3 Make a selection. Original Program/Playlist screen • Original Program If pop-up menu appears... • To cancel pop-up menu, press RETURN.</p></li><li><h6><a class="text-decoration-none text-link fw-bold" href=/manual/jvc/get0602-001a/dvd-receiver-with-monitor-instruction-manual/page-184.html>PAGE 184</a></h6><p>ENGLISH On-screen bar Ex.: DVD-Video Information Operation 1 Disc type 2 • DVD-Video: Audio signal format type and channel • VCD: PBC 3 Playback mode *1 DVD-Video: T. RPT: Title repeat C. RPT: Chapter repeat DVD-VR: C. RPT: Chapter repeat PG. RPT: Program repeat DivX/MPEG Video: T. RPT: Track repeat F. RPT: Folder repeat A. RND: All (Disc) random F. RND: Folder random JPEG: F. RPT: Folder repeat VCD *2: T. RPT: Track repeat A.</p></li><li><h6><a class="text-decoration-none text-link fw-bold" href=/manual/jvc/get0602-001a/dvd-receiver-with-monitor-instruction-manual/page-185.html>PAGE 185</a></h6><p>You can connect a USB mass storage class device such as a USB memory, Digital Audio Player, portable HDD, etc. to the unit. • You can also connect the iPod to the USB terminal of the unit. For details of the operations, 45 – 46. ENGLISH USB operations (for KW-AVX726/KW-AVX725) USB cable from the rear of the unit This unit can play JPEG/MPEG1/MPEG2/MP3/WMA/ WAV files stored in USB mass storage class device. • You can operate the USB device in the same way you operate the files on discs.</p></li><li><h6><a class="text-decoration-none text-link fw-bold" href=/manual/jvc/get0602-001a/dvd-receiver-with-monitor-instruction-manual/page-186.html>PAGE 186</a></h6><p>ENGLISH Using the Bluetooth® devices For Bluetooth operations, it is required to connect the Bluetooth adapter, KS-BTA200 (not supplied) to the CD changer jack on the rear of this unit. • Refer also to the instructions supplied with the Bluetooth adapter and the Bluetooth device. • Refer to the list (included in the box) to check the countries where you may use the Bluetooth ® function.</p></li><li><h6><a class="text-decoration-none text-link fw-bold" href=/manual/jvc/get0602-001a/dvd-receiver-with-monitor-instruction-manual/page-187.html>PAGE 187</a></h6><p>Status of the device • Signal strength/Battery remainder (only when the information comes from the device). [5 / ∞]: Selects the other registered device. Connected device name • When a cellular phone with audio function is registered/connected, appears. SOURCE Connected Device Name FLAT 3:00 ENGLISH Using the Bluetooth cellular phone AM Activates <voice dialing> Display <dial menu> screen. function. (Hold) • Appears on any source information screen when the Bluetooth adapter is connected.</p></li><li><h6><a class="text-decoration-none text-link fw-bold" href=/manual/jvc/get0602-001a/dvd-receiver-with-monitor-instruction-manual/page-188.html>PAGE 188</a></h6><p>ENGLISH When an SMS comes in... If the cellular phone is compatible with SMS (Short Message Service), you can read the messages on the screen. • You cannot edit or send a message through the unit. Presetting the phone numbers You can preset up to 6 phone numbers. 1 When <message info> is set to <auto>... The unit rings and the following screen is displayed to inform you of a message arrival.</p></li><li><h6><a class="text-decoration-none text-link fw-bold" href=/manual/jvc/get0602-001a/dvd-receiver-with-monitor-instruction-manual/page-189.html>PAGE 189</a></h6><p>Using the Bluetooth audio player ENGLISH Indicates the button pressed. • It may be different from the operation status. Starts playback/pause SOURCE Connected Device Name FLAT 3:00 AM [5 / ∞]: Selects the other registered device. [4 / ¢]: Reverse/ forward search Stops playback ~ Press [SOURCE], then press [Bluetooth AUDIO]. Ÿ Start playback. If playback does not start automatically, operate the Bluetooth audio player to start playback.</p></li><li><h6><a class="text-decoration-none text-link fw-bold" href=/manual/jvc/get0602-001a/dvd-receiver-with-monitor-instruction-manual/page-190.html>PAGE 190</a></h6><p>ENGLISH Listening to the DAB tuner (for KW-AVX726/KW-AVX725) Preset number SOURCE Band DAB Sound mode DAB indicators */ Standby Reception indicator DAB1 1 1475.216MHz LN Service Label FLAT If no signal is received, “No DAB Signal” appears. DRC 3:00 AM BAND ~ Press [SOURCE], then press [DAB]. Ÿ Press [BAND]. ! Press [ ] or [ ] to search for an ensemble—Auto Search. • Manual Search: Hold either [ repeatedly.</p></li><li><h6><a class="text-decoration-none text-link fw-bold" href=/manual/jvc/get0602-001a/dvd-receiver-with-monitor-instruction-manual/page-191.html>PAGE 191</a></h6><p>ENGLISH Listening to the iPod/iPhone You can connect the iPod/iPhone using the following cable or adapter: To Listen to the music Cable/adapter To operate KW-AVX726/KW-AVX725: USB 2.0 cable (accessory of the iPod/iPhone) to the USB cable from the rear of the unit. See “When connected with the USB cable” below. Interface Adapter for iPod, KS-PD100 (not supplied) to the CD changer jack on the rear of the unit. See “When connected with the interface adapter” on page 46.</p></li><li><h6><a class="text-decoration-none text-link fw-bold" href=/manual/jvc/get0602-001a/dvd-receiver-with-monitor-instruction-manual/page-192.html>PAGE 192</a></h6><p>ENGLISH ~ Press [SOURCE], then press [iPod ]. The following operations/settings are only available in “HEAD MODE.” • To display the <ipod artwork>, 16. • To select track/video from <search mode>, 26. • To select the playback mode, 24. • To change the play speed of the audio books, 25. Playback starts automatically. • When you connect the iPod to the USB terminal, “ iPod” is selected as the source and playback starts automatically. Ÿ Press [4] or [¢] to select a track/ video.</p></li><li><h6><a class="text-decoration-none text-link fw-bold" href=/manual/jvc/get0602-001a/dvd-receiver-with-monitor-instruction-manual/page-193.html>PAGE 193</a></h6><p>1 Press [4] or [¢] to select the desired item. Press [3 / 8] to confirm the selection. Repeat steps 2 and 3 to select a track. • When a track is selected finally, playback starts. • To return to the previous menu, press [SEARCH]. Press [SEARCH] to enter the main menu. “SEARCH” flashes on the screen during menu operations. • This mode will be canceled if no operations are done for about 5 seconds. 2 3 4 ENGLISH Selecting a track from the main menu 24.</p></li><li><h6><a class="text-decoration-none text-link fw-bold" href=/manual/jvc/get0602-001a/dvd-receiver-with-monitor-instruction-manual/page-194.html>PAGE 194</a></h6><p>ENGLISH Navigation screen You can also connect a Navigation System to the VIDEO IN jack so that you can watch the navigation screen. Preparation: Make sure <navigation> is selected for <av input>. ( 18) To view the navigation screen Press DISP on the monitor panel repeatedly. ( 56) • The aspect ratio of the navigation screen is fixed to <full> regardless of the <aspect> setting.</p></li><li><h6><a class="text-decoration-none text-link fw-bold" href=/manual/jvc/get0602-001a/dvd-receiver-with-monitor-instruction-manual/page-195.html>PAGE 195</a></h6><p>Caution on cleaning the unit Do not use any solvent (for example, thinner, benzine, etc.), detergent, or insecticide. This may damage the monitor or the unit. To keep discs clean A dirty disc may not play correctly. If a disc does become dirty, wipe it with a soft cloth in a straight line from center to edge. • Do not use any solvents (for example, conventional record cleaner, spray, thinner, benzine, etc.) to clean discs.</p></li><li><h6><a class="text-decoration-none text-link fw-bold" href=/manual/jvc/get0602-001a/dvd-receiver-with-monitor-instruction-manual/page-196.html>PAGE 196</a></h6><p>ENGLISH More about this unit General Turning on the power • By pressing SOURCE on the monitor panel, you can also turn on the power. If the source is ready, playback starts. Tuner (FM only) Storing stations in memory • When SSM is over, received stations are preset in no. 1 (lowest frequency) to no. 6 (highest frequency).</p></li><li><h6><a class="text-decoration-none text-link fw-bold" href=/manual/jvc/get0602-001a/dvd-receiver-with-monitor-instruction-manual/page-197.html>PAGE 197</a></h6><p>Playing JPEG files • This unit can recognize a total of 5 000 files and 250 folders (a maximum of 999 files per folder). • Use only “finalized” discs. • This unit can play back multi-session discs; however, unclosed sessions will be skipped while playing. • This unit can recognize a total of 25 characters for file/folder names. • Some discs or files may not be played back due to their characteristics or recording conditions. • This unit can play back JPEG files with the extension code <.jpg>, or <.jpeg>.</p></li><li><h6><a class="text-decoration-none text-link fw-bold" href=/manual/jvc/get0602-001a/dvd-receiver-with-monitor-instruction-manual/page-198.html>PAGE 198</a></h6><p>ENGLISH Disc/file information shown on the external monitor • DivX/MPEG1/MPEG2/JPEG/MP3/WMA/WAV The following screens appear only on the external monitor. • CD TIME T. RPT Track Information Album Four seasons Artist Robert M.</p></li><li><h6><a class="text-decoration-none text-link fw-bold" href=/manual/jvc/get0602-001a/dvd-receiver-with-monitor-instruction-manual/page-199.html>PAGE 199</a></h6><p>• • • • • • • • • • • • • • • • • Bluetooth operations General • While driving, do not perform complicated operation such as dialing the numbers, using phone book, etc. When you perform these operations, stop your car in a safe place. • Some Bluetooth devices may not be connected to this unit depending on the Bluetooth version of the device. • This unit may not work for some Bluetooth devices. • Connecting condition may vary depending on circumstances around you.</p></li><li><h6><a class="text-decoration-none text-link fw-bold" href=/manual/jvc/get0602-001a/dvd-receiver-with-monitor-instruction-manual/page-200.html>PAGE 200</a></h6><p>ENGLISH Icons for phone types • These icons indicate the phone type set on the device. : Cellular phone : Household phone : Office : General : Other than above CD changer • If you select a folder, which does not include any music files, on the list ( 26), you will hear a beep. Select another folder including music files. DAB (for KW-AVX726/KW-AVX725) • Only the primary DAB service can be preset even when you store a secondary service.</p></li><li><h6><a class="text-decoration-none text-link fw-bold" href=/manual/jvc/get0602-001a/dvd-receiver-with-monitor-instruction-manual/page-201.html>PAGE 201</a></h6><p>ENGLISH Menu settings • If you change the <amplifier gain> setting from <high> to <low> while the volume level is set higher than “30,” the unit automatically changes the volume level to “VOL 30.” • After you change any of <menu language audio language subtitle> settings, turn off then on the power, and re-insert the disc (or insert another disc) so that your setting takes effect.</p></li><li><h6><a class="text-decoration-none text-link fw-bold" href=/manual/jvc/get0602-001a/dvd-receiver-with-monitor-instruction-manual/page-202.html>PAGE 202</a></h6><p>ENGLISH Display information • Available display information varies among the playback sources. Each time you press DISP, the display changes to show the various information. Ex.: When the playback source is a DVD video disc SOURCE SOURCE DVD DVD FLAT FLAT CHAP.</p></li><li><h6><a class="text-decoration-none text-link fw-bold" href=/manual/jvc/get0602-001a/dvd-receiver-with-monitor-instruction-manual/page-203.html>PAGE 203</a></h6><p>Code Language Code Language Code Language Code Language Code Language AA AB AF AM AR AS AY AZ BA BE BG BH BI BN BO BR CA CO CS CY DZ EL EO ET EU Afar Abkhazian Afrikaans Ameharic Arabic Assamese Aymara Azerbaijani Bashkir Byelorussian Bulgarian Bihari Bislama Bengali, Bangla Tibetan Breton Catalan Corsican Czech Welsh Bhutani Greek Esperanto Estonian Basque FA FI FJ FO FY GA GD GL GN GU HA HI HR HU HY IA IE IK IN IS IW JA JI JW KA Persian Finnish Fiji Faroese Frisian Irish Scots Gaelic Galician Guarani G</p></li><li><h6><a class="text-decoration-none text-link fw-bold" href=/manual/jvc/get0602-001a/dvd-receiver-with-monitor-instruction-manual/page-204.html>PAGE 204</a></h6><p>ENGLISH • Manufactured under license from Dolby Laboratories. Dolby and the double-D symbol are trademarks of Dolby Laboratories. • “DVD Logo” is a trademark of DVD Format/Logo Licensing Corporation registered in the US, Japan and other countries. • DivX® is a registered trademark of DivX, Inc., and is used under license. • Plays DivX® video: • ABOUT DIVX VIDEO: DivX® is a digital video format created by DivX, Inc. This is an official DivX Certified or DivX Ultra Certified device that plays DivX video.</p></li><li><h6><a class="text-decoration-none text-link fw-bold" href=/manual/jvc/get0602-001a/dvd-receiver-with-monitor-instruction-manual/page-205.html>PAGE 205</a></h6><p>What appears to be trouble is not always serious. Check the following points before calling a service center. • For operations with the external components, refer also to the instructions supplied for the adapters used with the connections (as well as the instructions supplied with the external components). • Messages (enclosed in “ ”) in the tables below are shown in the language selected on <language>. ( 15) Messages described here are in the language of this manual.</p></li><li><h6><a class="text-decoration-none text-link fw-bold" href=/manual/jvc/get0602-001a/dvd-receiver-with-monitor-instruction-manual/page-206.html>PAGE 206</a></h6><p>Symptom ENGLISH • Disc can be neither recognized nor played back. • Disc cannot be ejected. • • Disc in general • • • • • • • DivX/MPEG1/MPEG2/MP3/WMA/WAV • • • • • Remedy/Cause Eject the disc forcibly. ( 3) Unlock the disc. ( 32) Recordable/Rewritable discs cannot • Insert a finalized disc. be played back. • Finalize the discs with the component which you used for Tracks on the Recordable/Rewritable recording. discs cannot be skipped. Playback does not start. • Insert the disc correctly again.</p></li><li><h6><a class="text-decoration-none text-link fw-bold" href=/manual/jvc/get0602-001a/dvd-receiver-with-monitor-instruction-manual/page-207.html>PAGE 207</a></h6><p>USB (for KW-AVX726/KW-AVX725) • Noise is generated. • Tracks cannot play back as you have intended them to play. • “Now Reading...” keeps flashing on the screen. The track played back is not a playable file format. Skip to another file. Playback order may differ from the one played back using other players. • Readout time varies depending on the USB device. • Do not use too many hierarchy and folders. • Turn off the power then on again. • “Cannot play this device Check the No tracks are stored.</p></li><li><h6><a class="text-decoration-none text-link fw-bold" href=/manual/jvc/get0602-001a/dvd-receiver-with-monitor-instruction-manual/page-208.html>PAGE 208</a></h6><p>DAB tuner (for KW-AVX726/ KW-AVX725) CD changer ENGLISH Symptom • “No Disc” appears on the screen. • “No Magazine” appears on the screen. • “Cannot play this disc Check the disc” appears on the screen. • “Reset08” appears on the screen. Insert a disc into the magazine. Insert the magazine. Current disc does not include playable files. Replace the disc with one including playable files. Connect this unit and the CD changer correctly and press the reset button of the CD changer.</p></li><li><h6><a class="text-decoration-none text-link fw-bold" href=/manual/jvc/get0602-001a/dvd-receiver-with-monitor-instruction-manual/page-209.html>PAGE 209</a></h6><p>Maximum Power Output: Continuous Power Output (RMS): FM/AM TUNER AMPLIFIER Load Impedance: Equalizer Control Range: Front/Rear: Front/Rear: Frequencies: Level: Signal-to-Noise Ratio: Audio Output Level: • LINE OUT (REAR) • SUBWOOFER (for KW-AVX726/ KW-AVX725): Color System: Line-Out Level/ Impedance: Output Impedance: 50 W per channel 20 W per channel into 4 Ω, 40 Hz to 20 000 Hz at no more than 1.0% total harmonic distortion 4 Ω (4 Ω to 8 Ω allowance) 60 Hz, 150 Hz, 400 Hz, 1 kHz, 2.5 kHz, 6.</p></li><li><h6><a class="text-decoration-none text-link fw-bold" href=/manual/jvc/get0602-001a/dvd-receiver-with-monitor-instruction-manual/page-210.html>PAGE 210</a></h6><p>DVD/CD KW AVX725) GENERAL MONITOR USB (for KW-AVX726/ ENGLISH Signal Detection System: Non-contact optical pickup (semiconductor laser) Frequency Response: DVD, fs=48 kHz/96 kHz: 16 Hz to 22 000 Hz VCD/CD: 16 Hz to 20 000 Hz Dynamic Range: 96 dB Signal-to-Noise Ratio: 98 dB Wow and Flutter: Less than measurable limit USB Standards: USB 2.0 Full Speed Data Transfer Rate Full Speed: Maximum 12 Mbps Low Speed: Maximum 1.5 Mbps Compatible Device: Mass storage class Compatible File System: FAT 32/16/12 Max.</p></li><li><h6><a class="text-decoration-none text-link fw-bold" href=/manual/jvc/get0602-001a/dvd-receiver-with-monitor-instruction-manual/page-211.html>PAGE 211</a></h6><p>General Reset ..................................................................3, 6 Volume ..............................................................6, 7 AV Menu ........................................................ 6, 13 Source................................................................6, 8 Short Cut .............................................................. 8 RM-RK252 ................................. 9, 10, 11, 35, 36 Clock .............................................................</p></li><li><h6><a class="text-decoration-none text-link fw-bold" href=/manual/jvc/get0602-001a/dvd-receiver-with-monitor-instruction-manual/page-212.html>PAGE 212</a></h6><p>Refer to page of How to reset your unit Vous avez des PROBLÈMES de fonctionnement? Réinitialisez votre appareil Référez-vous à la page intitulée Comment réinitialiser votre appareil Пожалуйста, перезагрузите Ваше устройство Для получения информации о перезагрузке Вашего устройства обратитесь на соответствующую страницу EN, FR, RU © 2009 Victor Company of Japan, Limited CoverRear_KW-AVX726_005A_f.</p></li><li><h6><a class="text-decoration-none text-link fw-bold" href=/manual/jvc/get0602-001a/dvd-receiver-with-monitor-instruction-manual/page-213.html>PAGE 213</a></h6><p>KW-AVX726/KW-AVX725/ KW-AVX626/KW-AVX625 GET0605-011A Installation/Connection Manual Manuel d’installation/raccordement Руководство по установке/подключению 0109DTSMDTJEIN EN, FR, RU © 2009 Victor Company of Japan, Limited [EU] ENGLISH FRANÇAIS РУССКИЙ This unit is designed to operate on 12 V DC, NEGATIVE ground electrical systems. If your vehicle does not have this system, a voltage inverter is required, which can be purchased at JVC IN-CAR ENTERTAINMENT dealers.</p></li><li><h6><a class="text-decoration-none text-link fw-bold" href=/manual/jvc/get0602-001a/dvd-receiver-with-monitor-instruction-manual/page-214.html>PAGE 214</a></h6><p>INSTALLATION (IN-DASH MOUNTING) INSTALLATION (MONTAGE DANS LE TABLEAU DE BORD) УСТАНОВКА (УСТАНОВКА В ПРИБОРНУЮ ПАНЕЛЬ) The following illustration shows a typical installation. However, you should make adjustments corresponding to your specific car. If you have any questions or require information regarding installation kits, consult your JVC IN-CAR ENTERTAINMENT dealer or a company supplying kits. • If you are not sure how to install this unit correctly, have it installed by a qualified technician.</p></li><li><h6><a class="text-decoration-none text-link fw-bold" href=/manual/jvc/get0602-001a/dvd-receiver-with-monitor-instruction-manual/page-215.html>PAGE 215</a></h6><p>ELECTRICAL CONNECTIONS PRECAUTIONS on power supply and speaker connections: • DO NOT connect the speaker leads of the power cord to the car battery; otherwise, the unit will be seriously damaged. • BEFORE connecting the speaker leads of the power cord to the speakers, check the speaker wiring in your car.</p></li><li><h6><a class="text-decoration-none text-link fw-bold" href=/manual/jvc/get0602-001a/dvd-receiver-with-monitor-instruction-manual/page-216.html>PAGE 216</a></h6><p>ENGLISH FRANÇAIS РУССКИЙ Connections without using the ISO connector / Connexions sans utiliser le connecteur ISO / Подключение без использования разъемов ISO Before connecting: Check the wiring in the vehicle carefully. Incorrect connection may cause serious damage to this unit. The leads of the power cord and those of the connector from the car body may be different in color. 1 Cut the ISO connector. 2 Connect the colored leads of the power cord in the order specified in the illustration below.</p></li><li><h6><a class="text-decoration-none text-link fw-bold" href=/manual/jvc/get0602-001a/dvd-receiver-with-monitor-instruction-manual/page-217.html>PAGE 217</a></h6><p>A Connecting the external amplifier and/or subwoofer / Connexion d’amplificateurs extérieurs et/ou d’un caisson de grave / Подключение внешних усилителей и/или низкочастотного динамика You can connect an amplifier to upgrade your car stereo system. • Connect the remote lead (blue with white stripe) to the remote lead of the other equipment so that it can be controlled through this unit. • Disconnect the speakers from this unit, connect them to the amplifier. Leave the speaker leads of this unit unused.</p></li><li><h6><a class="text-decoration-none text-link fw-bold" href=/manual/jvc/get0602-001a/dvd-receiver-with-monitor-instruction-manual/page-218.html>PAGE 218</a></h6><p>C Connecting the external components to the CD changer jack / Connexion des appareils extérieurs au changeur de CD / Подключение внешних устройств к разъему устройства автоматической смены компакт-дисков Lors de la connexion des appareils extérieurs, référez-vous aussi aux При подключении внешних устройств см. также руководства, поставляемые для устройств и адаптера. manuels fournis avec les appareils et les adaptateurs.</p></li><li><h6><a class="text-decoration-none text-link fw-bold" href=/manual/jvc/get0602-001a/dvd-receiver-with-monitor-instruction-manual/page-219.html>PAGE 219</a></h6><p>ENGLISH Having TROUBLE with operation? Please reset your unit Siehe Seite Zurücksetzen des Geräts Vous avez des PROBLÈMES de fonctionnement? Réinitialisez votre appareil Hebt u PROBLEMEN met de bediening? Stel het apparaat terug Zie de pagina met de paragraaf Het apparaat terugstellen Dear Customer, This apparatus is in conformance with the valid European directives and standards regarding electromagnetic compatibility and electrical safety.</p></li><li><h6><a class="text-decoration-none text-link fw-bold" href=/manual/jvc/get0602-001a/dvd-receiver-with-monitor-instruction-manual/page-220.html>PAGE 220</a></h6><p>ENGLISH Thank you for purchasing a JVC product. Please read all instructions carefully before operation, to ensure your complete understanding and to obtain the best possible performance from the unit. IMPORTANT FOR LASER PRODUCTS 1. CLASS 1 LASER PRODUCT 2. CAUTION: Do not open the top cover. There are no user serviceable parts inside the unit; leave all servicing to qualified service personnel. 3. CAUTION: Visible and/or invisible class 1M laser radiation when open.</p></li><li><h6><a class="text-decoration-none text-link fw-bold" href=/manual/jvc/get0602-001a/dvd-receiver-with-monitor-instruction-manual/page-221.html>PAGE 221</a></h6><p>• Your preset adjustments will also be erased (except the registered Bluetooth device). ( 28, 40) How to forcibly eject a disc Cautions on the monitor: • The monitor built in this unit has been produced with high precision, but it may have some ineffective dots. This is inevitable and is not malfunction. • Do not expose the monitor to direct sunlight. • Do not operate the touch panel using a ball-point pen or similar tool with the sharp tip.</p></li><li><h6><a class="text-decoration-none text-link fw-bold" href=/manual/jvc/get0602-001a/dvd-receiver-with-monitor-instruction-manual/page-222.html>PAGE 222</a></h6><p>ENGLISH Playable disc type Disc type DVD • DTS sound cannot be reproduced.</p></li><li><h6><a class="text-decoration-none text-link fw-bold" href=/manual/jvc/get0602-001a/dvd-receiver-with-monitor-instruction-manual/page-223.html>PAGE 223</a></h6><p>How to read this manual .................................................................................................................... How to reset your unit ....................................................................................................................... How to forcibly eject a disc................................................................................................................. Playable disc type ...................................................................</p></li><li><h6><a class="text-decoration-none text-link fw-bold" href=/manual/jvc/get0602-001a/dvd-receiver-with-monitor-instruction-manual/page-224.html>PAGE 224</a></h6><p>ENGLISH Basic operations Using the monitor panel/touch panel Display <av menu> screen, ( USB cable from the rear of the unit, ( 13) Display the <source menu> screen, ( 39) 8) Display/exit the Short Cut icons, ( 8) SOURCE CD 01 MP3 FLAT 3:00 AM 5 6 0:02:26 Folder Name File Name Track Title Artist Name Disc Title 1 Resets the unit ( 3). 2 • Turns on the power. 3 4 01 • Attenuates the sound (if the power is on). • Turns off the power. (Hold) Changes the display information.</p></li><li><h6><a class="text-decoration-none text-link fw-bold" href=/manual/jvc/get0602-001a/dvd-receiver-with-monitor-instruction-manual/page-225.html>PAGE 225</a></h6><p>• Switches the setting between “HEAD MODE” and “iPod MODE” (Hold) q • Displays <open tilt> screen. *6 [Open] : Opens the monitor panel. [Eject] : Ejects the disc. [Close] : Closes the monitor panel. [Tilt +] : Tilts open the monitor panel. [Tilt –] : Tilts close the monitor panel. • Ejects the disc and display <open tilt> screen. (Hold) • Closes the monitor panel if the panel is opened. w Monitor panel *1 Available display information varies among the playback sources.</p></li><li><h6><a class="text-decoration-none text-link fw-bold" href=/manual/jvc/get0602-001a/dvd-receiver-with-monitor-instruction-manual/page-226.html>PAGE 226</a></h6><p>ENGLISH <source menu> screen You can also select the source using the touch panel. SOURCE Source Menu TUNER FM1 1 87. 5 MHz Bayern Radio FLAT ST Pop Music 3:00 AM BAND Current source Exit Short Cut icons You can easily access some frequently used functions by using the Short Cut icons. Available icons vary among the sources. SOURCE TUNER FM1 1 87. 5 MHz Displays <illumination> menu. Bayern Radio FLAT ST ( Pop Music 3:00 19) Changes the sound mode.</p></li><li><h6><a class="text-decoration-none text-link fw-bold" href=/manual/jvc/get0602-001a/dvd-receiver-with-monitor-instruction-manual/page-227.html>PAGE 227</a></h6><p>Using the remote controller (RM-RK252) ENGLISH Installing the batteries R03/LR03/AAA Insert the batteries into the remote controller by matching the polarity (+ and –) correctly. Caution: • Danger of explosion if battery is incorrectly replaced. Replace only with the same or equivalent type. • Battery shall not be exposed to excessive heat such as sunshine, fire, or the like. If the effectiveness of the remote controller decreases, replace the batteries.</p></li><li><h6><a class="text-decoration-none text-link fw-bold" href=/manual/jvc/get0602-001a/dvd-receiver-with-monitor-instruction-manual/page-228.html>PAGE 228</a></h6><p>ENGLISH • DISC/USB: – DVD-Video: Selects the title. – DVD-VR: Selects the program/Playlist. – USB/other discs (except VCD/CD): Selects the folders if included. • CD-CH: – Selects the folders if included. • iPod: – 5 : Enters the main menu (then 5 / ∞ / 4 / ¢ work as menu selecting buttons.) 5 : Returns to the previous menu. ∞ : Confirms the selection. – ∞ : Pauses or resumes playback. 4 / ¢ buttons • TUNER/DAB: – Searches for stations/ensembles automatically if pressed briefly.</p></li><li><h6><a class="text-decoration-none text-link fw-bold" href=/manual/jvc/get0602-001a/dvd-receiver-with-monitor-instruction-manual/page-229.html>PAGE 229</a></h6><p>• Selects the source. e 3 (play) / 8 (pause) button • DISC/USB/ iPod : Starts playback/pauses. • Bluetooth PHONE: Answers incoming calls. • Bluetooth AUDIO: Starts playback. r (end call) button • Bluetooth PHONE: Ends the call. BAND button • TUNER/DAB: Selects the bands. 7 (stop) button • DISC/USB/ iPod : Stops playback. • Bluetooth AUDIO: Pauses. t * RETURN button • VCD: Returns to the PBC menu.</p></li><li><h6><a class="text-decoration-none text-link fw-bold" href=/manual/jvc/get0602-001a/dvd-receiver-with-monitor-instruction-manual/page-230.html>PAGE 230</a></h6><p>ENGLISH Preparation Canceling the display demonstration and setting the clock ~ Turn on the power. @ Set the clock. Setup Demonstration Wall Paper Color Scroll Dimmer Ÿ Display <av menu> screen. Bright Blue Once Auto 6 PM Dimmer Time Set Auto 7 AM Back BAND Setup ! Display <setup> screen. Time Set Time Format OSD Clock Clock Adjust AV Menu 1 12Hours Off Off : 00 AM 24Hours Auto Back Setup Time Set Time Format OSD Clock Clock Adjust ⁄ Cancel the demonstration. 3 : 45 PM Select [Off].</p></li><li><h6><a class="text-decoration-none text-link fw-bold" href=/manual/jvc/get0602-001a/dvd-receiver-with-monitor-instruction-manual/page-231.html>PAGE 231</a></h6><p>You can use the <av menu> for most of the operations and settings. The available menu items shown on the touch panel, depends on the selected source. • Non-available items will be shaded. ! Press the desired icon/item to perform the desired operations/settings. Moves to the preceding menu page ENGLISH AV Menu operations Indicates the next hierarchy level/setting item exists Setup The following steps are one of the fundamental procedures.</p></li><li><h6><a class="text-decoration-none text-link fw-bold" href=/manual/jvc/get0602-001a/dvd-receiver-with-monitor-instruction-manual/page-232.html>PAGE 232</a></h6><p>ENGLISH Initial: Underlined Menu item Demonstration Wall Paper Selectable setting/item ♦ Off ♦ On : Cancels. : Activates the demonstration on the screen. To stop it temporarily, touch the screen. ( 12) You can select the background picture of the screen. ♦ Bright, Future, Horizon, Plain You can select the color of the background picture. ♦ Blue, Light-Blue, Red, Orange, Yellow, Green, Purple, Dark-Blue, Dark-Green, Brown, Light-Brown, Black Scroll ♦ Off ♦ Once ♦ Auto : Cancels.</p></li><li><h6><a class="text-decoration-none text-link fw-bold" href=/manual/jvc/get0602-001a/dvd-receiver-with-monitor-instruction-manual/page-233.html>PAGE 233</a></h6><p>Menu item You can change the aspect ratio of the picture. ENGLISH Aspect *3 Selectable setting/item Aspect ratio of the incoming signal 4:3 16:9 Regular: For 4:3 original pictures Full: For 16:9 original pictures Display Panorama: For viewing 4:3 pictures naturally on the wide screen Clock Auto: • For “DISC”: Aspect ratio is automatically selected to match the incoming signals. • For the other video sources: Aspect ratio is fixed to <regular>.</p></li><li><h6><a class="text-decoration-none text-link fw-bold" href=/manual/jvc/get0602-001a/dvd-receiver-with-monitor-instruction-manual/page-234.html>PAGE 234</a></h6><p>ENGLISH Menu item Selectable setting/item Menu Language *5 Select the menu language; Initial English ( 57) 5 Select the audio language; Initial English ( 57) Audio Language * Subtitle *5 Select the subtitle language or erase the subtitle <off>.; Initial English ( 57) Monitor Type *5 16:9 4:3LB Disc 4:3PS Select the monitor type to watch a wide screen picture on the external monitor. ♦ 16:9 : Select when the aspect ratio of the external monitor is 16:9.</p></li><li><h6><a class="text-decoration-none text-link fw-bold" href=/manual/jvc/get0602-001a/dvd-receiver-with-monitor-instruction-manual/page-235.html>PAGE 235</a></h6><p>Disc Selectable setting/item D. (Digital) Audio Output *7 Select the signal format emitted through the DIGITAL OUT (optical) terminal. ( 55) ♦ PCM : Select this when connecting an amplifier or a decoder incompatible with Dolby Digital or MPEG Audio, or when connecting to a recording device. ♦ Dolby D : Select this when connecting an amplifier or a decoder compatible with Dolby Digital. ♦ Stream : Select this when connecting an amplifier or a decoder compatible with Dolby Digital or MPEG Audio.</p></li><li><h6><a class="text-decoration-none text-link fw-bold" href=/manual/jvc/get0602-001a/dvd-receiver-with-monitor-instruction-manual/page-236.html>PAGE 236</a></h6><p>Selectable setting/item TA Volume When you activate TA Standby Reception ( 6), the unit will temporarily switch to Traffic Announcement (TA) if available, from any source other than AM. You can preset the TA volume level. • The volume changes to the preset TA volume level if the current volume level is lower than the preset level. ♦ VOL 00 to 30 (or 50) *8; Initial VOL 15 Program Search *9 Usually when you select preset stations, the preset station is tuned in.</p></li><li><h6><a class="text-decoration-none text-link fw-bold" href=/manual/jvc/get0602-001a/dvd-receiver-with-monitor-instruction-manual/page-237.html>PAGE 237</a></h6><p>Menu item Selectable setting/item ♦ Changer/iPod *15 ENGLISH External Input *13, *14 For connecting an external component to the CD changer jack on the rear. 43), iPod, ( 46). : CD changer, ( : Any other than the above, ( 48). Beep ♦ Off ♦ On : Cancels. : Activates the key-touch tone. Telephone Muting *16 ♦ Off ♦ Muting1, : Cancels. : Select either one which mutes the sounds while using the cellular phone.</p></li><li><h6><a class="text-decoration-none text-link fw-bold" href=/manual/jvc/get0602-001a/dvd-receiver-with-monitor-instruction-manual/page-238.html>PAGE 238</a></h6><p>ENGLISH Selects a preset sound mode suitable to the music genre. ♦ Flat (Initial), Hard Rock, R&B, Pop, Jazz, Dance, Country, Reggae, Classic, User1, User2, User3 1 2 Adjust the settings, then store. Equalizer Display <av menu> screen. BAND 2 Back Display <equalizer> screen. Edit Make adjustments by moving each bar directly. AV Menu User Store User1 User2 User3 Back 3 Select a sound mode. Ex.: When storing into <user2>. Equalizer Moves to the other 6 sound modes. Ex.</p></li><li><h6><a class="text-decoration-none text-link fw-bold" href=/manual/jvc/get0602-001a/dvd-receiver-with-monitor-instruction-manual/page-239.html>PAGE 239</a></h6><p>Menu item Fader/Balance ENGLISH Initial: Underlined Selectable setting/item Fader : Adjust the front and rear speaker output balance. • When using a two-speaker system, set the fader level to “0.” ♦ F6 to R6; Initial 0 Balance : Adjust the left and right speaker output balance. ♦ L6 to R6; Initial 0 Press [ 5/∞/2/3 ] to adjust.</p></li><li><h6><a class="text-decoration-none text-link fw-bold" href=/manual/jvc/get0602-001a/dvd-receiver-with-monitor-instruction-manual/page-240.html>PAGE 240</a></h6><p>ENGLISH Initial: Underlined Selectable items when the source is: • TUNER : Mono, SSM, PTy Standby, PTy Code • DAB : D. (Dynamic) Range Control, Announce Standby, Announce Code, PTy Standby, PTy Code • DISC, USB, CD-CH, iPod : Repeat, Random • iPod *1 : Repeat, Random, Audiobooks • AV-IN, EXT-IN : Title Entry Menu item Selectable setting/item Mono When an FM stereo broadcast is hard to receive, activate monaural mode for better reception.</p></li><li><h6><a class="text-decoration-none text-link fw-bold" href=/manual/jvc/get0602-001a/dvd-receiver-with-monitor-instruction-manual/page-241.html>PAGE 241</a></h6><p>Selectable setting/item D. (Dynamic) Some DAB services provide Dynamic Range Control (DRC) signals together with their regular Range Control programme signals. DRC will reinforce the low level sounds to improve your listening when the surrounding sounds are noisy. • The DRC indicator will light up while tuning in to a service with the DRC signals. As the number increases, the effect becomes stronger.</p></li><li><h6><a class="text-decoration-none text-link fw-bold" href=/manual/jvc/get0602-001a/dvd-receiver-with-monitor-instruction-manual/page-242.html>PAGE 242</a></h6><p>Available items depend on the loaded disc type and playback file. iPod *4 — iPod — CD-CH MP3 Random USB CD DISC Disc/file type MPEG/MP3/ WMA/WAV Source VCD/CD Random*3 Selectable setting/item DivX/MPEG/ MP3/WMA/ WAV ENGLISH Menu item Folder Disc/USB (All) All Song Album Off ♦ Folder ♦ Disc/USB : Randomly plays all tracks of the current folder, then tracks of the next folders. : Randomly plays all tracks. (For VCD: When PBC is not in used.</p></li><li><h6><a class="text-decoration-none text-link fw-bold" href=/manual/jvc/get0602-001a/dvd-receiver-with-monitor-instruction-manual/page-243.html>PAGE 243</a></h6><p>TUNER/DAB ENGLISH Source Operation/setting • Storing a preset station/service manually 1 Press [BAND], then [ / ] to tune in to the station you want to preset. 2 Select <list> from the <av menu>. 3 Press and hold a preset number. List FM1 FM2 FM3 Ex.: Storing FM station in to preset number 4 Back The station selected in step 1 is now stored in preset number 4. • Selecting a preset station/service on the list List FM1 FM2 FM3 Ex.</p></li><li><h6><a class="text-decoration-none text-link fw-bold" href=/manual/jvc/get0602-001a/dvd-receiver-with-monitor-instruction-manual/page-244.html>PAGE 244</a></h6><p>ENGLISH Source Bluetooth PHONE Operation/setting Selecting a preset phone number on the list to make a call List Phone Number Back CD-CH Selecting a disc on the list Disc List Disc 01 Disc 04 Disc 02 MP3 Disc Disc 03 Disc 06 If an MP3 disc is selected, Folder/ Track List appear. Select a track to start playback.</p></li><li><h6><a class="text-decoration-none text-link fw-bold" href=/manual/jvc/get0602-001a/dvd-receiver-with-monitor-instruction-manual/page-245.html>PAGE 245</a></h6><p>ENGLISH Select “Bluetooth PHONE” or “Bluetooth AUDIO” as the source for operations. • Firstly, use <open> or <search> to register and establish the connection with a device. Menu item Dial Menu *1 Selectable setting/item Select the method to make a call. ♦ Redial : Shows the list of the phone numbers you have dialed. ♦ Received Calls : Shows the list of the received calls. ♦ Phonebook : Shows the phone book of the connected cellular phone. ♦ Missed Calls : Shows the list of the missed calls.</p></li><li><h6><a class="text-decoration-none text-link fw-bold" href=/manual/jvc/get0602-001a/dvd-receiver-with-monitor-instruction-manual/page-246.html>PAGE 246</a></h6><p>ENGLISH Menu item Open Selectable setting/item Preparation: • Operate the Bluetooth device to turn on its Bluetooth function. • Make sure “NEW DEVICE” is selected. If not, press [ 5 ] or [ ∞ ] to select it. 1 Press <open> on the <bluetooth> menu. 2 Enter a PIN (Personal Identification Number) *3. • You can enter any number you like (1-digit to 16-digit number). PIN Code Back You can enter [0] – [9] only. [BS] : Erases the character before the cursor. [Del] : Erases the character on the cursor.</p></li><li><h6><a class="text-decoration-none text-link fw-bold" href=/manual/jvc/get0602-001a/dvd-receiver-with-monitor-instruction-manual/page-247.html>PAGE 247</a></h6><p>Selectable setting/item Special Device Only for “NEW DEVICE.” Select a device you want to connect from the list of Bluetooth devices which require some special procedure to establish the Bluetooth connection. Then, use <open> or <search> to connect. • Once the connection is established, it is registered in the unit. You can connect the unit and the device by using <connect> the next time. Connect Only for the registered devices.</p></li><li><h6><a class="text-decoration-none text-link fw-bold" href=/manual/jvc/get0602-001a/dvd-receiver-with-monitor-instruction-manual/page-248.html>PAGE 248</a></h6><p>ENGLISH Listening to the radio Preset number SOURCE TUNER Band Sound mode FM1 1 87. 5 MHz PS (station name) for FM Radio Data System. * Bayern Radio FLAT ST Pop Music Tuner/Standby Reception indicator 3:00 AM PTY code for FM Radio Data System BAND ~ Press [SOURCE], then press [TUNER]. Ÿ Press [BAND]. ! Press [ ] or [ ] to search for a station—Auto Search. • The ST indicator lights up when receiving an FM stereo broadcast with sufficient signal strength.</p></li><li><h6><a class="text-decoration-none text-link fw-bold" href=/manual/jvc/get0602-001a/dvd-receiver-with-monitor-instruction-manual/page-249.html>PAGE 249</a></h6><p>Searching for FM Radio Data System programme—PTY Search Storing your favorite programme types You can store your favorite PTY codes into the PTY Preset List. Ex.: Storing <drama> into <preset 1> 1 You can search for your favorite programmes being broadcast by selecting the PTY code of your favorite programmes. 1 ENGLISH The following features are available only for FM Radio Data System stations. PTy Search Preset PTy Code Display <pty search> menu.</p></li><li><h6><a class="text-decoration-none text-link fw-bold" href=/manual/jvc/get0602-001a/dvd-receiver-with-monitor-instruction-manual/page-250.html>PAGE 250</a></h6><p>ENGLISH Disc operations The disc type is automatically detected, then playback starts (for some discs, the top menu of the disc appears). If a disc does not have any disc menu, all tracks on it will be played repeatedly until you change the source or eject the disc. If “ ” appears on the screen, the unit cannot accept the operation you have tried to do. • In some cases, without showing “ ,” operations will not be accepted. ~ Open the monitor panel. ! Insert a disc.</p></li><li><h6><a class="text-decoration-none text-link fw-bold" href=/manual/jvc/get0602-001a/dvd-receiver-with-monitor-instruction-manual/page-251.html>PAGE 251</a></h6><p>Changing the display information ENGLISH Each time you press the button, the display changes to show the different information. ( 56) Ex.: While playing a DVD Video SOURCE DVD FLAT CHAP. RPT 3:00 AM 1 Audio format—Dolby Digital, MP3, WMA, WAV 2 Disc type—DVD, DVD-VR, VCD, CD 3 Video format—DivX, MPEG, VR-PRG (program), VR-PLAY (playlist), PBC 4 [5 / ∞] 5 6 7 8 9 • DVD Video/DVD-VR: Selects title/program/ playlist.</p></li><li><h6><a class="text-decoration-none text-link fw-bold" href=/manual/jvc/get0602-001a/dvd-receiver-with-monitor-instruction-manual/page-252.html>PAGE 252</a></h6><p>ENGLISH Operation buttons on the screen You can display the following operation buttons while watching the playback pictures on the screen. • If no operation is done after awhile, the operation buttons disappear (except when a disc menu is displayed). A [SOURCE] [5 ∞] [3 / 8] [4 ¢] Touch the screen (center portion).</p></li><li><h6><a class="text-decoration-none text-link fw-bold" href=/manual/jvc/get0602-001a/dvd-receiver-with-monitor-instruction-manual/page-253.html>PAGE 253</a></h6><p>Operations using the remote controller (RM-RK252) Stop play ENGLISH / Button Stop play Start play/Pause (if pressed during play) • DivX/MPEG: Start play/Pause (if pressed during play) • JPEG: • Start play (Slide show: Each file is shown for a few seconds.) • Pause (if pressed during play). • Reverse/forward chapter search *1 (No sound can • DivX/MPEG: Reverse/forward track be heard.) search *4 (No sound can be heard.) • Slow motion *2 during pause (No sound can be heard.</p></li><li><h6><a class="text-decoration-none text-link fw-bold" href=/manual/jvc/get0602-001a/dvd-receiver-with-monitor-instruction-manual/page-254.html>PAGE 254</a></h6><p>ENGLISH Button Stop play Stop play Stop play Start play/Pause (if pressed during play) Reverse/forward track search *6 • Forward slow motion *7 during pause. (No sound can be heard.) – Reverse slow motion does not work. • Select track • Reverse/fast-forward track search *8 (No sound can be heard.</p></li><li><h6><a class="text-decoration-none text-link fw-bold" href=/manual/jvc/get0602-001a/dvd-receiver-with-monitor-instruction-manual/page-255.html>PAGE 255</a></h6><p>Operations using the on-screen bar 1 Display the Original Program screen. Display the Playlist screen. 2 Select an item you want to start play. (DVD/DVD-VR/DivX/MPEG/JPEG/VCD) These operations are possible on the monitor using the remote controller. 1 Show the on-screen bar ( ENGLISH Using the list screens... (DVD-VR) 38). (twice) 2 Select an item. 3 Make a selection. Original Program/Playlist screen • Original Program If pop-up menu appears... • To cancel pop-up menu, press RETURN.</p></li><li><h6><a class="text-decoration-none text-link fw-bold" href=/manual/jvc/get0602-001a/dvd-receiver-with-monitor-instruction-manual/page-256.html>PAGE 256</a></h6><p>ENGLISH On-screen bar Ex.: DVD-Video Information Operation 1 Disc type 2 • DVD-Video: Audio signal format type and channel • VCD: PBC 3 Playback mode *1 DVD-Video: T. RPT: Title repeat C. RPT: Chapter repeat DVD-VR: C. RPT: Chapter repeat PG. RPT: Program repeat DivX/MPEG Video: T. RPT: Track repeat F. RPT: Folder repeat A. RND: All (Disc) random F. RND: Folder random JPEG: F. RPT: Folder repeat VCD *2: T. RPT: Track repeat A.</p></li><li><h6><a class="text-decoration-none text-link fw-bold" href=/manual/jvc/get0602-001a/dvd-receiver-with-monitor-instruction-manual/page-257.html>PAGE 257</a></h6><p>You can connect a USB mass storage class device such as a USB memory, Digital Audio Player, portable HDD, etc. to the unit. • You can also connect the iPod to the USB terminal of the unit. For details of the operations, 45 – 46. ENGLISH USB operations USB cable from the rear of the unit This unit can play JPEG/MPEG1/MPEG2/MP3/WMA/ WAV files stored in USB mass storage class device. • You can operate the USB device in the same way you operate the files on discs.</p></li><li><h6><a class="text-decoration-none text-link fw-bold" href=/manual/jvc/get0602-001a/dvd-receiver-with-monitor-instruction-manual/page-258.html>PAGE 258</a></h6><p>ENGLISH Using the Bluetooth® devices For Bluetooth operations, it is required to connect the Bluetooth adapter, KS-BTA200 (not supplied) to the CD changer jack on the rear of this unit. • Refer also to the instructions supplied with the Bluetooth adapter and the Bluetooth device. • Refer to the list (included in the box) to check the countries where you may use the Bluetooth ® function.</p></li><li><h6><a class="text-decoration-none text-link fw-bold" href=/manual/jvc/get0602-001a/dvd-receiver-with-monitor-instruction-manual/page-259.html>PAGE 259</a></h6><p>Status of the device • Signal strength/Battery remainder (only when the information comes from the device). [5 / ∞]: Selects the other registered device. Connected device name • When a cellular phone with audio function is registered/connected, appears. SOURCE Connected Device Name FLAT 3:00 ENGLISH Using the Bluetooth cellular phone AM Activates <voice dialing> Display <dial menu> screen. function. (Hold) • Appears on any source information screen when the Bluetooth adapter is connected.</p></li><li><h6><a class="text-decoration-none text-link fw-bold" href=/manual/jvc/get0602-001a/dvd-receiver-with-monitor-instruction-manual/page-260.html>PAGE 260</a></h6><p>ENGLISH When an SMS comes in... If the cellular phone is compatible with SMS (Short Message Service), you can read the messages on the screen. • You cannot edit or send a message through the unit. Presetting the phone numbers You can preset up to 6 phone numbers. 1 When <message info> is set to <auto>... The unit rings and the following screen is displayed to inform you of a message arrival.</p></li><li><h6><a class="text-decoration-none text-link fw-bold" href=/manual/jvc/get0602-001a/dvd-receiver-with-monitor-instruction-manual/page-261.html>PAGE 261</a></h6><p>Using the Bluetooth audio player ENGLISH Indicates the button pressed. • It may be different from the operation status. Starts playback/pause SOURCE Connected Device Name FLAT 3:00 AM [5 / ∞]: Selects the other registered device. [4 / ¢]: Reverse/ forward search Stops playback ~ Press [SOURCE], then press [Bluetooth AUDIO]. Ÿ Start playback. If playback does not start automatically, operate the Bluetooth audio player to start playback.</p></li><li><h6><a class="text-decoration-none text-link fw-bold" href=/manual/jvc/get0602-001a/dvd-receiver-with-monitor-instruction-manual/page-262.html>PAGE 262</a></h6><p>ENGLISH Listening to the DAB tuner Preset number SOURCE Band DAB Sound mode DAB indicators */ Standby Reception indicator DAB1 1 1475.216MHz LN Service Label FLAT If no signal is received, “No DAB Signal” appears. DRC 3:00 AM BAND ~ Press [SOURCE], then press [DAB]. Ÿ Press [BAND]. ! Press [ ] or [ ] to search for an ensemble—Auto Search. • Manual Search: Hold either [ repeatedly.</p></li><li><h6><a class="text-decoration-none text-link fw-bold" href=/manual/jvc/get0602-001a/dvd-receiver-with-monitor-instruction-manual/page-263.html>PAGE 263</a></h6><p>ENGLISH Listening to the iPod/iPhone You can connect the iPod/iPhone using the following cable or adapter: To Listen to the music Cable/adapter To operate USB 2.0 cable (accessory of the iPod/iPhone) to the USB cable from the rear of the unit. See “When connected with the USB cable” below. Interface Adapter for iPod, KS-PD100 (not supplied) to the CD changer jack on the rear of the unit. See “When connected with the interface adapter” on page 46.</p></li><li><h6><a class="text-decoration-none text-link fw-bold" href=/manual/jvc/get0602-001a/dvd-receiver-with-monitor-instruction-manual/page-264.html>PAGE 264</a></h6><p>ENGLISH ~ Press [SOURCE], then press [iPod ]. The following operations/settings are only available in “HEAD MODE.” • To display the <ipod artwork>, 16. • To select track/video from <search mode>, 26. • To select the playback mode, 23, 24. • To change the play speed of the audio books, 24. Playback starts automatically. • When you connect the iPod to the USB terminal, “ iPod” is selected as the source and playback starts automatically. Ÿ Press [4] or [¢] to select a track/ video.</p></li><li><h6><a class="text-decoration-none text-link fw-bold" href=/manual/jvc/get0602-001a/dvd-receiver-with-monitor-instruction-manual/page-265.html>PAGE 265</a></h6><p>1 Press [4] or [¢] to select the desired item. Press [3 / 8] to confirm the selection. Repeat steps 2 and 3 to select a track. • When a track is selected finally, playback starts. • To return to the previous menu, press [SEARCH]. Press [SEARCH] to enter the main menu. “SEARCH” flashes on the screen during menu operations. • This mode will be canceled if no operations are done for about 5 seconds. 2 3 4 ENGLISH Selecting a track from the main menu 23, 24.</p></li><li><h6><a class="text-decoration-none text-link fw-bold" href=/manual/jvc/get0602-001a/dvd-receiver-with-monitor-instruction-manual/page-266.html>PAGE 266</a></h6><p>ENGLISH Navigation screen You can also connect a Navigation System to the VIDEO IN jack so that you can watch the navigation screen. Preparation: Make sure <navigation> is selected for <av input>. ( 18) To view the navigation screen Press DISP on the monitor panel repeatedly. ( 56) • The aspect ratio of the navigation screen is fixed to <full> regardless of the <aspect> setting.</p></li><li><h6><a class="text-decoration-none text-link fw-bold" href=/manual/jvc/get0602-001a/dvd-receiver-with-monitor-instruction-manual/page-267.html>PAGE 267</a></h6><p>Caution on cleaning the unit Do not use any solvent (for example, thinner, benzine, etc.), detergent, or insecticide. This may damage the monitor or the unit. To keep discs clean A dirty disc may not play correctly. If a disc does become dirty, wipe it with a soft cloth in a straight line from center to edge. • Do not use any solvents (for example, conventional record cleaner, spray, thinner, benzine, etc.) to clean discs.</p></li><li><h6><a class="text-decoration-none text-link fw-bold" href=/manual/jvc/get0602-001a/dvd-receiver-with-monitor-instruction-manual/page-268.html>PAGE 268</a></h6><p>ENGLISH More about this unit General Turning on the power • By pressing SOURCE on the monitor panel, you can also turn on the power. If the source is ready, playback starts. Tuner (FM only) Storing stations in memory • When SSM is over, received stations are preset in no. 1 (lowest frequency) to no. 6 (highest frequency).</p></li><li><h6><a class="text-decoration-none text-link fw-bold" href=/manual/jvc/get0602-001a/dvd-receiver-with-monitor-instruction-manual/page-269.html>PAGE 269</a></h6><p>Playing JPEG files • This unit can recognize a total of 5 000 files and 250 folders (a maximum of 999 files per folder). • Use only “finalized” discs. • This unit can play back multi-session discs; however, unclosed sessions will be skipped while playing. • This unit can recognize a total of 25 characters for file/folder names. • Some discs or files may not be played back due to their characteristics or recording conditions. • This unit can play back JPEG files with the extension code <.jpg>, or <.jpeg>.</p></li><li><h6><a class="text-decoration-none text-link fw-bold" href=/manual/jvc/get0602-001a/dvd-receiver-with-monitor-instruction-manual/page-270.html>PAGE 270</a></h6><p>ENGLISH Disc/file information shown on the external monitor • DivX/MPEG1/MPEG2/JPEG/MP3/WMA/WAV The following screens appear only on the external monitor. • CD TIME T. RPT Track Information Album Four seasons Artist Robert M.</p></li><li><h6><a class="text-decoration-none text-link fw-bold" href=/manual/jvc/get0602-001a/dvd-receiver-with-monitor-instruction-manual/page-271.html>PAGE 271</a></h6><p>Bluetooth operations General • While driving, do not perform complicated operation such as dialing the numbers, using phone book, etc. When you perform these operations, stop your car in a safe place. • Some Bluetooth devices may not be connected to this unit depending on the Bluetooth version of the device. • This unit may not work for some Bluetooth devices. • Connecting condition may vary depending on circumstances around you. • When the unit is turned off, the device is disconnected.</p></li><li><h6><a class="text-decoration-none text-link fw-bold" href=/manual/jvc/get0602-001a/dvd-receiver-with-monitor-instruction-manual/page-272.html>PAGE 272</a></h6><p>ENGLISH Icons for phone types • These icons indicate the phone type set on the device. : Cellular phone : Household phone : Office : General : Other than above CD changer • If you select a folder, which does not include any music files, on the list ( 26), you will hear a beep. Select another folder including music files. DAB • Only the primary DAB service can be preset even when you store a secondary service.</p></li><li><h6><a class="text-decoration-none text-link fw-bold" href=/manual/jvc/get0602-001a/dvd-receiver-with-monitor-instruction-manual/page-273.html>PAGE 273</a></h6><p>ENGLISH Menu settings • If you change the <amplifier gain> setting from <high> to <low> while the volume level is set higher than “30,” the unit automatically changes the volume level to “VOL 30.” • After you change any of <menu language audio language subtitle> settings, turn off then on the power, and re-insert the disc (or insert another disc) so that your setting takes effect.</p></li><li><h6><a class="text-decoration-none text-link fw-bold" href=/manual/jvc/get0602-001a/dvd-receiver-with-monitor-instruction-manual/page-274.html>PAGE 274</a></h6><p>ENGLISH Display information • Available display information varies among the playback sources. Each time you press DISP, the display changes to show the various information. Ex.: When the playback source is a DVD video disc SOURCE SOURCE DVD DVD FLAT FLAT CHAP.</p></li><li><h6><a class="text-decoration-none text-link fw-bold" href=/manual/jvc/get0602-001a/dvd-receiver-with-monitor-instruction-manual/page-275.html>PAGE 275</a></h6><p>Code Language Code Language Code Language Code Language Code Language AA AB AF AM AR AS AY AZ BA BE BG BH BI BN BO BR CA CO CS CY DZ EL EO ET EU Afar Abkhazian Afrikaans Ameharic Arabic Assamese Aymara Azerbaijani Bashkir Byelorussian Bulgarian Bihari Bislama Bengali, Bangla Tibetan Breton Catalan Corsican Czech Welsh Bhutani Greek Esperanto Estonian Basque FA FI FJ FO FY GA GD GL GN GU HA HI HR HU HY IA IE IK IN IS IW JA JI JW KA Persian Finnish Fiji Faroese Frisian Irish Scots Gaelic Galician Guarani G</p></li><li><h6><a class="text-decoration-none text-link fw-bold" href=/manual/jvc/get0602-001a/dvd-receiver-with-monitor-instruction-manual/page-276.html>PAGE 276</a></h6><p>ENGLISH • Manufactured under license from Dolby Laboratories. Dolby and the double-D symbol are trademarks of Dolby Laboratories. • “DVD Logo” is a trademark of DVD Format/Logo Licensing Corporation registered in the US, Japan and other countries. • DivX® is a registered trademark of DivX, Inc., and is used under license. • Plays DivX® video: • ABOUT DIVX VIDEO: DivX® is a digital video format created by DivX, Inc. This is an official DivX Certified or DivX Ultra Certified device that plays DivX video.</p></li><li><h6><a class="text-decoration-none text-link fw-bold" href=/manual/jvc/get0602-001a/dvd-receiver-with-monitor-instruction-manual/page-277.html>PAGE 277</a></h6><p>What appears to be trouble is not always serious. Check the following points before calling a service center. • For operations with the external components, refer also to the instructions supplied for the adapters used with the connections (as well as the instructions supplied with the external components). • Messages (enclosed in “ ”) in the tables below are shown in the language selected on <language>. ( 15) Messages described here are in the language of this manual.</p></li><li><h6><a class="text-decoration-none text-link fw-bold" href=/manual/jvc/get0602-001a/dvd-receiver-with-monitor-instruction-manual/page-278.html>PAGE 278</a></h6><p>Symptom ENGLISH • Disc can be neither recognized nor played back. • Disc cannot be ejected. • • Disc in general • • • • • • • DivX/MPEG1/MPEG2/MP3/WMA/WAV • • • • • Remedy/Cause Eject the disc forcibly. ( 3) Unlock the disc. ( 32) Recordable/Rewritable discs cannot • Insert a finalized disc. be played back. • Finalize the discs with the component which you used for Tracks on the Recordable/Rewritable recording. discs cannot be skipped. Playback does not start. • Insert the disc correctly again.</p></li><li><h6><a class="text-decoration-none text-link fw-bold" href=/manual/jvc/get0602-001a/dvd-receiver-with-monitor-instruction-manual/page-279.html>PAGE 279</a></h6><p>• Noise is generated. USB • Tracks cannot play back as you have intended them to play. • “Now Reading...” keeps flashing on the screen. Remedy/Cause The track played back is not a playable file format. Skip to another file. Playback order may differ from the one played back using other players. • Readout time varies depending on the USB device. • Do not use too many hierarchy and folders. • Turn off the power then on again. ENGLISH Symptom • “Cannot play this device Check the No tracks are stored.</p></li><li><h6><a class="text-decoration-none text-link fw-bold" href=/manual/jvc/get0602-001a/dvd-receiver-with-monitor-instruction-manual/page-280.html>PAGE 280</a></h6><p>CD changer ENGLISH Symptom • “No Disc” appears on the screen. • “No Magazine” appears on the screen. • “Cannot play this disc Check the disc” appears on the screen. • “Reset08” appears on the screen. DAB tuner • “Reset01” – “Reset07” appears on the screen. • The CD changer does not work at all. • “No DAB Signal” appears on the screen. • “Reset 08” appears on the screen. • The DAB tuner does not work at all. • “Antenna Power NG” appears on the screen. • The iPod/iPhone does not turn on or does not work.</p></li><li><h6><a class="text-decoration-none text-link fw-bold" href=/manual/jvc/get0602-001a/dvd-receiver-with-monitor-instruction-manual/page-281.html>PAGE 281</a></h6><p>Maximum Power Output: Continuous Power Output (RMS): AMPLIFIER Load Impedance: Equalizer Control Range: Front/Rear: Front/Rear: Frequencies: Level: Signal-to-Noise Ratio: Audio Output Level: • LINE OUT (REAR) • SUBWOOFER Line-Out Level/ Impedance: Output Impedance: Color System: Video Output (composite): Other Terminals: Input: FM/AM TUNER Frequency Range: FM Tuner: MW Tuner: LW Tuner: Output: Others: FM: AM: Usable Sensitivity: 50 dB Quieting Sensitivity: Alternate Channel Selectivity (400 kHz)</p></li><li><h6><a class="text-decoration-none text-link fw-bold" href=/manual/jvc/get0602-001a/dvd-receiver-with-monitor-instruction-manual/page-282.html>PAGE 282</a></h6><p>DVD/CD GENERAL MONITOR USB ENGLISH Signal Detection System: Non-contact optical pickup (semiconductor laser) Frequency Response: DVD, fs=48 kHz/96 kHz: 16 Hz to 22 000 Hz VCD/CD: 16 Hz to 20 000 Hz Dynamic Range: 96 dB Signal-to-Noise Ratio: 98 dB Wow and Flutter: Less than measurable limit USB Standards: USB 2.0 Full Speed Data Transfer Rate Full Speed: Maximum 12 Mbps Low Speed: Maximum 1.5 Mbps Compatible Device: Mass storage class Compatible File System: FAT 32/16/12 Max.</p></li><li><h6><a class="text-decoration-none text-link fw-bold" href=/manual/jvc/get0602-001a/dvd-receiver-with-monitor-instruction-manual/page-283.html>PAGE 283</a></h6><p>General Reset ..................................................................3, 6 Volume ................................................6, 7, 10, 21 AV Menu ........................................................ 6, 13 Source..................................................6, 8, 11, 34 Short Cut ...................................................6, 8, 34 RM-RK252 ................................... 9 – 11, 35 – 38 Clock .............................................................</p></li><li><h6><a class="text-decoration-none text-link fw-bold" href=/manual/jvc/get0602-001a/dvd-receiver-with-monitor-instruction-manual/page-284.html>PAGE 284</a></h6><p>ENGLISH Having TROUBLE with operation? Please reset your unit Siehe Seite Zurücksetzen des Geräts Vous avez des PROBLÈMES de fonctionnement? Réinitialisez votre appareil Hebt u PROBLEMEN met de bediening? Stel het apparaat terug Zie de pagina met de paragraaf Het apparaat terugstellen Dear Customer, This apparatus is in conformance with the valid European directives and standards regarding electromagnetic compatibility and electrical safety.</p></li><li><h6><a class="text-decoration-none text-link fw-bold" href=/manual/jvc/get0602-001a/dvd-receiver-with-monitor-instruction-manual/page-285.html>PAGE 285</a></h6><p>KW-AVX720 Installation/Connection Manual Einbau/Anschlußanleitung Manuel d’installation/raccordement Handleiding voor installatie/aansluiting GET0603-003A 0209DTSMDTJEIN [E] EN, GE, FR, NL © 2009 Victor Company of Japan, Limited ENGLISH DEUTSCH FRANÇAIS NEDERLANDS This unit is designed to operate on 12 V DC, NEGATIVE ground electrical systems. If your vehicle does not have this system, a voltage inverter is required, which can be purchased at JVC IN-CAR ENTERTAINMENT dealers.</p></li><li><h6><a class="text-decoration-none text-link fw-bold" href=/manual/jvc/get0602-001a/dvd-receiver-with-monitor-instruction-manual/page-286.html>PAGE 286</a></h6><p>INSTALLATION (IN-DASH MOUNTING) EINBAU (IM ARMATURENBRETT) INSTALLATION (MONTAGE INSTALLEREN (MONTEREN DANS LE TABLEAU DE BORD) IN DASHBOARD) The following illustration shows a typical installation. However, you should make adjustments corresponding to your specific car. If you have any questions or require information regarding installation kits, consult your JVC IN-CAR ENTERTAINMENT dealer or a company supplying kits.</p></li><li><h6><a class="text-decoration-none text-link fw-bold" href=/manual/jvc/get0602-001a/dvd-receiver-with-monitor-instruction-manual/page-287.html>PAGE 287</a></h6><p>ELEKTRISCHE ANSCHLÜSSE RACCORDEMENTS ELECTRIQUES ELEKTRISCHE VERBINDINGEN ELECTRICAL CONNECTIONS PRECAUTIONS on power supply and speaker connections: • DO NOT connect the speaker leads of the power cord to the car battery; otherwise, the unit will be seriously damaged. • BEFORE connecting the speaker leads of the power cord to the speakers, check the speaker wiring in your car.</p></li><li><h6><a class="text-decoration-none text-link fw-bold" href=/manual/jvc/get0602-001a/dvd-receiver-with-monitor-instruction-manual/page-288.html>PAGE 288</a></h6><p>ENGLISH DEUTSCH FRANÇAIS NEDERLANDS Connections without using the ISO connectors / Anschlüsse ohne Verwendung der ISO-Steckverbinder / Connexions sans l’utilisation des connecteurs ISO / Verbinden zonder gebruik van ISO-stekkers Before connecting: Check the wiring in the vehicle carefully. Incorrect connection may cause serious damage to this unit. The leads of the power cord and those of the connector from the car body may be different in color. 1 Cut the ISO connector.</p></li><li><h6><a class="text-decoration-none text-link fw-bold" href=/manual/jvc/get0602-001a/dvd-receiver-with-monitor-instruction-manual/page-289.html>PAGE 289</a></h6><p>A Connecting the external amplifier and subwoofer / Anschließen des externen Verstärkers und Subwoofers / Connexion d’amplificateurs extérieurs et d’un caisson de grave / Verbinden van een externe versterker en subwoofer You can connect an amplifier to upgrade your car stereo system. • Connect the remote lead (blue with white stripe) to the remote lead of the other equipment so that it can be controlled through this unit. • Disconnect the speakers from this unit, connect them to the amplifier.</p></li><li><h6><a class="text-decoration-none text-link fw-bold" href=/manual/jvc/get0602-001a/dvd-receiver-with-monitor-instruction-manual/page-290.html>PAGE 290</a></h6><p>C Connecting to the steering wheel remote controller / Anschluß an die Lenkradfernbedienung / Connexion de la télécommande de volant / Verbinden met de stuurwiel-afstandsbediening If your car is equipped with the steering wheel remote controller, you can operate this unit using the controller. To do it, a JVC’s OE remote adapter (not supplied) which matches with your car is required. Consult your JVC IN-CAR ENTERTAINMENT dealer for details.</p></li><li><h6><a class="text-decoration-none text-link fw-bold" href=/manual/jvc/get0602-001a/dvd-receiver-with-monitor-instruction-manual/page-291.html>PAGE 291</a></h6><p>Refer to page of How to reset your unit Затруднения при эксплуатации? Пожалуйста, перезагрузите Ваше устройство Для получения информации о перезагрузке Вашего устройства обратитесь на соответствующую страницу DVD RECEIVER WITH MONITOR Please reset your unit Маєте ПРОБЛЕМУ з функціонуванням? ENGLISH РУCCKИЙ DVD-ПРИЕМНИК С МОНИТОРОМ ПРИЙМАЧ ТА ПРОГРАВАЧ DVD-ДИСКІВ ІЗ МОНІТОРОМ KW-AVX720 УКРАЇНА Instructions Having TROUBLE with operation? DVD RECEIVER WITH MONITOR For canceling the display demonstr</p></li><li><h6><a class="text-decoration-none text-link fw-bold" href=/manual/jvc/get0602-001a/dvd-receiver-with-monitor-instruction-manual/page-292.html>PAGE 292</a></h6><p>ENGLISH Thank you for purchasing a JVC product. Please read all instructions carefully before operation, to ensure your complete understanding and to obtain the best possible performance from the unit. IMPORTANT FOR LASER PRODUCTS 1. CLASS 1 LASER PRODUCT 2. CAUTION: Do not open the top cover. There are no user serviceable parts inside the unit; leave all servicing to qualified service personnel. 3. CAUTION: Visible and/or invisible class 1M laser radiation when open.</p></li><li><h6><a class="text-decoration-none text-link fw-bold" href=/manual/jvc/get0602-001a/dvd-receiver-with-monitor-instruction-manual/page-293.html>PAGE 293</a></h6><p>• Your preset adjustments will also be erased (except the registered Bluetooth device). ( 28, 40) How to forcibly eject a disc Cautions on the monitor: • The monitor built in this unit has been produced with high precision, but it may have some ineffective dots. This is inevitable and is not malfunction. • Do not expose the monitor to direct sunlight. • Do not operate the touch panel using a ball-point pen or similar tool with the sharp tip.</p></li><li><h6><a class="text-decoration-none text-link fw-bold" href=/manual/jvc/get0602-001a/dvd-receiver-with-monitor-instruction-manual/page-294.html>PAGE 294</a></h6><p>ENGLISH Playable disc type Disc type DVD • DTS sound cannot be reproduced.</p></li><li><h6><a class="text-decoration-none text-link fw-bold" href=/manual/jvc/get0602-001a/dvd-receiver-with-monitor-instruction-manual/page-295.html>PAGE 295</a></h6><p>How to read this manual .................................................................................................................... How to reset your unit ....................................................................................................................... How to forcibly eject a disc................................................................................................................. Playable disc type ...................................................................</p></li><li><h6><a class="text-decoration-none text-link fw-bold" href=/manual/jvc/get0602-001a/dvd-receiver-with-monitor-instruction-manual/page-296.html>PAGE 296</a></h6><p>ENGLISH Basic operations Using the monitor panel/touch panel Display <av menu> screen, ( USB cable from the rear of the unit, ( 13) Display the <source menu> screen, ( 39) 8) Display/exit the Short Cut icons, ( 8) SOURCE CD 01 MP3 FLAT 3:00 AM 5 6 0:02:26 Folder Name File Name Track Title Artist Name Disc Title 1 Resets the unit ( 3). 2 • Turns on the power. 3 4 01 • Attenuates the sound (if the power is on). • Turns off the power. (Hold) Changes the display information.</p></li><li><h6><a class="text-decoration-none text-link fw-bold" href=/manual/jvc/get0602-001a/dvd-receiver-with-monitor-instruction-manual/page-297.html>PAGE 297</a></h6><p>• Switches the setting between “HEAD MODE” and “iPod MODE” (Hold) q • Displays <open tilt> screen. *6 [Open] : Opens the monitor panel. [Eject] : Ejects the disc. [Close] : Closes the monitor panel. [Tilt +] : Tilts open the monitor panel. [Tilt –] : Tilts close the monitor panel. • Ejects the disc and display <open tilt> screen. (Hold) • Closes the monitor panel if the panel is opened. w Monitor panel *1 Available display information varies among the playback sources.</p></li><li><h6><a class="text-decoration-none text-link fw-bold" href=/manual/jvc/get0602-001a/dvd-receiver-with-monitor-instruction-manual/page-298.html>PAGE 298</a></h6><p>ENGLISH <source menu> screen You can also select the source using the touch panel. SOURCE Source Menu TUNER FM1 1 87. 5 MHz Bayern Radio FLAT ST Pop Music 3:00 AM BAND Current source Exit Short Cut icons You can easily access some frequently used functions by using the Short Cut icons. Available icons vary among the sources. SOURCE TUNER FM1 1 87. 5 MHz Displays <illumination> menu. Bayern Radio FLAT ST ( Pop Music 3:00 19) Changes the sound mode.</p></li><li><h6><a class="text-decoration-none text-link fw-bold" href=/manual/jvc/get0602-001a/dvd-receiver-with-monitor-instruction-manual/page-299.html>PAGE 299</a></h6><p>Using the remote controller (RM-RK252) ENGLISH Installing the batteries R03/LR03/AAA Insert the batteries into the remote controller by matching the polarity (+ and –) correctly. Caution: • Danger of explosion if battery is incorrectly replaced. Replace only with the same or equivalent type. • Battery shall not be exposed to excessive heat such as sunshine, fire, or the like. If the effectiveness of the remote controller decreases, replace the batteries.</p></li><li><h6><a class="text-decoration-none text-link fw-bold" href=/manual/jvc/get0602-001a/dvd-receiver-with-monitor-instruction-manual/page-300.html>PAGE 300</a></h6><p>ENGLISH • DISC/USB: – DVD-Video: Selects the title. – DVD-VR: Selects the program/Playlist. – USB/other discs (except VCD/CD): Selects the folders if included. • CD-CH: – Selects the folders if included. • iPod: – 5 : Enters the main menu (then 5 / ∞ / 4 / ¢ work as menu selecting buttons.) 5 : Returns to the previous menu. ∞ : Confirms the selection. – ∞ : Pauses or resumes playback. 4 / ¢ buttons • TUNER/DAB: – Searches for stations/ensembles automatically if pressed briefly.</p></li><li><h6><a class="text-decoration-none text-link fw-bold" href=/manual/jvc/get0602-001a/dvd-receiver-with-monitor-instruction-manual/page-301.html>PAGE 301</a></h6><p>• Selects the source. e 3 (play) / 8 (pause) button • DISC/USB/ iPod : Starts playback/pauses. • Bluetooth PHONE: Answers incoming calls. • Bluetooth AUDIO: Starts playback. r (end call) button • Bluetooth PHONE: Ends the call. BAND button • TUNER/DAB: Selects the bands. 7 (stop) button • DISC/USB/ iPod : Stops playback. • Bluetooth AUDIO: Pauses. t * RETURN button • VCD: Returns to the PBC menu.</p></li><li><h6><a class="text-decoration-none text-link fw-bold" href=/manual/jvc/get0602-001a/dvd-receiver-with-monitor-instruction-manual/page-302.html>PAGE 302</a></h6><p>ENGLISH Preparation Canceling the display demonstration and setting the clock ~ Turn on the power. @ Set the clock. Setup Demonstration Wall Paper Color Scroll Dimmer Ÿ Display <av menu> screen. Bright Blue Once Auto 6 PM Dimmer Time Set Auto 7 AM Back BAND Setup ! Display <setup> screen. Time Set Time Format OSD Clock Clock Adjust AV Menu 1 12Hours Off Off : 00 AM 24Hours Auto Back Setup Time Set Time Format OSD Clock Clock Adjust ⁄ Cancel the demonstration. 3 : 45 PM Select [Off].</p></li><li><h6><a class="text-decoration-none text-link fw-bold" href=/manual/jvc/get0602-001a/dvd-receiver-with-monitor-instruction-manual/page-303.html>PAGE 303</a></h6><p>You can use the <av menu> for most of the operations and settings. The available menu items shown on the touch panel, depends on the selected source. • Non-available items will be shaded. ! Press the desired icon/item to perform the desired operations/settings. Moves to the preceding menu page ENGLISH AV Menu operations Indicates the next hierarchy level/setting item exists Setup The following steps are one of the fundamental procedures.</p></li><li><h6><a class="text-decoration-none text-link fw-bold" href=/manual/jvc/get0602-001a/dvd-receiver-with-monitor-instruction-manual/page-304.html>PAGE 304</a></h6><p>ENGLISH Initial: Underlined Menu item Demonstration Wall Paper Selectable setting/item ♦ Off ♦ On : Cancels. : Activates the demonstration on the screen. To stop it temporarily, touch the screen. ( 12) You can select the background picture of the screen. ♦ Bright, Future, Horizon, Plain You can select the color of the background picture. ♦ Blue, Light-Blue, Red, Orange, Yellow, Green, Purple, Dark-Blue, Dark-Green, Brown, Light-Brown, Black Scroll ♦ Off ♦ Once ♦ Auto : Cancels.</p></li><li><h6><a class="text-decoration-none text-link fw-bold" href=/manual/jvc/get0602-001a/dvd-receiver-with-monitor-instruction-manual/page-305.html>PAGE 305</a></h6><p>Menu item You can change the aspect ratio of the picture. ENGLISH Aspect *3 Selectable setting/item Aspect ratio of the incoming signal 4:3 16:9 Regular: For 4:3 original pictures Full: For 16:9 original pictures Display Panorama: For viewing 4:3 pictures naturally on the wide screen Clock Auto: • For “DISC”: Aspect ratio is automatically selected to match the incoming signals. • For the other video sources: Aspect ratio is fixed to <regular>.</p></li><li><h6><a class="text-decoration-none text-link fw-bold" href=/manual/jvc/get0602-001a/dvd-receiver-with-monitor-instruction-manual/page-306.html>PAGE 306</a></h6><p>ENGLISH Menu item Selectable setting/item Menu Language *5 Select the menu language; Initial Руccĸий ( 57) 5 Select the audio language; Initial Руccĸий ( 57) Audio Language * Subtitle *5 Select the subtitle language or erase the subtitle <off>.; Initial Руccĸий ( 57) Monitor Type *5 16:9 Disc 4:3PS 4:3LB Select the monitor type to watch a wide screen picture on the external monitor. ♦ 16:9 : Select when the aspect ratio of the external monitor is 16:9.</p></li><li><h6><a class="text-decoration-none text-link fw-bold" href=/manual/jvc/get0602-001a/dvd-receiver-with-monitor-instruction-manual/page-307.html>PAGE 307</a></h6><p>Disc Selectable setting/item D. (Digital) Audio Output *7 Select the signal format emitted through the DIGITAL OUT (optical) terminal. ( 55) ♦ PCM : Select this when connecting an amplifier or a decoder incompatible with Dolby Digital or MPEG Audio, or when connecting to a recording device. ♦ Dolby D : Select this when connecting an amplifier or a decoder compatible with Dolby Digital. ♦ Stream : Select this when connecting an amplifier or a decoder compatible with Dolby Digital or MPEG Audio.</p></li><li><h6><a class="text-decoration-none text-link fw-bold" href=/manual/jvc/get0602-001a/dvd-receiver-with-monitor-instruction-manual/page-308.html>PAGE 308</a></h6><p>Selectable setting/item TA Volume When you activate TA Standby Reception ( 6), the unit will temporarily switch to Traffic Announcement (TA) if available, from any source other than AM. You can preset the TA volume level. • The volume changes to the preset TA volume level if the current volume level is lower than the preset level. ♦ VOL 00 to 30 (or 50) *8; Initial VOL 15 Program Search *9 Usually when you select preset stations, the preset station is tuned in.</p></li><li><h6><a class="text-decoration-none text-link fw-bold" href=/manual/jvc/get0602-001a/dvd-receiver-with-monitor-instruction-manual/page-309.html>PAGE 309</a></h6><p>Menu item Selectable setting/item ♦ Changer/iPod *15 ENGLISH External Input *13, *14 For connecting an external component to the CD changer jack on the rear. 43), iPod, ( 46). : CD changer, ( : Any other than the above, ( 48). Beep ♦ Off ♦ On : Cancels. : Activates the key-touch tone. Telephone Muting *16 ♦ Off ♦ Muting1, : Cancels. : Select either one which mutes the sounds while using the cellular phone.</p></li><li><h6><a class="text-decoration-none text-link fw-bold" href=/manual/jvc/get0602-001a/dvd-receiver-with-monitor-instruction-manual/page-310.html>PAGE 310</a></h6><p>ENGLISH Selects a preset sound mode suitable to the music genre. ♦ Flat (Initial), Hard Rock, R&B, Pop, Jazz, Dance, Country, Reggae, Classic, User1, User2, User3 1 2 Adjust the settings, then store. Equalizer Display <av menu> screen. BAND 2 Back Display <equalizer> screen. Edit Make adjustments by moving each bar directly. AV Menu User Store User1 User2 User3 Back 3 Select a sound mode. Ex.: When storing into <user2>. Equalizer Moves to the other 6 sound modes. Ex.</p></li><li><h6><a class="text-decoration-none text-link fw-bold" href=/manual/jvc/get0602-001a/dvd-receiver-with-monitor-instruction-manual/page-311.html>PAGE 311</a></h6><p>Menu item Fader/Balance ENGLISH Initial: Underlined Selectable setting/item Fader : Adjust the front and rear speaker output balance. • When using a two-speaker system, set the fader level to “0.” ♦ F6 to R6; Initial 0 Balance : Adjust the left and right speaker output balance. ♦ L6 to R6; Initial 0 Press [ 5/∞/2/3 ] to adjust.</p></li><li><h6><a class="text-decoration-none text-link fw-bold" href=/manual/jvc/get0602-001a/dvd-receiver-with-monitor-instruction-manual/page-312.html>PAGE 312</a></h6><p>ENGLISH Initial: Underlined Selectable items when the source is: • TUNER : Mono, SSM, PTy Standby, PTy Code • DAB : D. (Dynamic) Range Control, Announce Standby, Announce Code, PTy Standby, PTy Code • DISC, USB, CD-CH, iPod : Repeat, Random • iPod *1 : Repeat, Random, Audiobooks • AV-IN, EXT-IN : Title Entry Menu item Selectable setting/item Mono When an FM stereo broadcast is hard to receive, activate monaural mode for better reception.</p></li><li><h6><a class="text-decoration-none text-link fw-bold" href=/manual/jvc/get0602-001a/dvd-receiver-with-monitor-instruction-manual/page-313.html>PAGE 313</a></h6><p>Selectable setting/item D. (Dynamic) Some DAB services provide Dynamic Range Control (DRC) signals together with their regular Range Control programme signals. DRC will reinforce the low level sounds to improve your listening when the surrounding sounds are noisy. • The DRC indicator will light up while tuning in to a service with the DRC signals. As the number increases, the effect becomes stronger.</p></li><li><h6><a class="text-decoration-none text-link fw-bold" href=/manual/jvc/get0602-001a/dvd-receiver-with-monitor-instruction-manual/page-314.html>PAGE 314</a></h6><p>Available items depend on the loaded disc type and playback file. iPod *4 — iPod — CD-CH MP3 Random USB CD DISC Disc/file type MPEG/MP3/ WMA/WAV Source VCD/CD Random*3 Selectable setting/item DivX/MPEG/ MP3/WMA/ WAV ENGLISH Menu item Folder Disc/USB (All) All Song Album Off ♦ Folder ♦ Disc/USB : Randomly plays all tracks of the current folder, then tracks of the next folders. : Randomly plays all tracks. (For VCD: When PBC is not in used.</p></li><li><h6><a class="text-decoration-none text-link fw-bold" href=/manual/jvc/get0602-001a/dvd-receiver-with-monitor-instruction-manual/page-315.html>PAGE 315</a></h6><p>TUNER/DAB ENGLISH Source Operation/setting • Storing a preset station/service manually 1 Press [BAND], then [ / ] to tune in to the station you want to preset. 2 Select <list> from the <av menu>. 3 Press and hold a preset number. List FM1 FM2 Ex.: Storing FM station in to preset number 4 Back The station selected in step 1 is now stored in preset number 4. • Selecting a preset station/service on the list List FM1 FM2 Ex.</p></li><li><h6><a class="text-decoration-none text-link fw-bold" href=/manual/jvc/get0602-001a/dvd-receiver-with-monitor-instruction-manual/page-316.html>PAGE 316</a></h6><p>ENGLISH Source Bluetooth PHONE Operation/setting Selecting a preset phone number on the list to make a call List Phone Number Back CD-CH Selecting a disc on the list Disc List Disc 01 Disc 04 Disc 02 MP3 Disc Disc 03 Disc 06 If an MP3 disc is selected, Folder/ Track List appear. Select a track to start playback.</p></li><li><h6><a class="text-decoration-none text-link fw-bold" href=/manual/jvc/get0602-001a/dvd-receiver-with-monitor-instruction-manual/page-317.html>PAGE 317</a></h6><p>ENGLISH Select “Bluetooth PHONE” or “Bluetooth AUDIO” as the source for operations. • Firstly, use <open> or <search> to register and establish the connection with a device. Menu item Dial Menu *1 Selectable setting/item Select the method to make a call. ♦ Redial : Shows the list of the phone numbers you have dialed. ♦ Received Calls : Shows the list of the received calls. ♦ Phonebook : Shows the phone book of the connected cellular phone. ♦ Missed Calls : Shows the list of the missed calls.</p></li><li><h6><a class="text-decoration-none text-link fw-bold" href=/manual/jvc/get0602-001a/dvd-receiver-with-monitor-instruction-manual/page-318.html>PAGE 318</a></h6><p>ENGLISH Menu item Open Selectable setting/item Preparation: • Operate the Bluetooth device to turn on its Bluetooth function. • Make sure “NEW DEVICE” is selected. If not, press [ 5 ] or [ ∞ ] to select it. 1 Press <open> on the <bluetooth> menu. 2 Enter a PIN (Personal Identification Number) *3. • You can enter any number you like (1-digit to 16-digit number). PIN Code Back You can enter [0] – [9] only. [BS] : Erases the character before the cursor. [Del] : Erases the character on the cursor.</p></li><li><h6><a class="text-decoration-none text-link fw-bold" href=/manual/jvc/get0602-001a/dvd-receiver-with-monitor-instruction-manual/page-319.html>PAGE 319</a></h6><p>Selectable setting/item Special Device Only for “NEW DEVICE.” Select a device you want to connect from the list of Bluetooth devices which require some special procedure to establish the Bluetooth connection. Then, use <open> or <search> to connect. • Once the connection is established, it is registered in the unit. You can connect the unit and the device by using <connect> the next time. Connect Only for the registered devices.</p></li><li><h6><a class="text-decoration-none text-link fw-bold" href=/manual/jvc/get0602-001a/dvd-receiver-with-monitor-instruction-manual/page-320.html>PAGE 320</a></h6><p>ENGLISH Listening to the radio Preset number SOURCE TUNER Band Sound mode FM1 1 87. 5 MHz PS (station name) for FM Radio Data System. * Bayern Radio FLAT ST Pop Music Tuner/Standby Reception indicator 3:00 AM PTY code for FM Radio Data System BAND ~ Press [SOURCE], then press [TUNER]. Ÿ Press [BAND]. ! Press [ ] or [ ] to search for a station—Auto Search. • The ST indicator lights up when receiving an FM stereo broadcast with sufficient signal strength.</p></li><li><h6><a class="text-decoration-none text-link fw-bold" href=/manual/jvc/get0602-001a/dvd-receiver-with-monitor-instruction-manual/page-321.html>PAGE 321</a></h6><p>Searching for FM Radio Data System programme—PTY Search Storing your favorite programme types You can store your favorite PTY codes into the PTY Preset List. Ex.: Storing <drama> into <preset 1> 1 You can search for your favorite programmes being broadcast by selecting the PTY code of your favorite programmes. 1 ENGLISH The following features are available only for FM Radio Data System stations. PTy Search Preset PTy Code Display <pty search> menu.</p></li><li><h6><a class="text-decoration-none text-link fw-bold" href=/manual/jvc/get0602-001a/dvd-receiver-with-monitor-instruction-manual/page-322.html>PAGE 322</a></h6><p>ENGLISH Disc operations The disc type is automatically detected, then playback starts (for some discs, the top menu of the disc appears). If a disc does not have any disc menu, all tracks on it will be played repeatedly until you change the source or eject the disc. If “ ” appears on the screen, the unit cannot accept the operation you have tried to do. • In some cases, without showing “ ,” operations will not be accepted. ~ Open the monitor panel. ! Insert a disc.</p></li><li><h6><a class="text-decoration-none text-link fw-bold" href=/manual/jvc/get0602-001a/dvd-receiver-with-monitor-instruction-manual/page-323.html>PAGE 323</a></h6><p>Changing the display information ENGLISH Each time you press the button, the display changes to show the different information. ( 56) Ex.: While playing a DVD Video SOURCE DVD FLAT CHAP. RPT 3:00 AM 1 Audio format—Dolby Digital, MP3, WMA, WAV 2 Disc type—DVD, DVD-VR, VCD, CD 3 Video format—DivX, MPEG, VR-PRG (program), VR-PLAY (playlist), PBC 4 [5 / ∞] 5 6 7 8 9 • DVD Video/DVD-VR: Selects title/program/ playlist.</p></li><li><h6><a class="text-decoration-none text-link fw-bold" href=/manual/jvc/get0602-001a/dvd-receiver-with-monitor-instruction-manual/page-324.html>PAGE 324</a></h6><p>ENGLISH Operation buttons on the screen You can display the following operation buttons while watching the playback pictures on the screen. • If no operation is done after awhile, the operation buttons disappear (except when a disc menu is displayed). A [SOURCE] [5 ∞] [3 / 8] [4 ¢] Touch the screen (center portion).</p></li><li><h6><a class="text-decoration-none text-link fw-bold" href=/manual/jvc/get0602-001a/dvd-receiver-with-monitor-instruction-manual/page-325.html>PAGE 325</a></h6><p>Operations using the remote controller (RM-RK252) Stop play ENGLISH / Button Stop play Start play/Pause (if pressed during play) • DivX/MPEG: Start play/Pause (if pressed during play) • JPEG: • Start play (Slide show: Each file is shown for a few seconds.) • Pause (if pressed during play). • Reverse/forward chapter search *1 (No sound can • DivX/MPEG: Reverse/forward track be heard.) search *4 (No sound can be heard.) • Slow motion *2 during pause (No sound can be heard.</p></li><li><h6><a class="text-decoration-none text-link fw-bold" href=/manual/jvc/get0602-001a/dvd-receiver-with-monitor-instruction-manual/page-326.html>PAGE 326</a></h6><p>ENGLISH Button Stop play Stop play Stop play Start play/Pause (if pressed during play) Reverse/forward track search *6 • Forward slow motion *7 during pause. (No sound can be heard.) – Reverse slow motion does not work. • Select track • Reverse/fast-forward track search *8 (No sound can be heard.</p></li><li><h6><a class="text-decoration-none text-link fw-bold" href=/manual/jvc/get0602-001a/dvd-receiver-with-monitor-instruction-manual/page-327.html>PAGE 327</a></h6><p>Operations using the on-screen bar 1 Display the Original Program screen. Display the Playlist screen. 2 Select an item you want to start play. (DVD/DVD-VR/DivX/MPEG/JPEG/VCD) These operations are possible on the monitor using the remote controller. 1 Show the on-screen bar ( ENGLISH Using the list screens... (DVD-VR) 38). (twice) 2 Select an item. 3 Make a selection. Original Program/Playlist screen • Original Program If pop-up menu appears... • To cancel pop-up menu, press RETURN.</p></li><li><h6><a class="text-decoration-none text-link fw-bold" href=/manual/jvc/get0602-001a/dvd-receiver-with-monitor-instruction-manual/page-328.html>PAGE 328</a></h6><p>ENGLISH On-screen bar Ex.: DVD-Video Information Operation 1 Disc type 2 • DVD-Video: Audio signal format type and channel • VCD: PBC 3 Playback mode *1 DVD-Video: T. RPT: Title repeat C. RPT: Chapter repeat DVD-VR: C. RPT: Chapter repeat PG. RPT: Program repeat DivX/MPEG Video: T. RPT: Track repeat F. RPT: Folder repeat A. RND: All (Disc) random F. RND: Folder random JPEG: F. RPT: Folder repeat VCD *2: T. RPT: Track repeat A.</p></li><li><h6><a class="text-decoration-none text-link fw-bold" href=/manual/jvc/get0602-001a/dvd-receiver-with-monitor-instruction-manual/page-329.html>PAGE 329</a></h6><p>You can connect a USB mass storage class device such as a USB memory, Digital Audio Player, portable HDD, etc. to the unit. • You can also connect the iPod to the USB terminal of the unit. For details of the operations, 45 – 46. ENGLISH USB operations USB cable from the rear of the unit This unit can play JPEG/MPEG1/MPEG2/MP3/WMA/ WAV files stored in USB mass storage class device. • You can operate the USB device in the same way you operate the files on discs.</p></li><li><h6><a class="text-decoration-none text-link fw-bold" href=/manual/jvc/get0602-001a/dvd-receiver-with-monitor-instruction-manual/page-330.html>PAGE 330</a></h6><p>ENGLISH Using the Bluetooth® devices For Bluetooth operations, it is required to connect the Bluetooth adapter, KS-BTA200 (not supplied) to the CD changer jack on the rear of this unit. • Refer also to the instructions supplied with the Bluetooth adapter and the Bluetooth device. • Refer to the list (included in the box) to check the countries where you may use the Bluetooth ® function.</p></li><li><h6><a class="text-decoration-none text-link fw-bold" href=/manual/jvc/get0602-001a/dvd-receiver-with-monitor-instruction-manual/page-331.html>PAGE 331</a></h6><p>Status of the device • Signal strength/Battery remainder (only when the information comes from the device). [5 / ∞]: Selects the other registered device. Connected device name • When a cellular phone with audio function is registered/connected, appears. SOURCE Connected Device Name FLAT 3:00 ENGLISH Using the Bluetooth cellular phone AM Activates <voice dialing> Display <dial menu> screen. function. (Hold) • Appears on any source information screen when the Bluetooth adapter is connected.</p></li><li><h6><a class="text-decoration-none text-link fw-bold" href=/manual/jvc/get0602-001a/dvd-receiver-with-monitor-instruction-manual/page-332.html>PAGE 332</a></h6><p>ENGLISH When an SMS comes in... If the cellular phone is compatible with SMS (Short Message Service), you can read the messages on the screen. • You cannot edit or send a message through the unit. Presetting the phone numbers You can preset up to 6 phone numbers. 1 When <message info> is set to <auto>... The unit rings and the following screen is displayed to inform you of a message arrival.</p></li><li><h6><a class="text-decoration-none text-link fw-bold" href=/manual/jvc/get0602-001a/dvd-receiver-with-monitor-instruction-manual/page-333.html>PAGE 333</a></h6><p>Using the Bluetooth audio player ENGLISH Indicates the button pressed. • It may be different from the operation status. Starts playback/pause SOURCE Connected Device Name FLAT 3:00 AM [5 / ∞]: Selects the other registered device. [4 / ¢]: Reverse/ forward search Stops playback ~ Press [SOURCE], then press [Bluetooth AUDIO]. Ÿ Start playback. If playback does not start automatically, operate the Bluetooth audio player to start playback.</p></li><li><h6><a class="text-decoration-none text-link fw-bold" href=/manual/jvc/get0602-001a/dvd-receiver-with-monitor-instruction-manual/page-334.html>PAGE 334</a></h6><p>ENGLISH Listening to the DAB tuner Preset number SOURCE Band DAB Sound mode DAB indicators */ Standby Reception indicator DAB1 1 1475.216MHz LN Service Label FLAT If no signal is received, “No DAB Signal” appears. DRC 3:00 AM BAND ~ Press [SOURCE], then press [DAB]. Ÿ Press [BAND]. ! Press [ ] or [ ] to search for an ensemble—Auto Search. • Manual Search: Hold either [ repeatedly.</p></li><li><h6><a class="text-decoration-none text-link fw-bold" href=/manual/jvc/get0602-001a/dvd-receiver-with-monitor-instruction-manual/page-335.html>PAGE 335</a></h6><p>ENGLISH Listening to the iPod/iPhone You can connect the iPod/iPhone using the following cable or adapter: To Listen to the music Cable/adapter To operate USB 2.0 cable (accessory of the iPod/iPhone) to the USB cable from the rear of the unit. See “When connected with the USB cable” below. Interface Adapter for iPod, KS-PD100 (not supplied) to the CD changer jack on the rear of the unit. See “When connected with the interface adapter” on page 46.</p></li><li><h6><a class="text-decoration-none text-link fw-bold" href=/manual/jvc/get0602-001a/dvd-receiver-with-monitor-instruction-manual/page-336.html>PAGE 336</a></h6><p>ENGLISH ~ Press [SOURCE], then press [iPod ]. The following operations/settings are only available in “HEAD MODE.” • To display the <ipod artwork>, 16. • To select track/video from <search mode>, 26. • To select the playback mode, 23, 24. • To change the play speed of the audio books, 24. Playback starts automatically. • When you connect the iPod to the USB terminal, “ iPod” is selected as the source and playback starts automatically. Ÿ Press [4] or [¢] to select a track/ video.</p></li><li><h6><a class="text-decoration-none text-link fw-bold" href=/manual/jvc/get0602-001a/dvd-receiver-with-monitor-instruction-manual/page-337.html>PAGE 337</a></h6><p>1 Press [4] or [¢] to select the desired item. Press [3 / 8] to confirm the selection. Repeat steps 2 and 3 to select a track. • When a track is selected finally, playback starts. • To return to the previous menu, press [SEARCH]. Press [SEARCH] to enter the main menu. “SEARCH” flashes on the screen during menu operations. • This mode will be canceled if no operations are done for about 5 seconds. 2 3 4 ENGLISH Selecting a track from the main menu 23, 24.</p></li><li><h6><a class="text-decoration-none text-link fw-bold" href=/manual/jvc/get0602-001a/dvd-receiver-with-monitor-instruction-manual/page-338.html>PAGE 338</a></h6><p>ENGLISH Navigation screen You can also connect a Navigation System to the VIDEO IN jack so that you can watch the navigation screen. Preparation: Make sure <navigation> is selected for <av input>. ( 18) To view the navigation screen Press DISP on the monitor panel repeatedly. ( 56) • The aspect ratio of the navigation screen is fixed to <full> regardless of the <aspect> setting.</p></li><li><h6><a class="text-decoration-none text-link fw-bold" href=/manual/jvc/get0602-001a/dvd-receiver-with-monitor-instruction-manual/page-339.html>PAGE 339</a></h6><p>Caution on cleaning the unit Do not use any solvent (for example, thinner, benzine, etc.), detergent, or insecticide. This may damage the monitor or the unit. To keep discs clean A dirty disc may not play correctly. If a disc does become dirty, wipe it with a soft cloth in a straight line from center to edge. • Do not use any solvents (for example, conventional record cleaner, spray, thinner, benzine, etc.) to clean discs.</p></li><li><h6><a class="text-decoration-none text-link fw-bold" href=/manual/jvc/get0602-001a/dvd-receiver-with-monitor-instruction-manual/page-340.html>PAGE 340</a></h6><p>ENGLISH More about this unit General Turning on the power • By pressing SOURCE on the monitor panel, you can also turn on the power. If the source is ready, playback starts. Tuner (FM only) Storing stations in memory • When SSM is over, received stations are preset in no. 1 (lowest frequency) to no. 6 (highest frequency).</p></li><li><h6><a class="text-decoration-none text-link fw-bold" href=/manual/jvc/get0602-001a/dvd-receiver-with-monitor-instruction-manual/page-341.html>PAGE 341</a></h6><p>Playing JPEG files • This unit can recognize a total of 5 000 files and 250 folders (a maximum of 999 files per folder). • Use only “finalized” discs. • This unit can play back multi-session discs; however, unclosed sessions will be skipped while playing. • This unit can recognize a total of 25 characters for file/folder names. • Some discs or files may not be played back due to their characteristics or recording conditions. • This unit can play back JPEG files with the extension code <.jpg>, or <.jpeg>.</p></li><li><h6><a class="text-decoration-none text-link fw-bold" href=/manual/jvc/get0602-001a/dvd-receiver-with-monitor-instruction-manual/page-342.html>PAGE 342</a></h6><p>ENGLISH Disc/file information shown on the external monitor • DivX/MPEG1/MPEG2/JPEG/MP3/WMA/WAV The following screens appear only on the external monitor. • CD TIME T. RPT Track Information Album Four seasons Artist Robert M.</p></li><li><h6><a class="text-decoration-none text-link fw-bold" href=/manual/jvc/get0602-001a/dvd-receiver-with-monitor-instruction-manual/page-343.html>PAGE 343</a></h6><p>Bluetooth operations General • While driving, do not perform complicated operation such as dialing the numbers, using phone book, etc. When you perform these operations, stop your car in a safe place. • Some Bluetooth devices may not be connected to this unit depending on the Bluetooth version of the device. • This unit may not work for some Bluetooth devices. • Connecting condition may vary depending on circumstances around you. • When the unit is turned off, the device is disconnected.</p></li><li><h6><a class="text-decoration-none text-link fw-bold" href=/manual/jvc/get0602-001a/dvd-receiver-with-monitor-instruction-manual/page-344.html>PAGE 344</a></h6><p>ENGLISH Icons for phone types • These icons indicate the phone type set on the device. : Cellular phone : Household phone : Office : General : Other than above CD changer • If you select a folder, which does not include any music files, on the list ( 26), you will hear a beep. Select another folder including music files. DAB • Only the primary DAB service can be preset even when you store a secondary service.</p></li><li><h6><a class="text-decoration-none text-link fw-bold" href=/manual/jvc/get0602-001a/dvd-receiver-with-monitor-instruction-manual/page-345.html>PAGE 345</a></h6><p>ENGLISH Menu settings • If you change the <amplifier gain> setting from <high> to <low> while the volume level is set higher than “30,” the unit automatically changes the volume level to “VOL 30.” • After you change any of <menu language audio language subtitle> settings, turn off then on the power, and re-insert the disc (or insert another disc) so that your setting takes effect.</p></li><li><h6><a class="text-decoration-none text-link fw-bold" href=/manual/jvc/get0602-001a/dvd-receiver-with-monitor-instruction-manual/page-346.html>PAGE 346</a></h6><p>ENGLISH Display information • Available display information varies among the playback sources. Each time you press DISP, the display changes to show the various information. Ex.: When the playback source is a DVD video disc SOURCE SOURCE DVD DVD FLAT FLAT CHAP.</p></li><li><h6><a class="text-decoration-none text-link fw-bold" href=/manual/jvc/get0602-001a/dvd-receiver-with-monitor-instruction-manual/page-347.html>PAGE 347</a></h6><p>Code Language Code Language Code Language Code Language Code Language AA AB AF AM AR AS AY AZ BA BE BG BH BI BN BO BR CA CO CS CY DZ EL EO ET EU Afar Abkhazian Afrikaans Ameharic Arabic Assamese Aymara Azerbaijani Bashkir Byelorussian Bulgarian Bihari Bislama Bengali, Bangla Tibetan Breton Catalan Corsican Czech Welsh Bhutani Greek Esperanto Estonian Basque FA FI FJ FO FY GA GD GL GN GU HA HI HR HU HY IA IE IK IN IS IW JA JI JW KA Persian Finnish Fiji Faroese Frisian Irish Scots Gaelic Galician Guarani G</p></li><li><h6><a class="text-decoration-none text-link fw-bold" href=/manual/jvc/get0602-001a/dvd-receiver-with-monitor-instruction-manual/page-348.html>PAGE 348</a></h6><p>ENGLISH • Manufactured under license from Dolby Laboratories. Dolby and the double-D symbol are trademarks of Dolby Laboratories. • “DVD Logo” is a trademark of DVD Format/Logo Licensing Corporation registered in the US, Japan and other countries. • DivX® is a registered trademark of DivX, Inc., and is used under license. • Plays DivX® video: • ABOUT DIVX VIDEO: DivX® is a digital video format created by DivX, Inc. This is an official DivX Certified or DivX Ultra Certified device that plays DivX video.</p></li><li><h6><a class="text-decoration-none text-link fw-bold" href=/manual/jvc/get0602-001a/dvd-receiver-with-monitor-instruction-manual/page-349.html>PAGE 349</a></h6><p>What appears to be trouble is not always serious. Check the following points before calling a service center. • For operations with the external components, refer also to the instructions supplied for the adapters used with the connections (as well as the instructions supplied with the external components). • Messages (enclosed in “ ”) in the tables below are shown in the language selected on <language>. ( 15) Messages described here are in the language of this manual.</p></li><li><h6><a class="text-decoration-none text-link fw-bold" href=/manual/jvc/get0602-001a/dvd-receiver-with-monitor-instruction-manual/page-350.html>PAGE 350</a></h6><p>Symptom ENGLISH • Disc can be neither recognized nor played back. • Disc cannot be ejected. • • Disc in general • • • • • • • DivX/MPEG1/MPEG2/MP3/WMA/WAV • • • • • Remedy/Cause Eject the disc forcibly. ( 3) Unlock the disc. ( 32) Recordable/Rewritable discs cannot • Insert a finalized disc. be played back. • Finalize the discs with the component which you used for Tracks on the Recordable/Rewritable recording. discs cannot be skipped. Playback does not start. • Insert the disc correctly again.</p></li><li><h6><a class="text-decoration-none text-link fw-bold" href=/manual/jvc/get0602-001a/dvd-receiver-with-monitor-instruction-manual/page-351.html>PAGE 351</a></h6><p>• Noise is generated. USB • Tracks cannot play back as you have intended them to play. • “Now Reading...” keeps flashing on the screen. Remedy/Cause The track played back is not a playable file format. Skip to another file. Playback order may differ from the one played back using other players. • Readout time varies depending on the USB device. • Do not use too many hierarchy and folders. • Turn off the power then on again. ENGLISH Symptom • “Cannot play this device Check the No tracks are stored.</p></li><li><h6><a class="text-decoration-none text-link fw-bold" href=/manual/jvc/get0602-001a/dvd-receiver-with-monitor-instruction-manual/page-352.html>PAGE 352</a></h6><p>CD changer ENGLISH Symptom • “No Disc” appears on the screen. • “No Magazine” appears on the screen. • “Cannot play this disc Check the disc” appears on the screen. • “Reset08” appears on the screen. DAB tuner • “Reset01” – “Reset07” appears on the screen. • The CD changer does not work at all. • “No DAB Signal” appears on the screen. • “Reset 08” appears on the screen. • The DAB tuner does not work at all. • “Antenna Power NG” appears on the screen. • The iPod/iPhone does not turn on or does not work.</p></li><li><h6><a class="text-decoration-none text-link fw-bold" href=/manual/jvc/get0602-001a/dvd-receiver-with-monitor-instruction-manual/page-353.html>PAGE 353</a></h6><p>Maximum Power Output: Continuous Power Output (RMS): AMPLIFIER Load Impedance: Equalizer Control Range: Front/Rear: Front/Rear: Frequencies: Level: Signal-to-Noise Ratio: Audio Output Level: • LINE OUT (REAR) • SUBWOOFER Line-Out Level/ Impedance: Output Impedance: Color System: Video Output (composite): Other Terminals: Input: FM/AM TUNER Frequency Range: FM Tuner: MW Tuner: LW Tuner: Output: Others: FM1/FM2: FM3: AM: Usable Sensitivity: 50 dB Quieting Sensitivity: Alternate Channel Selectivity</p></li><li><h6><a class="text-decoration-none text-link fw-bold" href=/manual/jvc/get0602-001a/dvd-receiver-with-monitor-instruction-manual/page-354.html>PAGE 354</a></h6><p>DVD/CD GENERAL MONITOR USB ENGLISH Signal Detection System: Non-contact optical pickup (semiconductor laser) Frequency Response: DVD, fs=48 kHz/96 kHz: 16 Hz to 22 000 Hz VCD/CD: 16 Hz to 20 000 Hz Dynamic Range: 96 dB Signal-to-Noise Ratio: 98 dB Wow and Flutter: Less than measurable limit USB Standards: USB 2.0 Full Speed Data Transfer Rate Full Speed: Maximum 12 Mbps Low Speed: Maximum 1.5 Mbps Compatible Device: Mass storage class Compatible File System: FAT 32/16/12 Max.</p></li><li><h6><a class="text-decoration-none text-link fw-bold" href=/manual/jvc/get0602-001a/dvd-receiver-with-monitor-instruction-manual/page-355.html>PAGE 355</a></h6><p>General Reset ..................................................................3, 6 Volume ................................................6, 7, 10, 21 AV Menu ........................................................ 6, 13 Source..................................................6, 8, 11, 34 Short Cut ...................................................6, 8, 34 RM-RK252 ........................................9–11, 35–38 Clock .............................................................</p></li><li><h6><a class="text-decoration-none text-link fw-bold" href=/manual/jvc/get0602-001a/dvd-receiver-with-monitor-instruction-manual/page-356.html>PAGE 356</a></h6><p>Refer to page of How to reset your unit Затруднения при эксплуатации? Пожалуйста, перезагрузите Ваше устройство Для получения информации о перезагрузке Вашего устройства обратитесь на соответствующую страницу DVD RECEIVER WITH MONITOR Please reset your unit Маєте ПРОБЛЕМУ з функціонуванням? ENGLISH РУCCKИЙ DVD-ПРИЕМНИК С МОНИТОРОМ ПРИЙМАЧ ТА ПРОГРАВАЧ DVD-ДИСКІВ ІЗ МОНІТОРОМ KW-AVX720 УКРАЇНА Instructions Having TROUBLE with operation? DVD RECEIVER WITH MONITOR For canceling the display demonstr</p></li><li><h6><a class="text-decoration-none text-link fw-bold" href=/manual/jvc/get0602-001a/dvd-receiver-with-monitor-instruction-manual/page-357.html>PAGE 357</a></h6><p>KW-AVX720 Installation/Connection Manual Руководство по установке/подключению Керівництво зі встановлення та з’єднання GET0604-002A 0109DTSMDTJEIN [EE] EN, RU, UK © 2009 Victor Company of Japan, Limited ENGLISH УКРАЇНА РУCCKИЙ This unit is designed to operate on 12 V DC, NEGATIVE ground electrical systems. If your vehicle does not have this system, a voltage inverter is required, which can be purchased at JVC IN-CAR ENTERTAINMENT dealers.</p></li><li><h6><a class="text-decoration-none text-link fw-bold" href=/manual/jvc/get0602-001a/dvd-receiver-with-monitor-instruction-manual/page-358.html>PAGE 358</a></h6><p>INSTALLATION (IN-DASH MOUNTING) УСТАНОВКА ВСТАНОВЛЕННЯ (УСТАНОВКА В ПРИБОРНУЮ ПАНЕЛЬ) (МОНТАЖ НА ПРИЛАДОВУ ПАНЕЛЬ) The following illustration shows a typical installation. However, you should make adjustments corresponding to your specific car. If you have any questions or require information regarding installation kits, consult your JVC IN-CAR ENTERTAINMENT dealer or a company supplying kits. • If you are not sure how to install this unit correctly, have it installed by a qualified technician.</p></li><li><h6><a class="text-decoration-none text-link fw-bold" href=/manual/jvc/get0602-001a/dvd-receiver-with-monitor-instruction-manual/page-359.html>PAGE 359</a></h6><p>ЭЛЕКТРИЧЕСКИЕ ПОДКЛЮЧЕНИЯ ЕЛЕКТРИЧНІ З’ЄДНАННЯ PRECAUTIONS on power supply and speaker connections: ПРЕДОСТЕРЕЖЕНИЯ по питанию и подключению громкоговорителей: ЗАСТЕРЕЖЕННЯ щодо приєднання джерела живлення та гучномовців: • DO NOT connect the speaker leads of the power cord to the car battery; otherwise, the unit will be seriously damaged. • BEFORE connecting the speaker leads of the power cord to the speakers, check the speaker wiring in your car.</p></li><li><h6><a class="text-decoration-none text-link fw-bold" href=/manual/jvc/get0602-001a/dvd-receiver-with-monitor-instruction-manual/page-360.html>PAGE 360</a></h6><p>ENGLISH РУCCKИЙ УКРАЇНА Connections without using the ISO connector / Подключение без использования разъема ISO / З’єднання без допомоги з’єднувача ISO Before connecting: Check the wiring in the vehicle carefully. Incorrect connection may cause serious damage to this unit. The leads of the power cord and those of the connector from the car body may be different in color. 1 2 3 4 Cut the ISO connector. Connect the colored leads of the power cord in the order specified in the illustration below.</p></li><li><h6><a class="text-decoration-none text-link fw-bold" href=/manual/jvc/get0602-001a/dvd-receiver-with-monitor-instruction-manual/page-361.html>PAGE 361</a></h6><p>A Connecting the external amplifier and subwoofer / Подключение внешнего усилителя и низкочастотного динамика / Приєднання зовнішнього підсилювача та низькочастотного динаміка You can connect an amplifier to upgrade your car stereo system. • Connect the remote lead (blue with white stripe) to the remote lead of the other equipment so that it can be controlled through this unit. • For amplifier only: – Disconnect the speakers from this unit, connect them to the amplifier.</p></li><li><h6><a class="text-decoration-none text-link fw-bold" href=/manual/jvc/get0602-001a/dvd-receiver-with-monitor-instruction-manual/page-362.html>PAGE 362</a></h6><p>C Connecting to the steering wheel remote controller / Подключение к рулевому пульту дистанционного управления / З’єднання з блоком дистанційного керування, що встановлений на кермі If your car is equipped with the steering wheel remote controller, you can operate this unit using the controller. To do it, a JVC’s OE remote adapter (not supplied) which matches with your car is required. Consult your JVC IN-CAR ENTERTAINMENT dealer for details.</p></li></ul></nav></div></section></section></main><footer class=page-footer><div class="container flex-column py-3 py-sm-4"><div class="row mb-1 mb-sm-2 mb-md-5"><a href=/ class="brand offset-sm-0 col-sm-4 col-md-3 col-lg-2 offset-2 col-8 text-center text-md-start"><img class=logo-small src=/assets/img/brand-large.png alt=Manualshelf></a></div><div class=row><dl class="text-center text-sm-start col-sm-3"><dt class=fw-bold>Who We Are</dt><dd><a class=text-decoration-none href=/about>About Us</a></dd><dd><a class=text-decoration-none href=/company>Company</a></dd><dd><a class=text-decoration-none href=/careers>Careers</a></dd><dd><a class=text-decoration-none href=/terms>Terms & Privacy</a></dd></dl><dl class="text-center text-sm-start col-sm-3"><dt class=fw-bold>Resources</dt><dd><a class=text-decoration-none href=/brands>List of Manufacturers</a></dd><dd><a href=/ class=text-decoration-none>Support</a></dd><dd><a class=text-decoration-none href=/press>For the Press</a></dd><dd><a class=text-decoration-none href=/press#assets>Media assets</a></dd><dd><a class=text-decoration-none href=/faq>FAQ</a></dd></dl><dl class="text-center text-sm-start col-sm-3"><dt class=fw-bold>Get in touch</dt><dd><a class=text-decoration-none href=#>Blog</a></dd><dd><a class=text-decoration-none href=#>Email</a></dd><dd><a class=text-decoration-none href=/dmca>DMCA</a></dd></dl></div><div class=row><div class="text-center text-sm-start col-sm-4 pe-sm-0"><a href=https://www.facebook.com/pages/ManualShelf/1488826334681423 class="fs-5 text-center d-inline-block social rounded-2 align-middle text-decoration-none me-2"><i class="fab fa-facebook-f"></i></a><a href=https://www.twitter.com/ManualShelf class="fs-5 text-center d-inline-block social rounded-2 align-middle text-decoration-none me-2"><i class="fab fa-twitter"></i></a><a href=https://plus.google.com/+ManualShelf class="fs-5 text-center d-inline-block social rounded-2 align-middle text-decoration-none me-2"><i class="fab fa-google-plus-g"></i></a><a href=http://www.pinterest.com/ManualShelf class="fs-5 text-center d-inline-block social rounded-2 align-middle text-decoration-none"><i class="fab fa-pinterest-p"></i></a></div><div class="col col-sm-8 d-flex flex-column align-items-center flex-sm-row flex-wrap flex-sm-nowrap justify-content-center justify-content-sm-end"><div class="copy w-auto d-flex align-items-center justify-content-center justify-content-sm-end mt-2 mt-sm-0 me-2">ManualShelf © 2013-2024</div><select class="form-select form-select-sm w-auto mt-2 mt-sm-0"><option value=usa>USA</option></select><div></div></div><div id=pixel><script>
googletag.cmd.push(function() { googletag.display('pixel'); });
</script></div></footer><script src=/assets/js/jquery-3.3.1.min.js></script><script src=/assets/js/bootstrap.bundle.min.js></script><script src=/assets/js/jquery.autocomplete.min.js></script><script type=text/javascript>
$.extend({
redirectPost: function(location, args) {
var form = '';
$.each(args, function(key, value) {
form += '<input type="hidden" name="' + key + '" value="' + value + '">';
});
form = '<form id="s1" action="' + location + '" method="POST">' + form + '</form>';
$(document.body).append(form);
$("#s1").submit();
}
});
$(document).ready(function(){
$("#query").autocomplete({
minChars: 3,
groupBy: 'type',
paramName: 'q',
dataType: 'json',
serviceUrl: '/autocomplete',
noCache: true,
showNoSuggestionNotice: true,
noSuggestionNotice: 'Zarro results found',
onSelect: function (suggestion) {
$.redirectPost(suggestion.data.url, {highlight: encodeURIComponent(JSON.stringify(suggestion.data.hls))});
}
});
var toc = $('.toc-selector');
if (toc.length) {
var slideParams = { duration: 800, easing: 'linear' };
toc.click(function() {
$(this).toggleClass('open');
var section = $('.toc-content');
var isCollapsed = section.attr('data-collapsed') === 'true';
if (isCollapsed) {
section.slideDown(slideParams)
section.attr('data-collapsed', 'false')
} else {
section.slideUp(slideParams);
section.attr('data-collapsed', 'true')
}
});
}
});
var lastSmall = $(window).width() < 576;
$(window).resize(function() {
var newSmall = $(window).width() < 576;
if (lastSmall != newSmall) {
lastSmall = newSmall;
window.location.href = window.location.href;
}
});
</script></body></html>