COMPACT VHS CAMCORDER GR-AXM670 GR-AXM270 Compact VHS For Customer Use: INSTRUCTIONS Enter below the Model No. and Serial No. which is located on the bottom of cabinet. Retain this information for future reference. Model No. Serial No.
EN Dear Customer, Thank you for purchasing the JVC Compact VHS camcorder. Before use, please read the safety information and precautions contained in the following pages to ensure safe use of your new camcorder. Using This Instruction Manual • All major sections and subsections are listed in the Table Of Contents (Z pg. 7). • Notes appear after most subsections. Be sure to read these as well. • Basic and advanced features/operation are separated for easier reference. It is recommended that you . . . .
EN IMPORTANT PRODUCT SAFETY INSTRUCTIONS Electrical energy can perform many useful functions. But improper use can result in potential electrical shock or fire hazards. This product has been engineered and manufactured to assure your personal safety. In order not to defeat the built-in safeguards, observe the following basic rules for its installation, use and servicing. 5. Ventilation Slots and openings in the cabinet are provided for ventilation.
EN USE SERVICING 1. Accessories 1. Servicing To avoid personal injury: • Do not place this product on an unstable cart, stand, tripod, bracket or table. It may fall, causing serious injury to a child or adult, and serious damage to the product. • Use only with a cart, stand, tripod, bracket, or table recommended by the manufacturer or sold with the product. • Use a mounting accessory recommended by the manufacturer and follow the manufacturer’s instructions for any mounting of the product.
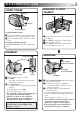
QUICK OPERATION GUIDE EN INSERTING A VIDEO CASSETTE SUPPLY POWER Hook on. 1 PUSH 2 Push in. EJECT 2 3 4 BATT. RELEASE Using the battery pack 1 Hook-on the battery pack’s top end to the 1 Open camcorder. (Charging procedure, Z pg. 8) 1 Open the LCD monitor to an angle of over place. 2 Press EJECT to open the cassette holder. 3 Insert a video cassette. 4 Press PUSH to close the cassette holder. 2 Push in the battery pack until it locks into To remove the battery pack Slide BATT.
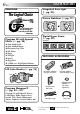
MAJOR FEATURES EN REMEMBER The Logical Choice Integrated Auto Light (Z pg. 23) Picture Stabilizer (Z pg. 21) The only compact video cassettes that can be used with your VHS VCR* Program AE with Special Effects (Z pg. 24) n Auto Mode Lock n Auto Mode Release n Electronic Fog Filter n ND Effect n Sepia n Twilight n Sports n Nega/Posi n 1/2000 sec. High Speed Shutter LCD Color Monitor (Z pg. 18) 180° 90° Program Manager II (Z pg.
CONTENTS RECORDING 16 Basic Recording ........................................................................ 16 Basic Features ......................................................................... 20 Advanced Features .................................................................... 24 PLAYBACK GETTING STARTED 8 Power ..................................................................................... 8 Clock (Lithium) Battery Insertion/Removal ........................................
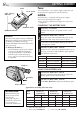
GETTING STARTED EN Power Marks To AC outlet CHG. (charge) indicator This camcorder’s 3-way power supply system lets you choose the most appropriate source of power. NOTES: ● No function is available without power supply. ● Use only specified power supply. ● Do not use provided power supply units with other equipment.
EN Charge marker 9 CHARGE MARKER (OPTIONAL BATTERY ONLY) A charge marker is provided on the battery pack to help you remember whether it has been charged or not. Two colors are provided (red and black)—you choose which one means charged and which means discharged. •The battery pack BN-V18U does not have a charge marker. NOTES: ● The recording time per charge is affected by such factors as the time spent in Record-Standby mode and the frequency of zooming. It is safer to have spare battery packs.
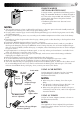
GETTING STARTED (cont.) EN A Clock (Lithium) Battery Insertion/Removal This battery is necessary for clock operation and to perform date/time settings. 1 2 3 4 5 SWITCH OFF POWER Switch off the unit’s power and remove the power supply unit. OPEN COVER Open the clock battery compartment cover while pressing the release tab. REMOVE BATTERY (when replacing) Insert a pointed, non-metallic object between the battery and the compartment ( A ) and pull the battery out.
EN 11 Date/Time Setting 1 2 Select Dial LCD monitor or viewfinder MENU FOCUS EXPOSURE DATE TIME TELE MACRO TAPE LENGTH M. W. B. ZOOM SPEED 4NEXT AUTO AUTO JAN 1. 98 OFF T30 AUTO FAST 3 1998 JAN 1 PM 12:00 YEAR MONTH DAY TIME 4 EXIT DATE/TIME Setting Menu 12-hour indication with AM or PM 5 MENU 4MENU END FOCUS EXPOSURE DATE TIME TELE MACRO TAPE LENGTH M. W. B. ZOOM SPEED 4NEXT AUTO AUTO DEC 25.
GETTING STARTED (cont.) EN SP/EP Recording Mode Button Recording Mode Setting Set depending on your preference. 1 SET RECORDING MODE First set the Power Switch to “CAMERA”. Press SP/EP Button for more than 1 second. “SP” (Standard Play) provides higher picture and sound quality and is better for dubbing, while “EP” (Extended Play) is more economical, providing three times as the recording time.
EN 13 Loading/Unloading A Cassette 4 1 2 3 1 2 5 3 Turn to take up slack. Erase Protection Gear 4 5 OPEN LCD MONITOR Open the LCD monitor to an angle of over 45 degrees. OPEN CASSETTE HOLDER Press EJECT until the holder opens. Do not use force to open. INSERT/REMOVE CASSETTE Make sure the label is facing outward. CLOSE CASSETTE HOLDER Press PUSH and make sure the holder is closed and locked. CLOSE LCD MONITOR First make sure the holder is closed. Then close the LCD monitor.
GETTING STARTED (cont.) EN Power Zoom Button Grip Adjustment 1 2 3 EXPAND LOOP Separate the Velcro strip. INSERT HAND Pass your right hand through the loop and grasp the grip. ADJUST STRAP LENGTH Adjust so your thumb and fingers can easily operate the Recording Start/Stop Button and Power Zoom Button. Refasten the Velcro strip. Recording Start/Stop Button Viewfinder Adjustment 3 1 1 2 Set POWER to “CAMERA”.
EN 15 Shoulder Strap Attachment 1 2 1 1 3 2 ATTACH STRAP Following the illustration at left, thread the strap through the top of the eyelet 1, then fold it back and thread it through the buckle 2. Repeat the procedure to attach the other end of the strap to the other eyelet 3, making sure the strap isn’t twisted. ADJUST LENGTH Adjust as shown in the illustration at left 1.
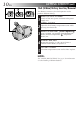
RECORDING Basic Recording EN LENS COVER Switch NOTE: You should already have performed the procedures listed below. If not, do so before continuing. ● Power (Z pg. 8) ● Recording Mode/Tape Length Setting ( Z pg. 12) ● Grip Adjustment (Z pg. 14) Power indicator 1 Power Switch Start/Stop Button LOAD A CASSETTE First open the LCD monitor to an angle of over 45 degrees. Press EJECT to open the cassette holder, then insert the cassette with the label facing out.
EN Tape remaining time indicator 25MIN MIN (Now calculating) 120MIN 119MIN 3MIN 2MIN (Blinking) 1MIN (Blinking) 0MIN (Blinking) Start/Stop Button 4 17 STOP RECORDING Press the Recording Start/Stop Button again to stop recording. •The camcorder re-enters the Record-Standby mode. NOTES: ● When the Power Switch is set to CAMERA and the LCD monitor is opened at an angle of 45 degrees or more, the LCD monitor switches on and the viewfinder switches off automatically to save power.
RECORDING Basic Recording (cont.) EN Shooting while watching the LCD monitor 180° Before the following steps, perform step 1 (Z pg. 16). 90° 2 Make sure the LCD monitor is fully open. Slide the LENS COVER Open/Close Switch to open the lens cover, then set the Power Switch to CAMERA. •The power indicator lights and the camcorder enters the Record–Standby mode. •The scene you’re aimed at appears in the LCD monitor, with the word “PAUSE” superimposed upon it.
EN 19 Journalistic shooting In some situations different angles of shooting may be required for more dramatic results. 1 2 OPEN LCD MONITOR Make sure the LCD monitor is fully open. TILT LCD MONITOR Tilt the LCD monitor in the most convenient direction. •The LCD monitor can rotate almost full circle (270°: 90° downward, 180° upward). Interface shooting A person you shoot can view himself/herself in the LCD monitor, and you can even shoot yourself while viewing your own image in the LCD monitor.
RECORDING Basic Features EN FEATURE: PURPOSE: Zoom-in Zoom-out OPERATION: Zoom indicator bar Zoom Level indicator Power Zoom button Select Dial MENU Jog Dial LCD monitor or viewfinder MENU 4MENU END FOCUS EXPOSURE DATE TIME TELE MACRO TAPE LENGTH M. W. B. ZOOM SPEED 4NEXT NOTES: AUTO AUTO JAN 1. 98 OFF T30 AUTO FAST Menu Screen ZOOM SPEED FAST SLOW Zooming To produce the zoom in/out effect, or an instantaneous change in image magnification.
EN FEATURE: PURPOSE: P. STABILIZER OPERATION: RETAKE (R/F) NOTE: FEATURE: PURPOSE: OPERATION: NOTE: FEATURE: PURPOSE: OPERATION: NOTES: 21 Quick Review To check the end of the last recording. 1) Press “ ” and release quickly during the Record–Standby mode. n Tape is rewound for about 2 seconds and played back automatically, then pauses in Record–Standby mode for the next shot. Distortion may occur at start of playback. This is normal. Retake To re-record certain segments.
RECORDING Basic Features (cont.) EN DATE/TIME FEATURE: PURPOSE: OPERATION: Display Select Dial Date display NOTES: Time display Date/Time display Auto Date Record mode Date-off mode (No display) Date display DEC 25.98 Auto Date Record mode AUTO DATE Auto date record mode Time display DEC 25.98 PM10:50:00 Date/Time display DEC 25.
EN FEATURE: PURPOSE: OPERATION: LIGHT OFF/AUTO/ON (Can be accessed when the LCD monitor is opened) NOTES: DANGER n The video light can become extremely hot. Do not touch it either while in operation or soon after turning it off, otherwise serious injury may result. n Do not place the camcorder into the carrying case immediately after using the video light, since it remains extremely hot for some time. n When operating, keep a distance of about 30 cm. (1 ft.
RECORDING Advanced Features EN Program AE With Special Effects 1 second later, the mode is activated. After 1 sec. All you have to do to access any of the variety of shooting effects is to turn the Select Dial. SEPIA 1 SELECT MODE Turn the Select Dial until the symbol of the function you want is aligned with the mark. •The selected mode’s name and its indication are displayed for approx. 1 second. Then the name disappears, and only the indication remains. The mode is activated.
EN Dial symbol LOCK LCD monitor/ Viewfinder indication AUTO LOCK Mode Dial symbol Auto Mode Lock LCD monitor/ Viewfinder indication 25 Mode Twilight TWILIGHT Auto Mode Lock Twilight Locks the camcorder in Full Auto mode, preventing incorrect operation due to accidental button pressing during shooting. • In this mode the following controls are disabled; DATE/TIME display select, and the Menu Jog Dial. Dusk, twilight scenery, fireworks, etc., look more natural and dramatic.
RECORDING Advanced Features (cont.) EN Fade/Wipe [Ex. : Fader] Fade-in These effects let you make pro-style scene transitions. Fade- or wipe-in works at recording start, and fade- or wipe-out works at recording end or when you enter Record–Standby mode. Fade-out Function indication 4EFFECT MOSAIC 1 LCD monitor or viewfinder 2 BK FADER MOSAIC OFF (No indication) SHUTTER SLIDE OFF Press EFFECT to cycle through the modes as shown at left.
EN LCD monitor or viewfinder 27 Wide This feature allows you to record black bars at the top and bottom of the screen to produce a cinema-like “wide-screen” effect. Wide mode 1 ENGAGE WIDE MODE Press WIDE. •To restore normal screen, press WIDE again. Super LoLux(Gain Up) Bright, natural recordings can be taken even in areas with low or poor lighting. WIDE SUPER LOLUX 1 LCD monitor or viewfinder 4S . LX After 2 sec.
RECORDING Advanced Features (cont.) EN Instant Titles LCD monitor or viewfinder Title display HAPPY BIRTHDAY No display OUR VACATION The camcorder has eight preset titles in memory. You can superimpose one of them above a previously stored title as shown in the illustration to the left. Instant Titles can be displayed not only in English but also in French, Spanish and Portuguese. Change the setting in TITLE LANG. in the Menu screen. (Z pg. 29, 31).
EN 29 Using Menu For Detailed Adjustment This camcorder is equipped with an easy-to-use, on-screen menu system that simplifies many of the more detailed camcorder settings. 1 Select Dial LCD monitor or viewfinder MENU 4MENU END FOCUS EXPOSURE DATE TIME TELE MACRO TAPE LENGTH M. W. B. ZOOM SPEED 4NEXT MENU Jog Dial 2 MENU REC TIME INT. TIME TALLY LAMP TITLE LANG. D. ZOOM COLOR BAR JLIP ID NO. DEMO MODE 4MENU END OFF OFF ON ENGLISH ON OFF 07 OFF 3 Menu Screen 2 TITLE LANG. EXIT Setting Menu (ex.
EN Menu Screen Explanations FOCUS EXPOSURE RECORDING Advanced Features (cont.) AUTO Adjusts focus automatically. MANU Allows you to adjust focus manually (Z pg. 32, 33). AUTO Adjusts exposure automatically. MANU Allows you to adjust exposure manually (Z pg. 34). DATE/TIME Allows you to set the current date and time (Z pg. 11). TELE MACRO OFF ON Usually the distance to a subject where the lens is in focus depends on the zoom magnification. Unless there is a distance more than 1m (3.3 ft.
EN 31 REC TIME This feature allows you to set the parameters for Animation and Time-Lapse recording (Z pg. 37). INT. TIME This feature allows you to set the parameters for Self-Timer (Z pg. 36) and TimeLapse recording (Z pg. 37). TALLY LAMP ON The tally lamp comes on to signal the start of recording. OFF The tally lamp remains off at all times. TITLE LANG. Allows you to select the language (ENGLISH, FRENCH, SPANISH or PORTUGUESE) of Instant Titles ( Z pg. 28) D.
RECORDING Advanced Features (cont.) EN Focusing Focus detection zone Auto Focus The camcorder’s Full Range AF system offers continuous shooting ability from close-up to infinity. However, correct focus may not be obtainable in the situations listed below (in these cases use manual focusing): •When two subjects overlap in the same scene. •When illumination is low.* •When the subject has no contrast (difference in brightness and darkness), such as a flat, one-color wall, or a clear, blue sky.
EN 33 Manual Focus NOTE: You should already have made the necessary viewfinder adjustments (Z pg. 14). If you haven’t, do so before continuing. MENU Jog Dial Select Dial 1 2 MENU FOCUS EXPOSURE DATE TIME TELE MACRO TAPE LENGTH M. W. B. ZOOM SPEED 4NEXT AUTO AUTO DEC 25.98 OFF T30 AUTO FAST Menu Screen 3 No indication during recording FOCUS Focus Menu Screen No indication during recording 4 5 6 Manual Focus Screen Press the MENU Jog Dial.
RECORDING Advanced Features (cont.) EN Exposure Control This feature automatically adjusts the iris for the best available picture quality, but you can override and make the adjustment manually. 1 Select Dial MENU Jog Dial LCD monitor or viewfinder 2 MENU 4MENU END FOCUS EXPOSURE DATE TIME TELE MACRO TAPE LENGTH M. W. B. ZOOM SPEED 4NEXT AUTO AUTO DEC 25.
EN Manual White Balance Adjustment (M.W.B.) LCD monitor or viewfinder MENU 4MENU END FOCUS EXPOSURE DATE TIME TELE MACRO TAPE LENGTH M. W. B. ZOOM SPEED 4NEXT 35 The white balance is usually adjusted automatically. However, the more advanced camcorder operator would prefer to control this function manually and achieve a more professional color/tint reproduction. AUTO AUTO DEC 25.98 OFF T30 AUTO FAST Menu Screen M. W. B. AUTO : FINE : CLOUD : HALOGEN MWB EXIT M.W.B.
RECORDING Advanced Features (cont.) EN Self-Timer You can set the delay between pressing the Recording Start/Stop Button and the actual start of recording. If you secure the camcorder, you (or whomever is operating the camcorder) can enter the scene before recording starts. NOTE: Make sure the camcorder is in the Record-Standby mode before performing the following steps.
EN 37 Animation Time-Lapse Give stationary scenes or objects an illusion of movement. This function allows you to shoot a series of pictures, each slightly different, of the same object for a brief period of time. You can record sequentially at preset time spans. Leaving the camcorder aimed at a specific subject, you can record subtle changes over an extended period of time.
PLAYBACK Basic Playback EN 1 REW Power Switch 2 PLAY/PAUSE FF 3 4 STOP LOAD A CASSETTE First open the LCD monitor to an angle of over 45 degrees. Press EJECT to open the cassette holder, then insert the cassette with the label facing out. Press PUSH to ensure the holder is closed and locked. SELECT MODE Make sure the LCD monitor is fully open. Then set the Power Switch to “PLAY”. The power indicator lights. PLAY BACK Press PLAY/PAUSE. The playback picture appears. STOP PLAYBACK Press STOP.
PLAYBACK Features EN 39 Adjust the brightness of the LCD monitor Speaker To brighten the image, turn the BRIGHT Dial toward “+”. To darken the image, turn the Dial toward “–”. Speaker volume control You can adjust the speaker volume by turning the VOLUME Dial. BRIGHT VOLUME 1 AT ADJUST VOLUME If you want to turn up the volume . . . Turn the Dial toward “+”. If you want to turn down the volume . . . Turn the Dial toward “–”.
PLAYBACK Features (cont.) EN COUNTER R/M REW PLAY/PAUSE FF FEATURE: PURPOSE: OPERATION: NOTE: STOP FEATURE: PURPOSE: OPERATION: NOTE: FEATURE: PURPOSE: OPERATION: NOTES: Still Playback To pause during playback. 1) Press PLAY/PAUSE during playback. 2) To resume normal playback, press PLAY/PAUSE again. Noise bars appear and pictures may become monochrome during Still Playback. This is normal. Shuttle Search To allow high-speed search in either direction.
PLAYBACK Using The Cassette Adapter EN 41 Cassette Adapter (VHS Playpak) Use this to play back a VHS-C video cassette recorded with this camcorder. It is fully compatible with any VHS video cassette recorder. The C-P7U adapter is battery powered and automatically performs tape loading and unloading. 1 VCR Compartment door 2 3 4 Sliding latch Compact video cassette INSERT BATTERY Slide the battery cover up to remove it, and install one “AA(R6)” size battery as shown in the illustration at left.
PLAYBACK Basic Connections EN There are three basic types of connections. When making the connections, refer also to your VCR and TV instruction manuals. Connection To A VCR A (Editing, Dubbing and Playback) NOTE: When connecting the cables, open the jack cover. To AUDIO and VIDEO OUT connectors Audio and Video cables (optional) To AUDIO and VIDEO IN connectors VCR Use the optional Audio and Video cables.
TAPE DUBBING EN 43 Tape Dubbing 1 PLAY/PAUSE 2 3 4 When connecting the cables, open the jack cover. Power Switch To AUDIO and VIDEO OUT connectors 5 6 7 Audio and Video cables (optional) To AUDIO and VIDEO IN connectors VCR (Recording deck) CONNECT EQUIPMENT Following the illustration at left, connect the camcorder and the VCR. PREPARE FOR DUBBING Set the camcorder’s Power Switch to “PLAY”, turn on the VCR’s power, and insert the appropriate cassettes in the camcorder and the VCR.
USER MAINTENANCE EN LENS COVER Open/Close Switch Set to “POWER OFF”. BATT. RELEASE PUSH After Use 1 2 3 4 5 6 Set the Power Switch to “POWER OFF” to turn off the camcorder. Press EJECT to open the cassette holder, then remove the cassette. Close and lock the cassette holder by pressing PUSH. Close and lock the LCD monitor. Slide BATT. RELEASE to remove the battery pack. Slide the LENS COVER open/close switch to close the lens cover. EJECT Cleaning The Camcorder 1 Remove.
TROUBLESHOOTING EN SYMPTOM 45 POSSIBLE CAUSE(S) POWER No power is supplied. ● The battery pack has not been attached correctly ( Z pg. 8). ● The battery pack is not charged (Z pg. 8). ● The power supply has not been correctly connected ( Z pg. 9). The power suddenly goes off and doesn’t come back on by itself. ● The battery pack has completely discharged. ● Remove the cassette and disconnect the power source, then after a few minutes, try turning the power back on.
TROUBLESHOOTING (cont.) EN SYMPTOM POSSIBLE CAUSE(S) OTHER The tape won’t eject. ● The battery pack is running low. ● If the LCD monitor is not open over 45 degrees, EJECT switch does not function. Some functions are not available. ● The Select Dial is set to “AUTO LOCK”. Vertical white lines appear when shooting a very bright object. ● This sometimes occurs when the contrast between the background and the object is great. It is not a defect of the camcorder.
INDEX EN 1* 2 3 8 9 ! 0 @ # $ % 4 5 47 6* 7 30MIN 4S. LX T30 REC SP 444 TWILIGHT NORM 01 LENS COVER MWB PAUSE 5MIN 1 4S TAPE END MERRY CHRISTMAS DEC 25.98 AM 11:45 :18 ^* * ) & ( q LCD monitor/Viewfinder Indications 1 *Cassette Warning / Tape Remaining Time ......................... Z pg. 17 When no cassette is inserted: the cassette ( ) warning blinks. When Erase Protection tab is not in the position that allows recording: the cassette ( ) warning lights.
INDEX (cont.
EN 49 Controls Connectors 1 Power Zoom Button ........................... Z pg. 20 2 Multi-Function Control w DC IN Jack ......................................... Z pg. 9 The jacks e to y are located beneath the jack •EFFECT Button ................................. Z pg. 26 •WIDE Button ................................... Z pg. 27 •TITLE Button .................................... Z pg. 28 •SUPER LOLUX Button ..................... Z pg. 27 3 Select Dial ......................................... Z pg.
INDEX Terms EN A M AC Power Adapter .................................. pg. 8 Animation Recording .............................. pg. 37 Auto Date Record ................................... pg. 22 Auto Focus .............................................. pg. 32 Auto Mode Lock Mode ........................... pg. 25 Auto Mode Release Mode ....................... pg. 25 Manual Focus ......................................... pg. 33 B Battery Pack ............................................ pg.
CAUTIONS EN 51 General Battery Precautions DANGER: Video Light • The video light becomes extremely hot. Do not touch it either while in operation or soon after turning it off, otherwise serious injury may result. • Do not place the camcorder into the carrying case immediately after using the video light, since it remains extremely hot for some time. • When operating, keep a distance of about 30 cm (1 ft.) between the video light and people or object. • Do not use near flammable or explosive materials.
CAUTIONS (cont.) EN Cassettes To properly use and store your cassettes, be sure to read the following cautions: 1. During use . . . ..... make sure the cassette bears the VHS-C mark. ..... be aware that recording onto prerecorded tapes automatically erases the previously recorded video and audio signals. ..... make sure the cassette is positioned properly when inserting. ..... do not load and unload the cassette repeatedly without allowing the tape to run at all.
SPECIFICATIONS GENERAL Format Power source Power consumption LCD monitor off, viewfinder on LCD monitor on, viewfinder off LCD monitor on, viewfinder on Output : 6.0 W (GR-AXM670) 6.0 W (GR-AXM270) AUDIO : 6.5 W (GR-AXM670) 6.3 W (GR-AXM270) : 7.2 W (GR-AXM670) 7.0 W (GR-AXM270) : 2.9 W : NTSC-type CAMERA Viewfinder White balance adjustment : 1/4” format CCD : F1.6, f = 3.8 to 83.6 mm, 22:1 power zoom lens with auto iris and macro control, filter diameter 46 mm : Electronic viewfinder with 0.
ESPAÑOL EN Marcas Indicador CHG. (carga) A la toma de corriente alterna Alimentación Esta cámara de video posee un sistema de alimentación de 3 vías que le permite seleccionar la fuente de alimentación más apropiada. NOTAS: ● Sin alimentación no hay ninguna función disponible. ● Utilice exclusivamente la alimentación indicada. ● No utilice la unidades de alimentación suministradas con otro equipo.
GUIA PARA OPERACION RAPIDA EN 55 Si la unidad comienza a funcionar mal, deje de usarla inmediatamente y consulte a su concesionario local de JVC. ALIMENTACION Enganche. INSERCION DEL CASSETTE DE VIDEO 1 PUSH 2 Empuje. EJECT 2 3 4 BATT. RELEASE Utilización de la batería 1 Enganche el extremo superior de la batería en la cámara de video. (Procedimiento para carga, Z P. 8) 2 Empuje la batería hacia adentro hasta que quede bloqueada en su lugar. Para extraer la batería Deslice BATT.
FOR SERVICING (Only in U.S.A.) EN HOW TO LOCATE YOUR JVC SERVICE CENTER TOLL FREE: 1-800-252-5722 Dear customer: In order to receive the most satisfaction from your purchase, read the instruction booklet before operating the unit. In the event that repair is necessary, or for the address nearest your location, please refer to the factory service center list below or within the Continental United States, call 1-800252-5722 for your authorized servicer.
WARRANTY (Only in U.S.A.) EN LIMITED WARRANTY 57 CONSUMER VIDEO 1-90 JVC COMPANY OF AMERICA warrants this product and all parts thereof, except as set forth below ONLY TO THE ORIGINAL PURCHASER AT RETAIL to be FREE FROM DEFECTIVE MATERIALS AND WORKMANSHIP from the date of original retail purchase for the period as shown below.
GR-AXM670 GR-AXM270 JVC COMPANY OF AMERICA DIVISION OF US JVC CORP. 41 Slater Drive, Elmwood Park, N.J. 07407 COPYRIGHT© 1998 VICTOR COMPANY OF JAPAN, LTD.