VIDEO PRINTER ENGLISH IMPRIMANTE VIDÉO IMPRESOR DE VIDEO ESPAÑOL FRANÇAIS GV-PT1 INSTRUCTIONS MANUEL D’INSTRUCTIONS MANUAL DE INSTRUCCIONES For Customer Use: Enter below the Serial No. of the GV-PT1U Video Printer. The serial number is located on the bottom of the GV-PT1U. Model No. GV-PT1U Serial No.
Dear Customer, Thank you for purchasing this Video Printer. Before use, please read the safety information and precautions contained in the following pages to ensure safe use of this product. SAFETY PRECAUTIONS CAUTION RISK OF ELECTRIC SHOCK DO NOT OPEN Using This Instruction Manual • All major sections and subsections are listed in the Table Of Contents (Z pg. 7). • Notes appear after most subsections. Be sure to read these as well.
IMPORTANT PRODUCT SAFETY INSTRUCTIONS Electrical energy can perform many useful functions. But improper use can result in potential electrical shock or fire hazards. This product has been engineered and manufactured to assure your personal safety. In order not to defeat the built-in safeguards, observe the following basic rules for its installation, use and servicing. ATTENTION: Follow and obey all warnings and instructions marked on your product and its operating instructions.
USE SERVICING 1. Accessories 1. Servicing To avoid personal injury: • Do not place this product on an unstable cart, stand, tripod, bracket or table. It may fall, causing serious injury to a child or adult, and serious damage to the product. • Use only with a cart, stand, tripod, bracket, or table recommended by the manufacturer or sold with the product. • Use a mounting accessory recommended by the manufacturer and follow the manufacturer’s instructions for any mounting of the product.
CAUTIONS If you notice smoke or a peculiar smell coming from the printer, shut it down and unplug it IMMEDIATELY. Use of the video printer under these conditions could lead to fire or electric shock. Contact your JVC dealer. DO NOT attempt to repair the malfunction yourself. DO NOT attempt to insert foreign objects into the video printer, as this can lead to electric shock or fire.
MAJOR FEATURES Using the GV-PT1, you can print scenes onto standard or seal print paper, in any one of several formats. MULTI-PRINT (Z pgs. 18 – 21) Print 4 or 16 images on one sheet. The same scene . . . . . . or different scenes INSET PRINT (Z pgs. 22 – 23) STROBE PRINT (Z pgs. 24 – 25) Inset one scene onto another. Print at set intervals, as when taking rapid-fire snapshots. TITLE IMPOSE PRINT (Z pgs. 26 – 27) Impose hand-drawn titles or illustrations on an image.
CONTENTS CONTROLS, INDICATORS AND CONNECTORS PREPARATION 8 10 Install/Remove Ink Sheet Cartridge ..................................................... 10 About Print Sheet Sets .................................................................... 11 About Ink Sheet Cartridges ............................................................... 11 BASIC PRINTING 12 Connections.................................................................................. 12 Language Select...............................
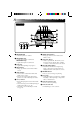
CONTROLS, INDICATORS AND CONNECTORS Front View 4 567 8 9 0 1 2 ! @ 3 $ % ^ 1 POWER On/Off • Turns the printer on and off. 2 POWER ON Lamp • Lights when power is turned on. POWER OFF Lamp • Lights when power is turned off. 3 Print Lamp • Lights when printing is in progress. 4 MENU Button • Brings up and closes the Printer Menu screen. 5 SELECT Button • Selects items at the Printer Menu and Mode Select screens. • Reverses the transparent and opaque portions of a title in Title Impose mode.
Rear View & $ PAUSE Connector • Used when printing snapshots or an editing index from a JVC camcorder or video cassette recorder. Connect a commercially available φ 3.5 mm mini plug to either the camcorder’s editing jack or the video cassette recorder’s R.A. EDIT or SPECIAL FUNCTION jack. % S-Video Input Connector (front) • If the source (camcorder or video cassette recorder) has an S-Video output jack, connect it to the video printer using a commercially available S-Video cable.
PREPARATION Install/Remove Ink Sheet Cartridge Door Before printing, you need to install an ink sheet cartridge. Follow these instructions for initial installation and for removal and replacement of a used cartridge. NOTE: Make sure the unit power is off before opening the lid. PRINTER LID 1 OPEN Slide the knob in the direction of the arrow. •The lid springs up, so apply gentle pressure as you open it. A A PROTECTIVE CLIP 2 REMOVE Press as indicated by the arrow, then lift A and remove the clip.
About Print Sheet Sets You must use one of the sets shown in the following chart: SET CONTENTS USES VU-PS50U (Standard) • Standard Print Paper (50 Sheets) • Ink Sheet Cartridge (50 Prints) Print your favorite scenes, just like snapshots. VU-PC50U (Seal) • Seal Print Paper (50 Sheets) • Ink Sheet Cartridge (50 Prints) Make customized seals and stick them on business cards, greeting cards, etc. * One VU-PS50U set is provided. Both VU-PS50U and VU-PC50U are sold separately.
BASIC PRINTING Connections The GV-PT1 accepts both normal video and S-video signals. The connection you make depends on the image source (camcorder, video cassette recorder) and its output capabilities.
NOTES: ● Some televisions and video cassette recorders require a specific type of output cable. Refer to the TV’s and/or VCR’s instruction manual when connecting to the GV-PT1. ● The video printer assigns a priority to input signals. A signal input to the front terminals is accepted before a signal input to the rear terminals. S-Video signals take priority over regular video signals.
BASIC PRINTING (cont.) Single Print You should already have performed the following steps: •Prepare paper sheet set (Z pg. 11) •Install ink sheet cartridge (Z pg. 10) •Prepare print paper (Z pg. 11) •Connect image source to video printer (Z pg. 12) •Plug video printer’s power plug into AC outlet and press POWER. The power comes on and the POWER ON Lamp lights. If not, go back to the appropriate page and perform the procedure(s). This section details the procedure for printing one scene.
SOURCE PLAYBACK 4 BEGIN Fast-forward or rewind the source tape to find the desired scene, then start playback a little before the scene. DESIRED SCENE 5 STORE Press MEMORY when the desired scene appears. The scene is stored in memory and appears on the screen. SCENE 6 PRINT Insert a print sheet with the print side (the side with no writing on it) UP into the print sheet insertion slot until it is pulled in automatically. •The Print Lamp comes on, indicating printing is in progress.
ADVANCED PRINTING Setting The Print Menu Options available in the menu are as shown in the chart.
MENU Button SELECT Button SET Buttons POWER Button POWER ON Lamp 2 PRINT MENU PIX STABILIZER MULTI PIX 1/2 : OFF : OFF CONTENT : SELECTED PIX TO SELECT TO SET PUSH ( SELECT ) PUSH ( + , – ) 2/2 STROBE SPEED : LOW ID NUMBER : 20 LANGUAGE : ENGLISH TO SELECT TO SET PUSH ( SELECT ) PUSH ( + , – ) ON VIDEO PRINTER’S 1 TURN POWER Press POWER. The Power On Lamp comes on. PRINT MENU 2 ACCESS Press MENU. The Print Menu screen appears on the connected TV.
ADVANCED PRINTING (cont.) Multi-Print (Same Scene) You can print the same scene 4 or 16 times on one sheet. MENU Button SELECT Button SET Buttons POWER Button POWER ON Lamp PICTURE SELECT Button Print Lamp MEMORY Button Print Sheet Exit Slot Print Sheet Insertion Slot Preparation ● Connect the image source (camcorder, video cassette recorder) to the printer (Z pg. 12). ● Install the ink sheet cartridge in the printer (Z pg. 10) ● Plug in the printer and press POWER.
SOURCE PLAYBACK 5 BEGIN Fast-forward or rewind the source tape to find the desired scene, then start playback a little before the scene. SCENE FOR PRINTING 6 STORE When the desired scene is located, press MEMORY. The image appears on screen and is stored in memory. •Only one image is stored in memory, regardless of the “MULTI PIX” setting.
ADVANCED PRINTING (cont.) Multi-Print (Different Scenes) You can print various scenes on the same print sheet. MENU Button SELECT Button SET Buttons POWER Button POWER ON Lamp PICTURE SELECT Button Print Lamp MEMORY Button Print Sheet Exit Slot Print Sheet Insertion Slot Preparation ● Connect the image source (camcorder, video cassette recorder) to the printer (Z pg. 12). ● Install the ink sheet cartridge in the printer (Z pg. 10). ● Plug in the printer and press POWER.
1 2 3 4 1 2 3 4 5 6 7 8 9 10 11 12 13 14 15 16 DESIRED SCENE, SELECT 6 STORE POSITION When the desired scene is located, press MEMORY. The scene appears on screen and is stored in memory. •The next segment of the total image to be displayed darkens. Now set the position of the stored image. Press SET +/– to move the shading to a different section of the image. •Pressing “+” moves from “1” toward “4” (or “16” if you selected “16”), and pressing “–” moves in the reverse direction.
ADVANCED PRINTING (cont.) Inset Print MENU Button SELECT Button SET Buttons POWER Button POWER ON Lamp PICTURE SELECT Button Print Lamp MEMORY Button Main Image Inset Print Sheet Exit Slot Print Sheet Insertion Slot Preparation ● Connect the image source (camcorder, video cassette recorder) to the printer (Z pg. 12). ● Install the ink sheet cartridge in the printer (Z pg. 10). ● Plug in the printer and press POWER. The power comes on and the POWER ON Lamp lights.
INSET IMAGE 4 LOCATE/STORE Press PICTURE SELECT to return to the source image display. Then fast-forward or rewind to locate the desired image, and press MEMORY. •To add more insets to the main image, repeat steps 3 and 4. IMAGE 5 PRINT Insert a print sheet with the print side (the side with no writing on it) UP into the insertion slot until it is pulled in automatically. •The Print Lamp lights, indicating printing is in progress. •“NOW PRINTING” appears on screen, on a blue background.
ADVANCED PRINTING (cont.) Strobe Print The printer stores a selected number of images at short intervals, and prints them on one sheet. MENU Button SELECT Button SET Buttons POWER Button POWER ON Lamp PICTURE SELECT Button Print Lamp MEMORY Button Print Sheet Exit Slot Print Sheet Insertion Slot Preparation ● Connect the image source (camcorder, video cassette recorder) to the printer (Z pg. 12). ● Install the ink sheet cartridge in the printer (Z pg. 10).
DESIRED SCENE 5 STORE When the scene appears, press MEMORY. •When “STROBE SPEED” is set to “HIGH”, the printer stores images approximately every 1/4 of a second, and when set to “LOW”, images are stored approximately every 1/2 a second. •Once the selected number of images has been stored, the input image is replaced on the screen by the most recently stored image.
ADVANCED PRINTING (cont.) Title Impose You can print a scene or image with your own handwritten characters or drawing imposed on it. The title or drawing will cover the entire image area of the print sheet, regardless of the “MULTI PIX” setting.
4 MODE SELECT MENU TITLE SNAP SHOT PRINTING EDITING INDEX QUIT TO SELECT PUSH ( SELECT ) TO SET PUSH ( MODE SELECT ) MODE 4 SELECT Place the pointer next to “TITLE” by pressing SELECT, then press MODE SELECT. •The Mode Select Menu disappears, and the image with the title or drawing imposed on it appears on screen. CONDITION AND COLOR 5 SET Pressing SELECT reverses the transparent and opaque portions of the title or drawing. To change the color, press SET +/–.
ADVANCED PRINTING (cont.) Snapshot Print If you have a JVC camcorder with a Snapshot Search function (such as the GR-SV7 and GR-DV1), you can easily locate and print snapshots. SELECT Button SET Buttons MENU Button MODE SELECT Button POWER Button POWER ON Lamp PICTURE SELECT Button Print Lamp MEMORY Button PAUSE Connector Print Sheet Insertion Slot Print Sheet Exit Slot Preparation ● Connect the image source (camcorder, video cassette recorder) to the printer (Z pg. 12).
DESIRED SCENE 5 LOCATE Rewind the tape in the camcorder to the scene you want to print, then pause the tape. SNAPSHOT 6 STORE Press the camcorder’s Snapshot button. The camcorder automatically locates the beginning of the snapshot, and the printer stores the scene. •Once the selected number of images has been stored, “STOP PLAYBACK MACHINE” appears on screen. Press the Stop button on the camcorder.
ADVANCED PRINTING (cont.) Editing Index While editing the source tape, using Random Assemble Editing (available on selected JVC camcorders and VCRs), you can store and print out the scenes at the Edit-In and Edit-Out points you’ve registered. This allows you to make an editing index.
4 MODE SELECT MENU TITLE SNAP SHOT PRINTING EDITING INDEX QUIT TO SELECT PUSH ( SELECT ) TO SET PUSH ( MODE SELECT ) MODE 4 SELECT Place the pointer next to “EDITING INDEX” by pressing SELECT, then press MODE SELECT. •The Mode Select Menu disappears and the Editing Index mode is activated. •In this mode, one sheet is divided into 16 equal sections, regardless of the “MULTI PIX” setting in the Print Menu.
Message ERROR MESSSAGES v Appears in this situation m How to clear indication CLOSE DOOR v When the lid is not securely closed. m Press PUSH to close the lid (Z pg. 10). PAPER JAM POWER OFF/REMOVE PAPER v When a print sheet or the ink sheet is caught inside the printer. m Open the lid, remove the ink sheet cartridge, then remove the problem sheet (Z pg. 10). v There is no ink sheet cartridge installed, or the one installed is used up. m Install an ink sheet cartridge (Z pg. 10).
TROUBLESHOOTING SYMPTOM POSSIBLE CAUSE 33 CORRECTIVE ACTION The power doesn’t come on. v The video printer’s power cord is not plugged into an AC outlet. v Plug the power cord into an AC outlet. The error lamp lights or begins blinking. v An error message appears on the connected TV’s screen. v A malfunction has occurred but no message appears. v Refer to the list of error messages (Z pg. 32).
CORRECTIVE ACTION Printer Jam Cleaning The Thermal Heads If a print sheet gets stuck inside the printer, follow these steps to remove it: The thermal heads may be in need of cleaning. If the heads become covered with dust or dirt, print quality will drop. Use a cotton swab to clean the heads. If this doesn’t remove the dirt, please consult your nearest JVC dealer or Technical Service Center. LID, REMOVE INK SHEET 1 OPEN CARTRIDGE Move the slide knob in the direction of the arrow.
SPECIFICATIONS Power Power consumption During printing When idle Signal Print format Print quality Resolution Gradation Print medium Ink sheet (dedicated) Print sheet (dedicated) Connectors S-Video input : AC 120 V `, 60 Hz : : : : Approx. 74 W Approx. 13 W NTSC standard Sublimation dye thermal transfer line printing : 704 (horiz.) x 464 (vert.
GV-PT1 JVC COMPANY OF AMERICA DIVISION OF US JVC CORP. 41 Slater Drive, Elmwood Park, N.J. 07407 JVC CANADA INC. 21 Finchdene Square, Scarborough Ontario M1X 1A7 COPYRIGHT© 1996 VICTOR COMPANY OF JAPAN, LTD.