
Memory Recorder Instruction Manual


7
Setup
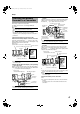
There are 2 ways to connect the IEEE1394.
Connecting via IEEE1394 Cable
● Connect the IEEE1394 cable to the KA-UM100G adapter
and the IEEE1394 terminal of the camcorder.
● Set the [INT/EXT] switch to AEXTB.
M
emo:
● When the switch is set to [INT], signal input and output is
disabled.
● For information on where to purchase an IEEE1394 cable,
please consult our authorized dealers.
Connection via Internal Wiring
Changes need to be made to the internal wire connections of
the camcorder.
M
emo:
●
When making a connection with the switch set to [INT], it is
necessary to alter the internal wire connections of the
camcorder. For details, please consult our authorized dealers.
● When making a connection with internal wiring, the
IEEE1394 terminal of the adapter is disabled.
Turning On the Power
1
Set the [POWER] switch of the camcorder to “On”
2 Press and hold down the [POWER] button of the
memory recorder for at least one second
●
The power of the memory recorder turns on. After a message
indicating
A
KA-MR100 POWER ON
B
appears on the LCD
panel for several seconds, the status screen is displayed.
M
emo:
●
It is necessary to set the built-in clock immediately after
purchasing this product or when it has not been used for a
prolonged period of time (three months or longer). After the
power of the memory recorder turns on, a message
indicating
A
CLOCK SETUP MENU
B
appears for several
seconds. Next, the [CLOCK1] setting screen is automatically
displayed.
A
Setting the Date/Time
B
(
A
Page 7)
Turning Off the Power
1 Press and hold down the [POWER] button of the
memory recorder for at least one second
● The power of the memory recorder turns off.
M
emo:
● You can turn off the power of the memory recorder using
the [POWER] switch of the camcorder by setting [DR-
HD100 A.OFF] on the OTHERS[2/2] menu screen of the
GY-HD200/HD250 series camcorder to AOnB.
Note:
● Make use of a battery to supply power to the memory
recorder. Power cannot be supplied from the DC INPUT
terminal of the camcorder.
Set the time of the built-in clock on the [CLOCK1] setting
screen of the menu screen.
1 Select the item to set (ATIME ZONEB, ADATEB or
ATIMEB)
● Press the [PREV] or [NEXT] button to select an item.
● After making a selection, press the [PLAY/STILL] or [FWD]
button to confirm.
2 Set the respective items
Set the items listed in the table below.
M
emo:
● Be sure to set the ATIME ZONEB before setting the
ADATEB and ATIMEB”.
● The memory recorder does not support daylight savings
time.
● Press the [PREV] or [NEXT] button to select a value,
followed by using the [PLAY/STILL] button to confirm the
selection.
● When setting DATE, press the [FWD] or [REV] button to
jump between month, day, and year. When setting TIME,
press the same button to jump between hour, minute and
second.
3 Press the [MENU] button to return to the status
screen
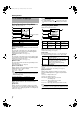
Connecting IEEE1394
[INT/EXT]
Switch
Description
INT
● For recording data to or playing data from the
SxS memory card.
●
When the switch is set to [INT], the IEEE1394
terminal on the camcorder is disabled.
EXT
● For connecting the IEEE1394 terminal on the
camcorder to a computer or other devices.
● When the switch is set to [EXT], the internal
connection between the memory recorder
and the camcorder is disabled.
Turning On/Off the Power
KA-UM100G adapter
IEEE1394 cable
[INT/EXT] switch
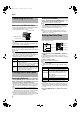
Setting the Date/Time
Item Description
TIME ZONE
For setting the time difference with the
UTC (Universal Time Coordinate). The
values of the ADATEB and ATIMEB items
will be automatically adjusted when this
item is altered.
AUTC Time Difference Chart by RegionB
(A Page 17)
DATE For setting the date (month/day/year).
TIME For setting the time (hour:minute:second).
<[CLOCK1] Setting Screen>
<Buttons to use>
[PREV] button
[REV] button
[PLAY/STILL]
button
[FWD] button
[STOP] button
[NEXT] button
KA-MR100G_EN.book Page 7 Thursday, February 5, 2009 5:28 PM