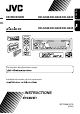
KD-G396/KD-G395/KD-G245 KD-G396/KD-G395/KD-G245 For canceling the display demonstration, see page 6. For installation and connections, refer to the separate manual.
ENGLISH Thank you for purchasing a JVC product. Please read all instructions carefully before operation, to ensure your complete understanding and to obtain the best possible performance from the unit. IMPORTANT FOR LASER PRODUCTS 1. CLASS 1 LASER PRODUCT 2. CAUTION: Do not open the top cover. There are no user serviceable parts inside the unit; leave all servicing to qualified service personnel. 3. CAUTION: Visible and/or invisible class 1M laser radiation when open.
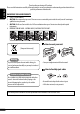
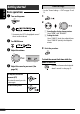
If you press M MODE, the unit goes into functions mode, then the number buttons and 5/∞ buttons will work as different function buttons. CONTENTS Control panel — KD-G396/KD-G395/KD-G245 .................. Ex.: When number button 2 works as MO (monaural) button. 4 Remote controller — RM-RK50........... 5 Getting started ................................ 6 ENGLISH How to use the M MODE button Basic operations ...................................................
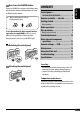
ENGLISH Control panel — KD-G396/KD-G395/KD-G245 Parts identification Display window 1 5 (up) / ∞ (down) buttons 2 0 (eject) button 3 (standby/on attenuator) button 4 KD-G396/KD-G395: Remote sensor 5 6 7 8 9 p q w e r t y u i o 4 DO NOT expose the remote sensor to strong light (direct sunlight or artificial lighting).
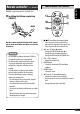
Remote controller — RM-RK50 ENGLISH Main elements and features RM-RK50 is supplied only for KD-G396/KD-G395. Installing the lithium coin battery (CR2025) 1 Aim the remote controller directly at the remote sensor on the unit. Make sure there is no obstacle in between. 2 Warning: • Do not install any battery other than CR2025 or its equivalent; otherwise, it may explode.
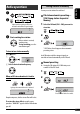
ENGLISH Getting started Basic settings Basic operations • See also “General settings — PSM” on pages 11 and 12. ~ 1 Turn on the power. 2 Ÿ 1 Canceling the display demonstrations Select “DEMO,” then “DEMO OFF.” 2 Setting the clock Select “CLOCK H” (hour), then adjust the hour. Select “CLOCK M” (minute), then adjust the minute. * You cannot select “CD” as the playback source if there is no disc in the unit. ! ⁄ For FM/AM tuner 3 Adjust the volume. Volume level appears.
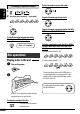
Radio operations You can preset six stations for each band. ~ FM station automatic presetting— SSM (Strong-station Sequential Memory) Ÿ Lights up when receiving an FM stereo broadcast with sufficient signal strength. ! Start searching for a station. When a station is received, searching stops. To stop searching, press the same button again. 1 1 Select the FM band (FM1 – FM3) you want to store into. 2 3 “SSM” flashes, then disappears when automatic presetting is over.
ENGLISH Listening to a preset station To fast-forward or reverse the track 1 2 Select the preset station (1 – 6) you want.
Skipping tracks quickly during play • When “TAG DISP” is set to “TAG ON” (see page 12) • KD-G396/KD-G395: For MP3 or WMA discs, you can skip tracks within the same folder Ex.
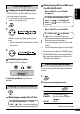
ENGLISH 7 Random play Adjusting the sound Mode Plays at random FLDR RND * : All tracks of the current folder, then the tracks of the next folder ] and so on. [ ALL RND : All tracks of the current disc. [ ] RND OFF : Cancels. You can adjust the sound characteristics to your preference. 1 2 * KD-G396/KD-G395: Only while playing an MP3 or a WMA disc. [ ] : Corresponding indicator lights up on the display BAS *1 (bass), [–06 to +06] Adjust the bass.
You can connect an external component to the AUX (auxiliary) input jack on the control panel. Portable audio player, etc Stereo mini plug (not supplied) General settings — PSM You can change PSM (Preferred Setting Mode) items listed in the table on page 12. 1 2 Select a PSM item. 3 Adjust the PSM item selected. ENGLISH Other external component operations ~ Ÿ ! ⁄ Turn on the connected component and start playing the source. Adjust the volume.
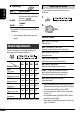
ENGLISH Indications Item ( : Initial) Selectable settings, [reference page] DEMO Display demonstration • DEMO ON : The display demonstration will be activated automatically if no operation is done for about 20 seconds, [6]. : Cancels. • DEMO OFF CLK DISP *1 Clock display • ON • OFF : The clock time is shown on the display at all times when the power is turned off. : Cancels; pressing DISP will show the clock time for about 5 seconds when the power is turned off, [6].
How to clean the connectors Frequent detachment will deteriorate the connectors. To minimize this possibility, periodically wipe the connectors with a cotton swab or cloth moistened with alcohol, being careful not to damage the connectors. To keep discs clean A dirty disc may not play correctly. If a disc does become dirty, wipe it with a soft cloth in a straight line from center to edge. • Do not use any solvents (for example, conventional record cleaner, spray, thinner, benzine, etc.) to clean discs.
ENGLISH More about this unit Basic operations Turning on the power • By pressing SRC on the unit, you can also turn on the power. If the source is ready, playback also starts. Turning off the power • If you turn off the power while listening to a disc, disc play will start from where it had been stopped previously next time you turn on the power. Tuner operations Storing stations in memory • During SSM search... – All previously stored stations are erased and the stations are stored anew.
• This unit can play back MP3/WMA files with the extension code <.mp3> or <.wma> (regardless of the letter case—upper/lower). • This unit can show the names of albums, artists (performer), and Tag (Version 1.0, 1.1, 2.2, 2.3, or 2.4) for MP3 files and for WMA files. • This unit can display only one-byte characters. No other characters can be correctly displayed. • This unit can play back MP3/WMA files meeting the conditions below: – Bit rate: 8 kbps — 320 kbps – Sampling frequency: 48 kHz, 44.
What appears to be trouble is not always serious. Check the following points before calling a service center. General Remedies/Causes • Sound cannot be heard from the speakers. • Adjust the volume to the optimum level. • Check the cords and connections. • The unit does not work at all. Reset the unit (see page 2). FM/AM Symptoms • SSM automatic presetting does not work. Store stations manually. • Static noise while listening to the radio. Connect the antenna firmly.
AUDIO AMPLIFIER SECTION CD PLAYER SECTION Maximum Power Output: Front/Rear: 50 W per channel Continuous Power Output (RMS): Front/Rear: 19 W per channel into 4 Ω, 40 Hz to 20 000 Hz at no more than 0.8% total harmonic distortion. Load Impedance: 4 Ω (4 Ω to 8 Ω allowance) Tone Control Range: Bass: ±12 dB at 60 Hz Mid-range: ±12 dB at 1 kHz Treble: ±12 dB at 7.5 kHz Frequency Response: 40 Hz to 20 000 Hz Signal-to-Noise Ratio: 70 dB For KD-G396/KD-G395: Line-Out Level/ 2.
Having TROUBLE with operation? Please reset your unit Refer to page of How to reset your unit EN, TH © 2007 Victor Company of Japan, Limited 0807DTSMDTJEIN
KD-G396/KD-G395/KD-G245 Installation/Connection Manual °“√μ‘¥μ—Èß/§ŸË¡◊Õ°“√μ‘¥μ—Èß 0807DTSMDTJEIN GET0486-006A [U/UH] EN, TH © 2007 Victor Company of Japan, Limited ‰∑¬ ENGLISH This unit is designed to operate on 12 V DC, NEGATIVE ground electrical systems. If your vehicle does not have this system, a voltage inverter is required, which can be purchased at JVC car audio dealers.
INSTALLATION (IN-DASH MOUNTING) °“√μ‘¥μ—Èß (°“√ª√–°Õ∫·ºßÀπÈ“ªí∑¡Ï‡¢È“) The following illustration shows a typical installation. If you have any questions or require information regarding installation kits, consult your JVC car audio dealer or a company supplying kits. • If you are not sure how to install this unit correctly, have it installed by a qualified technician.
‰∑¬ ENGLISH °“√‡™◊ËÕ¡‚¥¬„™È ‰øøÈ“ ELECTRICAL CONNECTIONS A Typical connections / °“√‡™◊ËÕ¡μËÕ·∫∫ª°μ °ËÕ•∑”°“•‡™•ËÕ¡μËÕ: μ•«®†Õ•°“•‡¥‘•†“¬‰ø„•••¬•μÏլ˓ߕ–¡—¥•–«—լ˓„ÀȺ‘¥æ•“¥„•°“•‡™•ËÕ¡μËÕ™ÿ¥ª•–°Õ•™ÿ¥•’ °“•‡™•ËÕ¡μËÕº‘¥æ•“¥Õ“®∑”„Àȇ°‘¥§«“¡‡†’¬À“¬•È“¬·•ß°—•™ÿ¥ª•– °Õ••’ȉ¥È“•μ–°—Ë«¢Õ߆“¬‰ø ·•–¢ÕßÕÿª°••ÏμËÕ‡™•ËÕ¡®“°μ—«• ß••Õ“®¡’’ ∑’ˉ¡Ë‡À¡•Õ•°— 1 μËÕ “¬‰ø ’μ“¡≈”¥—∫∑’Ë√–∫ÿ„π√Ÿª¥È“π≈Ë“ß 2 ‡™◊ËÕ¡μËÕ°—∫“¬Õ“°“» 3 ÿ¥∑È“¬ μËÕ Ë«π§«∫§ÿ¡°“√‡¥‘𠓬‰ø‡¢È“°—∫™ÿ¥ª√–°Õ∫™ÿ¥π’È Before connecting: Check the wiring in the
B Connecting the external amplifier (only for KD-G396/KD-G395) / °“√‡™◊ËÕ¡μËÕ‡§√◊ËÕߢ¬“¬‡ ’¬ß¿“¬πÕ° ( ”À√—∫ KD-G396 À√◊Õ KD-G395 ‡∑Ë“π—Èπ) §ÿ≥ “¡“√∂μËÕ°—∫·Õ¡æ≈‘ø“¬‡ÕÕ√Ï ‡æ◊ËÕ‡æ‘Ë¡§ÿ≥ ¿“æ‡ ’¬ß„ÀÈ°—∫√–∫∫ ‡μÕ√‘‚Õ¢Õß√∂¬πμÏ • μËÕ “¬μ–°—Ë«√–¬–‰°≈ ( ’πÈ”‡ß‘π≈“¬¢“«) ‡¢È“°—∫ “¬μ–°—Ë«√–¬–‰°≈¢ÕßÕÿª°√≥ÏÕ◊Ëπ Ê ‡æ◊ËÕ®– “¡“√∂§«∫§ÿ¡‚¥¬™ÿ¥ª√– °Õ∫π’ȉ¥È • ∂Õ¥≈”‚æßÕÕ°®“°™ÿ¥ª√–°Õ∫π’È ·≈È«μËÕ‡¢È“°—∫‡§√◊ËÕߢ¬“¬ ∑‘Èß “¬μ–°—Ë«≈”‚æߢÕß™ÿ¥ª√–°Õ∫π’ȉ«È You can connect an amplifier to upgrade your car stereo system.