ENGLISH РУCCKИЙ CD RECEIVER РЕСИВЕР С ПРОИГРЫВАТЕЛЕМ КОМПАКТ-ДИСКОВ KD-G407 For installation and connections, refer to the separate manual. Указания по установке и выполнению соединений приводятся в отдельной инструкции.
ENGLISH IMPORTANT FOR LASER PRODUCTS 1. CLASS 1 LASER PRODUCT 2. CAUTION: Do not open the top cover. There are no user serviceable parts inside the unit; leave all servicing to qualified service personnel. 3. CAUTION: Visible and invisible laser radiation when open and interlock failed or defeated. Avoid direct exposure to beam. 4. REPRODUCTION OF LABEL: CAUTION LABEL, PLACED OUTSIDE THE UNIT. How to reset your unit While holding SEL (select), press This will reset the built-in microcomputer.
ENGLISH Thank you for purchasing a JVC product. Please read all instructions carefully before operation, to ensure your complete understanding and to obtain the best possible performance from the unit. CONTENTS How to reset your unit ............................... How to use the MODE button ................... 2 2 LOCATION OF THE BUTTONS ............ 4 Control panel ............................................. 4 BASIC OPERATIONS ....................... 5 Turning on the power ........................
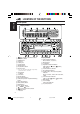
LOCATION OF THE BUTTONS ENGLISH Control panel Display window 1 2 3 4 5 6 7 8 9 p q w e r t y u i o ; a (standby/on attenuator) button SEL (select) button FM/AM button CD button Loading slot Display window 0 (eject) button EQ (equalizer) button Remote sensor • You can control this unit with an optionally purchased remote controller.
ENGLISH BASIC OPERATIONS 1 3 2 Turning on the power 1 4 Adjust the sound as you want. (See pages 21 and 22.) Turn on the power. To drop the volume in a moment Note on One-Touch Operation: When you select a source in step 2 below, the power automatically comes on. You do not have to press this button to turn on the power. 2 Select the source. Press briefly while listening to any source. “ATT” starts flashing on the display, and the volume level will drop in a moment.
ENGLISH Canceling the display demonstration 3 When shipped from the factory, display demonstration has been activated, and starts automatically when no operations are done for about 20 seconds. • It is recommended to cancel the display demonstration before you use the unit for the first time. To cancel the display demonstration, follow the procedure below: 1 Select “DEMO OFF.” DEMO OFF 4 DEMO ON Finish the setting.
ENGLISH 4 Setting the clock 1 Finish the setting. Press and hold SEL (select) for more than 2 seconds so that one of the PSM items appears on the display. (PSM: see page 23.) To check the current clock time or change the display mode 2 Press DISP (display) repeatedly. Each time you press the button, the display changes as follows: Set the hour. 1 Select “CLOCK H” (hour) if not shown on the display. 2 Adjust the hour.
ENGLISH RADIO OPERATIONS 2 Listening to the radio You can use either automatic searching or manual searching to tune in to a particular station. Searching for a station automatically: Auto search 1 Start searching for a station. To search for stations of higher frequencies To search for stations of lower frequencies When a station is received, searching stops. Select the band (FM1 – 3, AM).
1 1 Press MODE to enter the Select the band (FM1 – 3, AM). Each time you press the button, the band changes as follows: FM1 FM2 FM3 AM Note: This receiver has three FM bands (FM1, FM2, FM3). You can use any one of them to listen to an FM broadcast. 2 3 When an FM stereo broadcast is hard to receive ENGLISH Searching for a station manually: Manual search Press and hold ¢ or 4 until “M” (manual) starts flashing on the display. functions mode while listening to an FM stereo broadcast.
ENGLISH Storing stations in memory You can use one of the following two methods to store broadcasting stations in memory. • Automatic preset of FM stations: SSM (Strongstation Sequential Memory) • Manual preset of both FM and AM stations FM station automatic preset: SSM You can preset 6 local FM stations in each FM band (FM1, FM2, and FM3). 1 Select the FM band (FM1 – 3) you want to store FM stations into.
Press and hold the number button (in this example, 1) for more than 2 seconds. Tuning in to a preset station You can easily tune in to a preset station. Remember that you must store stations first. If you have not stored them yet, see “Storing stations in memory” on pages 10 and 11. 1 ENGLISH 3 Select the band (FM1 – 3, AM). Each time you press the button, the band changes as follows: FM1 Preset number flashes for a while.
ENGLISH CD OPERATIONS Refer “MP3 OPERATIONS” on pages 17 to 20 for operating MP3 discs. Playing a CD Insert a CD into the loading slot. The unit turns on, draws the CD and starts playback automatically. Notes: • When a CD is inserted upside down, “EJECT” appears on the display and the CD automatically ejects. • If there is no CD in the loading slot, you cannot select CD as the source. “NO DISC” appears on the display.
To go to a track quickly (+10 and –10 buttons) 1 Press MODE to enter the functions mode while playing a CD. To fast-forward or reverse the track Press and hold ¢ , while playing a CD, to fast-forward the track. Press and hold reverse the track. 2 Press +10 or –10. To skip 10 tracks* forwards to the last track 4, while playing a CD, to To skip 10 tracks* backwards to the first track To go to the next or previous tracks Press ¢ briefly, while playing a CD, to go ahead to the beginning of the next track.
ENGLISH Selecting CD playback modes To play back tracks repeatedly (Track Repeat Play) To play back tracks at random (Disc Random Play) You can play back the current track repeatedly. You can play back all tracks on the CD at random. 1 Press MODE to enter the functions mode while playing a CD. 2 Press RND (random), while “MODE” is still flashing on the display, so that “DISC RND” appears on the display. Each time you press the button, disc random play mode turns on and off alternately.
Prohibiting disc ejection In a CD Text, some information about the disc (its disc title, performer, and track title) is recorded. This CD Text information will be shown automatically when you play a CD Text. You can prohibit disc ejection and can lock a disc in the loading slot. ENGLISH Playing a CD Text While pressing CD, press and hold 0 for more than 2 seconds. To change the CD Text information manually, select text display mode while playing a CD Text. Press DISP (display) repeatedly.
ENGLISH MP3 INTRODUCTION What is MP3? MP3 is an abbreviation of Motion Picture Experts Group (or MPEG) Audio Layer 3. MP3 is simply a file format with a data compression ratio of 1:10 (128 Kbps*). * Bit rate is the average number of bits that one second of audio data will consume. The unit used is Kbps. To get a better audio quality, choose a higher bit rate. The most popular bit rate for encoding is 128 Kbps.
ENGLISH MP3 OPERATIONS Refer also to “CD OPERATIONS” on pages 12 to 15. Playing an MP3 disc Insert an MP3 disc into the loading slot. Note on One-Touch operation: When a disc is already in the loading slot, pressing CD turns on the unit and starts playback automatically. CD indicator Notes: • MP3 discs require a longer readout time. (It differs due to the complexity of the folder/file configuration.) • When playback starts, folder and file names (or ID3 tags) will automatically appear.
ENGLISH To change the display information While playing back an MP3 file, you can change the disc information shown on the display. Press DISP (display) repeatedly. Each time you press the button, the display changes to show the following: • When “TAG DISP” is set to “TAG ON” (initial setting: see page 24) Album name / performer (folder name*) (TAG lights up on the display) Notes: • The display shows up to 8 characters at a time and scrolls if there are more than 8 characters.
1 Press MODE to enter the functions mode while playing a disc. 2 Press +10 or –10. To skip 10 files* forwards to the last file To skip 10 files* backwards to the first file * First time you press +10 or –10 button, the file skips to the nearest higher or lower file with a file number of multiple ten (ex. 10th, 20th, 30th). Then each time you press the button, you can skip 10 files (see “How to use the +10 and –10 buttons” below). • After the last file, the first file will be selected, and vice versa.
ENGLISH To skip to the next or previous folder Press 5 (up) while playing an MP3 disc to skip to the next folder. Each time you press the button consecutively, the next folder is located (and the first file in the folder starts playing, if recorded). Press ∞ (down) while playing an MP3 disc to skip back to the previous folder. Each time you press the button consecutively, the previous folder is located (and the first file in the folder starts playing, if recorded).
Selecting preset sound modes (C-EQ: custom equalizer) Indication For: Preset values BAS TRE LOUD USER (Flat sound) 00 00 OFF You can select a preset sound mode (C-EQ: custom equalizer) suitable to the music genre. ROCK Rock or disco music +03 +01 ON Select the sound mode you want.
ENGLISH Adjusting the sound *1 When you adjust the bass, treble, or loudness, the You can adjust the sound characteristics to your preference. 1 Select the item you want to adjust. Each time you press the button, the adjustable items change as follows: BAS TRE (bass) (treble) Adjust the setting. VOL LOUD BAL (loudness) (balance) To increase the level or turn on the loudness Range To decrease the level or turn off the loudness –06 (min.) | +06 (max.
OTHER MAIN FUNCTIONS Adjust the PSM item selected. ENGLISH 3 Changing the general settings (PSM) You can change the items listed in the table below by using the PSM (Preferred Setting Mode) control. Basic Procedure 1 2 4 Press and hold SEL (select) for more than 2 seconds so that one of the PSM items appears on the display. (See below.) 5 Repeat steps 2 and 3 to adjust the other PSM items if necessary. Finish the setting. Select the PSM item you want to adjust.
ENGLISH To select the dimmer mode—DIMMER You can dim the display at night (according to your preference). When shipped from the factory, dimmer is deactivated. • OFF: • ON: Cancels the dimmer. Activates the dimmer. To select the telephone muting—TEL This mode is used when a cellular phone system is connected. Depending on the phone system used, select either “MUTING 1” or “MUTING 2” whichever mutes the sounds from this unit. When shipped from the factory, this mode is deactivated.
You can detach the control panel when leaving the car. When detaching or attaching the control panel, be careful not to damage the connectors on the back of the control panel and on the panel holder. Attaching the control panel 1 Insert the left side of the control panel into the groove on the panel holder. ENGLISH Detaching the control panel Detaching the control panel Before detaching the control panel, be sure to turn off the power. 1 2 Unlock the control panel.
ENGLISH USING THE REMOTE CONTROLLER This unit can be remotely controlled as instructed here (with an optionally purchased remote controller). We recommend that you use remote controller RM-RK50 or RM-RK60 with your unit. (Ex.: When you are using RM-RK60) 3. Return the battery holder. Insert again the battery holder by pushing it until you hear a clicking sound. (back side) Before using the remote controller: • Aim the remote controller directly at the remote sensor on the main unit.
RM-RK60 3 • Selects the preset stations while listening to the radio. Each time you press the button, the preset station number increases, and the selected station is tuned in. • Skips to the first file of the previous folder while listening to an MP3 disc. Each time you press the button, you can move to the previous folder and start playing the first file. ENGLISH Location of the buttons 4 Selects the sound mode (C-EQ: custom equalizer). Each time you press the button, the sound mode (C-EQ) changes.
What appears to be trouble is not always serious. Check the following points before calling a service center. Symptoms Causes • Sound cannot be heard from the speakers. Remedies The volume level is set to the minimum level. Adjust it to the optimum level. Connections are incorrect. Check the cords and connections. • This unit does not work at all. The built-in microcomputer may have functioned incorrectly due to noise, etc.
Remedies No MP3 files are recorded on the disc. Change the disc. MP3 files do not have the extension code <.mp3> in their file names. Add the extension code <.mp3> to their file names. MP3 files are not recorded in the format compliant with ISO 9660 Level 1, Level 2, Romeo, or Joliet. Change the disc. (Record MP3 files using a compliant application.) • Noise is generated. The file played back is not an MP3 file (although it has the extension code <.mp3>). Skip to another file or change the disc.
ENGLISH MAINTENANCE Handling discs When playing a CD-R or CD-RW This unit has been designed to reproduce CDs, CD-Rs (Recordable), CD-RWs (Rewritable), and CD Texts. • This unit is also compatible with MP3 discs. How to handle discs When removing a disc Center holder from its case, press down the center holder of the case and lift the disc out, holding it by the edges. • Always hold the disc by the edges. Do not touch its recording surface.
AUDIO AMPLIFIER SECTION CD PLAYER SECTION Maximum Power Output: Front: 50 W per channel Rear: 50 W per channel Continuous Power Output (RMS): Front: 19 W per channel into 4 Ω, 40 Hz to 20 000 Hz at no more than 0.8% total harmonic distortion. Rear: 19 W per channel into 4 Ω, 40 Hz to 20 000 Hz at no more than 0.8% total harmonic distortion.
Having TROUBLE with operation? Please reset your unit Refer to page of How to reset your unit Затруднения при эксплуатации? Пожалуйста, перезагрузите Ваше устройство Для получения информации о перезагрузке Вашего устройства обратитесь на соответствующую страницу EN, RU 0304KKSMDTJEIN © 2004 VICTOR COMPANY OF JAPAN, LIMITED Cover001A_KD-G407[EE]f.
KD-G407 Installation/Connection Manual Руководство по установке/подключению GET0223-002A 0304KKSMDTJEIN EN, RU [EE] РУССКИЙ ENGLISH Это устройство разработано для эксплуатации на 12 В постоянного напряжения с минусом на массе. Если Ваш автомобиль не имеет этой системы, требуется инвертор напряжения, который может быть приобретен у дилера автомобилнего специалиста JVC. This unit is designed to operate on 12 V DC, NEGATIVE ground electrical systems.
Removing the unit Удаление устройства Before removing the unit, release the rear section. Перед удалением устройства освободите заднюю часть. 1 2 B 3 Insert the two handles, then pull them as illustrated so that the unit can be removed. Вставьте два рычажка, затем потяните их, как показано на рисунке, чтобы вынуть устройство.
РУССКИЙ ENGLISH ELECTRICAL CONNECTIONS ЭЛЕКТРИЧЕСКИЕ ПОДКЛЮЧЕНИЯ To prevent short circuits, we recommend that you disconnect the battery’s negative terminal and make all electrical connections before installing the unit. • Be sure to ground this unit to the car’s chassis again after installation. Для предотвращения коротких замыканий мы рекомендуем Вам отсоединить отрицательный разъем аккумулятора и осуществить все подключения перед установкой устройства.
B Connections Adding Other Equipment / Подключение других устройств Amplifier / Усилитель Для обновления автомобильной стереосистемы Вы можете подключить усилитель. • Подсоедините провод внешнего устройства (синий с белой полосой) к проводу внешнего устройства другого оборудования так, чтобы им можно было управлять с этого устройства. • Отсоедините громкоговорители от данного устройства, подключите их к усилителю. Оставьте провода громкоговорителей данного устройства неиспользованными.