ENGLISH ESPAÑOL FRANÇAIS KD-R338/KD-R330 CD RECEIVER / RECEPTOR CON CD / RÉCEPTEUR CD For canceling the display demonstration, see page 4. / Para cancelar la demostración en pantalla, consulte la página 4. / Pour annuler la démonstration des affichages, référez-vous à la page 4. For installation and connections, refer to the separate manual. Para la instalación y las conexiones, refiérase al manual separado. Pour l’installation et les raccordements, se référer au manuel séparé.
Thank you for purchasing a JVC product. Please read all instructions carefully before operation, to ensure your complete understanding and to obtain the best possible performance from the unit. INFORMATION (For U.S.A.) This equipment has been tested and found to comply with the limits for a Class B digital device, pursuant to Part 15 of the FCC Rules. These limits are designed to provide reasonable protection against harmful interference in a residential installation.
How to attach/detach the control panel CONTENTS 3 How to attach/detach the control panel 3 How to reset your unit 3 How to forcibly eject a disc 3 Maintenance 4 How to reset your unit Your preset adjustments will also be erased. How to forcibly eject a disc 4 5 5 6 7 8 9 [Hold] 9 • Be careful not to drop the disc when it ejects. • If this does not work, reset your unit. Maintenance Cleaning the unit Wipe off the dirt on the panel with a dry silicon or soft cloth.
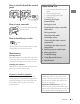
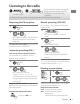
Canceling the display demonstration 1 Turn on the power. 4 Select . [Hold] 2 5 [Hold] (Initial setting) 3 6 Finish the procedure. (Initial setting) Setting the clock 1 Turn on the power. [Hold] 2 [Hold] (Initial setting) 3 Select . 4 Select . 5 Adjust the hour. (Initial setting) 6 Adjust the minute. 7 Finish the procedure.
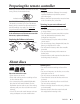
Preparing the remote controller When you use the remote controller for the first time, pull out the insulation sheet. Insulation sheet For USA-California Only: This product contains a CR Coin Cell Lithium Battery which contains Perchlorate Material— special handling may apply. See www.dtsc. ca.gov/hazardouswaste/perchlorate If the effectiveness of the remote controller decreases, replace the battery.
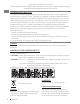
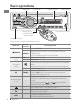
Basic operations Loading slot Control dial Display window Remote sensor • DO NOT expose to bright sunlight. Ejects the disc Front auxiliary input jack Detaches the panel When you press or hold the following button(s)... Remote General operation controller — Turns on/off [Hold]. Selects the sources (FM, CD, F-AUX, BT AUDIO or R-AUX or / SOURCE SOURCE BT PHONE, AM). • “CD” is selectable only when a disc is loaded. VOL – / + Adjusts the volume level. Control dial (turn) — Selects items.
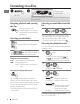
Listening to the radio ~ Ÿ • [Press] Searches for stations automatically. • [Hold] Searches for stations manually. “M” flashes, then press the button ] “FM” or “AM” repeatedly. “ST” lights up when receiving an FM stereo broadcast with sufficient signal strength. Improving the FM reception 1 [Hold] Manual presetting (FM/AM) You can preset up to 18 stations for FM and 6 stations for AM. 1 2 ] ] ] Reception improves, but stereo effect will be lost.
Listening to a disc ~ Ÿ Playback starts automatically. ] “CD” All tracks will be played repeatedly until you change the source or eject the disc. Stopping playback and ejecting the disc If the ejected disc is not removed within 15 seconds, it is automatically inserted into the loading slot.
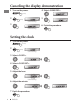
Connecting the other external components You can connect an external component to the auxiliary input jack on the control panel (F-AUX) and/or on the rear side of the unit (R-AUX). Summary of using the external components through the auxiliary input jacks: Preparation Connecting Auxiliary Source External component cable/device Menu setting Subinput jack name Setting (not supplied) item item Portable audio Front SRC SELECT F-AUX ON F-AUX See below.
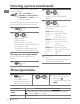
Selecting a preset sound mode You can select a preset sound mode suitable for the music genre. FLAT = NATURAL = DYNAMIC = VOCAL BOOST = BASS BOOST = USER = (back to the beginning) While listening, you can adjust the subwoofer and tone level of the selected sound mode. 1 2 ] ] 3 Adjust the sound elements of the selected tone. [Hold] 2 Adjust the level: SUB.W * : 00 to 08 BASS/ MID/ TRE : –06 to +06 The sound mode is automatically stored and changed to “USER.
Menu item AUTO : Changes the display and button illumination between the Day/Night adjustments in setting when you turn off/on the car headlights. *1 / ON : Selects the Night adjustments in setting for the display and button illumination. / OFF : Selects the Day adjustments in setting for the display and button illumination. BRIGHTNESS DAY [ 31 ] / NIGHT [ 15 ] : Selects the display and button illumination brightness level [00 — 31] for day and night.
SRC SELECT TUNER AUDIO Menu item Selectable setting, [Initial: Underlined] AMP GAIN *7 LOW POWER : VOLUME 00 – VOLUME 30 (Selects if the maximum power of each speaker is less than 50 W to prevent damaging the speakers.) / HIGH POWER : VOLUME 00 – VOLUME 50 SSM *8 See page 7. AREA US : When using in North/Central/South America. AM/FM intervals are set to 10 kHz/200 kHz. / EU : When using in any other areas. AM/FM intervals are set to 9 kHz/50 kHz (50 kHz during auto search).
Troubleshooting Symptom Remedy/Cause MP3/WMA playback Disc playback FM/AM General Sound cannot be heard from the speakers. Adjust the volume to the optimum level. / Make sure the unit is not muted/paused. (page 6) / Check the cords and connections. “MISWIRING CHK WIRING THEN RESET Check to be sure the terminals of the speaker leads are covered UNIT” / “WARNING CHK WIRING THEN with insulating tape properly, then reset the unit.
Using Bluetooth ® devices For Bluetooth operations, it is required to connect the Bluetooth adapter, KS-BTA100 (not supplied) to the auxiliary input jack (R-AUX/BT ADAPTER) on the rear of the unit. (page 9) • For details, refer also to the instructions supplied with the Bluetooth adapter and the Bluetooth device. • Operations may be different according to the connected device. Preparation 1 Register (pair) a Bluetooth device with KS-BTA100. Refer to the instructions manual supplied with KS-BTA100.
Specifications AUDIO AMPLIFIER SECTION Power Output : 20 W RMS × 4 Channels at 4 Ω and ≤ 1% THD+N Signal-to-Noise Ratio : 80 dBA (reference: 1 W into 4 Ω) Load Impedance : 4 Ω (4 Ω to 8 Ω allowance) Frequency Response : 40 Hz to 20 000 Hz Line-Out or Subwoofer-Out Level/ Impedance : 2.
Having TROUBLE with operation? Please reset your unit Refer to page of How to reset your unit Still having trouble?? USA ONLY Call 1-800-252-5722 http://www.jvc.
KD-R338/KD-R330 GET0760-002A Installation/Connection Manual Manual de instalación/conexión Manuel d’installation/raccordement 0811DTSMDTJEIN EN, SP, FR © 2011 JVC KENWOOD Corporation [J] ENGLISH / ESPAÑOL / FRANÇAIS WARNINGS / ADVERTENCIAS / AVERTISSEMENTS • Necesitará los kits de instalación que corresponden con su vehículo.
ELECTRICAL CONNECTIONS / CONEXIONES ELECTRICAS / RACCORDEMENTS ELECTRIQUES Signal cord / Cable de señal / Cordon de signal *1 Reset the unit. / Reinicialice la unidad. / Réinitialisez l’appareil.
WHEN IT IS NOT REQU IRED TO DETAC H THE FRON T CONT ROL PANEL FROM THE MAIN UNIT, USE THE PROV IDED SCRE WTO ATTAC HTHE CONT ROLP ANEL TO THE MAIN UNIT.
1.\ CAUTION ~ w 0:: 0 LL w m w __, w INCORRECT CONNECTION CAUSES SERIOUS DAMAGE TO THIS UNIT PLEASE READ INSTALLATION/CONNECTION MANUAL CAREFULLY. c U) W ...... ~ 0 0 Q2 m 1- w _.
Please do not send products or other correspondence to this address. PLEASE PLACE STAMP HERE JVC AMERICAS CORP. 1700 Valley Road Wayne, NJ 07470 PO BOX 1189 BEDFORD, TX 76095-1189 11 ... 1.11 •• 11 ••• 1.1 ... 1.1 .... 11 ... 111 •• 1.1.1 •• 1•• 1.1.1 .. 1... 11 PRODUCT REGISTRATION CARD I QUESTIONNAIRE USA CUSTOMERS ONLY Registering your product will allow us to contact you in the unlikely event a product safety notification is required. This form is for Product Registration purposes only.
Registeronline at REGISTER . JVC.COM and receive a special offer! PRODUCT REGISTRATION First Name: Last Name: Address: Apt.
,... CANADA ONLY ,. JVC CANADA SEULEMENT WAIIANTY GARANTIE OWNER'S COPY OF WARRANTY CARD COPIE D'ENREGISTREMENT DE LA GARANTIE DU PROPRIETAIRE (Save sales docket together with this warranty card, as a proof of date of purchase. La facture et cette garantie sont vos preuves de Ia date d'achat; rangez-les.) MODEL . SERIAL NO. . MODELE . .................... .................................... NO DE SERlE . ........................................ . Purchase from. Date purchased . Achete chez · .........
(e) (f) (g) (h) (i) (j ) (k) Any JVC products on which the serial num-ber has been defaced, modified or removed. Maintenance, cleaning or periodic check-up Conversion to foreign or domestic voltage or frequency. Any JVC product without the Canadian Electrical Safety Regulations 10. Any JVC products used for commercial or institutional, rental, or display purposes. Parts ...... 1 year (except video head - 90 days) Labour ...
TO OUR VALUED CUSTOMER-THANK YOU FOR PURCHASING THIS JVC PRODUCT. WE WANT TO HELP YOU ACHIEVE A PERFECT EXPERIENCE. NEED HELP ON HOW TO HOOK UP? NEED ASSISTANCE ON HOW TO OPERATE? NEED TO LOCATE A JVC SERVICE CENTER? LIKE TO PURCHASE ACCESSORIES? JVC®IS HERETO HELP! TOLL FREE: 1(800)252-5722 http://www.jvc.com Remember to retain your Bill of Sale for Warranty Service. - - - Do not attempt to service the product yourself Caution To prevent electrical shock, do not open the cabinet.
****************************************************************************** * i JVC® ~ LIMITED WARRANTY IONLY FOR PRODUCT PURCHASED IN U.S.A. I 1-1 i* I USA ONLY I ~ * JVC Americas Corp. (JVC) warrants this product and all parts thereof, except as set forth below ONLY TO THE ~ ~ ORIGINAL RETAIL PURCHASER to be FREE FROM DEFECTIVE MATERIALS AND WORKMANSHIP from the date of * * original purchase for the period shown below.