JVC ENGLISH ESPANOL FRAN<;AIS KW-V40BT/KW-V20BT/KW-V200BTI KW-V1 0/KW-Vl 00 MONITOR WITH DVD RECEIVER Please read all instructions carefully before operation to obtain the best possible performance from the unit. INSTRUCTION MANUAL Por favor lea detenidamente este manual para comprender a fondo todas las instrucciones y obtener un maximo disfrute de esta unidad.
5 BEFORE USE................................................... 2 How to reset your unit. ................................................... 3 How to forcibly eject a disc ........................................... 3 INITIAL SETTINGS ......................................... 4 BASICS ........................................................... 5 Component names and functions ............................. 5 Common operations .......................................................
I!~E.(tRE USE For KW-V40BT Region 1/KW-V20BT Region 1/KWV200BT/KW-V10 Region 1/KW-VlOO: &CAUTION Use of controls or adjustments or performance of procedures other than those specified herein may result in hazardous radiation exposure. In compliance with Federal Regulations, the following are reproductions of labels on, or inside the product relating to laser product safety.
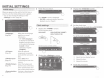
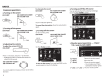
2 Initial setup Dcmonstr~lton ·- Camera lnpul AV.It-J ,p(ld On Oft n~·:pt,)· Ot'st~1 n Uemoflstrattor. Fnl+!~ On Off • Select the text language used for on-screen information. o Set to display the operation buttons and menu items in the selected language ([Local]: initially selected) or English ([English]). Select an external (Page 45) component connected to the AV-IN1 terminal to play. Select [On] when (Page 45) connecting the rear view camera.
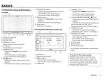
·;· · Co:m.po.nent.··nam.es . · an~•· • ft~•nctiO•IlS KW-V40BT [[] DISP/DISP OFF button • Switches the screen between the current source and Apps. (Press) • Turns off the screen. (Hold) (Page 6) • Turns on the screen. (Hold) (Page 6) []] ~ (Eject) button • Displays the screen. (Press) (Page 6) • Ejects the disc forcibly. (Hold) (Page 3) [Q] Reset button Resets the unit.
To attenuate the sound KW-V20BT/KW-V200BT/ KW-V40BT KW-V1 0/KW-Vl 00 Common.operation~ OTurning on the power 0 Turning on/off the AV source You can activate the AV function by selecting a source on the screen. KW-V20BT/KW-V200BT/ KW-V1 0/KW-Vl 00 KW-V40BT The ATI indicator lights up. To cancel the attenuation: Press the same button again.
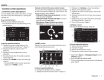
Common. screen operations OCommon screen descriptions You can display other screens any time to change the source, show the information, or change the settings, etc. Source control screen Performs source playback operations. • The operation buttons vary depending on the selected source. Common operation buttons: OJ Displays the screen of the App from the connected iPod touch/iPhone.* 1 (Page 17) [1] Displays the phone control screen.* 2 * 3 (Page 33) [I] Displays the sound adjustment screen.
BA CS OTouch screen operations Selecting the playback source KW-V40BT [TUNER] [Satellite]* 2 [DISC] [USB] [iPod] [Biuetooth]* 3 ITJ Displays the video control menu while playing a video. [Pandora]* 2 KW-V20BT/ KW-V200BT [AV-IN]*4 [Apps)* 5 [Front AUX]*6 W Displays the source control screen while playing a video. • The operation buttons disappear when the screen is touched or when no operation is done for about 10 seconds. [I] Goes to the previous chapter/track.* [I] Goes to the next chapter/track.
0 Ejecting a disc ;l PI~¥ing· · ~> ~i§~·< • If a disc does not have a disc menu, all tracks on it will be played repeatedly until you change the source or eject the disc. • For playable disc types/file types, see page 55. KW-V40BT 0 Indications and buttons on the source control screen For DVD/DVD-VR/VCD/DivX/M PEG1/MPEG2/JPEG 0 Inserting a disc Insert a disc with the label side facing up. • For KW-V40BT: To open the monitor panel, see page 6.
Operation buttons [•]* 1 Stops playback. [ ~]*2 [-I. t1* 3 Displays the folder/track list. (See the far right column.) Selects playback mode. (Page 12) [.... /11 1 Starts/pauses playback. [c!:_)] [Mode]* 6 [HOME] *1 *2 *3 *4 • Selects a chapter/track. (Press) • Reverse/forward search.* 5 (Hold) Selects title (DVD)/program or playlist (DVD-VR)/folder (DivX/ MPEG 1/MPEG2/JPEG). Changes the settings for disc playback on the screen. (Page 12) Displays the screen.
Q;l,~e~CtammMiiiM&MiHI!tl!MWl! Mit!M!!l'ltiiiil MIW&IIlMll!!lli!Ht! N!\f:!!ttMt@IHil'!MNfiMlMi'tH1MMNtWMltFM t%!iil [Menu]* OVideo menu operations You can display the video menu screen during video playback. • Available items on the screen differ depending on the types of the loaded disc and playback files. • The operation buttons disappear when the screen is touched or when no operation is done for about 10 seconds. Mll!!Mii!iit!lil!li'HIIMNifii IMM ii!MMMW original program (DVD-VR) .
DISCS 0 Selecting playback mode [c!:.,)] Selects Repeat playback mode. [.J. t1 Selects Random playback mode. • For DVD/DVD-VR: Repeat play is available. For VCD (without PBC)/CD/DivX/MPEG 1/MPEG2/ MP3/WMA/WAV: Repeat and Random play are available. - You cannot activate the repeat mode and the random mode at the same time. • Each time you press the button, the playback mode changes. (The corresponding indicator lights up.) - Available items differ depending on the types of loaded disc and playback file.
'!l ~ oiini~~'IIJ ~ ;~$11 ~'~~cvou can connect a USB mass storage class device such as a USB memory, Digital Audio Player etc. to the unit. • For details about connecting USB devices, see page 52. • You cannot connect a computer or portable HDD to the USB input terminal. • For playable file types and notes on using USB devices, see page 56. When a USB device is connected ... The source changes to "USB" and playback starts.
SB 0 settings 0 Selecting a folder/track on the list Setting [Audio] Plays back audio files. [Still Picture] Plays back JPEG files. [Video] Plays back MPEG 1/MPEG2 files. 1 [Audio&Video] (Initial) Plays back audio files and MPEG1/MPEG2 files. • For playable files, see page 56. If the USB device contains no files of the selected type, the existing files are played in the following priority: audio, video, then still picture.
OSetting for iPod/iPhone playback 3 Playback operations Select an appropriate input setting for according to the connection method of the iPod/ iPhone. • For KW-V40BT/KW-V20BT/KW-V200BT/KW-V1 0 Region 1/KW-V1 00: Make sure that" AV Off" is selected as the rear source. (Page 29) 1 Turn off the AV source. [AV-IN] On the screen: " Dtsplay 1 -.!~ lt !., ~\& _3!...
Operation buttons [~ 1 [~] [.I. t1 ,. [ .... ] [~] [~] [Mode] [HOME] Displays the audio/video file list. (See below.) Selects repeat playback mode. • ~SONGS: Functions the same as //Repeat One.~~ • ~ALL: Functions the same as //Repeat All." Selects random playback mode.* 1 · .1. t SONGS: Functions the same as //Shuffle Songs." .1. t ALBUMS: Functions the same as //Shuffle Albums." Starts/pauses playback. • Selects an audio/video file.* 2 (Press) • Reverse/forward search.
Video: 1 Turn off the AV source. (Page 6) 2 Display the setting screen. To view the App screen On the screen: On the source control screen: For some applications such as navigation applications, the operating buttons and information are not shown. You can perform the operations on the touch panel, such as scrolling the map. You can also play back the audio/video using iPod/ iPhone itself instead of the unit. 3 Select [iPhone] for on the screen.
e.~~9~!3!9~~!l4W""'V~9~> You can stream Pandora from iPod touch/iPhone via a wired connection or from Android devices through Bluetooth. • Install the latest version of the Pandora application on your iPod touch/iPhone/Android. • Android devices can only be used with KW-V40BT Region 1/KW-V20BT Region 1/KWV200BT. Preparation Connect the device, then start Pandora application. For Android 1 Pair the Android device through Bluetooth. (Page 30) 2 Select "Pandora" as the source.
&!lt.d .Q.~~/ ~a~A®!! !! i I:\:B!Wi\ !! :: it iil%\\Ml~f!I iii%!MNf%l#M iii it itKMmt1lt W\ 0 Adding a station from the to the ! it Lt:Jf'\W!\tM ' it Fi!MiliHW:l ! ! 1! iMI.Wm!tL! MM! i i !!IMtW!t! Htii& il k!! MW!l!:f@!MHM! !M!iti@M!WMMMI!i!MrMWt!MHM!MMW!ifWJJM.%\%!%HMH !i!!HIW:W M1S11!MM !Bf@ii@!!MtM%!M!!tiJtitt!Mt1iid!lkWWM1lt:fiMM!MtlBHi 0 Selecting a station from the The screen shows the genres sent by the connected device.
Liste11i111J to the·radio Preparation: Select the appropriate tuner channel interval for . (Page 21) 0 Indications and buttons on the source control screen Operation buttons • Selects a stored station. (Press) [P1] - [P6] • Stores the current station. (Hold) Changes the display information. [ ] (See the right column) [TP]* Activates/deactivates TA standby reception mode. (Page 23) Enters PTY search mode. (Page 22) [PTYQ_]* ... [BAND] Selects the band. LFMl-. FM2 __.. FM3 -.
Activate monaural mode for better reception. 0 Reducing interference during FM reception 1 1 0 Improving the FM reception PTY. Mode\&_ HO~!!I! II > ~ II ... 1 2 [Off] Activate monaural mode to improve FM reception, but the stereo effect will be lost. The MO indicator lights up. Restore the stereo effect. 2 [Auto] D Tuning in FM stations only with strong signals-LO/DX (Local/Distanceextreme) 1 2 [Local] [OX] The tuner channel interval changes depending on the area you use this unit.
Presetting stations 0 Storing stations in the memory You can preset 6 stations for each band. Manual presetting 1 Tune in to a station you want to preset. (Page 20) 2 Select a preset number. FM RBDS features OSearching for FM RBDS programs-PlY Search You can search for your favorite programs being broadcast by selecting the PTY code for your favorite programs. Automatic presetting-SSM (Strong-station Sequential Memory) (For FM only) 1 1 (Hold) 2 2 Select a PTY code.
SiriusXM® RADIO CJ Activating/deactivating TA Standby Reception The unit is in standby to switch to Traffic J\nnouncement (TA) if available. (The TP indicator lights up.) • If the TP indicator flashes, tune into another station providing RBDS signals. !9!J,!, ~tfS;~\\~~;;~d2§'L;;!!!,S~i"9,!liia&,~~i·~~g§;){:rke~!g,!ea wJ~!S~&~~,.
~;i,!iitY,!.I~M,:%tBI~., tD,.\1i":ln1l:twntrmmrmtittJMlltWwmw;tmMiM!iNiMtJWiH!iMWit&¥itiMmi!MMT!M\rtt+b1iEW~t4r!lmmrnn£&1IM&~tmtt!HMW~tmMww)W!fi.itrt£s\n::ar;HsN;1MmmMmw&tttHWtttntnMmw;;'iliwJutimJM:ww::mwrrRwtnmM!mRi!ItiaM;;;g;;;;;;;f;;imwrwmrwat;n§&t~.iiWBi''Fh:liHMiil\W!KJmtR:&mm;;mt¥lmm;mm::; Operation buttons • Selects a stored channel. (Press) [P1 1- [P6] • Stores the current channel. (Hold) Changes the display information. [...,.] (See the right column) Displays the Category/Channel List.
~lli!!,§l,fti~;=Jit~~,,QI~;~Q~, H liiwfflii!ilti ;;;;;; t'1lihi8HSd,@!ii!M tKMl%M!iW!!i\M!t1ii1f&tHlMWli!iM \@fillLMM\ i@!i!1Mllmf8illiiwii!MttfiiE1tr0:W1&lH!MMikMillilfWMMMM8i\ill%MJMillk'&JMHMHlM%t&&f#J[Jii1MM I&idMMMMH1ttlfiMl1li*iM!!kiHMiM!:H'lWHMiiWliMt&100!!tJMM!!MMMM!Mtt!:l!M!t¥iMltilfl:~;r;;;z_gtt@!tif To change the parental code: Press [Change] in Setting the reception restrictiQns ~ pre,setting , channels step 1, enter current code, then new code in step 2 0 Storing channels in the memory 0 Setti
3 Select a category((})), and then a channel 2 you want to activate the parental lock for Enter your parental code number((})), then confirm the entry(@). 2 Select a category ((})), and then select a • Press [Clear] to delete the entry. • You can change the page to display more items by pressing [A]/[T]. The II indicator appears beside the selected channels. • Repeat this step if you want to skip more channels. channel you want to skip (@) (@).
Using external audio/video players-AV-IN 0 Indications and buttons on the source control screen U~~~~ e~~rnai .~IJ~io ~~y~rs;,' Front AUX(only for KW·V2.0BT/KW-V200BT/ KW-V10/KW-V100) • When the operation buttons are not displayed on the screen, touch the area shown on the illustration. - For KW-Vl 0/KW-Vl 00: You can also display/hide the operations buttons by pressing FNC on the monitor panel. - To change settings for video playback, see page 39.
Using a rear view camera • To use a rear view camera, a REVERSE GEAR SIGNAL lead connection is required. (Page 51) 0 Displaying the picture from the rear view camera The rear view screen is displayed when you shift the gear to the reverse (R) position. To display the picture from the rear view camera manually On the screen: 0 Activating the rear view camera 1 Display the setting screen.
9rZ,tli~,I:L~,I;J;;~~~J~J,I;Las;Q.,M ~RQ,fl',;IJ:I)I~~.:. .··nu;w:trltmmnxH!l't11hl'\\t1tWi~WJmtml&\Fi\1\Rir!Iil!!tmmwi1\awtt;mw:w&aM:w&;am;iMW!tmtt1triB1ThttJiMH&lli¥t~Mll&JMJJJJNtwnrun:mt:rntmnw;::Rn!lWwWI;llttmmwunmJnHmHMiSii'ilfif%\WMmrm;m'Iit1Jmmnttmm<lHt:!t1&NttrmtwmitM!MWt:WmJmtmlMmll'lftt~ Qsing a. nexte. ~ne~l monitor__.:Rea.
Information for usingBluetooth® devices 0 Bluetooth® Bluetooth is a short-range wireless radio communication technology for mobile devices such as mobile phones, portable PCs, and other devices. Bluetooth devices can be connected without cables and communicate with each other. Notes • While driving, do not perform complicated operations such as dialing numbers, using the phonebook, etc. When you perform these operations, stop your car in a safe place.
Pairing a Bluetooth device using a PIN code (for Bluetooth 2.0) 1 2 Change the PIN code. • If you skip changing the PIN code, go to step 3. • The PIN code is initially set to "0000". • The maximum number of digits in the PIN code is 16. Display the screen. On the screen: 4 Select the 11JVC Unit" for your Bluetooth device. • If the PIN code is required, enter "0000" (initial). PIN code 0000 When pairing is complete, the device is listed on .
To disconnect 0 Connecting/disconnec ting a registered Bluetooth device 1 Select [Disconnect] next to the target device. Display the screen. (Page 31) Using the Bluetooth mobile phone 0 Receiving a call When a call comes in ... 2 To connect: Select [Connect] next to the target device to display the screen (G)), and then select the device you want to connect (@). A confirmation message appears. Press [Yes].
0 Adjusting the volume of calls/earpiece/ microphone While talking ... • You can adjust the volume level between -20 to +8 (initial: 0). • This adjustment does not affect the volume level of the other sources. • Use the monitor panel to adjust the call/earpiece volume. (Page 6) 0 Notifying SMS reception 0 Making a call If the mobile phone is compatible with SMS (Short Message Service), the unit tells you a message has been received. (Page 37) 1 Display the phone control screen.
From the preset list/phone book/call lists 1 iH -·- [Preset] 12345678X . ~· • To use the A to Z search on phone book: When the phone book list screen is displayed, you can search by initial. 1 From the preset list • To display the details of an entry: When the phone book list screen is displayed, you can display the details of an entry and select a phone number if several phone numbers are registered. 1 Display the details of the desired entry.
Voice dialing • Available only when the connected mobile phone has a voice recognition system. 2 Select an item from the phone book/call 3 lists. 1 Activate voice dialing. On the phone control screen: •>)~'- ~34XXX~X 3 1 Select a phone number. ·~23XXXXXX ,~~ -~ ' On the monitor panel: KW-V40BT KW-V20BT/KW-V200BT t ~(Hold) I~~ (Hold) ~(Hold) 4 2 Select a preset number to store into. Say the name of the person you want to call.
BLU About mobile phones compatible with Phone Book Access Profile (PBAP) If your mobile phone supports PBAP, you can display the phone book and call lists on the touch panel screen when the mobile phone is connected. • Phone book: up to 5 000 entries • Dialed calls, received calls, and missed calls: up to 50 entries each 0 Deleting the phone number entries in the unit 1 Display the preset list/phone book/call list you want to delete. (Page 34) 2 • You cannot delete data when [Phone) is selected.
Operation buttons Q Setting items <:Auto Answer> <::SMS Notify> <:Ring Mode> • On: The unit answers the incoming calls automatically. • Off (Initial): The unit does not answer the calls automatically. Answer the calls manually. • On (Initial): The unit informs you of the arrival of a message by ringing and displaying "Receiving Message". • Off: The unit does not inform you of the arrival of a message. • System (Initial): The ring tone set on the unit is used.
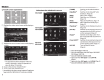
Sound adjustment 2 Select a sound mode. 2 Select a band. 0 Using the sound equalization • The adjustment is memorized for each source until you adjust the sound again. If the source is a disc, the adjustment is stored for each of the following categories. - DVD/DVD-VRNCD -CD - DivX/MPEG1/MPEG2/MP3/WMA/WAV • You cannot adjust the sound when the AV source is turned off. Selecting a preset sound mode 1 Display the screen. On the screen: 3 Adjust the sound.
Q Adjusting the crossover frequency 1 Display the screen. On the screen: 1 1 tr Adjustment for v.ideo playback 2 Select [t]] (dimmer on) or [£3] (dimmer off). 0 Adjusting the picture You can adjust the picture quality. 1 Display the adjustment menu. 3 Adjust the picture (-15 to+ 15). 2 Select the item to adjust (G)), then make adjustments (@). Adjusts the crossover for the front ([Front]) or rear ([Rear]) speakers (high pass filter).
~l~,J;J;IJ:,t~,i~~,.·M %1W!lii:IMnJ:i:MiJtt@iiti%dWttMfi!Mtl\ttli%i!i!iiiWt.t41\'M:M:l~li&:Wit.t.iiiiiWMlMMMWtWt:H:WtJMIWimt@t~IIlWIM:::f.ii::::mmMIW'%:M:%tiJl%fi@f!lli1i!im1MHiiiWii.i X l ill 0ilfi0:Miiii:MMll\l\MlMWtl W:Mtft:MMMMWil@i\f.Mi1WMt1!itMii111Wid!llMMMIM!l1M1t.diiMiiWBM1iMtfft1@iltifiiWtllH!ii!WlM!M!:Wt&Mi'':'::,:,.:::::''•'••·:.::':••:·:'.•, .•. \·.·.:.n 0 Changing the aspect ratio 2 Select the aspect ratio. OZooming the picture You can change the aspect ratio for video playback.
3 Select the design or color. You can change the background, the color of text, touch panel buttons, and monitor panel buttons. 1 Display the screen. On the screen: To select a background Select a background design (G)), then select or adjust color (@). • When selecting color, select the Dimmer setting for the color ([I]J: Dimmer On or g: Dimmer Off), then select the color from the color palette or adjust the color using the color adjuster.
5 Capture the image displayed on the screen. Customizing the system settings 3 0 Memorizing/recalling the settings Select an item ([User1 ], [User2] or [User3]) to memorize the settings.
Clearing your settings 1 On the screen: Display the screen. (Page 42) • If the update has failed, turn the power off and then on, and retry the update. • Even if you have turned off the power during the update, you can restart the update after the power is turned on. The update will be performed from the beginning. * Only for KW-V40BT/KW-V20BT/KW-V200BT. I 2 0 Adjusting the touch position 3 Select the item you want to clear.
0
s CJ setting screen • Auto (Initial): Dims the screen and button illumination when you turn on the headlights. - The ILLUMIIead connection is required. (Page 51) • On: Activates dimmer. • Off: Cancels. Dimmer Time Set: Sets the Dimmer On .)/Off (IB) times. - Press [.&.]/[T] to set the time. Change the display design (background, the color of text, touch panel buttons, and monitor panel buttons).
s GS *1"'-====-~-=,W-~>-*'-=<'W.W->m=>•=>•=--»w=--»<=-> 0 setting screen ·~ Select the text language used for on-screen information. • English (lnitiai)/Espanoi/Fran~ais/Deutsch/ ltaliano/Nederlands/Svenska/Dansk/PyccKMVt/ Portugues - "Please Power Off" appears when the setting is changed. Turn off the power, then turn on to enable the change. · GUI Language: Select a language used for displaying operation buttons and menu items.
For KW-V40BT Region 1/KW-V20BT Region 1I KW-V1 0 Region 1: To use the remote controller, purchase RM-RK252P separately. ~f'era.~~f)•n• s• • ·~ ·si· l)9•·• t11e>• relfl~~·~ c:ontroller(RM-RK2561RM~RK252P) 0 Basic button functions l,··tr.•stal·l·i·ns•.• the .• .b.alteries ATT Attenuates/restores the sound. 0 Installing the batteries DISP Does not function for this unit. • Tuner/SiriusXM radio * 1: Selects the preset stations. Selects a title/item/folder.
~tvi • DVD-Video: Makes selection/ settings. • DivX: Skips back or forward by about 5 minutes. ENT Confirms selection. Does not function for this unit. DUAL/# Does not function for this unit. SHIFT Functions with other buttons. DIRECT/CLR • Enters direct search mode when pressed with SHIFT button. (See the right column.) • Erases the misentry when pressed with SHIFT button. • "SURROUND" function does not work for this unit.
6WARNING • If you connect the ignition wire (red) and the battery wire (yellow) to the car chassis (ground), you may cause a short circuit, that in turn may start a fire. Always connect those wires to the power source running through the fuse box. • Do not cut out the fuse from the ignition wire (red) and the battery wire (yellow). The power supply must be connected to the wires via the fuse.
' iQf:I!J,.HJgLQJWJ~il!lbUIDQili-------------------~O~In~s~t:al~li:n:g~t:he:':tr:im~p:la:t:e:(o:n:l:y~fo:flr~:K;;w:0 Installation procedure 1 To prevent a short circuit, remove the key 2 3 4 from the ignition and disconnect the 8 battery. Make the proper input and output wire connections for each unit. Connect the speaker wires of the wiring harness. Region 4/KW-V20BT Region 4/KW-V1 0 Region 4) Connect the wiring harness wires in the following order: ground, battery, ignition. the unit.
UConnecting wires to terminals r---r-:R::-:E~v=E=-Rs-::-:E::--,.--Pu-rp-le-w-it-hw-h-it-e-st-rip_e_ Connect to the vehicle's reverse lamp harness when GEAR using the optional rear view camera. SIGNAL (Reverse sensor wire) L~·n---rr=---:-~--~ PARKING] Light green Elil0-+ ~ USB terminal: See lf121 ;l~~ page 52. [ r---------!.!.!..[f Je ~ FUSE10A EXTI/F BRAKE (Parking sensor wire) ~L .. 10 Afuse Connect to the vehicle's parking brake detection switch harness.
[§] Front precut 0 Connecting a USB device/iPod/iPhone iPhone 5/iPod touch (5th Generation)/iPod nano (7th Generation) (commercially available) D 0 • Audio left output (White) • Audio right output (Red) IIl AV-OUT/ Audio output (03.
0 Removing the unit 0 Connecting microphone for Bluetooth (only for KW-V40BT/KW-V20BT/ KW-V200BT} Connect the microphone (Cl)) to the MIC terminal. • To install the microphone, peel off the adhesive tape, fix on the installation position, then adjust the direction of the microphone to face the driver. After installing, fix the microphone cable to the car with clamps (commercially available).
.R Maintenance 0 Caution on cleaning the unit Do not use any solvent (for example, thinner, benzine, etc.), detergent, or insecticide. This may damage the monitor or the unit. Recommended cleaning method: Gently wipe the panel with a soft, dry cloth. 0 Moisture condensation Moisture may condense on the lens inside the unit in the following cases: • After starting the heater in the car. • If it becomes very humid inside the car. Should this occur, the unit may malfunction.
Playing MP3/WMA/WAV files • This unit can play back files with the extension code <.mp3>, <.wma>, or <.wav> (regardless of the letter case-upper/lower). • This unit can play back the files meeting the conditions below: - Bit rate: MP3/WMA: 32 kbps- 320 kbps - Sampling frequency: 48 kHz, 44.1 kHz, 32 kHz (for MPEG 1) 24 kHz, 22.05 kHz, 16 kHz (for MPEG2) 48 kHz, 44.1 kHz, 32 kHz, 22.05 kHz (for WMA) 44.1 kHz (for WAV) • This unit can show 103 Tag Version 1.0/1.1/2.2/2.3/2.4 (for MP3).
CES Playing Recordable/Rewritable discs This unit can recognize a total of 5 000 files and 250 folders (a maximum of 999 files per folder). Use only "finalized" discs. This unit can play back multi-session discs; however, unclosed sessions will be skipped while playing. Some discs or files may not be played back due to their characteristics or recording conditions.
ES 0 Using Apps of iPod touch/iPhone 0 Language codes (for DVD/DVD-VR language selection) SAFETY INSTRUCTIONS Use of the iPhone Navigation App is only permitted if the traffic conditions are suitable and you are absolutely sure that no risk, obstruction or injury will be incurred to you, your passengers or other road users. The requirements of the Road Traffic Regulations must always be followed and may vary by state. The destination must not be entered while the vehicle is in motion.
11 Error messagf;! li~t If an error occurs while using the unit, a message appears. Take appropriate action according to the following message/remedy/cause list. 11 NO Signal": • Start the playback on the external component connected to the AV-IN1 terminal. • Check the cords and connections. • Signal input is too weak. ''MISWIRING Check wiring connection then reset unit" / 11 WARNING Check wiring connection then reset unit": • A speaker cord has shorted or it has come in to contact with the car chassis.
"SXM Check Tuner": • Make sure the SiriusXM Connect Vehicle Tuner is connected to the unit. "SXM Chan Unavailable" (appears on the screen for about 2 seconds, then returns to the previous channel): • Selected channel is no longer available. Select another channel or continue listening to the previous channel. "SXM Ch Unsubscribed": • Selected channel is not part of your current subscription plan. Call 1-866-635-2349 to subscribe.
DUSB "Now Reading ••• " does not disappear from the screen. • Turn the power off and on again. Videos cannot be played. • Connect with USB Audio and Video cable JVC KS-U59. Other cables cannot be used. • Select [iPod] for . (Page 45) While playing a track, sound is sometimes interrupted. • The tracks are not properly copied into the USB device. Copy tracks again, and try again. No sound of videos comes out. • Connect with USB Audio and Video cable JVC KS-U59. Other cables cannot be used.
The unit does not make pairing with the Bluetooth device. • For devices compatible with Bluetooth 2.1: Register the device using a PIN code. (Page 31) • For devices compatible with Bluetooth 2.0: Enter the same PIN code for both the unit and target device. If the PIN code of the device is not indicated on its instructions , try "0000" or "1234." Echo or noise occurs. • Adjust the microphone unit position. • Make sure that the NR/EC (Noise reduction/E cho cancel) function is activated.
CES Signal to Noise Ratio 99 dB (DVD-Video 96kHz) Profile Dynamic Range HFP (Hands Free Profile) OPP (Object Push Profile) 0 Video section 99 dB (DVD-Video 96 kHz) Disc Format DVD-Video/DVD-VRNIDEO-CD/ CD-DA Sampling Frequency 44.
Installation Dimensions (W x H x D) KW-V40BT Region 1/KW-V20BT Region 1I KW-V200BT/KW-V1 0 Region 1/KW-V1 00: 178 mm (7-1 /16 11 • x 100 mm x 159 mm X 3-15/16 11 X 6-5/16 11 ) KW-V40BT Region 4/KW-V20BT Region 4/KW-V1 0 Region 4: 182 mm x 111 mm x 162 mm (7-3/16 11 X 4-3/8 11 X 6-7/16 11 ) Operational Temperature Range +60°C -1 ooc - Weight KW-V40BT Region 1: 2.5 kg (5.5 lbs) KW-V40BT Region 4: 2.8 kg (6.2 lbs) KW-V20BT Region 1/KW-V200BT/KW-V1 0 1.9 kg (4.
Having TROUBLE with operation? Please reset your unit Refer to page of How to reset your unit Still having trouble?? USA ONLY Call1-800 -252-5722 http://www .jvc.
U.S.A. JVC AMERICAS CORP. TO OUR VALUED CUSTOMER THANK YOU FOR PURCHASING THIS JVC PRODUCT. WE WANT TO HELP YOU ACHIEVE A PERFECT EXPERIENCE. JVC LIMITED WARRANTY ONLY FOR PRODUCT PURCHASED IN U.S.A. JVC Americ as Corp. (JVC) warrants this product and all parts thereof, except as set forth below ONLY TOTHE ORIGINAL RETAIL PURCHASER to be FREE FROM DEFECTIVE MATER IALS AND WORKMANSHIP from the date of ori ginal purchase for the period shown below. ("The Warranty Period") .
CANADA JVC JVC CANADA INC. WARRANTY GARANTIE Warranty applies only to PRODUCT distributed in Canada by JVC Canada Inc. Lagarantls' applrque seulement aux PRODUITS distrlbues au Canada par JVC Canada Inc. JVC CANADA INC. (hereafter called "JVC") grves the following express warranty for each new JVC product distributed in Canada by JVC and sold by an authorized JVC dealer. JVC warrants that this JVC product is free, under normal use and maintenance.