MP-XP7220KR,MP-XP5220KR SERVICE MANUAL Mobile mini note PC 02 2003 G1004 MP-XP7220KR,MP-XP5220KR Area Suffix KR ------------------ Korea TABLE OF CONTENTS 1 SPECIFIC SERVICE INSTRUCTIONS . . . . . . . . . . . . . . . . . . . . . . . . . . . . . . . . . . . . . . . . . . . . . . . . . . . . . . 1.1 Disassembly procedure . . . . . . . . . . . . . . . . . . . . . . . . . . . . . . . . . . . . . . . . . . . . . . . . . . . . . . . . . . . . 1.2 Preinstallation procedure . . . . . . . . . . . . . . . . . .
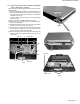
MP-XP7220KR,MP-XP5220KR SECTION 1 SPECIFIC SERVICE INSTRUCTIONS 1.1 Disassembly procedure 1.1.1 Removing the internal battery (See Figure 1) Prior to performing the following procedure, remove the external battery. (1) Remove one screw A on the bottom of the main body. (2) Pull out the internal battery in the rear direction. 1.1.
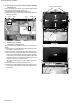
MP-XP7220KR,MP-XP5220KR 1.1.3 Removing the top case and LCD panel assembly (See Figure 1 and Figure 5 ~ Figure 8) • Prior to performing the following procedure, remove the keyboard assembly. (1) Insert a single-slotted screwdriver or a flat screwdriver in a space b on the underside of the hinge cover. Then, remove the hinge cover by pulling the screwdriver in the direction indicated by the arrow. And then, remove one more hinge cover at the other side of the main body.
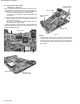
MP-XP7220KR,MP-XP5220KR 1.1.4 Removing the mother board (See Figure 9 ~ Figure 11) • Prior to performing the following procedure, remove the keyboard assembly, the top case, and the LCD panel assembly. (1) Remove one screw F (short), one screw G (middle), and the two screws H (long) attaching the mother board. (*In attaching the mother board, tighten H1, H2, G, and F in this order.
MP-XP7220KR,MP-XP5220KR 1.1.5 Removing the parts on the mother board (See Figure 12 ~ 15) • Prior to performing the following procedure, remove the mother board. *Removing the fan assembly (1) Remove the four screws I attaching the fan assembly. (2) Disconnect the connector wire from the connector CN13 on the mother board. *Removing the hard disc drive (1) Remove one screw J at the side of the mother board where the hard disc drive is not attached.
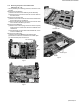
MP-XP7220KR,MP-XP5220KR 1.1.6 Removing the top case and the LCD panel assembly (See Figure 16) • Prior to the following procedure, remove the top case and the LCD panel assembly from the bottom case. (1) Remove the two screws N attaching the hinge. (2) Remove the tapes fixing the two wires of the LCD panel assembly if necessary. N Hinge Tape Tape Hinge Rubber pad and screw O Latch N LCD Latch Latch Latch Fig.16 1.1.
MP-XP7220KR,MP-XP5220KR 1.2 Preinstallation procedure No data including Windows XP has been recorded in service parts HDD. It is necessary to put data in HDD after HDD is replaced. < The following materials are needed > *CD-ROM drive (model name MP-CDX1E) *CD for installing HD Image (a set of five CDs) (1) Connect CD-ROM drive (model name MP-CDX1E) and the Mobile Mini Note PC by using PC card slot. (2) Insert the 1st CD for installing HD Image in CD-ROM drive. (3) Push a power supply button.
MP-XP7220KR,MP-XP5220KR 1.3 Caution in exchanging a bottom case 1.3.1 As for COA LABEL Neither "LE40888-001A/COA LABEL PRO" nor "LE40888-002A/COA LABEL HOME" can be reused. COA LABEL is also necessary in exchanging a bottom case. 1.3.2 As for serial label "Serial label" where model name and serial number are written is not dealt with as service parts. Please reuse it.
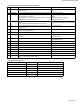
MP-XP7220KR,MP-XP5220KR 1.5 Operation check item list after the repair is completed Item Contents Required equipment 1 IEEE1394 Is connected with IEEE1394 port the Digital video camera and Digital video camera made of our company. do recognize it? 2 SD CARD Is connected with SD card slot the SD card and do recognize it? SD card on the market. 3 PC CARD Check whether PC card operates properly when it is connected to PC card slot for Card Bus.
MP-XP7220KR,MP-XP5220KR VICTOR COMPANY OF JAPAN, LIMITED AV & MULTIMEDIA COMPANY MOBILE IT CATEGORY 1644, Shimotsuruma, Yamato, Kanagawa 242-8514, Japan (No.