
User manual


13
Cleaning the interior
Before using the appliance for the first time, wash
the interior and all internal accessories with luke-
warm water and some neutral soap so as to remove
the typical smell of a brand-new product, then dry
thoroughly.
Do not use detergents or abrasive
powders, as these will damage the finish.
USE
CONTENTS
Warnings . . . . . . . . . . . . . . . . . . . . . . . . . . . . . . . . . . . . . . . . . . . . . . . . . . . . . . . . . . . . . . . . . . . . . . . . . . .12
Use - Cleaning the interior - Operation . . . . . . . . . . . . . . . . . . . . . . . . . . . . . . . . . . . . . . . . . . . . . . . . . . . . . . . .13
Use - Temperature regulation - Fresh food refrigeration - Freezing fresh food - Storage of frozen food - Thawing
Ice-cube production . . . . . . . . . . . . . . . . . . . . . . . . . . . . . . . . . . . . . . . . . . . . . . . . . . . . . . . . . . . . . . . . . . . . . . . . .14
Use - Movable shelves - Positioning the door shelves - Hints - Hints for refrigeration - . . . . . . . . . . . . . . . . . .15
Hints - Hints for freezing - Hints for storage of frozen food - Maintenance - Periods of no operation . . . . .
Periodic cleaning . . . . . . . . . . . . . . . . . . . . . . . . . . . . . . . . . . . . . . . . . . . . . . . . . . . . . . . . . . . . . . . . . . . . . .16
Maintenance - Interior light - Defrosting . . . . . . . . . . . . . . . . . . . . . . . . . . . . . . . . . . . . . . . . . . . . . . . . . . . .17
Customer service and spare parts - Installation - Location - Electrical connection - Fitting the decor panel . .18
Installation - Door reversibility - Inner door reversal . . . . . . . . . . . . . . . . . . . . . . . . . . . . . . . . . . . . . . . . . .19
Installation - Building-in instructions . . . . . . . . . . . . . . . . . . . . . . . . . . . . . . . . . . . . . . . . . . . . . . . . . . . . . .20
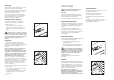
• Do not place carbonated or fizzy drinks in the
freezer as it creates pressure on the container,
which may cause it to explode, resulting in
damage to the appliance.
Installation
• During normal operation, the condenser and
compressor at the back of the appliance heat up
considerably. For safety reasons, minimum
ventilation must be as shown in the relevant
Figure.
Attention: keep ventilation openings clear of
obstruction.
• If the appliance is transported horizontally, it is
possible that the oil contained in the compressor
flows in the refrigerant circuit. It is advisable to
wait at least two hours before connecting the
appliance to allow the oil to flow back in the
compressor.
• There are working parts in this product which
heat up. Always ensure that there is adequate
ventilation as a failure to do this will result in
component failure and possible food loss. See
installation instructions.
• Parts which heat up should not be exposed.
Wherever possible the back of the product
should be against a wall.
• If the appliance has been transported
horizontally, it is possible that the oil contained in
the compressor ílows in the refrigerant circuit. It
is advisable to wait at least two hours before
connecting the appliance to allow tlıe oil to flow
back in the compressor.
Environment Protection
This appliance does not contain gasses which
could damage the ozone layer, in either its
refrigerant circuit or insulation materials. The
appliance shall not be discarded together with
the urban refuse and rubbish. Avoid damaging
the cooling unit, especially at the rear near the
heat exchanger. Information on your local
disposal sites may be obtained from municipal
authorities. The materials used on this appliance
marked by the symbol are recyclable.
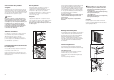
Operation
Insert the plug into the wall socket.
Open the refrigerator door and turn the thermostat
knob, clockwise, beyond the «O» (STOP) position.
The appliance will start to operate. To stop
operation, simply turn the thermostat knob to
position «O»
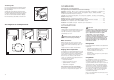
20
conduct of ventilation having the following
dimensions:
Depth 50 mm
Width 540 mm
Slide the appliance into the recess, pushing it
against the wall on the handle side.
A
D022
PR01
540
50
B
T
H
Instructions for totally built-in appliances
50 mm
min.
cm
2
200
200 cm
2
min.
D567
Building-in instructions
Dimensions of housing
Height 880 mm
Depth 550 mm
Width 560 mm
For safety reasons, minimum ventilation must be as
shown in Fig.
Attention: keep ventilation openings clear of
obstruction.
It is necessary that the niche is provided with a
D585
Open the door and fasten the appliance with 4
screws provided in the kit included with the
appliance.