QUALITY MOUNTING SOLUTIONS STEP-BY-STEP INSTALLATION MANUAL K2-A3-S ARTICULATING MOUNT k2mounts.
K2-A3-S Installation Instructions & Manual Table of Contents Before You Begin What You Will Need Package Contents Installation Wood Stud Wall Installation Concrete or Concrete Block Wall Installation Specifications K2Mounts Warranty 1 1 2 3 3 4 6 7 Before You Begin Read this entire manual! Do not attempt to install this product if you do not understand the instructions or if there are missing or defective parts.
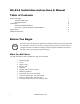
Package Contents Verify that you have received all of the parts listed below: Articulating Arm/Wall Mounting Plate Wall Hardware 6 - 3” X 7/16” lag bolts 6 - 3/4” washers Screen Plate Screen Hardware Hex wrench 6 - 3/8” x 1/2” black spacer 6 - 3/8” x 3/4” black spacer 6 - 3/4” washers 6 - 7/16” washers 6 - M6 x 30mm screws 6 - M6 x 15mm screws 6 - M5 x 30mm screws 6 - M5 x 15mm screws 6 - M4 x 30mm screws 6 - M4 x 12mm screws If any parts are missing or damaged, contact K2Mounts at su
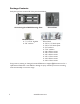
Installation To mount to a wood stud wall, continue below. To mount to a concrete wall, go to page 4. Wood Stud Wall Installation Locate the Wall Studs Wall studs run vertically (up and down) inside the wall, behind the drywall or plaster. You must attach the mounting plate to two separate wall studs that run from floor to ceiling. This mount requires that the wall studs be 16 inches apart (on center). 1.
Concrete or Concrete Block Wall Installation ! Warning: Attaching the wall mount to a brick wall could result in property damage or personal injury. Obtain Concrete Anchors The hardware needed to mount to a concrete wall is not included. Purchase at least 5 concrete anchors with a weight rating that will accomodate your screen plus the weight of the mounting bracket (about 16 lbs.). Install Anchors 1. If you have the installation poster: a.
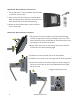
Attach the Screen Plate to the Screen 1. Line up the holes in the Screen Plate with the holes on the back of the screen. 2. If the screws that came with your screen hold the plate securely, use them, otherwise use screws from those provided in the Screen Hardware bag. 3. Attach the Screen Plate with a washer and then a screw in each hole. Attach the Screen Plate to the Arm 2. 1. Using the hex wrench provided in the Screen Hardware bag, remove the upper hex screws protruding from the arm.
Specifications ! Caution: This mounting bracket is intended for use only with the maximum load weight indicated. Use with products heavier than the maximum weight indicated may result in instability and possibly cause injury. Bracket Weight: Tilt Range: Maximum Load Weight: VESA Monitor sizes: Monitor Sizes: 15.4 lbs 5 degrees up, 14 degrees down 110 lbs 75 x 75, 100 x 100, 200 x 200 All sizes VESA 75, 100 and 200, not exceeding maximum weight limit. www.k2mounts.
K2Mounts Warranty K2Mounts warrants to the original purchaser of its mounting brackets for the life of the bracket, that the bracket shall be free from defects in assembly, material, or workmanship and will repair or replace, at its sole discretion, a defective bracket free of charge, provided the bracket is returned to K2Mounts prepaid by purchaser.
you may also have other rights, which may vary from state to state. Some states do not allow the exclusion of limitation of incidental or consequential damage so the above limitations may not apply to you. The warranty and insurance is valid only for the original purchaser of the product and only if the original purchaser registers the purchase on-line at www.k2mounts.com or by mailing a copy of the purchase receipt and product warranty registration card to screen Mounting Brackets Inc.
Copyright 2006 K2Mounts. All rights reserved. k2mounts.