Clothes Dryer INSTRUCTION MANUAL
PLEASE DO NOT RETURN TO STORE STOP Please do not return this product to the retailer!! We are able to assist you in ANY way If you find that you have any trouble with assembly or missing or damaged parts please contact the seller.
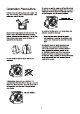
lmpo「font Safegua心S • Do not reach into the appliance if the drum is moving. • Do not place items that have been soiled with flammable liquids inside the dryer without washing them with detergent thoroughly before hand. When using electrical appliances, in order to reduce the risk of fire, electric shock, and/or injury to persons, basic safety precautions should always be followed, including: • Do not excessively bend, stretch, twist or bind the power cord or place heavy objects on it.
A Oil-affected items can ig nite spontaneously, especially when exposed to heat sources such as in a tumble d r yer. The items become warm, causing a n oxidation reaction in the oil. Oxidation creates heat. If the heat can not escape, the items can become hot enough to catch fire. Piling, stacking or storing oil-affected items can p r event heat f r om escaping and so create a fire hazard.
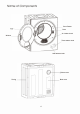
Name of Components Door Gasket Drum Air intake shroud Window Timer selector knob Heat selector knob Exhaust vent Casing Back cover 4
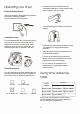
Operating you「 d「ye「 • Check the items to be d廿ed do not have combustible materials or foreign objects within them ie: lighters, hair pins, coins. Electrical Requirements The unit is required to be plugged into a three pm socket that is reliably grounded. Plug the power cord into the socket. � • Turn items with zippers inside out and fasten buckles. • Dryer heat may permanently set stains, ensure you check prio「 to drying that stains are removed.
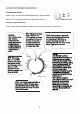
Cont「of Panel Functions Heat Selector button Select "High" for items that are particularly bulky or large quantities. Select "Low" for delicate items such as Silk, nylon, linen etc Drying Program Selector o:=: 二 Heat Selector Knob There are five drying combinations available: Cool, Anti-wrinkle, Warm, Hot and Air dry Air Dry: This function runs with cool air, primarily to air items that require freshening i.e.: clothes that have been stored for a long period of time.
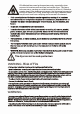
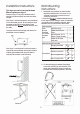
Installation Inst,「uctions This dryer can not be used upside down Where to place your dryer? Place the dryer in a dry well ventilated area. It should be positioned away from heat and direct sunlight. If the dryer is not wall mounted, it must be placed on firm horizontal ground. Do not place the dryer on carpet as this will block the intake. There should be at least 6 inches between the dryer and the walls The dryer comes with fixed legs that need to be assembled to ensure stability.
3. To install the hanging hook to timber , start at Fig 2 4. Align hanging hooks and fasten screws tightly Fig. 3 Connector base 5. Please adjust the exhaust connector direction, then, match the exhaust connector onto the connector. Please 「efer to Fig 3. 6. Turn the exhaust connector clockw ise, until it insert into the connector's groove. 7-. Us ing 4 x 12mm screws (provided) to fix the 2 spacers as pe「Fig4 8. With assistance, mount dryer on wall bracket See Fig. 5 Fig.
Maintenance Cleaning of the Air Intake Filter Cleaning the Lint Filter The filter should be cleaned once a month. Please unplug the power cord prior to any cleaning. The lint filter must be in place whenever drying. It must be cleaned before each use. 1. Removing the filters Remove by pulling outwards holding the upper and lower ends of the air intake shroud. Remove the filter inside the shroud and clean it with a soft brush.
T「oubleshooting Review the following pages before calling for service Problem Possible Cause What to do Timer knob does not turn • Is the power cord inserted firmly? • Insert the power cord firmly D 「um does not turn • Is the door closed? • Is the power cord inserted? • Does the receptacle have power? Hot air is not blowing out • Is the time「 incorrectly set on cold air? • Close the door. • Insert the power cord fi 「mly. • Check the power cord receptacle. • Set the timer to hot air.