
Operation Manual


Copies of the I/B. Please reproduce them without any
changes except under special instruction from Team
International BELGIUM. The pages must be reproduced
and folded in order to obtain a booklet A5 (+/- 148.5 mm
width x 210 mm height). When folding, make sure you
keep the good numbering when you turn the pages of
the I/B. Don’t change the page numbering. Keep the
language integrity.
5 KA ADH 7 - 101118
Assembly page 5/32
Fax +32 2 359 95 50
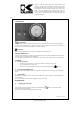
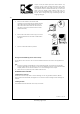
1. Take out the water tank.
Gently pull the tank out using its handles.
Caution: Do not take off the buoy or the sensor in
the water tank, because the buoy or the sensor is
used to monitor whether the water tank is full or
not. Damage to the buoy or the sensor will make
the water in the tank overflow to wet the furniture
or to cause electric shocks or short circuit hazard.
2. Empty the water tank.
Caution: When the water tank is re-installed, push it with force to its original position manually. If
the water tank fails to be re-installed to its original position, the indication light for full water will
be on and the unit will not operate properly.
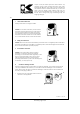
3. Re-install the water tank
Caution: If the water tank is taken out during
operation, or when the unit has just stopped
operating, the condensed water might drop to the
base. It is recommended to take out the water
tank for emptying when the unit has stopped
operating for 30 minutes. (If the water has dropped
out already, you may wipe it off).
B. Continuous drainage of water
This unit is equipped with a water outlet for continuous drainage. Use a water tube (bore size
11.5 mm) available in the markets, you can make continuous drainage of the condensed
water. When you fit the tube for continuous drainage, make sure that the unit is switched off
and the power plug is pulled out.
1. Remove the cap of the drain hole located on
the back of the appliance.
A