KAMADO JOE JOE JR. OWNER’S MANUAL A GUIDE TO KAMADO COOKING Additional manual language translations available at kamadojoe.com.
Table of Contents Warnings 4 Parts List & Tools Required 8 Grill Set-Up Instructions 9 Internal Assembly Instructions 10 The Art of Kamado 12 The Fundamentals of Fire 14 The Fundamentals of Smoke 16 The Fundamentals of Distance 18 The Technique of Grilling 20 The Technique of Searing 22 The Technique of Baking 24 The Technique of Roasting 26 The Technique of Smoking 28 Safety Information 30 Cleaning & Care 31 Warranty & Registration 32 Quick Start Guide 34
Finding the Spark What flame does to food is something hard to describe. Almost magical, fire brings out sweetness, heightens flavor, deepens complexity. The pursuit of this taste sparked my passion for grilling 20 years ago—and began a search that would lead me to the kamado tradition. I tried everything from high-end gas grills to traditional charcoal briquette grills; the smoky taste of the charcoal intrigued me, but I kept exploring.
WAR N I N G S WARNING • This manual contains important information necessary for the proper assembly and safe use of the appliance. • Read and follow all warnings and instructions before assembling and using the appliance. • Keep this manual for future reference. Failure to follow these instructions could result in fire, explosion or burn hazard which could cause property damage, personal injury or death.
WARNINGS WARNINGS AND IMPORTANT SAFEGUARDS READ ALL INSTRUCTIONS • WARNING! This barbecue will become very hot. Do not move it during operation. • WARNING! Do not use indoors! • WARNING! Do not use alcohol, gasoline or other similar liquids to light or relight the barbeque. • WARNING! Keep children and pets away from grill at all times. Do NOT allow children to use grill. Close supervision is necessary when children or pets are in the area where grill is being used.
WAR N I N G S WARNINGS AND IMPORTANT SAFEGUARDS • Never use grill for anything other than its intended use. This grill is NOT for commercial use. • Accessory attachments not supplied by Kamado Joe are NOT recommended and may cause injury. • Use of alcohol, prescription or non-prescription drugs may impair user’s ability to assemble or safely operate grill. • Keep a fire extinguisher accessible at all times while operating grill.
WARNINGS WARNINGS AND IMPORTANT SAFEGUARDS • Be careful when removing food from grill. All surfaces are HOT and may cause burns. Use protective gloves/mitts or long, sturdy cooking tools for protection from hot surfaces or splatter from cooking liquids. • Do not touch HOT surfaces. • Grill is HOT during use. To avoid burns, keep face and body away from vents and when opening lid. Steam and hot air are expelled during use.
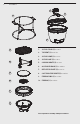
ASS E M B LY 2 3 1 4 5 6 7 8 1. JOE JR. STAND (1) KJ-MC13 2. TOP VENT (1) KJ-DFT13 3. JOE JR. DOME (1) KJ-CD13 4. JOE JR. BASE (1) KJ-CB13 5. COOKING GRATE (1) KJ-CG13 6. ACCESSORY RACK (1) KJ-IHPR13 7. DEFLECTOR PLATE (1) KJ-IHP13 8. CAST IRON FIRE GRATE (1) KJ-MFG13 9. FIREBOX RING (1) KJ-CFR13 10.
ASSEMBLY Grill Set-Up and Assembly 1 Cut the plastic bands and open the shipping container. 2 Open the dome of the grill and remove the components from the inside of the grill. Handle the internal ceramic parts with care. 3 Once the internal components of the grill have been removed, lift the grill out of the container and set it aside. Use the rear hinge and the front lower vent opening as lifting points. 4 Remove the plastic wrapping from the base of the grill cart. 5 Lift the grill into the stand.
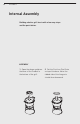
ASS E M B LY Internal Assembly Building a better grill starts with a few easy steps and the parts below. ASSEMBLY 1 Open the dome and place 2 Set the Cast Iron Fire Grate the base of the FireBox in on top of the base. Note: the the bottom of the grill. ribbed side of the fire grate should face downward.
PARTS Ceramics FireBox x1 FireBox Ring x1 Cast Iron Fire Grate x1 Accessory Rack x1 3 Place the FireBox Ring on 4 Place the Accessory Rack top of the Firebox. on top of the FireBox Ring. Note: the rack should fit on the indents of the ring.
The Art of Kamado FIRE TAMED THE WORLD—BECAUSE WITHOUT FIRE, THERE IS NO COOKING Meals began and ended around a fire. Over time, cooking progressed from a simple skewer to a spit to early ovens. These earthenware cooking vessels channeled and controlled the fire’s heat for better flavor. Slowly, the rudimentary cooking vessels evolved around the world, becoming the tandoor oven in India and the charcoal-fueled mushikamado in Japan.
FUNDAMENTALS TECHNIQUES Good kamado cooking begins with Knowing these few quintessential a good foundation. Learn how to methods will expand your grilling master the elements and control possibilities. They’ll equip you for your grill—and you’ll be on your any recipe you want to tackle. way to incredible flavor. — PG.14 — PG.22 FIRE GRILLING — PG.16 — PG.24 SMOKE SEARING — PG.18 — PG.26 DISTANCE BAKING — PG.20 — PG.28 SURFACES ROASTING — PG.
FIRE 14 T H E F UN DA M E N TA L S F I RE The Fundamentals of Fire Fire is the single most important ingredient in successful kamado cooking—and it’s made from just three elements: oxygen, heat and fuel. Learn how to control them, and you’ll know how to control your fire. FLAVOR COMES FROM FUEL Only use premium hardwood lump charcoal to fuel your fire. Combustible liquids (starter fluid, etc.) will impart undesired flavors, damage your grill and create a fire hazard.
TH E FUNDAMENTALS FIR E 15 FIRE MORE AIR, MORE HEAT–LESS AIR, LESS HEAT The Kamado Joe’s top and bottom vent system is like a volume dial for your fire. Air moves in the bottom vent and out through the top. Open them to accelerate air flow and ‘turn up’ the temperature; close them to lower it. If you want a hot fire for searing, you’ll need both vents to be mostly open. A low fire for smoking? They should be mostly closed.
T H E F UN DA M E N TA L S SM OKE The Fundamentals of Smoke SM O K E Smoke is the taste that can’t be mimicked or faked. It transforms even the most lowly of meats, adds complexity, makes a meal worth remembering. Because the Kamado Joe is charcoal-fueled, everything you cook in it will come away subtly changed by smoke, no matter which technique you use. Smoke is the flavor we’re all chasing.
TH E F UNDAMENTALS SMO K E 17 SMOKING IS AN ART, NOT A SCIENCE suggestions. Every decision you make—from the type of wood to the spice rub to the length of smoking time—is driven by your palate and preferences. Different types of wood produce different aromas and taste or flavor intensities. High-intensity woods, like hickory and mesquite, make a natural pairing for beef, while light-intensity fruitwoods bring out the sweetness of pork.
T H E F UN DA M E N TA L S DI STANCE The Fundamentals of Distance FINDING THE SWEET SPOT Perhaps your first lesson about fire, heat and distance came from the great childhood s’more. Maybe you were patient in the pursuit of the ideal golden toast and you held your DISTAN C E marshmallow high over the fire, waiting. Maybe you craved the crispy char of a blackened outside so you zipped yours in and out of the flame.
TWO WAYS TO PERFECTION Sometimes you’ll want to cook two different ways. Maybe you’re looking for that perfect sear on a steak, but also want to slowroast your vegetables. With the heat deflector installed, the flame is completely covered to produce the ideal indirect heat for baking, smoking and roasting. This method effectively converts your Joe Jr. from a grill to a charcoal-fired oven – meaning that anything you can cook in an indoor oven can also be cooked on your Kamado Joe.
T H E TE C H N I QUE S GRI LLI NG The Technique of Grilling HOW TO GRILL Grilling is the go-to technique for quick, delicious and consistent results. Using high-quality charcoal will ensure a steady flame and unmatched flavor in everything you grill, from burgers to corn on the cob. 1. Top off or fill the firebox with charcoal. Light the charcoal in 1–2 places to help your grill heat as quickly as possible. 2. Install cooking grate. Leave the dome open for about 10 minutes, then close. 3.
TH E TECHNIQUES GR IL L IN G 21 Barbecue Cheddar Burgers Preparation: 30–60 mins. Cooking: 15–20 mins. 1 Preheat your Kamado Joe grill to 400–450°F INGREDIENTS (205-230°C). Serves 4 2 Combine sauce ingredients in a small bowl 1 ¼ pounds (.57kg) ground chuck and set aside. (80/20) 1 Vidalia onion, sliced 3 In a mixing bowl, combine the ground beef 4 slices sharp cheddar cheese with the barbecue and beer sauce and mix 4 slices of tomato completely.
T H E TE C H N I QUE S S EARI NG The Technique of Searing HOW TO SEAR Searing delivers the incredible color and flavor you think of when you picture a juicy steak or flame-finished scallops. Timing is key to mastering this high-heat technique. You’ll need to give the Kamado Joe enough time to reach the right temperature (500–750°F/260–400°C) for searing, so be sure to light your grill well in advance. With the grill rolling at such high temperatures, searing won’t take long.
TH E TECHNIQUES SEAR IN G 23 Dry-Rubbed New York Strip Steaks Preparation: 30–60 mins. Cooking: 10 mins. 1 Preheat your Kamado Joe grill. Place the INGREDIENTS cooking grate directly above the hot coals. Place Serves 4 a heat deflector on the opposite side with a grill grate above the heat deflector. Allow the grill to reach 500°F (260°C). 2 While the grill is preheating, combine the dry rub ingredients, mix well and set aside. 3 Melt the clarified butter or unsalted butter.
T H E TE C H N I QUE S B AKI NG The Technique of Baking HOW TO BAKE More than a grill, the Kamado Joe can become a charcoalfired oven. Its ceramic walls retain heat and its circular shape promotes superior air circulation, creating ideal conditions for baking. You can bake anything you’d cook in an indoor oven, from wood-fired pizzas to rustic berry cobblers to fresh, crusty bread.
TH E TECHNIQUES BAK IN G 25 Pizza Preparation: 90–120 mins. Cooking: 10 mins. 1 Mix water, olive oil, sugar and yeast in the INGREDIENTS mixing bowl of a stand mixer. Let sit for 10–15 Serves 4–6 (2 pizzas) minutes until bubbling occurs. Pizza Dough: 2 Stir in flour and salt and mix with the dough hook attachment for about 5–6 minutes.
T H E TE C H N I QUE S ROAST I NG The Technique of Roasting HOW TO ROAST Juicy and tender on the inside, crisp and flavorful on the outside— this is the work of roasting. This technique is delicious for larger cuts of meat, like whole chicken or pork loin, or for vegetables. The mid-range temperature (300–450°F/150–230°C) harnesses the power of slow, indirect heat to infuse food with wood-fired flavor and tenderness, while delivering enough heat to create a crisp crust or finish.
TH E TECHNIQUES R OASTIN G 27 Roast Chicken Preparation: 30–60 mins. Cooking: 60–90 mins. 1 Rub the entire chicken with the olive oil. INGREDIENTS 2 Combine the salt, pepper, thyme and cumin 1 whole chicken, 4 to 6 lbs. (1.8 to 2.7kg), rinsed, patted dry with all items removed from inside and coat the outside of the chicken liberally.
T H E TE C H N I QUE S S MOKI NG The Technique of Smoking HOW TO SMOKE Smoking is low and slow cooking at its finest. The unique shape and design of the kamado keeps meat moist as the heat gently breaks down collagen—all the while infusing it with a deep, smoky flavor. Of course, meat isn’t the only food you can smoke. From fish to nuts to vegetables, a range of foods benefit from the complex flavor of wood smoke. 1. Fill the firebox with fresh charcoal. Light the charcoal. 2.
TH E TECHNIQUES SMO K IN G 29 Smoked Pulled Pork Barbecue Preparation: 30–60 mins. Cooking: 8–10 hrs. 1 Preheat your Kamado Joe grill to 250°F INGREDIENTS (120°C) with 2 or 3 chunks of hickory smoking 1 6–7 (2.7–3.2kg) pound bone-in wood added to the firebox. Place the heat Boston butt deflector and the grill grate. Dry Rub: 2 Rinse and pat the Boston butt dry. Combine the ¼ cup salt dry rub ingredients and apply liberally to all sides ¼ cup sugar of the meat.
A DJ U S T M E N T S Safety Information HINGE Do not attempt to disassemble the hinge from your grill without the proper hardware. Should you need to disassemble the hinge to replace the ceramic dome or base, please call Kamado Joe and they will provide the proper hardware to safely secure the hinge in the close position for disassembly. If attempting to use the hinge as a lifting point, grasp the hinge near the mounting point and/or bands, not the bottom.
A DJ U S T M E N T S Cleaning & Care Your Kamado Joe grill is made of quality materials, so general care and maintenance is minimal. The best way to protect your Kamado Joe from the elements is with a grill cover. SELF-CLEANING 1 Add charcoal and light it. 2 Install the accessory rack and heat deflector on the accessory rack. 3 Open the top and bottom air vents fully and let the temperature inside the grill rise to 600°F (315°C) with the dome closed.
WAR RA N T Y & R E G I S T RATI ON Built to Last a Lifetime Limited Lifetime Warranty on Ceramic Parts Kamado Joe warrants that all ceramic parts used in this Kamado Joe grill are free of defects in material and workmanship for as long as the original purchaser owns the grill. 5-Year Warranty on Metal Parts Kamado Joe warrants that all metal and cast iron parts used in this Kamado Joe grill are free of defects in material and workmanship for a period of five years.
WA RRANTY & REGISTRATION What is Not Covered? This warranty does not apply to damage caused by abuse or use of the product for purposes other than that for which it is designed, damage caused by lack of proper use, assembly, maintenance or installation, damages caused by accidents or natural disasters, damage caused by unauthorized attachments or modifications, or damage during transport.
Quick Start Guide STARTING IT UP 1 Add charcoal to firebox and light using one or two fire starters. 2 Leave dome open for 10 minutes with the bottom vent fully open. 3 Close the dome. 4 Begin closing the top vent and bottom vent when the dome temperature is within 50°F (10°C) of your target. MAINTAINING TEMPERATURE To lower the temperature, decrease the airflow through the grill by closing the vents. Conversely, raise the temperature by opening the vents.
QUICK TEMPERATURE GUIDE Approximate temperatures for cooking techniques. GRILLING 400–600˚F (205–315°C) SEARING 500–750˚F (260–400°C) BAKING 300–750˚F (150–400°C) ROASTING 300–450˚F (150–230°C) SMOKING 225–275˚F (105–135°C) CAUTION BURP When cooking above 350°F (175°C), carefully open the grill (or burp the grill) each time you lift the grill dome to prevent flashback. LIQUIDS Do not spill liquids inside or on the grill while it is hot. SIDE SHELVES Do not set hot items on the side shelves.
Fire it up. Slow it down. Thank you for choosing Kamado Joe! We are thrilled to welcome you to our ever-growing community of kamado cooks. We are confident that we have crafted the finest kamado-style cooker in the world, and we want to make sure you feel the same way. Don’t hesitate to reach out to our team with questions, concerns or comments—we’re always here to help. YOU CAN REACH US A FEW WAYS: ONLINE, AT KAMADOJOE.COM BY PHONE: U.S.
GATHER ‘ROUND This Owner’s Manual will equip you with the foundational knowledge you need for great cooks, but we invite you to join us and other kamado fans online and on social media for endless recipes, tips, techniques, ideas and, yes, showing-off. If you want to learn the basics or study up on your technique, our Kamado Joe YouTube channel is the best place to start. If you want to debate the finer points of smoking woods, you’ll certainly find kindred spirits on our forums.
FIRE IT UP. SLOW IT DOWN. KAMADOJOE.COM U.S. UK EU | | | CONTACT@KAMADOJOE.COM | SERVICE.UK@KAMADOJOE.COM | SERVICE.EUROPE@KAMADOJOE.