
Operation Manual


10 - EN
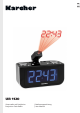
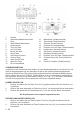
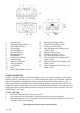
1. Volume Knob
2. Alarm Radio/Buzz Switch
3. AM/FM Band Switch
4. Tuning Knob
5. Time Set Button
6. Hour Set Button
7. Minute Set Button
8. Sleep Button
9. Auto Dimmer Sensor
10. Snooze Button
11. Alarm On/Off Button
12. Alarm Set Button
13. On/Off Button
14. LCD
15. Battery Door (Bottom of Unit)
POWER CONNECTION
Plug the AC power cord to a household outlet AC source. This unit is equipped with a battery
back up system, it requires a size 1 x 3V CR2032 at lithium battery (not included). Insert the
battery in the battery compartment, making certain that the positive and negative (+ and -)
battery terminals are attached to the corresponding terminals on the plate in the battery com-
partment. If and AC power failure occurs, the clock automatically switches to the battery power
supply, the clock and timer memory continue running. When the AC power resumes, the clock
switches back to AC again.
TO SET THE TIME
1. Press and hold down the Time Set button (5).
2. Next, press the Hour Set button (6) until you reach the correct hour setting.
3. Keep holding down the Time Set button (5) and press the Minute Set button (7) until you
reach the correct minute setting.
The projection clock must be set separately
16. Rating Label (Rear of Unit)
17. Projection Unit (Rear of Unit)
18. Projection On/Off Switch
19. Hour Set Button for Projection Unit
(Rear of Unit)
20. Speaker (Rear of Unit)
21. FM Antenna (Rear of Unit)
22. AC Power Cord (Rear of Unit)
23. Time Set Button for Projection Unit
(Rear of Unit)
24. Minute Set Button for Projection Unit
(Rear of Unit)
25. Focus Adjustment for Projection Unit
(Rear of Unit)
1 2 3 4
5 6 7 8 9 10 11 12
13
14 15
16 17 18
19
20
21 22
23
24
25