
Operating instructions
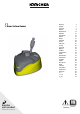
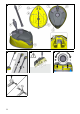


Table Of Contents
- Inhalt
- Allgemeine Hinweise
- Abbildungen und Beschreibungen in dieser Betriebsanleitung
- Bestimmungsgemäße Verwendung
- Umweltschutz
- Zubehör und Ersatzteile
- Lieferumfang
- Sicherheitshinweise
- Symbole auf dem Gerät
- Gerätebeschreibung
- Montage Verlängerungsrohr
- Betrieb
- Nach dem Gebrauch
- Lagerung
- Pflege und Wartung
- Hilfe bei Störungen
- Garantie
- Contents
- General notes
- Illustrations and descriptions in these operating instructions
- Intended use
- Environmental protection
- Accessories and spare parts
- Scope of delivery
- Safety instructions
- Symbols on the device
- Device description
- Extension tube installation
- Operation
- After use
- Storage
- Care and service
- Troubleshooting guide
- Warranty
- Contenu
- Remarques générales
- Illustrations et descriptions dans ce manuel d'utilisation
- Utilisation conforme
- Protection de l'environnement
- Accessoires et pièces de rechange
- Etendue de livraison
- Consignes de sécurité
- Symboles sur l'appareil
- Description de l'appareil
- Montage du tuyau de rallonge
- manuel
- Après l’utilisation
- Stockage
- Entretien et maintenance
- Dépannage en cas de défaut
- Garantie
- Indice
- Avvertenze generali
- Illustrazioni e descrizioni nelle presenti istruzioni per l'uso
- Impiego conforme alla destinazione
- Tutela dell'ambiente
- Accessori e ricambi
- Volume di fornitura
- Avvertenze di sicurezza
- Simboli riportati sull’apparecchio
- Descrizione dell’apparecchio
- Montaggio tubo di prolunga
- Esercizio
- Dopo l'utilizzo
- Stoccaggio
- Cura e manutenzione
- Guida alla risoluzione dei guasti
- Garanzia
- Inhoud
- Algemene instructies
- Afbeeldingen en beschrijvingen in deze gebruiksaanwijzing
- Reglementair gebruik
- Milieubescherming
- Toebehoren en reserveonderdelen
- Leveringsomvang
- Veiligheidsinstructies
- Symbolen op het apparaat
- Beschrijving apparaat
- Montage verlengbuis
- Werking
- Na het gebruik
- Opslag
- Onderhoud
- Hulp bij storingen
- Garantie
- Índice de contenidos
- Avisos generales
- Figuras y descripciones de este manual de instrucciones
- Uso previsto
- Protección del medioambiente
- Accesorios y recambios
- Alcance del suministro
- Instrucciones de seguridad
- Símbolos en el equipo
- Descripción del equipo
- Montaje del tubo de prolongación
- Funcionamiento
- Tras la utilización
- Almacenamiento
- Cuidado y mantenimiento
- Ayuda en caso de fallos
- Garantía
- Índice
- Indicações gerais
- Figuras e descrições neste manual de instruções
- Utilização prevista
- Protecção do meio ambiente
- Acessórios e peças sobressalentes
- Volume do fornecimento
- Avisos de segurança
- Símbolos no aparelho
- Descrição do aparelho
- Montagem do tubo de extensão
- Operação
- Após a utilização
- Armazenamento
- Conservação e manutenção
- Ajuda em caso de avarias
- Garantia
- Indhold
- Generelle henvisninger
- Illustrationer og beskrivelser i denne driftsvejledning
- Bestemmelsesmæssig anvendelse
- Miljøbeskyttelse
- Tilbehør og reservedele
- Leveringsomfang
- Sikkerhedshenvisninger
- Symboler på maskinen
- Maskinbeskrivelse
- Montering af forlængerrør
- Drift
- Efter brug
- Opbevaring
- Pleje og vedligeholdelse
- Hjælp ved fejl
- Garanti
- Indhold
- Generelle merknader
- Illustrasjoner og beskrivelser i denne bruksanvisningen
- Forskriftsmessig bruk
- Miljøvern
- Tilbehør og reservedeler
- Leveringsomfang
- Sikkerhetsanvisninger
- Symboler på apparatet
- Beskrivelse av apparatet
- Montering forlengelsesrør
- Bruk
- Etter bruk
- Lagring
- Stell og vedlikehold
- Bistand ved feil
- Garanti
- Innehåll
- Allmän information
- Bilder och beskrivningar i denna driftsanvisning
- Avsedd användning
- Miljöskydd
- Tillbehör och reservdelar
- Leveransens omfattning
- Säkerhetsinformation
- Symboler på maskinen
- Beskrivning av maskinen
- Montering av förlängningsrör
- Drift
- Efter användning
- Förvaring
- Skötsel och underhåll
- Hjälp vid störningar
- Garanti
- Sisältö
- Yleisiä ohjeita
- Tämän käyttöohjeen kuvat ja kuvaukset
- Määräystenmukainen käyttö
- Ympäristönsuojelu
- Lisävarusteet ja varaosat
- Toimituksen sisältö
- Turvallisuusohjeet
- Laitteessa olevat symbolit
- Laitekuvaus
- Jatkoputken asennus
- Käyttö
- Käytön jälkeen
- Varastointi
- Hoito ja huolto
- Ohjeet häiriötilanteissa
- Takuu
- Περιεχόμενα
- Γενικές υποδείξεις
- Εικόνες και περιγραφές σε αυτό το εγχειρίδιο λειτουργίας
- Προβλεπόμενη χρήση
- Προστασία του περιβάλλοντος
- Παρελκόμενα και ανταλλακτικά
- Περιεχόμενα συσκευασίας
- Υποδείξεις ασφαλείας
- Σύμβολα επάνω στη συσκευή
- Περιγραφή συσκευής
- Τοποθέτηση σωλήνα προέκτασης
- Λειτουργία
- Μετά τη χρήση
- Αποθήκευση
- Φροντίδα και συντήρηση
- Αντιμετώπιση βλαβών
- Εγγύηση
- İçindekiler
- Genel uyarılar
- Bu kullanım kılavuzundaki resimler ve açıklamalar
- Amaca uygun kullanım
- Çevre koruma
- Aksesuarlar ve yedek parçalar
- Teslimatın içeriği
- Güvenlik bilgileri
- Cihazdaki simgeler
- Cihaz açıklaması
- Uzatma borusu montajı
- İşletim
- Kullanımdan sonra
- Depolama
- Bakım ve koruma
- Arıza durumunda yardım
- Garanti
- Содержание
- Общие указания
- Рисунки и описания в данной инструкции по эксплуатации
- Использование по назначению
- Защита окружающей среды
- Принадлежности и запасные части
- Комплект поставки
- Указания по технике безопасности
- Символы на устройстве
- Описание устройства
- Сборка удлинительной трубки
- Эксплуатация
- После использования
- Хранение
- Уход и техническое обслуживание
- Помощь при неисправностях
- Гарантия
- Tartalom
- Általános utasítások
- Az ebben a használati utasításban található ábrák és leírások
- Rendeltetésszerű alkalmazás
- Környezetvédelem
- Tartozékok és pótalkatrészek
- Szállítási terjedelem
- Biztonsági tanácsok
- Szimbólumok a készüléken
- A készülék leírása
- A hosszabbító cső felszerelése
- Üzemeltetés
- Használat után
- Raktározás
- Ápolás és karbantartás
- Segítség üzemzavarok esetén
- Garancia
- Obsah
- Obecné pokyny
- Ilustrace a popisy v tomto návodu k použití
- Použití v souladu s určením
- Ochrana životního prostředí
- Příslušenství a náhradní díly
- Rozsah dodávky
- Bezpečnostní pokyny
- Symboly na přístroji
- Popis přístroje
- Montáž prodlužovací trubky
- Provoz
- Po použití
- Skladování
- Péče a údržba
- Nápověda při poruchách
- Záruka
- Kazalo
- Splošna navodila
- Slike in opisi v teh navodilih za uporabo
- Namenska uporaba
- Zaščita okolja
- Pribor in nadomestni deli
- Obseg dobave
- Varnostna navodila
- Simboli na napravi
- Opis naprave
- Montaža cevnega podaljška
- Obratovanje
- Po uporabi
- Skladiščenje
- Nega in vzdrževanje
- Pomoč pri motnjah
- Garancija
- Spis treści
- Wskazówki ogólne
- Ilustracje i opisy zamieszczone w niniejszej instrukcji obsługi
- Zastosowanie zgodne z przeznaczeniem
- Ochrona środowiska
- Akcesoria i części zamienne
- Zakres dostawy
- Wskazówki dotyczące bezpieczeństwa
- Symbole na urządzeniu
- Opis urządzenia
- Montaż rury przedłużającej
- Eksploatacja
- Po użyciu
- Składowanie
- Czyszczenie i konserwacja
- Usuwanie usterek
- Gwarancja
- Cuprins
- Indicaţii generale
- Imagini şi descrieri din aceste instrucţiuni de funcţionare
- Utilizarea conform destinaţiei
- Protecţia mediului
- Accesorii şi piese de schimb
- Pachet de livrare
- Indicaţii privind siguranţa
- Simboluri pe aparat
- Descrierea aparatului
- Montajul ţevii de prelungire
- Funcţionare
- După utilizare
- Depozitarea
- Îngrijirea şi întreţinerea
- Remedierea defecţiunilor
- Garanţie
- Obsah
- Všeobecné upozornenia
- Obrázky a popisy v tomto návode na obsluhu
- Používanie v súlade s účelom
- Ochrana životného prostredia
- Príslušenstvo a náhradné diely
- Rozsah dodávky
- Bezpečnostné pokyny
- Symboly na prístroji
- Popis prístroja
- Montáž predlžovacej trubice
- Prevádzka
- Po použití
- Skladovanie
- Ošetrovanie a údržba
- Pomoc pri poruchách
- Záruka
- Sadržaj
- Opće napomene
- Slike i opisi u ovim uputama za rad
- Namjenska uporaba
- Zaštita okoliša
- Pribor i zamjenski dijelovi
- Sadržaj isporuke
- Sigurnosni napuci
- Simboli na uređaju
- Opis uređaja
- Montaža produžne cijevi
- Rad
- Nakon upotrebe
- Skladištenje
- Njega i održavanje
- Pomoć u slučaju smetnji
- Jamstvo
- Sadržaj
- Opšte napomene
- Slike i opisi u ovom uputstvu za upotrebu
- Namenska upotreba
- Zaštita životne sredine
- Pribor i rezervni delovi
- Obim isporuke
- Sigurnosne napomene
- Simboli na uređaju
- Opis uređaja
- Montaža produžne cevi
- Rad
- Nakon upotrebe
- Skladištenje
- Nega i održavanje
- Pomoć u slučaju smetnji
- Garancija
- Съдържание
- Общи указания
- Фигури и описания в настоящото ръководство за експлоатация
- Употреба по предназначение
- Защита на околната среда
- Аксесоари и резервни части
- Комплект на доставката
- Указания за безопасност
- Символи върху уреда
- Описание на уреда
- Монтаж на удължаващата тръба
- Експлоатация
- След употребата
- Съхранение
- Грижа и поддръжка
- Помощ при повреди
- Гаранция
- Sisukord
- Üldised juhised
- Joonised ja kirjeldused antud kasutusjuhendis
- Nõuetekohane kasutamine
- Keskkonnakaitse
- Lisavarustus ja varuosad
- Tarnekomplekt
- Ohutusjuhised
- Seadmel olevad sümbolid
- Seadme kirjeldus
- Pikendustoru montaaž
- Käitamine
- Pärast kasutamist
- Ladustamine
- Hooldus ja jooksevremont
- Abi rikete korral
- Garantii
- Saturs
- Vispārīgas norādes
- Attēli un apraksti šajā lietošanas instrukcijā
- Noteikumiem atbilstoša lietošana
- Apkārtējās vides aizsardzība
- Piederumi un rezerves daļas
- Piegādes komplekts
- Drošības norādes
- Simboli uz ierīces
- Ierīces apraksts
- Pagarinātājcaurules montāža
- Ekspluatācija
- Pēc lietošanas
- Uzglabāšana
- Kopšana un apkope
- Palīdzība traucējumu gadījumā
- Garantija
- Turinys
- Bendrosios nuorodos
- Šioje eksploatavimo instrukcijoje pateikti paveikslai ir aprašymai
- Numatomasis naudojimas
- Aplinkos apsauga
- Priedai ir atsarginės dalys
- Tiekimo rinkinys
- Saugos nurodymai
- Simboliai ant įrenginio
- Įrenginio aprašymas
- Ilginamojo vamzdžio montavimas
- Eksploatavimas
- Užbaigus naudoti
- Sandėliavimas
- Techninė priežiūra ir eksploatacinės parengties užtikrinimas
- Pagalba, jeigu būtų aptiktos triktys
- Garantija
- Зміст
- Загальні вказівки
- Рисунки та описи в цій інструкції з експлуатації
- Використання за призначенням
- Охорона довкілля
- Приладдя та запасні деталі
- Комплект поставки
- Вказівки з техніки безпеки
- Символи на пристрої
- Опис пристрою
- Збирання подовжувальної трубки
- Експлуатація
- Після використання
- Зберігання
- Догляд та технічне обслуговування
- Допомога в разі несправностей
- Гарантія
- Мазмұны
- Жалпы нұсқаулар
- Осы пайдалану нұсқаулығындағы суреттер мен сипаттамалар
- Бұйымды мақсатына сәйкес қолдану
- Қоршаған ортаны қорғау
- Керек-жарақ және қосалқы бөлшектер
- Жеткізілім жинағы
- Қауіпсіздік техникасы бойынша нұсқаулар
- Құрылғыдағы белгілер
- Құрылғының сипаттамасы
- Ұзартқыш түтікті орнату
- Пайдалану
- Пайдаланғаннан кейін
- Сақтау
- Күтім және техникалық қызмет көрсету
- Ақаулар кезіндегі көмек
- Кепілдік
- 目录
- 一般性提示
- 本操作说明书中的插图和说明
- 按规定使用
- 环境保护
- 附件和备件
- 供货范围
- 安全提示
- 设备上的标志
- 设备说明
- 安装延长管
- 运行
- 使用完成后
- 存放
- 保养和维护
- 故障排除
- 质量保证
- 目次
- 一般的な注意事項
- この取扱説明書内の図および説明
- 規定に沿った使用
- 環境保護
- 付属品と交換部品
- 同梱品
- 安全注意事項
- 機器上のシンボル
- 機器に関する説明
- 延長管の取付け
- 運転
- 使用後
- 保管
- 手入れとメンテナンス
- 障害発生時のサポート
- 保証
- Blank Page
- Blank Page

6English
● Recoil danger. Keep proper footing and hold the high-
pressure gun and extension tube firmly.
● Maximum water temperature 60°C (please observe
the instructions for your high-pressure cleaner).
Note
● Be sure to always adhere to the safety instructions for
your high-pressure cleaner and the locally applicable
regulations and directives.
Symbols on the device
Device description
For the illustrations, refer to the graphics page
Illustration A
1 Extension tube
2 Rotor arm height adjustment
3 Casing
4 Bayonet connector with union nut
5 Handle
6 Surface cleaning foot button
7 Edge and corner cleaning foot button
8 High-pressure nozzle
9 Rotor arm
10 Front high-pressure nozzle
Extension tube installation
Note
Ensure that the device components are tightly connect-
ed on installation.
Illustration B
1. Plug the bayonet into the mounting.
2. Turn the extension until it latches into place.
3. Tighten the union nut.
Repeat the procedure for all further extension tubes.
Operation
Note
The extension tubes can be used with all Kärcher ac-
cessories.
Note
For optimum cleaning results, do not operate the high-
pressure cleaner in the Eco mode.
Cleaning floors
Remove coarse dirt from the surface to be cleaned (e.g.
by sweeping) before using the device to avoid damage
to the T-Racer.
ATTENTION
Damage to the rotor arm
The rotor arm can be damaged if it hits edges and cor-
ners.
Do not move the device over free-standing corners and
edges.
Illustration C
Note
● The T-Racer is not suitable for scraping or scrub-
bing.
● Test the device on an inconspicuous area before us-
ing on sensitive surfaces, e.g. wood.
● Do not allow it to remain in one area, but keep it in
motion.
1. Attach the T-Racer to the high-pressure gun using
the extension tube.
Illustration B
a Press the extension tube onto the bayonet con-
nector of the high-pressure gun.
b Turn the extension tube by 90° until it latches into
place.
c If necessary, repeat the procedure for further
connections.
2. Adjust the rotor arm height adjustment. according to
the surface to be cleaned.
3. Unlock the lever of the trigger gun.
4. Pull the lever of the trigger gun.
The device switches on.
5. Clean the floor surface by guiding the T-Racer over
the floor surface without exerting excessive pres-
sure.
Cleaning wall surfaces
1. Attach the T-Racer directly to the high-pressure gun.
a Press the bayonet connector of the T-Racer into
the connection on the high-pressure gun and
then turn by 90° until it latches into place.
b Tighten the union nut if present.
2. Clean the wall surface.
Rotor arm height adjustment
The clearance of the high-pressure nozzles to the sur-
face to be cleaned can be adjusted via the rotor arm
height adjustment.
Adjust the rotor arm height adjustment. according to the
surface to be cleaned.
Illustration D
For powerful cleaning of stubborn soiling on dura-
ble surfaces, e.g. tiles, concrete, stone:
1. Set the rotor arm height adjustment to "HARD".
For cleaning sensitive surfaces:
2. Set the rotor arm height adjustment to "SOFT".
Surface cleaning foot switch
For cleaning larger areas:
1. Press the surface cleaning foot switch.
A water jet is emitted from the two high-pressure
nozzles in the rotor arm.
Edge and corner cleaning foot switch
Note
Guide the T-Racer along the corner area to achieve op-
timum cleaning results.
DANGER
Risk of injury! Never reach under the
edge of the T-Racer during operation
Cleaning type: Surface cleaner
Cleaning type: Edge and corner cleaning
HARD For durable surfaces, e.g. tiles, concrete,
stone
SOFT For sensitive surfaces, e.g. wood