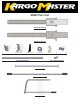
40923 Parts List Front Bow Assy.(1) Rear Bow Assy.(1) Rail Mnt Foot(4) Ladder Hook (2) Ladder Stop (2) Load Plate(2) Long Mounting Rail(2) Latch(1) Mounting Bracket(6) Short Mounting Rail(2) Torque Tube (1) Ladder Pan Stiffener (1) Handle Assy.
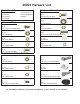
+DUZDUH /LVW 7RROV 1HHGHG 7DSH 0HDVXUH 6RFNHW 6RFNHW 6RFNHW +DUGZDUH 3DFN &RQW (QG :UHQFK (QG :UHQFK +DPPHU +DUGZDUH 3DFN D 4W\ [ &DUULDJH %ROW E 4W\ )ODW :DVKHU F F 4W\ /RFN :DVKHU G 4W\ 1\ORF 1XW H 4W\ [ +H[ %ROW J 4W\ [ +H[ %ROW K 4W\ )ODW :DVKHU )ODW :DVKHU L 4W\ /RFN :DVKHU M 4W\ [ )XOO\ 7KUHDGHG +H[ %ROW N 4W\
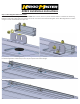
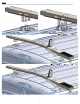
40923 Installation Instructions Step 1 - Mounting Rails-2015 Ford Transit First mount the rear "Mounting Bracket" with M8x30MM bolts as shown, be sure to put the "Rubber Washer" in between the "Mounting Bracket" and the roof to keep water from leaking into the van. Then mount the "short Mounting Rail" to the "Mounting Bracket" as shown using the "T-Stud" and flat washer and nyloc nut.
0923 Installation Instructions Step 1͘Ϯ - Mounting Rails-Nissan NV First install the M8 U-Nuts as shown. Then mount the "Short Mounting Rail" as shown on the front mounting location. Be sure to put the "TStud" in place. Repeat that process for the "Long Mounting Rail" as shown below. Be sure to put the end with the first hole that is 9 3/8" towards the rear of the van.
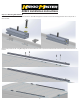
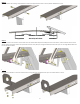
Step 2 Measure width of the mounting rail and bolt feet to bows at that approximate location as shown, DO NOT TIGHTEN at this point. Step 3 Attach the "Latch" to the rear bow. The rear bow is the one with the black dampener assembly and 2 holes in the lift arm, which should face the rear of the vehicle. Bolts go through the 2nd row of square holes from end. Use 5/16”x3/4” carriage bolts with flat washers and nyloc nuts. The Kargo Master label must face the rear of the vehicle.
Step 5 Place “Rear Bow Assy.” as shown and bolt to rails using 5/16”x1” bolts with nyloc nuts and flat washers, DO NOT TIGHTEN at this time.
Step 6 Place “Front Bow Assy.” as shown and bolt to rails using 5/16”x1” bolts with nyloc nuts and flat washers, DO NOT TIGHTEN at this time.
Step 7 Attach torque tube using ¼” bolts with flat washers and nylock nuts. Check distance between feet on both driver and passenger side, they must be EXACTLY the same to insure the bow assemblies are parallel.
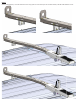
Step 8 Next attach the "Handle Assy." as shown using 5/16"x2" bolt with flat washers and nyloc nuts.
Step 9 Next attach the “Ladder Hooks” and “Ladder Stops”. Attach "Ladder Hooks" to ladder pans on 5/16” studs in desired location. Attach "Ladder Stops" to coincide with "Ladder Hooks" by removing 3/8”x3/4” bolt and placing stop so the tab on the stop goes into the corresponding slot. The first 4 pictures show the front hooks, the next 4 show the rear hook set in the “step ladder” location. If you are using an extension ladder use the same location as the front bow.
Rear bow location for step ladder.
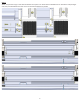
Step 10 Attach ladder pan stiffener, in the closed position, using 5/16”x5/8” bolts with lock and flat washers. Confirm that distance between passenger side feet and driver side feet are still EXACTLY the same. Now you can tighten the feet for the front and rear bow assemblies. The installation is complete.
Completed Install setup for a "Step Ladder".
12