
Assembly Instructions


13
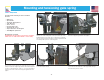
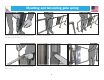
M. Once the gate is completely closed tighten the locking nut
to hold the tension. Caution:- Continue to hold the ratchet
firmly and do not release until the lock nut is tightened. Now
remove the socket and spanner from the hinge. Repeat as
necessary, to ensure that the gate closes sufficiently, once
opened and released.
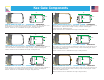
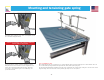
Note:- Installing Kee Gate
When installing Kee Gate on a pitched roof it is essential that the gate is mounted vertically level to the horizontal. This can
be accommodated by using standard 90 degree Elbows (15-8) (4No required per gate).
The elbows permit adjustment allowing the Kee Gate to be orientated to the correct angle. If the gate is not set at the correct
angle the hinge cannot be tensioned correctly and the gate may not close as required.
L. Using the 15/16” socket & ring spanner start to tighten the
bolt until the gate completely closes. (Note:- You may have to hold
the socket whilst using the ratchet).
Caution! Over tensioning of the spring assembly will
result in failure of the product!!
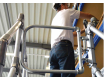
Mounting and tensioning gate spring