Use & Care Guide Manual de uso y cuidado English / Español Model/Modelo: 665.1471* Kenmore Elite ® ® HE Ultra Wash Dishwasher Lavavajillas Ultra Wash® HE * = color number, número de color P/N W11022664A Sears Brands Management Corporation Hoffman Estates, IL 60179 U.S.A. www.kenmore.
TABLE OF CONTENTS WARRANTY...........................................................................3 DISHWASHER SAFETY...........................................................4 PARTS AND FEATURES..........................................................6 START-UP/QUICK REFERENCE..............................................7 ULTRA WASH® HE FILTRATION SYSTEM................................... 8 360° POWERWASH...............................................................9 TURBOZONE REACH™................
KENMORE ELITE LIMITED WARRANTY WITH PROOF OF SALE the following warranty coverage applies when this appliance is correctly installed, operated and maintained according to all supplied instructions. In all cases replacement units or parts are warranted only for the unexpired portion of the warranty period from the original date of sale. FOR ONE YEAR from the date of sale this appliance is warranted against defects in material or workmanship.
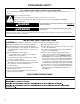
DISHWASHER SAFETY Your safety and the safety of others are very important. We have provided many important safety messages in this manual and on your appliance. Always read and obey all safety messages. This is the safety alert symbol. This symbol alerts you to potential hazards that can kill or hurt you and others. All safety messages will follow the safety alert symbol and either the word “DANGER” or “WARNING.
GROUNDING INSTRUCTIONS ■ Tip Over Hazard Do not use dishwasher until completely installed. Do not push down on open door. Doing so can result in serious injury or cuts. ■ Electrical Shock Hazard Electrically ground dishwasher. Connect ground wire to green ground connector in terminal box. For a grounded, cord-connected dishwasher: The dishwasher must be grounded.
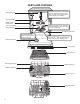
PARTS AND FEATURES TurboZone® provides a concentrated wash on the back of the lower dish rack to power clean stuck-on foods without soaking or scrubbing. Upper level wash Water feed tube Model and serial number label 360º PowerWash® lower wash arm provides additional spray coverage and corner cleaning. Water inlet opening Heating element Overfill protection float Rinse aid dispenser reduces spotting and improves drying. Ultra Wash® HE filter removes soil from water and improves cleaning action.
START-UP/QUICK REFERENCE HE SmartWash® Cycle ® HE SmartWash provides improved results using only the amount of water and energy needed. The SmartWash® HE and Pots & Pans cycles are recommended for tough soil. Express Wash – When you need fast results High Efficiency dishwashers run longer to save water and energy, just as driving a car slower saves on gas. When you need fast results, the Express Wash will clean your dishes using more water and energy.
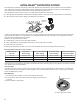
HE ULTRA WASH® FILTRATION SYSTEM Your dishwasher has the latest technology in dishwasher filtration. This triple filtration system minimizes sound and optimizes water and energy consumption while providing superior cleaning performance. Throughout the life of your dishwasher, the Ultra Wash® HE filters will require maintenance to sustain peak cleaning performance. The triple filtration system consists of 2 parts – an upper filter assembly and a lower filter.
Cleaning IMPORTANT: Do not use wire brush, scouring pad, etc., as they may damage the filters. Rinse filter under running water until most soils are removed. If you have hard-to-remove soils or calcium deposits from hard water, a soft brush may be required. L O C PU K SH DOWN & T UR N L UN O CK Filter Reinstallation 1.
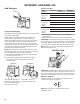
DETERGENT AND RINSE AID Powders and Gels Add Detergent SLIDE Premeasured Detergents High quality premeasured tablets and packs are recommended for improved performance. Quality tablets and packs have been proven better than powder, liquid, or gel detergents at reducing filming on dishes. Using tablets and packs over time will start to reduce or eliminate white film. They are suitable for all hardness and soil levels.
OP SLID E Pre Wa sh EN 1. To add rinse aid, open the rinse dispenser lid by gently pushing in the center of the lid with your thumb and pulling up on the edge. 2. Pour rinse aid into the opening until the dispenser is full. Do not overfill. 3. Clean up any spilled rinse aid. Spilled rinse aid can create excessive suds. 4. Then, close the dispenser by pushing down gently on the lid. Rinse Aid Setting Your rinse aid dispenser is adjustable.
5. Place cups and glasses in the rows between tines. 6. Check that nothing is blocking the upper or lower spray arms. Items in rack can block the spray arms. Top Rack Loading Loading Recommendations Place cups and glasses in the rows between tines. Placing them over the tines can lead to breakage and water spots. To avoid damage to your delicate items, be sure china, crystal, stemware, and other similar items do not touch during dishwasher operation.
Deluxe Adjustable 2-Position Rack You can raise or lower the top rack approximately 2" (5 cm) to fit tall items in either the top or bottom rack. Adjusters are located on each side of the top rack. Each adjuster has two preset positions. 1. To raise, lift rack until both sides are at the same height and lock. 2. To lower, depress both tabs on rack adjusters, as shown, and lower.
Bottom Rack Loading Loading Recommendations The bottom rack is best suited for plates, pans, casseroles, and utensils. (See recommended loading patterns shown.) Load small items in the bottom rack only if they are secured in place. Load plates, soup bowls, etc., between tines. Load bowls securely between the rows of tines. Ensure that there is space between dishes so that the spray will reach all surfaces. Load heavily soiled items facing the spray.
Loading Tall Items You can wash larger items, such as pots, roasters, and cookie sheets, in the bottom rack by removing the top rack. See the “Top Rack Loading” section. Splittable Silverware Basket Your new silverware basket can be split into three segments. Removing one segment will increase your capacity in the TurboZone® loading area. You can remove the covered side baskets to place in the top rack. Use for small delicate items such as baby bottle caps, nipples, and small baking utensils, etc.
DISHWASHER USE Cycles and Options Information IMPORTANT: The sensor in your dishwasher monitors the soil level. Cycle time and/or water usage can vary as the sensor adjusts the cycle for the best wash performance. If the incoming water is less than the recommended temperature or food soils are heavy, the cycle will automatically compensate by adding time, heat, and water as needed. Cycles Estimated Wash Time* H:MM 3:15 Range of Water Usage Gallons (Liters) 3.8 to 7.
Options Can be selected with What it does Added time to cycle TurboZone® Directs water into your casserole or other dishes to eliminate the need for soaking and scrubbing of dirty, baked-on food soils. For your toughest items, use the TurboZone® option with the Pots & Pans cycle. See loading information. High Temp Wash Raises main wash temperature to improve cleaning for loads containing tough, baked-on food.
Dishwasher Control Section Control Lock Option Use the Control Lock option to avoid unintended use of the dishwasher between cycles. When Locked is lit, all buttons are disabled. The dishwasher door can still be opened or closed while the controls are locked. To turn on Control Lock: Press and hold SANI RINSE for 3 seconds. The indicator will light up. If you press any button while your dishwasher is locked, the light flashes three times. NOTE: The dishwasher cannot start if the control is locked.
Canceling a Cycle 1. Open the door slightly to stop the cycle. Wait for the spraying action to stop before completely opening the door. 2. To cancel selections and/or drain, press and hold CANCEL/DRAIN until the light turns on. The drain will not begin until the door is closed. 3. Close the door. The dishwasher starts a drain cycle (if water remains in bottom of dishwasher). Let the dishwasher drain completely. The Cancel/Drain light will turn off after 2 minutes.
WASHING SPECIAL ITEMS If you have doubts about washing a particular item, check with the manufacturer to see if it is dishwasher safe.
DISHWASHER CARE Cleaning Cleaning the exterior In most cases, regular use of a soft, damp cloth or sponge and a mild detergent is all that is necessary to keep the outside of your dishwasher looking nice and clean. If your dishwasher has a stainless steel exterior, a stainless steel cleaner (Part Number W10355016 or W10355049) may be ordered from Sears.com. Do not use abrasive cleaning products on the exterior of your dishwasher.
TROUBLESHOOTING CHECK THESE POINTS TO HELP SAVE YOU TIME AND MONEY PROBLEM DISHWASHER DOES NOT RUN DETERGENT REMAINS IN THE DISPENSER OR TABLET IS ON BOTTOM OF TUB CYCLE RUNS TOO LONG DISHWASHER NOT DRYING WILL NOT FILL 22 SOLUTION NOTE: It is normal for the dishwasher to repeatedly pause several times during a cycle. If the Start/Resume light is blinking: Press START/RESUME and close the door within 4 seconds. Be sure the door is closed and latched.
PROBLEM WATER REMAINS IN THE TUB/WILL NOT DRAIN HARD WATER (WHITE RESIDUE ON DISHWASHER INTERIOR OR GLASSWARE) ODORS NOISY FOOD SOILS REMAIN ON DISHES SOLUTION Be sure the cycle has completed. (The Complete indicator light will be on.) If it has not, resume the cycle by: Pressing Start/Resume and closing the door within 4 seconds. If dishwasher is connected to a food waste disposer, be sure the knockout plug has been removed from the disposer inlet. Check for kinks in the drain hose.
PROBLEM DISHES DIRTY/SUDS IN DISHWASHER/CYCLE NOT COMPLETE DID NOT SANITIZE DAMAGE TO DISHWARE BLINKING LIGHTS CLOUDY OR SPOTTED DISHWARE (AND HARD WATER SOLUTION) ETCHING (PERMANENT CLOUDINESS) LEAKING WATER TUB IS DISCOLORED 24 SOLUTION If foam or suds are detected by the dishwasher sensing system, the dishwasher may not operate properly or may not fill with water.
ÍNDICE GARANTÍA..........................................................................26 SEGURIDAD DE LA LAVAVAJILLAS......................................27 PIEZAS Y CARACTERÍSTICAS.............................................. 29 PUESTA EN MARCHA/REFERENCIA RÁPIDA.......................30 SISTEMA DE FILTRACIÓN ULTRA WASH® HE..........................31 360° POWERWASH®............................................................ 33 CONSEJOS PARA LA EFICIENCIA DE LA LAVAVAJILLAS.....
GARANTÍA LIMITADA DE KENMORE ELITE CON EL COMPROBANTE DE VENTA, la cobertura de garantía que sigue es válida siempre y cuando este electrodoméstico se instale, opere y mantenga correctamente de acuerdo con todas las instrucciones que se suministran. En todos los casos, las unidades o las piezas de reemplazo tienen garantía únicamente para la parte que no haya expirado del período de garantía de la fecha de venta original.
SEGURIDAD DE LA LAVAVAJILLAS Su seguridad y la seguridad de los demás es muy importante. Hemos incluido muchos mensajes importantes de seguridad en este manual y en su electrodoméstico. Lea y obedezca siempre todos los mensajes de seguridad. Este es el símbolo de alerta de seguridad. Este símbolo le llama la atención sobre peligros potenciales que pueden ocasionar la muerte o una lesión a usted y a los demás.
INSTRUCCIONES DE CONEXIÓN A TIERRA ■ Peligro de Vuelco No use la lavavajillas antes de estar completamente instalada. No se apoye en la puerta abierta. No seguir estas instrucciones puede ocasionar heridas serias o cortaduras. ■ Peligro de Choque Eléctrico Conecte a tierra la lavavajillas. Conecte el alambre de conexión a tierra al conector verde de conexión a tierra en la caja de terminales. No use un cable eléctrico de extensión.
PIEZAS Y CARACTERÍSTICAS TurboZone® proporciona un lavado concentrado en la parte posterior de la canasta de platos inferior, para limpiar de manera potente los alimentos pegados sin remojar ni restregar. Lavado del nivel superior Tubo de alimentación de agua Etiqueta de número de modelo y de serie Abertura de la entrada de agua El brazo de lavado inferior de 360º PowerWash® proporciona una cobertura de rociado adicional y limpia mejor los rincones.
PUESTA EN MARCHA/REFERENCIA RÁPIDA Ciclo SmartWash® HE Carga para TurboZone® El ciclo SmartWash® HE brinda resultados mejorados y usa solo la cantidad necesaria de agua y energía. Se recomiendan los ciclos de SmartWash® HE y Pots & Pans (Ollas y cacerolas) para la suciedad rebelde. Al seleccionar la opción TurboZone®, se obtiene un lavado concentrado en la parte posterior de la canasta inferior para los platos difíciles de lavar.
Canasta de tercer nivel fácil de retirar Si se requiere espacio adicional en la canasta superior, es posible retirar fácilmente la canasta del tercer nivel. Para retirar, extienda completamente el estante hasta que se detenga. Luego, abra los topes de la canasta a cada lado y deslice la canasta para retirar. Es posible cargar artículos con bajo perfil, como utensilios de servicio y cubiertos en la canasta del tercer nivel. A. Tape de la guía B.
Intervalos recomendados para la limpieza del filtro Cantidad de cargas por semana Si usted lava antes de cargar Si usted raspa la Si solamente raspa Si no raspa la comida comida y enjuaga la comida antes de ni enjuaga antes de antes de cargar* cargar cargar 13 – 14 Una vez por año Cada 4 meses Cada 2 meses Una vez por semana 8 – 12 Una vez por año Dos veces por año Cada 2 meses Cada 2 semanas 4–7 Una vez por año Una vez por año Cada 4 meses Una vez por mes 1–3 Una vez por año Una vez por año Dos veces por
360° POWERWASH® El brazo de lavado inferior de 360º POWERWASH® proporciona una cobertura de rociado excepcional y llega a más rincones. CONSEJOS PARA LA EFICIENCIA DE LA LAVAVAJILLAS El agua caliente disuelve y activa el detergente para lavavajillas. El agua caliente también disuelve la grasa que se encuentra en los platos y ayuda a secar los vasos sin manchas. Para obtener resultados óptimos con la lavavajillas, el agua debe estar a 120°F (49°C) cuando entra en la lavavajillas.
Ninguno Lleno Línea de llenado “Soft” Línea de llenado “Soft” Línea de llenado “Soft” Línea de llenado “Soft” Lleno** Lleno** Lleno** Lleno** Lleno** Media Ligero Ninguno (5-9 granos por galón Normal Lleno de EE.UU.) Intenso Lleno Dura Ligero Lleno (10-14 Normal Lleno granos por Intenso Lleno galón de EE.UU.) *El compartimiento de prelavado está en la parte superior de la puerta deslizante del depósito. **Un compartimiento de lavado principal lleno contiene 2 cucharas soperas (30 ml).
CARGA Cómo cargar para un mejor rendimiento del lavado y el secado 1. Coloque en ángulo las superficies más sucias de la vajilla hacia abajo y deje espacio para que el agua fluya hacia arriba, a través de cada canasta y entre la vajilla. 4. Coloque en ángulo las superficies cóncavas, tales como la base de las tazas de café, para permitir que el agua se desagüe y así mejorar el rendimiento del secado. Artículos con las superficies en ángulo 5. Coloque las tazas y los vasos en las hileras entre las puntas.
Cómo cargar la canasta superior Recomendaciones para cargar Coloque las tazas y los vasos en las hileras entre las puntas. Si los coloca sobre las puntas pueden romperse o terminar con manchas de agua. Para evitar que se dañen sus artículos delicados, asegúrese de que la porcelana, cristalería y otros objetos similares no se toquen durante el funcionamiento de la lavavajillas. Coloque los objetos livianos y de plástico aptos para lavavajillas solo en la canasta superior.
Sujetadores para copas Use los sujetadores para copas para una mayor seguridad. Sujetadores para copas Canasta superior removible La canasta superior removible le permite lavar objetos más grandes tales como ollas, charolas para asar y moldes para galletas en la canasta inferior. IMPORTANTE: Quite los platos antes de retirar la canasta superior de la lavavajillas.
Cómo cargar la canasta inferior Recomendaciones para cargar La canasta inferior es más apropiada para platos, ollas, cacerolas y utensilios. (Vea los siguientes modos de carga recomendados). Coloque los artículos pequeños en la canasta inferior únicamente si están seguros en su lugar. Coloque los platos, tazones de sopa, etc. entre las puntas. Coloque los tazones firmemente entre las hileras de puntas.
Cómo cargar los artículos altos Puede lavar artículos más grandes, tales como ollas, asadores y charolas para galletas en la canasta inferior, si retira la canasta superior. Vea la sección “Cómo cargar la canasta superior”. Canastilla separable de los cubiertos Su nueva canastilla para cubiertos puede separarse en tres segmentos. Retirar un segmento aumentará su capacidad en el área de carga TurboZone®. Puede quitar las canastas laterales cubiertas para colocarlas en la canasta superior.
CÓMO USAR LA LAVAVAJILLAS Información sobre los ciclos y opciones IMPORTANTE: El sensor en su lavavajillas monitorea el nivel de suciedad. El tiempo del ciclo y/o el uso del agua pueden variar a medida que el sensor ajusta el ciclo para obtener un rendimiento de lavado óptimo. Si la temperatura del agua de entrada es más baja que la temperatura recomendada, o si la suciedad es muy profunda, el ciclo lo compensará automáticamente agregando tiempo, calor y agua, según sea necesario.
Opciones Puede seleccionarse con Lo que hace Tiempo adicional del ciclo Agua agregada* en galones (litros) TurboZone® SmartWash®HE Concentra todo el 0:10 a 2:20 0,0 a 5,0 Dirige el agua dentro de las cacerolas u otros Pots & Pans (Ollas poder de lavado de (0,0 a 18,9) la lavavajillas en el artículos de vajilla para eliminar la necesidad de y cacerolas) área de TurboZone® remojar y fregar restos de alimentos quemados Normal Wash durante ciertos adheridos.
Sección de control de la lavavajillas Opción Control Lock (Bloqueo del control) Use la opción Control Lock para evitar el uso no intencional de la lavavajillas entre un ciclo y otro. Cuando el indicador de bloqueo está encendido, todos los botones están desactivados. La puerta de la lavavajillas puede abrirse o cerrarse mientras los controles están bloqueados. Para activar el bloqueo: Mantenga presionado SANI RINSE (Enjuague sanitario) durante 3 segundos. El indicador se encenderá.
Cómo cancelar un ciclo 1. Abra la puerta ligeramente para detener el ciclo. Espere hasta que la acción de rociado se detenga antes de abrir la puerta por completo. 2. Para cancelar las selecciones y/o desaguar, presione el botón CANCEL/DRAIN (Cancelar/Desaguar). El desagüe no comenzará hasta que la puerta esté cerrada. 3. Cierre la puerta. La lavavajillas comienza un ciclo de desagüe (si le ha quedado agua en el fondo). Deje que la lavavajillas complete el desagüe.
CÓMO LAVAR ARTÍCULOS ESPECIALES Si tiene dudas acerca del lavado de un artículo determinado, consulte con el fabricante para ver si se trata de un artículo lavable en la lavavajillas.
CUIDADO DE LA LAVAVAJILLAS Limpieza Limpieza externa En la mayoría de los casos, todo lo que se debe hacer es usar periódicamente un paño suave y húmedo o una esponja con un detergente suave para que el exterior de su lavavajillas se vea limpio y reluciente. Si su lavavajillas tiene exterior de acero inoxidable, puede ordenar un limpiador para acero inoxidable (Número de pieza W10355016 o W10355049) en Sears.com. No use limpiadores abrasivos en el exterior de la lavavajillas.
SOLUCIÓN DE PROBLEMAS VERIFIQUE ESTOS PUNTOS PARA AHORRAR TIEMPO Y DINERO PROBLEMA LA LAVAVAJILLAS NO FUNCIONA QUEDA DETERGENTE EN EL DEPÓSITO O LA PASTILLA ESTÁ EN EL FONDO DE LA CUBA EL CICLO DURA DEMASIADO TIEMPO 46 SOLUCIÓN NOTA: Es normal que la lavavajillas haga pausas repetidamente durante un ciclo. Si está parpadeando la luz de Start/Resume (Inicio/Reanudar): Presione START/RESUME (Inicio/Reanudar) y cierre la puerta en menos de 4 segundos. Cerciórese de que la puerta esté cerrada y asegurada.
PROBLEMA LA LAVAVAJILLAS NO SECA SOLUCIÓN NOTA: Los objetos de plástico y los artículos con superficies antiadherentes son difíciles de secar, ya que tienen una superficie porosa que tiende a retener las gotas de agua. Puede ser necesario secar con un paño de cocina. Se debe usar el agente de enjuague junto con la opción Heated Dry (Secado con calor) para un secado adecuado. El cargar los artículos adecuadamente puede afectar el secado.
PROBLEMA RUIDOS SOLUCIÓN Se pueden escuchar periódicamente sonidos de gorgoteo a lo largo del ciclo, mientras se desagua la lavavajillas. Puede escucharse periódicamente el silbido normal de la válvula de agua. Puede escucharse un sonido normal de chasquido cuando se abre el depósito de detergente durante el ciclo y cuando se abre la puerta al final del mismo. La instalación incorrecta afectará los niveles de ruido. Asegúrese de que estén bien instalados los filtros.
PROBLEMA VAJILLA TURBIA O CON MANCHAS (Y SOLUCIÓN PARA AGUA DURA) CORROSIÓN (TURBIDEZ PERMANENTE) FUGAS DE AGUA SE HA DECOLORADO LA CUBA SOLUCIÓN Añada o ajuste la cantidad de agente de enjuague líquido para favorecer el secado y reducir las manchas. Consulte la sección “Detergente y agente de enjuague” Use la cantidad adecuada de detergente. Confirme que se pueda quitar la turbidez remojando el artículo en vinagre blanco durante 5 minutos. Si desaparece la turbidez, ésta se debe a agua dura.
NOTAS 50
NOTAS 51
Kenmore ® Customer Care Hotline To schedule in-home repair service or order replacement parts Para pedir servicio de reparación a domicilio, y ordenar piezas 1-844-553-6667 www.kenmore.