Use & Care Guide Manual de uso y cuidado Guide d’utilisation et d’entretien English / Español / Français Model/Modelo/Modèle: 665.14703* Kenmore PRO ® ULTRACLEAN Dishwasher ™ Lavavajillas ULTRACLEAN ™ Lave-vaisselle ULTRACLEAN ™ * = color number, número de color, le numéro de la couleur P/N W10847203A Sears Brands Management Corporation Hoffman Estates, IL 60179 U.S.A. www.kenmore.com Sears Canada Inc. Toronto, Ontario, Canada M5B 2C3 www.sears.
TABLE OF CONTENTS PROTECTION AGREEMENTS ...................................................2 WARRANTY .............................................................................3 DISHWASHER SAFETY ............................................................ 4 PARTS AND FEATURES ............................................................6 START-UP/QUICK REFERENCE ............................................... 7 ULTRACLEAN™ FILTRATION SYSTEM ....................................8 360º POWERWASH® ..........
KENMORE PRO® LIMITED WARRANTY WITH PROOF OF SALE the following warranty coverage applies when this appliance is correctly installed, operated and maintained according to all supplied instructions. In all cases replacement units or parts are warranted only for the unexpired portion of the warranty period from the original date of sale. FOR ONE YEAR from the date of sale this appliance is warranted against defects in material or workmanship.
DISHWASHER SAFETY Your safety and the safety of others are very important. We have provided many important safety messages in this manual and on your appliance. Always read and obey all safety messages. This is the safety alert symbol. This symbol alerts you to potential hazards that can kill or hurt you and others. All safety messages will follow the safety alert symbol and either the word “DANGER” or “WARNING.
GROUNDING INSTRUCTIONS ■ Tip Over Hazard Do not use dishwasher until completely installed. Do not push down on open door. Doing so can result in serious injury or cuts. ■ Electrical Shock Hazard Electrically ground dishwasher. Connect ground wire to green ground connector in terminal box. For a grounded, cord-connected dishwasher: The dishwasher must be grounded.
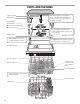
PARTS AND FEATURES Upper level wash SmartDryTM vent TurboZone® provides a concentrated wash on the back of the lower dish rack to power clean stuck-on foods without soaking or scrubbing. ULTRA FLOW water feed tube Model and serial number label Water inlet opening 360o PowerWash® lower wash arm provides additional spray coverage and corner cleaning. Heating element Rinse aid dispenser reduces spotting and improves drying.
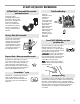
START-UP/QUICK REFERENCE ULTRACLEAN™ removable filters provide peak performance Cleaning the filters periodically helps keep the dishwasher working at peak performance. The filters can be found at the bottom center of your dishwasher. See “Ultraclean™ Filtration System” for information on removing and maintaining the filters. TurboZone® loading When the TurboZone® option is selected, it provides a concentrated wash on the back of the lower dish rack for hard-to-clean dishes.
ULTRACLEAN™ FILTRATION SYSTEM Your dishwasher has the latest technology in dishwasher filtration. This triple filtration system minimizes sound and optimizes water and energy consumption while providing superior cleaning performance. Throughout the life of your dishwasher, the filter will require maintenance to sustain peak cleaning performance. The triple filter system consists of 2 parts, an upper filter assembly and a lower filter.
Cleaning Instructions IMPORTANT: Do not use wire brush, scouring pad, etc., as they may damage the filters. Rinse filter under running water until most soils are removed. If you have hard-to-remove soils or calcium deposits from hard water, a soft brush may be required. Filter Reinstallation Instructions 1.
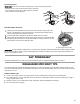
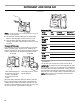
DETERGENT AND RINSE AID Detergent SLIDE Powders and Gels SLIDE NOTE: If you do not plan to run a wash cycle soon, run a rinse cycle. Do not use detergent. ■ Use automatic dishwasher detergent only. Add powder, liquid, or tablet detergent just before starting a cycle. ■ Fresh automatic dishwasher detergent results in better cleaning. Store tightly closed detergent container in a cool, dry place. Premeasured Detergents Many detergents now come in premeasured forms (gel packs, tablets, or powder packs).
Rinse Aid Rinse Aid Setting Your rinse aid dispenser is adjustable. For most water conditions, the factory setting will give good results. If you have hard water and notice calcium buildup on your dishware, you may want to try a higher setting. If you notice foam in your dishwasher, use a lower setting. SLIDE IMPORTANT: Your dishwasher is designed to use rinse aid. The use of rinse aids greatly improves drying by allowing water to drain from the dishes after the final rinse.
LOADING Loading for Best Cleaning and Drying Performance 1. Angle dirtiest dish surfaces downward and allow space for water to flow up through each rack and between dishware. 4. Angle concave surfaces such as the bottom of coffee cups to allow water to drain and improve drying performance. Angled surfaces 5. Check that nothing is blocking the upper or lower spray arms. Separating allows water flow. 2. For best silverware cleaning, use the slots in the covers to keep items separated. 6.
Top Rack Loading Loading Recommendations Place cups and glasses in the rows between tines. Placing them over the tines can lead to breakage and water spots. To avoid damage to your delicate items, be sure china, crystal, stemware, and other similar items do not touch during dishwasher operation. Load lightweight and dishwasher-safe plastic items only in the top rack.
Stemware Clips Use the stemware clips to hold stemware more securely. Stemware clips Removable Top Rack The removable rack allows you to wash larger items such as pots, roasters, and cookie sheets in the bottom rack. IMPORTANT: Remove dishes prior to removing the top rack from dishwasher. To remove the rack: 1. To gain access to the track stops, pull the upper rack forward about halfway out of the tub. 2.
Bottom Rack Loading Loading Recommendations The bottom rack is best suited for plates, pans, casseroles, and utensils. See recommended loading patterns shown. Load small items in the bottom rack only if they are secured in place. Load plates, soup bowls, etc., between tines. Load bowls securely between the rows of tines. Ensure that there is space between dishes so that the spray will reach all surfaces. Load heavily soiled items facing the spray.
TurboZone® Loading IMPORTANT: For proper performance, only one row of items may face the TurboZone® spray jets. You must select the TurboZone® wash option to utilize this wash feature. Load pans, casserole dishes, etc., with the soiled surfaces facing the TurboZone® spray jets. TurboZone® wash area is located at the back of the lower dish rack. Place the fold-down tine row in the 60° position when using the TurboZone® option.
DISHWASHER USE Cycles and Options Information Estimated Time* Displayed: H:MM Range of Water Usage Gallons (Liters) SmartWash® HE cycle The most advanced and versatile cycle. This cycle senses the soil amount and toughness of soil. This cycle is optimized to achieve outstanding cleaning with minimal water and energy. 2:49 3.8 to 7.7 (14.4 to 29.3) Pots & Pans Works best on your toughest items, such as casseroles with baked-on food residue.
Options Can be selected with TurboZone® Directs water into your casserole or other dishes to eliminate the need for soaking and scrubbing dirty, baked-on food soils. For your toughest items, use the TurboZone® option with the Pots & Pans cycle. See loading information. SmartWash® Pots & Pans Normal Wash High Temp Raises main wash temperature to improve cleaning for loads containing tough, baked-on food.
Dishwasher Control Section Delay Hours Use this option to run your dishwasher during off-peak hours. Local utility providers recommend using energy during off-peak hours when possible. To delay the start: 1. Select a wash cycle and options. 2. Press DELAY HOURS to choose the number of hours to be delayed. 3. Press START/RESUME. NOTE: Anytime the door is opened for more than 5 seconds (such as, to add a dish), the Start/Resume button must be pressed again to resume the delay countdown.
Canceling a Cycle 1. Open the door slightly to stop the cycle. Wait for the spraying action to stop before completely opening the door. 2. Press and hold the CANCEL/DRAIN button until the Cancel/Drain light turns on. 3. Close the door. The dishwasher starts a drain cycle if water remains in bottom of dishwasher. Let the dishwasher drain completely. The Cancel/Drain light turns off after 2 minutes.
WASHING SPECIAL ITEMS If you have doubts about washing a particular item, check with the manufacturer to see if it is dishwasher safe. Material Dishwasher Safe? Comments Aluminum Yes High water temperature and detergents can affect finish and color of aluminum. Disposable Aluminum No Do not wash disposable aluminum pans in the dishwasher. These might shift during washing and transfer black marks to dishes and other items. Bottles and Cans No Wash bottles and cans by hand.
DISHWASHER CARE Cleaning Cleaning the exterior In most cases, regular use of a soft, damp cloth or sponge and a mild detergent is all that is necessary to keep the outside of your dishwasher looking nice and clean. If your dishwasher has a stainless steel exterior, a stainless steel cleaner is recommended. Cleaning the interior Hard water minerals can cause a white film to build up on the inside surfaces, especially just beneath the door area. Do not clean the dishwasher interior until it has cooled.
Drain Air Gap Some state or local plumbing codes require the addition of a drain air gap between a built-in dishwasher and the home drain system. Check the drain air gap when your dishwasher is not draining well. The drain air gap is usually located on top of the sink or counter top near the dishwasher. To order a drain air gap, please call 1-844-553-6667. Ask for Part Number 300096. You may also purchase the part online: www.searspartsdirect.com.
TROUBLESHOOTING CHECK THESE POINTS TO HELP SAVE YOU TIME AND MONEY. PROBLEM SOLUTION DISHWASHER DOES NOT RUN NOTE: It is normal for the dishwasher to repeatedly pause several times during a cycle. If the Start/Resume light is blinking, close the door and push START/RESUME. Be sure the door is closed and latched. Check that there is not an interference with large casserole dishes and the wash system at the back of the dishwasher. Adjust loading as necessary to ensure door is closed and latched.
PROBLEM SOLUTION HARD WATER (WHITE RESIDUE ON DISHWASHER INTERIOR OR GLASSWARE) NOTE: Extremely hard water mineral deposits can cause damage to your dishwasher and make it difficult to achieve good cleaning. You may bring water samples to Sears to check your water hardness level. A water softener is strongly recommended if your hardness is 15 grains or more. If a water softener is not installed, the following steps may help: Use a cleaner designed for dishwashers once per month.
PROBLEM SOLUTION CLOUDY OR SPOTTED DISHWARE (AND HARD WATER SOLUTION) NOTES: ■ Liquid rinse aid is necessary for drying and to reduce spotting. ■ Use the correct amount of detergent. Confirm that the cloudiness is removable by soaking the item in white vinegar for 5 minutes. If the cloudiness disappears, it is due to hard water. Adjust the amount of detergent and rinse aid. See “Hard Water (White Residue On Dishwasher Interior Or Glassware)” in “Troubleshooting.
ÍNDICE CONTRATOS DE PROTECCIÓN .............................................27 GARANTÍA.............................................................................28 SEGURIDAD DE LA LAVAVAJILLAS.......................................29 PIEZAS Y CARACTERÍSTICAS ................................................ 31 PUESTA EN MARCHA/REFERENCIA RÁPIDA.........................32 SISTEMA DE FILTRACIÓN ULTRACLEAN™ ...........................33 360º POWERWASH®.........................................................
GARANTÍA LIMITADA DE KENMORE PRO® CON EL COMPROBANTE DE VENTA, la cobertura de garantía que sigue es válida siempre y cuando este electrodoméstico se instale, opere y mantenga correctamente de acuerdo con todas las instrucciones que se suministran. En todos los casos, las unidades o las piezas de reemplazo tienen garantía únicamente para la parte que no haya expirado del período de garantía de la fecha de venta original.
Sears Brands Management Corporation Hoffman Estates, IL 60179 Sears Canada Inc. Toronto, Ontario, Canada M5B 2C3 *No se dispone de servicio de reparaciones en la casa en todas las áreas geográficas de Canadá; esta garantía no cubrirá los gastos de viaje y transporte del usuario o del personal de servicios si este producto está ubicado en un área remota (según lo defina Sears Canada Inc.) donde no haya personal de servicios autorizado disponible.
Advertencias de la Proposición 65 del estado de California: ADVERTENCIA: Este producto contiene una o más sustancias químicas identificadas por el estado de California como causantes de cáncer. ADVERTENCIA: Este producto contiene una o más sustancias químicas identificadas por el estado de California como causantes de defectos congénitos o algún otro tipo de daños en la función reproductora.
PIEZAS Y CARACTERÍSTICAS TurboZone® proporciona un lavado concentrado hacia la parte posterior de la canasta inferior para limpiar intensamente los alimentos endurecidos sin remojar ni restregar. Lavado de nivel superior Ventilación SmartDryTM ULTRA FLOW Tubo dealimentación de aqua Etiqueta con el número de modelo y serie El brazo de lavado inferior de 360° PowerWash® prove una cobertuna adicional de rocaido y limpieza en las esquinas.
PUESTA EN MARCHA/REFERENCIA RÁPIDA Los filtros desmontables ULTRACLEAN™ proporcionan un rendimiento óptimo El limpiar los filtros periódicamente permite que la lavavajillas funcione con un rendimiento óptimo. Los filtros se encuentran en la parte central inferior de la lavavajillas. Vea “Sistema de filtración ultraclean™” para obtener información acerca de la remoción y el mantenimiento de los filtros.
SISTEMA DE FILTRACIÓN ULTRACLEAN™ Su lavavajillas tiene la última tecnología en sistemas de filtración. El sistema de filtración triple minimiza los sonidos y optimiza el consumo de agua y energía, mientras proporciona una limpieza superior. Durante la vida útil de su lavavajillas, el filtro necesitará mantenimiento para conservar el rendimiento óptimo de limpieza. El sistema de tres filtros consiste de 2 piezas, un ensamblaje de filtro superior y un filtro inferior.
Instrucciones para quitar el filtro 1. Gire el ensamblaje del filtro superior ¼ de vuelta hacia la izquierda, levante y sáquelo. 2. Agarre el filtro inferior en la abertura circular, levántelo levemente y jale hacia adelante para quitarlo. 3. Limpie los filtros como se muestra a continuación. Para quitar el ensamblaje del filtro superior Instrucciones de limpieza IMPORTANTE: No use un cepillo de alambre, estropajo, etc., ya que pueden dañar los filtros.
CONSEJOS PARA LA EFICIENCIA DE LA LAVAVAJILLAS El agua caliente disuelve y activa el detergente para lavavajillas. El agua caliente también disuelve la grasa en los platos y ayuda a los vasos a secarse sin manchas. Para obtener los mejores resultados de lavado, el agua debe estar por lo menos a 120 ºF (49 ºC) cuando entra en la lavavajillas. Si la temperatura del agua está muy baja, los platos podrían quedar menos limpios.
Agente de enjuague SLIDE SLIDE Polvos y geles Dureza del agua Blanda (0-4 granos por galón de EE.UU.) Media (5-9 granos por galón de EE.UU.) Dura (10 a 14 granos por galón de EE.UU.
CÓMO CARGAR Cómo cargar para mejorar el rendimiento de limpieza y secado 1. Coloque en ángulo hacia abajo las superficies más sucias de los platos, y deje espacio para que el agua fluya a través de cada canasta y entre la vajilla. 4. Coloque en ángulo las superficies cóncavas, tales como la base de las tazas de café, para permitir que el agua se drene y así mejorar el rendimiento del secado. Superficies inclinadas 5. Verifique que no haya nada que bloquee los brazos rociadores superior o inferior.
Cómo cargar la canasta superior Recomendaciones para cargar Coloque las tazas y los vasos en las filas entre las puntas. Si los coloca sobre las puntas pueden romperse o terminar con manchas de agua. Para evitar que se dañen sus artículos delicados, asegúrese de que la porcelana, cristalería , copas y otros objetos similares no se toquen durante el funcionamiento de la lavavajillas. Coloque los objetos livianos y de plástico aptos para lavavajillas sólo en la canasta superior.
Sujetadores para copas Utilice los clips de copas para celebrar copas de forma más segura. Sujetadores de cristalería Parrilla superior removible La canasta removible le permite lavar objetos más grandes tales como ollas, charolas para asar y moldes para galletas en la canasta inferior. IMPORTANTE: Quite los platos antes de quitar la canasta superior de la lavavajillas. Para retirar la canasta: 1.
Cómo cargar la canasta inferior Recomendaciones para cargar La canasta inferior es más apropiada para platos, ollas, cacerolas y utensilios. Consulte los modelos de carga recomendados que se muestran. Coloque los artículos pequeños en la canasta inferior únicamente si están seguros en su lugar. Coloque los platos, tazones de sopa, etc., entre las puntas. Coloque los tazones firmemente entre las hileras de puntas.
Carga para TurboZone® IMPORTANTE: Para un funcionamiento adecuado, solamente una hilera de artículos puede mirar hacia los surtidores de rociado TurboZone®. Debe seleccionar la opción de lavado TurboZone® para utilizar esta característica de lavado. Cargue sartenes, cacerolas, platos, etc. con las superficies sucias mirando hacia los surtidores de rociado TurboZone®. El área de lavado TurboZone® está ubicada en la parte posterior de la canasta inferior.
USO DE LA LAVAVAJILLAS Información sobre los ciclos y opcions Ciclos Tiempo estimado* en pantalla: H:MM Rango de galones (litros) de agua empleados Ciclo SmartWash® HE El ciclo más avanzado y versátil. Este ciclo detecta la cantidad de suciedad y su resistencia. Este ciclo ha sido optimizado para alcanzar una limpieza excepcional con una mínima cantidad de agua y consumo de energía. Incluye secado con calor. 2:49 3.8 a 7.7 (14.4 a 29.
Opciones Puede seleccionarse con TurboZone® Dirige el agua dentro de las cacerolas u otros artículos de vajilla para eliminar la necesidad de remojar y fregar restos de alimentos quemados adheridos. Para los artículos más difíciles, use la opción TurboZone® con el ciclo Pots & Pans (Ollas y cacerolas). Vea la información sobre cómo cargar.
Opciones Puede seleccionarse con Top Rack Only (Solo canasta superior) Para más comodidad, utilícelo para lavar una carga pequeña de vajilla en la canasta superior, para ayudar a mantener la cocina limpia constantemente. Disponible con cualquier ciclo No se puede usar con la opción TurboZone® Bottom Rack Only (Solo canasta inferior) Para mayor comodidad, use esta opción para lavar una pequeña carga de platos en la canasta inferior y mantener la cocina siempre limpia.
Sección de información provista por la lavavajillas Indicadores de ciclo y pantalla de tiempo Los indicadores se encenderán cuando la lavavajillas esté lavando, secando, si ha terminado y/o si ha higienizado. También se encenderán si el control está bloqueado y/o se ha seleccionado la opción de retraso. La pantalla de estado se usa para seguir el progreso del ciclo de la lavavajillas y para mostrar otros datos.
CÓMO LAVAR ARTÍCULOS ESPECIALES Si tiene dudas acerca del lavado de un artículo determinado, consulte con el fabricante para ver si se trata de un artículo lavable en la lavavajillas.
CUIDADO DE LA LAVAVAJILLAS Limpieza Limpieza externa En la mayoría de los casos, todo lo que se debe hacer es usar periódicamente un paño suave y húmedo o una esponja con un detergente suave para que el exterior de su lavavajillas se vea limpio y reluciente. Si el exterior de la lavavajillas es de acero inoxidable, se recomienda un limpiador de acero inoxidable.
Purga de aire del desagüe Algunas normas de plomería locales o estatales exigen que se instale una purga de aire del desagüe entre una lavavajillas empotrada y el sistema de desagüe de la casa. Revise la purga de aire del desagüe cuando su lavavajillas no esté desaguando bien. La purga de aire del desagüe está por lo general ubicada encima del fregadero o en el mostrador, cerca de la lavavajillas. Para pedir una purga de aire del desagüe, llame al 1-844-553-6667. Pida la pieza número 300096.
SOLUCIÓN DE PROBLEMAS VERIFIQUE ESTOS PUNTOS PARA AYUDARLE A AHORRAR TIEMPO Y DINERO. PROBLEMA SOLUCIÓN LA LAVAVAJILLAS NOTA: Es normal que la lavavajillas haga pausas repetidamente durante un ciclo. NO FUNCIONA Si está destellando la luz de Start/Resume (Inicio/Reanudar), cierre la puerta y presione START/RESUME. Cerciórese de que la puerta esté cerrada y asegurada. Cerciórese de que no haya interferencia con fuentes grandes, y el sistema de lavado en la parte posterior de la lavavajillas.
PROBLEMA QUEDA AGUA EN LA TINA/ NO DESAGUA SOLUCIÓN Asegúrese de que se haya terminado el ciclo (la luz verdever está encendida). Si no se ha terminado, deberá reanudar el ciclo cerrando la puerta y presionando START/RESUME (Inicio/Reanudar). Si la lavavajillas está conectada a un recipiente de desechos alimenticios, asegúrese de haber quitado el tapón del disco removible de la entrada del recipiente de desechos. Verifique si la manguera de desagüe está retorcida.
PROBLEMA NO HA HIGIENIZADO DAÑOS EN LA VAJILLA LUCES DESTELLANDO VAJILLA TURBIA O CON MANCHAS (Y SOLUCIÓN DE AGUA DURA) SOLUCIÓN Si la luz indicadora de Sani Rinse (Enjuague sanitario) está parpadeando, la carga NO está higienizada. Se ha interrumpido el ciclo en el enjuague final o el calentador de agua se ha fijado en una temperatura muy baja. Fije el calentador de agua en 120 °F (49 °C). Una carga inapropiada puede hacer que los platos se desportillen o se dañen.
W10847203A © 2016 KCD IP, LLC 1/16