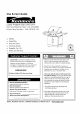
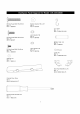
Use & Care Liquid Guide Propane Kenmore Model KmartItem Gas (LPG) Grill Number: Number: • Safety • Assembly • Use and Care • Cooking Guide • Espa_ol, Pg. 30 • Parts and Call us first 119.16312800 640-787678-119 Service Failure to comply with these instructions could result in a fire or explosion that could cause serious bodily injury, death or property damage. if you have any problem with this product.
Primary Safety Warnings ................................... 1-3 IF YOU SHELL Warranty Information ............................................ 2 Pre-Assembly Instructions .................................... 3 Part Diagram and Lists ...................................... GAS: Shut off gas to the 4-9 Extinguish appliance. any open flame. Assembly Instructions .................................... 10-18 Use & Care Instructions ................................. 19-27 Open lid.
DONOTlightthisgrill withoutfirstreading the LightingInstructions. DONOTlightthisgrill withoutchecking the burnertubesforblockage thatcouldhave occurredduringshipment.SeetheCleaning andMaintenance Instructions. • DO NOT use any type of charcoal in this grill. • DO NOT operate the main burners and back burner at the same time. (If Equipped) • ALWAYS inspect use.
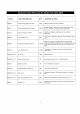
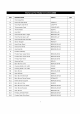
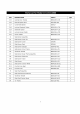
PART# PART DESCRIPTION QTY PURPOSE OF PART SB0064 Phillips Head Bolt,M6x35mm 4PCS Attaches SB0027 Phillips Head Bolt,M6xl6mm 24PCS Install Casters, Attaches Firebox Assembly, Burner Assembly and Side Shelf Assembly FEOI05 M6xl.
Phillips Head Bolt Qty: 4 Part # SB0064 M6x35mm Plastic Qty: Part Washer M6xl.
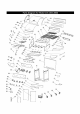
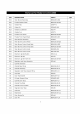
KEY DESCRIPTION PART# QTY A Hood Assembly AI Hood Left Side Panel CAOO44-L 1 A2 Hood Right CA0044-R 1 A3 Thermometer CA0045D-002 1 A4 Thermometer SE0076 1 A5 Hood Bolt B06W1B-6-A5 2 A6 Hood Handle Seat - Right B06W1B-6-A6 1 A7 Hood Handle Seat- Left B06WIB-6-A7 1 A8 Hood Handle Heat FE0010 2 A9 Silicon FE0001M 4 A10 Hood Outer Panel B06WIB-28-A10 1 All Hood Inner Panel B06WIB-28-All 1 A12 Hood Handle B06W1B-28-A12 1 Side Panel Seat In
KEY DESCRIPTION PART# B19 Main B20 Firebox Bottom B21 Grease Tray B22 Cotter B23 Grease Cup B24 Grease Cup B25 Firebox Front Panel B26 Firebox Front Heat B27 Gas B28 Main Burner Control Panel B29 Main Burner Control Knob B30 Back Burner Control Knob B31 Main Burner Control B32 Back Burner Control B33 Electronic Igniter B34 Electronic Igniter B35 Electronic Igniter B36 Regulator and Burner Electrode B06W1B-6-B10 4 B06WlB-28-B20 1 SA0647-3
KEY DESCRIPTION PART# C15 Cabinet Door C16 Manual Igniter C17 Condiment C18 Locking C19 Standard C20 Locking C21 Swivel Handle Stick Basket Standard Caster Caster Swivel Caster Caster QTY B06W1B-6-C15 2 SE0159D-001 1 SE9027 1 B06W1B-6-C18 1 B06W1B-6-C19 1 B06W1B-6-C20 1 B06W1B-6-C21 1 B06WIB-6-D1 1 D Side Burner Assembly D1 Side Burner Cover D2 Side Burner Cover SA0390 1 D3 Side Burner Rack SE0084 1 D4 Side Burner Stopper SB0045D-001 2 D5
H Firebox from Cabinet []Remove Unscrew and discard the 6 Phillips Head Bolts and Washers from the corner holes of the cabinet. Remove the crossbar, [] Carefully lift the cabinet up from the firebox and set on cardboard. Remove all foam packing from cabinet. [] Cut fastening straps on lid handle. Raise lid and remove and unpack parts inside firebox. Crossbar Install Control Knobs and Casters [] Push the Main Burner Control Knobs and Back Burner [] Control Knob onto the valve stems. See Inset 1.
Install [] Cabinet Attach Lock [] Phillips Qty: Attach Head Bolt: Head Bolt the Front Cabinet Washers Door Crossbar and Front Crossbar Top Brackets labeled Door Top Brackets to the Cabinet using 4 Phillips Head Cabinet using 4 Phillips Bolts (M6x35mm) L and R to the Head Bolts (M4x8mm). M6x35mm 4 Phillips M4x8mm qty : 4 © Lock Washer Qty: 4 M6 Attach [] and (M6), Door Top Brackets Qty: 2 (L/R) Doors to Cabinet Push down on top hinge illustrations.
Hang Condiment Basket and attach Cabinet Door Stop [] Hang Condiment Basket on the inside of cabinet Right Door, See Inset 1. [] Attach the Cabinet Door Stop to the front of cabinet bottom using 2 Phillips Head Bolts (M4x8mm), See Inset 2. Inset 1 Phillips Head Bolt M4x8mm qty: 2 \IIIII Cabinet qty: 1 Door Stop Inset Install [] Grease Insert 2 Tray the Grease Tray along two sides of the Firebox ]2 from the back underneath the firebox.
AttachFireboxto Cabinet [] [] Place the firebox onto the cabinet frame with regulator hose and side burner ignition wire hanging inside of the cabinet, We recommend using 2 people to lift the firebox. Line up the holes and attach the firebox to the cabinet frame using 4 Phillips Head Bolts (M6x16mm) and 4 Washers (M6x!.0T). Hint: You may need to slide the Firebox Assembly forward, backward, or lift slightly for the bolt holes to properly line up.
Install [] [] Towel Bar Handles, Utensil Hooks, Side Panels Use 2 Phillips Head Bolts (M4X8mm), 2 Lock Washers (M4), and 2 Washers (M4) to attach a Towel Bar to the side burner frame. Use 3 Phillips Head Bolts (M4X8mm) and 3 Lock Washers (M4) to attach the Side Burner Control Panel to the side burner frame. See Insets 1 and 2. Slide 3 Utensil Hooks into the second Towel Bar and use 2 Phillips Head Bolts (M4X8mm), and 2 Lock Washers (M4), and 2 Washers (M4) to attach the Towel Bar to the side shelf.
Install Side Burner Valve [] Detach side burner ignition wire from the regulator hose if they are taped together. [] Insert the side burner valve stem up through the hole in the Side Burner Control Panel. See Inset 1. [] Center the side burner valve in the side burner tube, See Inset 2. [] Secure the side burner valve stem to the Side Burner Control (M4x8mm). See Inset 3.
_1_ Attach Side Burner Control Knob and Side [] Slide the side burner ignition wire through Burner Ignition the hole located Firebox Assembly and over the side burner igniter connector. Push the Control Knob onto the valve stem. See Inset 3. [] r Inset Side Burner Control qty: Wire in the lower left front corner See Insets of the 1 and 2.
Install the Heat Diffuser, [] Place the Heat Diffuser 1. [] Place See [] the Inset Insert the Cooking Cooking Grates, Warming into the firebox between the Grates into the firebox. Rack into the holes Rack ridges The grate in the bottoms front have and a small back panels. knob on each See Inset corner. 2. Warming of firebox side Inset panels as shown, See Inset 3.
Install Battery [] Unscrew the electronic igniter cap. Place the "AA" Battery Screw the electronic igniter cap back into place. Battery qty: 1 into the igniter with the positive (+) end up. (Size AA) Congratulations - Assemblylabels is now complete! [] Remove any additional or packing material from the grill except the CSA label. Be sure to clean all foam packing material out of all areas.
CORRECT LP GAS TANK USE • Use of alcohol or drugs may impair the ability to assemble and operate the appliance. • Keep a fire extinguisher readily accessible. In the event of an oil or grease fire, do not attempt to extinguish with water. Use a Type B extinguisher or smother with dirt, sand, or baking soda. • In the event of rain, cover the grill and turn off the burner and gas supply. • Use your grill on a level, stable surface and ensure the locking casters are locked before use.
Notes about LP Gas Tank Exchange Regulator Programs • Many retailers that sell grills offer you the option of replacing your empty LP gas tank through an exchange service. Use only those reputable exchange companies that inspect, precision fill, test and certify their tanks. Exchange your tank only for an OPD safety feature equipped tank as described in the LP gas tank section of this manual. The gas pressure outdoor LP Gas Tank provided appliance with this must be used.
Flow Limiting Valves on LP Gas Tanks Check all connections Your LP gas tank is equipped with a flow limiting valve that will restrict the flow of gas due to a sudden change in pressure. This can often activate without your knowledge. You will notice among other things that your grill does not get as hot as it should, will take longer to heat up, or you may not be able to light all burners. If you notice any of the above, then you should reset the valve and clear your gas line.
I,_.t :IF__I_I D][or__l:| din4_ [,,.i II :| I.[q IIn(o] _[,: Grill Lighting I. 2. 3. 4. Instructions Back Burner Before each use, check all hoses for cracks, nicks, cuts, or abrasions. If a hose is damaged in any way, do not use your grill before replacing the hose with an authorized part from the Parts List. Also make sure all gas supply connections are securely tightened. Familiarize yourself with the Safety and Use and Care instructions in this manual.
MANUALLY LIGHTING THE MATCH HOLDER 1. Open the lid. 2. Ensure all burners THE BURNERS WITH MANUALLY OR are in the "OFF" position. THE LIGHTING BACK THE SIDE BURNER BURNER 1. Open the grill lid or side burner 2. Ensure the control position coven knob is in the "OFF" as well as any main burner not in 3. Slowly turn on the gas at the LP cylinder valve if it is not already on. 4. Place a match in the match light stick, This is located inside the left cabinet door. 4. 5.
Troubleshooting If the grill fails to light: 1. Turn gas off at source and turn control knobs to "OFF". Wait at least 5 minutes for gas to clear, and then retry 2. If your grill still fails to light, check the gas supply and connections. Ensure gas supply is turned on (turn counterclockwise), there is gas in the tank, and the regulator is properly seated in the tank valve. 3. Repeat lighting procedure.
9. Check and clean each electrode tip. Adjust the spacing between the tips and the burner as necessary. The space between the electrode tip and burner should be approximately 3/16". 10. Replace the heat diffusers, grates, warming rack, and grease tray. 11. Reconnect the gas source and observe the burner flame for correct operation. Propercareandmaintenance willkeepyourgrill in goodoperating condition and prolong its life.
Regardless of the burner cleaning procedure you use, we recommend you also complete the following steps to help prolong burner life. 1 Use a fiber pad or nylon brush to clean the entire outer surface of each burner until free of food residue and dirt. 2. Clean any clogged ports with a stiff wire, such as an open paper clip. 3. Inspect each burner for damage (cracks or holes) and if such damage is found, order and install a new burner.
Burn-Off Do not place the food directly over a burner to use this method. Instead, the food should be placed on the left or right side of your grill with the burner lit on the opposite side or in the center with the center burners off. Indirect cooking must be done with the lid down. Some of the new parts of your grill could have residual oils, We recommend you ignite the burners, turn to "Hi", and lower the lid for 3 to 5 minutes to burn any oils off before grilling for the first time.
Question: can I convert my gas grill from one fuel type to another, such as LP to NG (natural gas) or vice versa? 3. 4. Answer: No, your gas grill is manufactured to specific standards developed by CSA and ANSI for your safety and is certified for one type of gas only. Question: Are the serial and model numbers listed somewhere for reference? Answer: The serial and model numbers are silver CSA label placed on the grill.
Question: Where do I use my grill and better performance? for safer Question: can I clean parts of my grill, such as the cooking grates and heat tents, in a self-cleaning oven? Answer: No. You should not clean any part of your grill in a self-cleaning oven. operation Answer: Strong winds and low temperatures can affect the heating and performance of your gas grill so factor in these elements when positioning your grill outdoors for cooking.
Congratulations onmakinga smartpurchase. Your newKenmore (_productis designed andmanufactured foryearsofdependable operation. Butlikeallproducts, it mayrequirerepairfromtimeto time.That'swhen havinga RepairProtection Agreement cansaveyou moneyandaggravation.
Your Home ccc;_ For repair - in your home - of all major lawn and garden equipment, no matter who brand appliances, or heating and cooling systems, made it, no matter For the replacement who parts, accessories sold it! and owner's manuals that you need to do-it-yourself. For Sears professional installation .......................... of home appliances and items like garage door openers and water heaters. 1-800-4-MY-HOME Call, anytime, ® (1-800.469-4663) day or night (U.S.A.