Use and Care Guide ® Liquid Propane Gas Grill Sears Model No. 122.16648900 Kmart item No. 640-82960819-9 • Parts • Assembly • Safety Rules • Use and Care • Troubleshooting //_ Note to Consumer WARNING: Read this Owner's manual carefully and be sure your gas grill is properly assembled, installed and maintained. Failure to follow these instructions could result in serious injury and/or property damage.
//_ WARNING Warranty Safety Precautions. Parts Diagram ......................................... Parts List ................................................ Assembly Instructions. Lighting Instructions Light Operation Instruction. Cleaning and Maintenance ................... Troubleshooting Cooking Instruction Cooking Chart 2 2~-4 5 6 Combustion by products produced when using this product contain chemicals known to the State of California to cause cancer, birth defects, or other reproductive harm. .
• Have your LP gas tank filled by a reputable propane gas dealer and visually inspected and re-qualified at each filling. • Do not store a spare LP gas tank under or • near this appliance. • Never fill the tank beyond 80 percent full. If this information is not followed exactly, a fire causing death or serious injury may occur. • Always keep LP gas tanks in an upright position. • Do not store (or) or use gasoline or other flammable vapors and liquids in the vicinity of this gas grill.
WARNING A strong gas smell, or the hissing sound of gas indicates a serious problem with your gas grill or the LP gas tank. Failure to immediately follow the steps listed below could result in a fire or explosion that could cause serious bodily injury, death, or property damage. • Shut off gas supply to the gas grill. • Turn the control knobs to OFF position. • Put out any flame with a proper fire extinguisher. • Open Grill Lid. • Get away from the LP gas tank. • Do not try to fix the problem yourself.
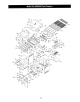
/--02 # _06 O5 5 91
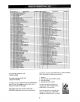
KEY'#I PARTS DESCRIPTION i 6SoA-d0":l' Terr_erature Gauge 2 i 65OA-002 Main Lid screw 3 i 650A-003 Main Lid ] 6SOA-O04 Logo _ QUANTITY 1 2 ...... i'"' 1 5...j 650A-005 Main Lid Handle Heel Insulating Spacer 6 J"650A-D0'B'Ho'od Bufi'er ............. 7 650A-D07 _,_'in Lid Handle " 8 "650A-008 S_de Shelf Handle, Left -- 9 550A-009 Side Sheif Front PanetlLefi ...... 10 650A-010 Hooks 1t ' I 65OA.
CAUTION: While it is possible for one person to assemble this grill, obtain assistance from another person when handling some of the larger, heavier pieces 1. Open lid of shipping carton and remove top sheet of cardboard. Lay cardboard sheet on floor and use as a work surface to protect floor and grill parts from scratches. 2. Remove packing materials from shipping carton. 3. You may slice the carton front corners with a utility knife to lay open the carton front panel.
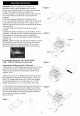
6. Fromundersideofleftsideshelf,remove2 screwsand lockwashersto assembly towelrackandbezelsHangthe Figure twotrashclips(R)totherightsideburnershelfedge(Fig.6). 7. Remove(3) 1/4x 3/8"Phillipsheadscrewsand(3) 1/4" lockwashersonsideshelffrontpanel.Thenattachfront paneltosideshelfusingthesame3 screwsandlock washers(Fig.7). 8.Attachleftsideshelfin samemannerasdescribed for rightsideshelfin steps2 and3. 9 InstallingIgniterModule Locate igniter module at right side of cabinet.
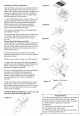
Installing Cooking Components Figure14 Important: Before cooking on your grill the first time, wash cooking grids and cooking rack with warm, soapy water. Rinse and dry thoroughly. Season with cooking oil regularly. After cooking is completed, turn grill to HIGH setting for 3 to 5 minutes to burn off excess grease or food residue. 1. Install heat diffusers above burners. Holes in rear corners of diffusers attach onto pegs in the back edge of firebox.
Checking for LP gas leaks Never test for leaks with a flame. Prior to first use, at the beginning of each season, or every time your LP gas tank is changed, you must check for gas leaks. 6. To light additional burners, push and turn burner knob(s) to;,_ HI or ON and hold in for 3 to 5 seconds dntil burner(s) ignites, then adjust knob(s) to desired setting. 1. Make a 50/50 (soap/water) mild soap solution. 2. Turn the control knobs to full OFF position; then turn gas ON at supply tank. 3.
Z_ WARNING Never lean over the grill cooking area while lighting your gas grill. Keep your face and body a safe distance (at least 18 inches) from the cooking grid surface when lighting your grill by match. Manually Lighting Your Grill by Match 1. Take the manual lighting stick 2. Insert a match into the lighting stick. 3. Follow steps 1 through 5 of the Basic Lighting Procedure. 4. Light the match and extend the lighting stick to cooking grid surface. 5.
1.Make sure the light power switch on the control panel is in the "OFF" position. 2. Connect power plug to properly grounded outlet. 3.Turn the light power switch to "ON." ,/_ WARNING Keep any electrical supply cord away from any heated surface. Halogen Bulb Replacement 1 .Make sure that the grill has cooled before changing the light bulb. 2.Make sure the light's power switch on the control panel is in the "OFF" position and power plug is disconnected from the outlet. 3.
Then loosen but do not remove the upper two screws above the light. 7. Pull out the light bulb and replace with a new bulb. Tighten the four screws. Note: Do not touch the halogen bulb with bare hands. 8. Replace glass cover, reinsert light bulb housing into the grill, and insert and tighten the screw. Cleaning Method Follow steps 1 through 4 above for glass cover removal. Use a damp towel to clean the surface of the glass cover. Make sure the glass cover is completely dry before re-installing.
Cleaning Exterior Stainless Steel Surfaces To ensure a proper working unit the following proper care and maintenance is suggested. Cleaning Cooking Grids We suggest you wash your cooking grids in a mild soap and warm water solution. You can use a wash cloth or soft brush to clean your cooking grids. Cleaning Heat diffusers Periodically you should wash the heat diffusers in a soap and warm water solution. Use a soft brush to remove stubborn burnt-on cooking residue.
Regardless of which burner cleaning procedure you use, we recommend you also complete the following steps to help prolong burner life. 1. Use a fiber pad or nylon brush to clean the entire outer surface of each burner until free of food residue and dirt. 3. Inspect each burner for damage (cracks or holes) and if such damage is found, order and install a new burner. After installation check to ensure that gas valve orifices are correctly placed inside the ends of the burner tubes.
Indirect Cooking I_. WARNING Do not leave the grill unattended. Your grill will get very hot. Never lean over the cooking area while using your grill. Do not touch cooking surfaces, grill housing. Grill Lid or any other grill parts while the grill is in operation, or until the grill has cooled down after use. Failure to comply with these instructions may result in serious bodily injury.
WARNING: To ensure that it is safe to eat, food must be cooked to the minimum internal temperatures listed iinthe table below. USDA* Safe Minimum internal Temperatures Fish 1450 F Pork 160 ° F Egg Dishes 160 ° F Steaks and Roasts of Beef, Veal or Lamb 145 ° F Ground 160 ° F Whole Beef, Veal or Lamb Poult_ (Turkey, Chicken, Ground or Pieces Poultry 165 ° F Duck, etc.) (Chicken 165 ° F Breast, etc.
Your Home For expe_ troub!eshooting and home solutions advice: ÷ age For repair- in your home - of a!! major brand appliances, _awn and garden equipment, or heating and cooling systems, no ma_er who made it, no ma_er who sold it! For the replacement pa_s, accessories and owner's manuals that you need to do-it-yourself. For Sears professional instaliation of home appliances and items like garage door openers and water heaters.