® GAS ILT--I OVE E HORNO Models, Modelos 790. 3052;',-" .,. = Color number, nL_mero de color r r Sears Roebuck www.sears.com and Co., Hoffman Estates, IL 60179 U.S.A. P/N 318200961 Rev.
Table of Contents Oven Vent and Racks ...................................................... Air Circulation in the Oven ............................................. Oven Control Functions ................................................. Wall Oven Warranty ....................................................... 2 Product Record .............................................................. 2 Serial Plate Location ...................................................... 2 IMPORTANT SAFETY iNSTRUCTIONS ....
important Safety instructions Read all instructions before using this appliance. Save these instructions for future reference. This manual contains important safety symbols and instructions. Please pay attention to these symbols and follow all instructions given. This symbol will help alert you to situations that may cause serious bodily harm, death or property damage. This symbol will help alert you to situations that may cause bodily injury or property damage.
important Safety instructions • DO NOTTOUCH INTERIOROVEN BURNEROR INTERIOR SURFACES OF THE WALL OVEN UNTIL THEY HAVE Placement of Oven Racks. Always place oven racks in desired location while oven is cool. Remove all utensils COOLED. The oven heating burner may be hot even though the flames are not visible. Areas near the burner may become hot enough to cause burns.
Grounding instructions (e ectrignition c IMPORTANT: models only) READ AND SAVE THESE INSTRUCTIONS. This appliance is equipped with a 3-prong grounding plug for your protection against shock hazard and should be plugged directly into a properly grounded receptacle. DO NOT cut or remove the grounding prong from this plug. For personal safety, this oven must be properly grounded. For maximum safety, the power cord must be plugged into a 120V--60 Hz. outlet that is correctly polarized and properly grounded.
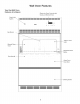
Wall Oven Features Your Gas Wall Oven Features At a Glance Electronic Oven Controls with Clock and Kitchen Timer Oven Light Switch I Gas Burner -- Interior Oven Light Manual Clean -Oven Adjustable Oven Racks i Door Handle -Glass Front Oven Door Broiling drawer
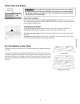
Oven Vent and Racks Oven Vent Location Some models are equipped with a blower which runs in baking and self-cleaning mode to keep a[[ internal components at a coo[ temperature. The blower may keep running even if the oven has been turned off, until the components have cooled down. Oven Vent Location The oven is vented through the upper control panel trim. When the oven is on, warm air is released through the vent. This venting is necessary for proper air circulation in the oven and good baking results.
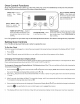
Oven Control Functions READ THE INSTRUCTIONS CAREFULLY BEFORE USING THE OVEN. For satisfactory use of your oven, become familiar with the various functions of the oven as described below. BAKE PAD--Used select function. the f to UP and DOWN ARROW PADS-- Used along with the function pads to select oven temperature, time of day and minute timer. ba_ @ Select BROIL PAD-Used to select the variable broil function. @ / TIMER SET/OFF PAD-- Used to set or cancel the minutetimer.
Setting Oven Controls Note: The time of day must first be set in order to operate the oven. To Set the MinuteTimer: 1. Press _. 2. 3. Press the A to increase the time in one minute increments. Press and hold the A to increase the time in 10 minute increments. The timer can be set for any amount of time from 1 minute to 11 hours and 59 minutes. Note: If you press the v pad first, the timer will advance to 11 hours and 59 minutes.
Setting Oven Controls Oven (cont'd) Baking For best cooking results, heat the oven before baking cookies, breads, cakes, pies or pastries, etc. There is no need to preheat the oven for roasting meat or baking casseroles. The cooking times and temperatures needed to bake a product may vary slightly from your previously owned appliance. Baking Problems Baki ng Problems Cookies and his= cuits burn on the bottom. Cakes too dark on Causes Cakes not level.
Setting Oven Controls Broiling (cont'd) information Broiling is a method of cooking tender cuts of meat by direct heat under the broil element of the oven. Always use the broiler pan and grid supplied with the appliance for broiling. Preheating Preheating the oven is suggested when searing rare steaks. (Remove your broiler pan before preheating. Foods will stick if placed on hot metal.) To preheat, set the control(s) to BROIL as instructed in this Use & Care Guide.
Setting Oven Controls (cont'd) Broil Grid Broiling is a method of cooking tender cuts of meat by direct heat under the broil element of the oven. Be sure you center your broiler pan directly under the broil element for best results. The broiler pan and its insert allow dripping grease to drain and be kept away from the high heat of the broiler. DO NOT use the pan without its insert. DO NOT cover the insert with foil. The exposed grease could ignite.
Adjusting Your Oven Temperature Your new oven has been factory calibrated and tested to ensure an accurate baking temperature. For the first few uses, follow your recipe times and temperature recommendations carefully. If you feel your oven is too hot or too cool from your baking experience, the oven temperature may be adjusted to your liking, see instructions below. Note: DO NOT adjust your oven temperature based on oven thermometers, such as those found in grocery stores because they may not be accurate.
General Care & Cleaning Cleaning Various Parts of Your Oven Before cleaning any part of the oven, be sure all controls are turned OFF and the oven is COOL. REMOVE SPILLOVERS AND HEAVY SOUNG AS SOON AS POSSIBLE. REGULAR CLEANINGS NOWWILL REDUCE THE EXTENTAND DIFFICULTY OF MAJOR CLEANING LATER. Surfaces Aluminum & Vinyl How to Clean (Trim Pieces) Painted and Plastic Control Panel, Body Parts, and Decorative Trim Use hot, soapy water and a cloth. Dry with a clean cloth.
General Care & Cleaning Cleaning the Porcelain (cont'd) Enamel Oven (ManualClean Oven Only) Porcelain has a smooth finish and is a type of glass fused to metal. Oven cleaners can be used on all interior oven surfaces. REMOVE SPILLOVERS AND HEAVY SOILING AS SOON AS POSSIBLE. REGULAR CLEANINGS NOW WILL REDUCE THE EXTENT AND DIFFICULTY OF MAJOR CLEANINGS LATER. Adhere to the following cleaning precautions: ,, Allow the oven to cool before cleaning.
General Care & Cleaning e lever hook Hinge support Removing and Replacing the Oven Door The door is heavy. For safe, temporary storage, lay the door flat with the inside of the door facing down. Lock engaged for door removal =Figure 1 HING_ SLOT =Door removed from the oven Figure 2 Hinge lever To Remove Oven Door: 1. Open the door to the fully opened position. 2. Pull up the lock located on both hinge supports and engage it in the hinge lever hooks (Figure 1).
General Care & Cleaning To Remove and Replace Oven Bottom Burner To Remove the Oven Bottom: 1. 2. Baffle Horizontal Tab Lift Oven Tab Bottom Lift up the lift tab at the back of the oven bottom Slide oven bottom out, and lift it up and out. To Replace the Oven Bottom: 1. Slide horizontal tabs on back of oven bottom into the holes at the back of 2. 3. oven cavity. Lower the front of the oven bottom so locking flange fits into locking channel. Replace lift tab to hold oven bottom in place.
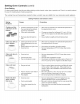
Before You Call Solutions to Common Problems Before you call for service, review this list. It may save you time and expense. The list includes common occurrences that are not the result of defective workmanship or materials in this appliance. OCCURRENCE POSSIBLE CAUSE/SOLUTION Oven Control Beeps and Displays any F code error (example F11). Electronic control has detected a fault condition. Press STOP/CLEAR to clear the display and stop the beeping. Reprogram the oven.
PROTECTION AGREEMENTS Master Protection Agreements Acuerdos Congratulations on making a smart purchase. Your new Kenmore®product is designed and manufactured for years of Enhorabuena por haber hecho una compra intetigente. Su nuevo producto Kenmore®esta diseSado y fabricado para brindarle aSos de funcionamiento fiable. Pero, como cualquier producto, puede necesitar mantenimiento preventivo o reparaciones peri6dicas.
Your Home For expert troubleshooting and home solutions advice: www.managemyhome.com For repair - in your home - of all major brand appliances, lawn and garden equipment, or heating and cooling systems, no matter who made it, no matter who sold it! For the replacement parts, accessories and owner's manuals that you need to do-it-yourself. For Sears professional installation of home appliances and items like garage door openers and water heaters.
® OV ii"iUi _!i!:!!i:!_ ii'?i bii¸_i!!!i!!::!_ il _::iiiii:ii _,_!::::::!:IJ_, !ii ¸ _i,S S L_ii _i!!!i!!::!_ ii_ ¸'¸'_ii ¸O Models, Modelos 790. 3052;',--. ,,,3,,, .,. = Color number, nL_mero de color Sears Roebuck www.sears.corn and Co., Hoffrnan Estates, IL 60179 U.S.A. P/N 318200961 Rev.
Tabla de materias Respirado del homo y las parrillas del homo .............. 7 Circulaci6n del Aire en el Homo .................................... 7 Fonciones de lasTeclas de Control ............................... 8 Ajuste de los Controles del Homo ............................. 9=12 Ajuste de la temperatura del homo ............................... 13 Cuidado y Limpieza General .................................... 14=17 Antes de Solicitar Servicio ............................................
Instrucciones Importantes de Seguridad Lea todas las instrucciones Guarde estas instrucciones Este manual contiene simbolos todas las instrucciones. e instrucciones de seguridad antes de utilizar el aparato para futura consultaci6n importantes. Preste mucha atenci6n a estos simbolos y siga Este simbolo le advertirA sobre situaciones que pueden causar lesiones corporales graves, muerte o daRos materiales.
Instrucciones Importantes de Seguridad Use una vestimenta apropiada- No use ropa que es suelta u holgada cuando utiJice el aparato. No ponga la ropa u otros materiales inflamables en contacto con las areas calientes. electrodom6stJco F._,_ NUNCAuseeste como calefactor de _rea para caientar la habitaci6n. Esto podria causar envenenamiento por mon6xido de carbono y sobrecalentamiento del horno.
Instrucciones para ia puesta a tierra (solamente para modelos que se encienden con electricidad) IMPORTANTE: LEA Y GUARDE ESTAS INSTRUCCIONES W!_J__ Par su protecci6n personal, este aparato cuenta con un enchufe de puesta a tierra con tres clavijas. Hay que enchufarlo en un receptAculo adecuado. No corte ni elimine la clavija de puesta a tierra de este enchufe. Para su seguridad personal, asegQrese de que la estufa este puesta a tierra adecuadamente.
Caracteristicas Caracteristicas de su Homo de Pared Interruptor de la luz Interior del Homo del homo de pared Controles Electronicos del Homo con Reloj y Contador de Tiempo v I Quemador de gas -- Luz Interior del Horno Limpieza Manual -- Rejillas del Homo Adjustables Manija de la Puerta-Puerta Delantera de Vidrio del Homo -- Caj6n para asar
Respiradero del Homo y las Parrillas del Homo Ubicaci6n del Respiraderodel Homo AIgunos modelos vienen equipado con un ventilador que trabaja bajo el ciclo de horneado y auto=limpieza para mantener todos los componentes a una temperatura fria. Es posible que este ventilador continue trabajando aun si el homo este apagada y trabajara hasta que el homo este totalmente fria. Ubicaci6n del Respiradero del Homo El homo se ventila por el respirador superior del panel de control.
Funciones de los Controles del Homo LEA CUIDADOSAMENTE LAS INSTRUCCIONES ANTES DE USAR EL HORNO. Para uso satisfactorio de su horno aprenda a utilizar las diversas funciones que se describen a continuaci6n. TECLA 'BAKE' [Hornear] -- Se usa para seleccionar la -------funci6n de horneado.
Ajuste de los Controles del Homo Nota: Primero se debe programar Prograrnaci6n la hora del alia para que el homo funcione. del Contador de iVlinutos: 1. Optima @. 2. Optima _,_ para aumentar la hora en incrementos de un minuto. Oprima y mantenga oprimida _. para aumentar la hora en incrementos de 10 minutos. El contador se puede programar para cualquier cantidad de tiempo desde 1 minuto a 11 horas y 59 minutos. Nota: Si oprime v primero, el contador avanzarA a 11 horas y 59 minutos. 3.
Ajuste de los controles del homo Homeado Para mejores resultados, caliente el horno antes de hornear galletas, panes, tortas, pasteles o dulces, etc. No necesita precalentar el homo para rostizar la came o para cocer caserolas. Los tiempos de cocido y las temperaturas que se necesitan para hornear un producto pueden variar lijeramente de sus aparatos antiguos. Problemas de borneo y tabla de soluciones Problemas Causas Las galletas se queman por debajo e Los pasteles estbn muy negros por encima o debajo.
Ajuste de los Controles del Homo Asar es un metodo para cocer cortes finos de came aplicando el calor directo debajo del elemento asador del homo. Precalentarniento El precalentamiento es sugerido cuando grille pedazos de biftec (retire la parilla antes de precalentar. La comida puede adherirse si es colocada en el metal caliente). Para precalentar, ajuste los controles del homo en BROIL como indica en la minuter[a o en el MANUAL DEL USUARIO.
Ajuste de los Controles del Horno Rejilla Broil (Asar a la parrilla) Asar es un metodo para cocinar cortes tiernos de came por medio del calor directo debajo del elemento para asar del homo. Para obtener los mejores resultados, verificar que la asadera este centrada directamente debajo del elemento para asar. Colocar la parrilla del horno mientras el homo esta frio. Colocar la parrilla en la posici6n deseada.
Ajuste de los Controles del Homo Ajuste de la ternperatura del homo Su homo nuevo ha sido calibrado en la fAbrica y ha sido probado para asegurar una temperatura de horneado precisa. Durante los primeros usos, siga las instrucciones de tiempo y temperatura de sus recetas cuidadosamente. Si siente que su homo estA demasiado caliente o no Io suficientemente caliente de acuerdo con su experiencia, usted puede ajustar la temperatura de horneado a su gusto.
Cuidado y Limpieza General Limpieza de diferentes partes del home de pared Antes de limpiar cualquier parte del homo, aseg_rese que todos los controles estb.n apagados y que el horno este fria. RETIRE LOS DERRAMES Y LAS MANCHAS DIFfCILES TAN PRONTO COMO PUEDA. LA LIMPIEZA CONSTANTE DISMINUIRA EL ESFUERZO DE UNA LIMPIEZA A FONDO. Superficies Como Limpiar Aluminio & Vinilo Use agua caliente jabonosa y un paRo. Seque con un paRo limpio.
Cuidado y Limpieza General Limpieza del homo de esmalte de porcelana (algunosmodelos) La porcelana tiene un terminado muy delicado yes un tipo de vidrio mezclado con metal. Los limpiadores de homo puden ser utilizados en todas las partes interiores del horno.RETIRE LOS DERRAMES Y LAS MANCHAS DIFfCILES LO M,_S PRONTO POSIBLE. LA LIMPIEZA REGULAR DISMINUIRA LA NECESIDAD DE LIMPIEZAS A FONDO MAS ADELANTE DESPUC:S. Siga las siguientes precautiones de limpieza • Permita que el homo enfrie antes de limpiarlo.
Cuidado y Limpieza General Para retirar o remplazar la puerta del horno La puerta es pesada. Para guardarla temporalmente de manera segura, deposite la puerta horizontalmente, con el lado interior dirigido hacia abajo. Agujero para la bisagra puerta quitada del homo Figura 1 Cierre en posici6n enganchada, para sacar la puerta Figura 2 Para retirar la puerta del homo: 1. Abra lapuertacompletamente. 2.
Cuidado y Lirnpieza General Corno quitar y reinstalar el rondo del homo LengOeta horizontal Para quitar el fondo del homo: 1. Levante la lengQeta que estb. detr_s del fondo del homo. 2. Deslice el fondo del homo hacia afuera y levantelo para desprenderlo. Fondo del homo LengQeta Para colocar el fondo del homo: 1. 2. 3. Deslice las lengOetas horizontales que estb.n detrAs del fondo del horno dentro de los agujeros de la parte posterior del homo.
Antes de Solicitar Servicio Soluciones de Problemas Comunes Consulte ia lista siguiente antes de solicitar servicio. Puede ahorrarle tiempo y dinero. La lista incluye los incidentes mAs comunes que no son originados por la fabricaci6n o materiales defectuosos de este electrodomestico. El control del homo emite seSales sonoras y el indicador visual muestra cualquier c6digo 'F' (pot ejemplo, 'F11 '): 1. El control electr6nico ha detectado una anomalia. Pulse CLEAR para borrar la pantalla y parar el sonido.
ACUERDOS DE PROTECCION Master Protection Agreements Congratulations Acuerdos on making a smart purchase. Enhorabuena Your new Kenmord _ product is designed and manufactured for years of dependable operation. But like all products, it may require preventive maintenance or repair from time to time. That's when having a Master Protection and aggravation. The Master Protection Agreement Agreement can save you money also helps extend the life of your new product.
Your Home For expert troubleshooting and home solutions advice: www.managemyhome.com For repair - in your home - of all major brand appliances, lawn and garden equipment, or heating and cooling systems, no matter who made it, no matter who sold it! For the replacement parts, accessories and owner's manuals that you need to do-it-yourself. For Sears professional installation of home appliances and items like garage door openers and water heaters.