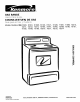
® GAS RANGE COClNA (ESTUFA) DE GAS Models, Mode]os 362.61020, 72211, 75192, 61021, 72212, 75198, 61028, 72214, 75199, 61120, 72760, 75210, 61121, 72761, 75211, 61128, 72765, 75212, 71091, 72768, 75214 71098, 75190, 72210, 75191, rfl r" leSmt D1 ZI 183D55BOPlt0 (SR85025) 201 JR Printed _n Mex|co This brook/s printed on r_c3_Jed pape_, Sears, Roebuck and Co., Hoffman Estates, tL 60179 U.S.A. www.sears.
Electrical Connections ................. For Your Safety ........................... LP ..................................... Safety Instructions Anti-Tip Device ................. Important Safety Instructions ............ 2, 3, 3t, 39 2-6, 30 Before You Call for Service .............. Care and Cleaning ...................... Consumer Services .................... Repair Services .......................... Thermostat Adjustment ...................... Warranty .................................
Read all instructions before using this appliance. IMPORTANT SAFETY NOTICE The California Safe Drinking Water and Toxic Enforcement Act requires the Governor of California to publish a list of substances known to the state to cause cancer, birth defects or other reproductive harm, and requires businesses to warn customers of potential exposure to such substances.
Cook meat and poultry thoroughly---meat to at least an INTERNAL temperature of 160°F and poultry to at least an INTERNAL temperature of 180°F Cooking to these temperatures usually protects against foodborne illness Using Your Range • Do not leave children alone or unattended where a range is hot or in operation. They could be seriously burned. Do not allow anyone to climb, stand or hang on the door, storage or broiler drawer (depending on model) or cooktop.
, Do not use a wok on models with sealed burners if the wok has a round metal ring that is placed over the burner grate to support the wok. This ring acts as a heat trap, which may damage the burner grate and burner head, Also, it may cause the burner to work improperly. This may cause a carbon monoxide levet above that allowed by current standards, resulting in a health hazard.
Baking, Broiling and Roasting Cleaning Your Range ° Do not use the oven for a storage area. Items stored in the oven can ignite. • Clean only parts listed in this Use and Care Manual. . Stand away from the range when opening the door of a hot oven. The hot air and steam that escape can cause burns to hands, face and eyes. • Keep the range clean and free of accumulations grease or spillovers, which may ignite.
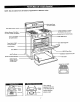
NOTE: Not all models have all features. Appearance of features varies.
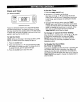
Surface Burner Controls Lighting Instructions for Standing Pilot Models The surface burners on these ranges have standing pilots that must be lit in_tia_ly_ To light lhe:_ sure the surface burner The knobs that turn the surface burners on and off are marked as to which burners they control. ( r-_ _ _t The two knobs on the left control the left front and left rear burners, The two knobs on the right control the right front and right rear burners, ____-..__---.&'_7__ position,, ----_'_ "_, "_ 2.
After Lighting a Burner Wok This Way • After the burner ignites, turn the knob to adjust the flame. (on models with sealed burners) • Check to be sure the burner you turned on is the one you want to use. • Do not operate a burner for an extended period of time without cookware on the grate. The finish on the grate may chip without cookware to absorb the heat., • Be sure the burners and grates are coot before you place your hand, a pot holder, cleaning cloths or other materials on them.
Clock and Timer To Set the Timer (on some models) 1. Press the TIMER ON/OFF pad, I 2. Use the A or V pads to setthe timer, Short taps on the A or V pad change the timer's setting one minute at a time. Pressing and continuing to hold the A pad increases the setting ten minutes at a timer h _.F_lO 3. Once you have set your timer, press the TIMER ON/OFF pad to start timing, As the timer counts down a signal will indicate when one minute is left.
Before Using Your Oven Lighting Instructions for Electric Ignition Models Be sure you understand how to set the control properly. Practice removing and replacing the shelves while the oven is cool. Read the information and tips on the following pages. Keep this manual handy where you can refer to it, especially during the first weeks of using your new range. The oven burner is lighted by electric ignition (on some models). To light the burner, turn the OVEN TEMP knob to the desired temperature.
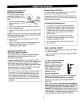
OVEN TEMP Knob Oven Shelves The OVEN TEMP knob The shelves are designed with stop-locks so, when placed correctly on the shelf supports, they will stop before coming completely out of the oven and will not tilt when you are removing food from them or placing food on them. is located on the control panel on the front of the range,. Simply turn the knob to the desired cooking temperatures. It will normally take 30-90 seconds before the flame comes on..
Shelf Positions Oven Vents The oven has five shelf The oven is vented through duct openings at the rear of the cooktop See Features section. Do not block these openings when cooking in the oven--it is important that the flow of hot air from the oven and fresh air to the oven burners be uninterrupted. supports for baking and roasting as shown in this itlustration--A (bottom), B, C, D and E (top).
Baking Preheating Preheat the oven if the recipe calls for it. Preheat means bringing the oven up to the specified temperature before putting the food in the oven.
Baking Aluminum (continued) Never cover the oven bottom with aluminum foil, Baking Guides When using prepared baking mixes, follow package recipe or instructions for the best baking results, Never entirely cover a shelf with aluminum foil. This will disturb the heat circulation and result in Cookies When baking cookies, flat cookie sheets (without sides) produce betterlooking cookies.
Adjust the Oven Thermostatn Do It Yourself! Air Adjustment Shutter for Oven Burners The air adjustment shutter for the bottom burner regulates the flow of air to the flames, You may feel that your new oven cooks differently than the one it replaced. We recommend that you use your new oven for a few weeks to become more familiar with it, following the times given in your recipes as a guide.
Roasting 3, Turn the OVEN TEMP knob to (you may hear a slight clicking oven is working properly) See temperatures and approximate If your model has a latch, do not lock the oven door during roasting, The latch is used for self-cleaning onlyo Roasting is cooking by dry heat.. Tender can be roasted uncovered in your oven. temperatures, which should be low and spattering meat or poultry Roasting steady, keep to a minimum, the desired temperature sound, indicating the the Roasting Guide for cooking times.
Roasting Guide Oven Temperature Internal Temperature Tender cuts; rib, high quality sirloin tip, rump or top round* 325°F (163°C) Rare: Medium: Well Done: Approximate Roasting Time in Minutes per Pound 3 to 5 Ibs. 6 to 8 lbs. (1.4 to 2,3 kg) (2.7 to 3.
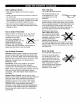
Broiling Use of Aluminum Foil Broiling is cooking food by direct heat from above the food. Your range has a convenient drawer below the oven for broiling It also has a specially designed broiler pan and grid that allows the dripping fat to drain away from the high heat of the gas flame. You can use aluminum foil to line your broiler pan and broiler grid. However, you must motd the foil tightly to the grid and cut slits in it just like the grid.
Broiling Guide The oven door and broiler during drawer must be closed o If desired, marinate meats or chicken before broilingo Or brush with barbecue sauce last 5 to t0 minutes ontyo broiling. • When arranging the food on the pan, do not tet fatty edges hang over the sides because dripping fat could soil the oven. • Always use the broiler pan and grid that comes with your range. It is designed to minimize smoking and spattering by trapping juices in the shielded lower part of the pan.
Propercareandcleaningare important so yourrangewill giveyouefficientandsatisfactoryservice°Followthese directionscarefullyin caringforit to helpassuresafeand propermaintenance,. Burner Heads (on sealed burners only) NOTE: Before removing the burner heads and caps, remember their size and location, Replace them in the same location after cleaning, BE SURE ELECTRICAL POWER IS DISCONNECTED BEFORE CLEANING ANY PART OF YOUR RANGE.
Burner Caps Drip Pans Left (on sealed burners only) (on some models) Lift off when cool. Wash burner caps in hot, soapy water and rinse with clean water, You may scour with a plastic scouring pad to remove burned-on food particles° Remove the grates and lift out the drip pans° The drip pans can be cleaned in a Dry them in a warm oven or with a cloth--don't reassemble them wet. Replace the burner caps.
Standard To remove burned-on food, soak the surface burner in a solution of mild liquid detergent and water. Soak the surface burner for 20 to 30 minutes. For more stubborn stains use a cleanser like Soft Scrub ® brand or Ben AmP brand_ Rinse well to remove any traces of the cleanser that might clog the burner openings_ Do not use steel wool because it will clog the surface burner openings and scratch the surface burners, if the holes become clogged, clean them with a sewing needle or twist-tie.
Control Oven Air Vents Panel and Knobs It's a good idea to wipe the control panel after each use of the oven. Clean with mild soap and water, or vinegar and water, rinse with clean water and polish dry with a soft cloth. Never block the vents (air openings) of the range.
Lift-Off Oven Door Porcelain Oven Interior The oven door is removable but it is heavy, You may need help removing and replacing the door,, (on all models except continuous cleaning models) With proper care, the porcelain enamel interior wilt retain its attractive finish for many years. To remove the door, open it a few inches to the special stop position that will hold the door open. Grasp firmly on each side and lift the door straight up and off the hinges.
Oven Bottom Removable The oven bottom has a porcelain enamel finish. To make cleaning easier, protect the oven bottom from excessive spi!!overs by placing a cookie sheet on the shelf below the shelf you are cooking on, You can use aluminum foil ff you do not cover the whole shelf.
To Clean the Continuous Special Care of the Continuous Cleaning Oven Interior Cleaning Oven: 1. Let range parts cool before handling We recommend rubber gloves be worn when cleaning. 2. Remove shelves and cookwareo (on some models) The special coating is a porous ceramic material, which is dark in color and feels slightly rough to the touch. 3. Soil visibility may be reduced by operating the oven at 400°F (204°C). Close the door and turn OVEN TEMP knob to 400°F (204°C) Time for at least four hours.
FOR YOUR SAFETY WARNING If you smell gas: 1. Open windows. 2. Don't touch electrical switches. Improper installation, adjustment, alteration, service or maintenance can cause injury or property damage. Refer to this manual. For assistance or additional 3. Extinguish any open flame. 4o Immediately call your gas supplier. information, consult a qualified installer, service agency, manufacturer (dealer) or the gas supplier. Never reuse old flexible connectors.
DIMENSIONS AND CLEARANCES Provide adequate clearances between the range and adjacent combustible surfaces. De 3th with door closed ...-- (sPr:tdu_ "tehi_ (Porcelain 30 _ (76,2 cm) I , _ *Product (Includes door handle): 27_/. (70,5 cm) -_i Height: 61020 61021 61028 61120 61121 61128 451/2 (115.5 cm) 71091 71098 461/2 (118,t 72210 72211 72212 72214 72760 72761 72765 72768 75190 75t 91 75"192 75198 75 t 99 75210 75211 75212 75214 40 (101.6 cm) crn) _4mm) door) ............
iMPORTANT SAFETY INSTRUCTIONS EXCEPTION: Installation of a listed microwave oven or cooking appliance over the cooktop shall conform to the installation instructions packed with that appliance. • Installation of this range must conform with local codes, or in the absence of local codes, with the National Fuel Gas Code, ANSI Z223.1, latest edition. In Canada, installation must conform with the current Natural Gas Installation Code, CAN/CGAB149.1 or the current Propane Installation Code, CAN/CGA-Bt49.
WARNING PROTECT All ranges can tip and injury could result° To prevent accidental tipping of the range, attach an approved Anti-Tip device to the wall and floor, (See Installing the Anti-Tip Device in this section.) Your range, like many other household items, is heavy and can settle into soft floor coverings such as cushioned vinyi or carpeting.
PREPARATION STEP • Remove all tape and packaging+ Lift up the cooktop (on models with standard twin burners) and remove any packing matedat under ito Make sure the standard twin burners are properly seated and level. Connect Range to Gas Because hard piping restricts movement of the range, the use of an A_G..A.-certffied flexible metal appliance connector is recommended unless local codes require a hard-piped connection+ Never use an otd connector when installing a new range.
Rigid Pipe Hookup for Models Equipped with Sealed Burners Gas Pipe and Electric Outlet Locations for Models Equipped with Standard Twin Burners This area allows for flush range installation with through-thewall connection of pipe stub/shut-off valve and rear wall 120V outlet. Shortest connection from hard pipe stub location to range hookup. i,_=l o _ Pressure _"'_"- Regulator 90 _ Elbow -- 8lack iron Pipe --- Union -_,._ the consumer of the location of the Installer: inform 1 gas shut-off valve.
STEP 3 1. install a manual gas line shut-off valve in the gas line in an easily accessed location outside of the range, Make sure everyone operating the range knows where and how to shut off the gas supply to the range Electrical Connections (on some models) Electrical Requirements 2, Install male 1/2 flare union adapter to the _,5 NPT internal thread elbow at inlet of pressure regulator.
A: Usage Situations where Appliance Power Cord will be Disconnected Infrequently. B: Usage Situations where Appliance Power Cord wii! Be Disconnected Frequently. TEMPORARY METHOD (Adapter plugs not _._-._, permitted in Canada) _-l'l Do not use an adapter plug in these situations because disconnecting of the power cord ptaces undue strain on the adapter and leads to eventual failure of the adapter ground terminal.
STEP 5 Adjust the Surface Burner Light the Pilots Pilots if Necessary (for models equipped with standing pilots) 1. Raise the cooktop. The range should be installed in its permanent position before any pilots are lit or adjusted 2. Locate the pilot adjustment screw.
Quality of Flames * Stand-by pilot flame The combustion quality of burner flames needs to be determined visually. (k) Yellow flames--Call service Heater pilot flame 4, Turn the OVEN TEMP knob to a setting above 200°F (93°C)_ The pilot flame will increase in size and impinge on the temperature-response element, The oven burner will light in 30-90 seconds.
Remove the metal shield at the rear of the drawer cavity The air adjustment shutter is behind this shield. To adjust the flow of air to the burner, loosen the Phillips-head screw and rotate the shutter to allow more or less the burner tube. STEP 8 Adjusting the Air Adjustment Shutter If Necessary To determine if the oven burner flames are burning properly, first remove the oven bottom, To remove the oven bottom: 1. Remove the knurled screws holding down the rear of the oven bottom. 2.
STEP 10 Installing the Anti-Tip Device 3. For wood construction, drill a V8 pilot hole in the center of each of the pre-marked wood floor and wall hole positions (a nail or awl may be used if a drill is not available), Fasten the Anti-Tip device with the 4 screws provided, WARNING: • Range must be secured with an approved Anti-Tip device.
PROBLEM TOP BURNERS DO NOT UGHT OR DO NOT BURN EVENLY POSSIBLE CAUSE Make sure electrical plug is plugged into a live power outlet. Burner holes on the side or around the top of burner may be clogged. Remove burners (on models with standard twin burners) or burner heads (on models with sealed burners) or burner caps on spill-proof models, and clean them with a sewing needle or twist4ie. Make sure you do not enlarge the holes_ On spill-proof models, check electrode area for burned-on food or grease.
PROBLEM POSSIBLE CAUSE Range electrical plug must be securely seated in a live power outlet Check for blown fuse or tripped circuit breaker. CLOCK DOES NOT WORK OVEN LIGHT DOES NOT COME ON • Bulb may be loose or burned out. OVEN WILL NOT WORK , • Electrical plug must be plugged into a live power outlet° Plug on the range is not completely inserted in the electrical outtet. • Pilot(s) is (are) not lit (on standing pilot models).
FREE-STANDING GAS RANGE WARRANTY ® F FULL ONE YEAR WARRANTY ON ALL PARTS If, within one year from the date of instaflation_ any part fails to function property due to a defect in material or workmanship, Sears will repair or replace it, at our option, free of charge If this product is subjected to other than private family use, the above warranty is effective for only 90 days, WARRANTY SERVICE IS AVAILABLE BY CONTACTING SERVICE CENTER IN THE UNITED STATES.
Dimensiones y espacios ....................... Dispositivo antiwolcaduras .................. Para su seguridad ............................. LP (propano) .................................. Instrucciones de seguridad Dispositivo anti-volcaduras ............ 43, 44, 72, 80 Instrucciones de seguridad importantes .... 43-47, 71 Cuidado y mantenimiento Ajuste del termostato del homo Antes de Itamar para servicio ................ Cuidado y limpieza ......................... Garantia .............................
Lea estas instrucciones • No trate de reparar o reemplazar ninguna parte de su cocina a manes qua se recomiende especJficamente en este manual. Todo otro servicio se debe remitir a un t_cnico de servicio calificado. antes de usar este aparato.
AI usar su cocina Cocine muy bien todas las carnes, incluyendo las carries de aves; las cames de res, por ejemplo, deben cocinarse a una temperatura INTERNA de por Io menos 160°F (71°C) y las cames de ayes deben cocinarse a una temperatura INTERNA de por Io menos 180°F (82°C). Por to general, cocinar a estas temperaturas pro!ege contra las enfermedades que se transmiten a traves de los alimento& No deje a los nifios solos o desatendidos donde hay una cocina caliente o en operaci6n.
Cocinando en la superficie (continuacibn) Aleje todos los artmulos de material pidstico de los quemadores de superficie. • Vigile con atenci6n los alimentos que se frien en llama alta° No deje articulos de pl&stlco sobre la superficie---se pueden derretir si se dejan muy cerca del respiradero. • Nunea obstruya los respiraderos (aberturas de aire) de la cocina. Estas proporcionan la entrada y la salida de aire necesarias para que la cocina funcione adecuadamente con una combustt6n correcta.
Si hubiera un incendio causado por la grasa en ia bandeja del asador, apague el control del horno y mantenga cerrados el caj6n del asador y la puerta det homo para contener el fuego hasta q_e se apague. Hornear, asar al fuego directo y asar • No use el horno para guardar cosas. Los articulos guardados en el homo se pueden quemar. • Permanezca lejos de la cocina al abrir la puerta de un homo caliente.
NOTA: No todos los modelos tienen todas las caractefisticas. La apariencia de las caracteristicas varia.
lnstrucciones para encender los modelos con pilotos permanentes Controles Los dos botones en el lado izquierdo controtan los quemadores izquierdos, delantero y trasero. Los dos botones en el tado derecho controlan los quemadores derechos, delantero y trasero. 1. Asegt]rese de que los botones de control de los En las cocinas con quemadores quemadores de superficie est_n en la posici6n OFF (apagado).
Antes de encender un quemador • Si su cocina incluye charolas recolectoras, utilizarias siempre, Despuds de encender un quemador debe • Despu_s de encender el quemador, haga girar el bot6n para ajustar et tamaSo de la llama. • AsegSrese de que todas las parrillas de los quemadores de la cocina est_n en su lugar antes de usar cualquier quemador. • No deje un quemador funcionando per un periodo largo de tiempo sin poner un recipiente sobre ta parrilla.
Utensilios de coccibn para la superficie No use el "wok" Aluminio: Se recomienda et uso de utensitios de peso mediano, ya qua _stos distribuyen el calor r&pidamente y de manera uniformeo La mayor[a de los alimentos se dorar&n de manera uniforme en una sart6n de aluminio, Use una cazuela con tape ajustada cuando cocine con una pequeSa cantidad de agua. ningdn otto soporte en forma de aro.
Para cambiar o cancelar el contador Reloj y contador de tiempo (enciertos modeles) de tiempo Cuando e! contador de tiempo hace el conteo regresivo, use ei bot6n A (arriba) y V (abajo) pare cambiar et tiempo que queda, u oprima el bot6n TIMER ON/OFF (contador de tiempo encendidotapagado) para parer el contador de tiempo, El contador de tiempo no se puede canceler a menos que se hayan compietado las instrucciones para fijar el contador de tiempo. r I ,,_-,oo @ ! .
Antes de usar su homo Instrucciones para encender los modelos Cerci6rese de que usted sabe c6mo fijar los controles correctamenteo Practique quitar y colocar tas parrillas cuando et homo est6 frJo Lea la informaci6n y tas sugerencias en las p&ginas siguientes., Conserve esta guia a mane, en un lugar deride pueda consultarla, especiatmente durante tas primeras semanas. con ignicion Instrucciones para encender E! quemador del homo se enciende por ignici6n el_ctrica (en ciertos modelos).
Parrillas dei homo Los respiraderos del horno Las parrillas est_n E1homo reoibe ventilaci6n a trav_s de aberturas en los conductos de la parte posterior de la superficie de cocci6n. Vea ta secci6n de Caracteristicas. No bioquee estas aberturas ouando est_ cocinando en el horno--es importante que no se interrumpa ta circulaci6n de aire oaliente que sale del homo y el aire fresco que va a los quemadores del homo.
Hornear Precalentamiento La temperatura de su homo est& controlada en forma muy precisa mediante un sistema de control de homo° Se recomienda que opere el homo durante vadas semanas para familiarizarse con el desempeSo de su nuevo homo. Si cree que es necesario un ajuste, yea la secci6n Ajuste del termostato del homo° Precaliente el homo si la receta asi 1o indic& Precalentar significa hacer que el homo alcance ta temperatura especificada antes de poner los alimentos en el homo.
Hornear Pasteles (continuaci6n) Cuando hornee pasteles, tenga en cuenta que los moldes doblados o combados provocar&n un horneado disparejo y productos con una forma inadecuada. Un pastel que se hornee en un mofde m&s grande qua el que recomienda la receta, por Io general quedar& mAs crujiente, de_gado y seco de io que deber{a. Si se hornea en un molde m_s pequeSo que el recomendado, puede quedar crudo y la masa puede desbordarse.
Obturador de ajuste de aire para los quemadores del homo Ajuste el termostato del horno-ill,gale usted mismo! E1obturador de ajuste de aire del quemador det rondo regula el flujo de aire alas llamas, Usted pudiera encontrar que su nuevo homo cocina de manera diferente al otto que tenia.
Cbmo asar 2, Cornpruebe el peso de la cerne. Co!oque la came con el lade grasoso hacia arriba o 1as eves con la pechuga hacia arriba en la parrilla de asar sobre un recipiente plane. BaSe la carne con la grasa qua se va escurriendo° Seleccione una bandeja pare asar de un tamaflo qua se aproxime lo m&s posible al tama_o de la carrie. (La bandeja del asador a fuego directo, con su rejilla, es un buen recipiente pare esto).
Carnes de asar congeladas Cocinando Las carnes de asar congeladas de res, puerco, cordero, etc° pueden empezarse a cocinar sin descongelarlas, pero habr& que aumentar et tiempo de cocci6n entre t5 y 25 minutos adicionales por cada libra (450 g) (15 minutos por cada libra [450 g] para carnes de asar de menos de 5 libras [2.3 kg] y m&s tiempo para las carnes de m&s peso).
For repair of major brand appliances in your own home... no matter who made it, no matter who sold it! 1-800-4-MY-HOME ® ::.... Anytime, day or night (US,A. and Canada) (1-800-469-4663) www.sears.com www,sears,,ca , : ! :: For repair of carry-in products like vacuums, lawn equipment and electronics, call for the location of your nearest Sears Parts and Repair Center. 1-800-488-1222 1 Anytime, day or night (U.SA. only) www°sears.com .:.