Microwave Hood Combination Combinaci6n Homo Models, de Campana y Microondas Modelos 363.6270_ :_ = color number, n_mero de color .s 164D3370P304 SR40374 253JR Seam, Roebuck and Co., Hoffman Estates, IL 60179 U.S.A. i www.sears.
READ ALL SAFETY INFORMATION BEFORE USING A PRECAUTIONS TOA VOID POSSIBLE EXPOSURE TO EXCESSIVE MICROWAVE ENERGY For your safety the information in this manual must be followed to minimize the risk of fire or explosion or to prevent property damage, personal injury or loss of life. Do Not Attempt to operate this oven with the door open since open-door operation can result in harmful exposure to microwave energy. It is important not to defeat or tamper with the safety interlocks.
Safety Instructions Precautions to Avoid Possible Exposure to Excessive Microwave Energy ...2 Important Safety Instructions .... 4-7 Grounding Instructions .......... 8 Care and Maintenance Cleaning the Microwave ...... Light Bulb Replacement ...... The Vent Fan and Grease Fitter Charcoal Filter ................ Operation Important Parts of Your Microwave ................ Quick Start--Controls ....... Operating Instructions ....... Microwave Terms ............. 24 25 . .
WARNING When using electrical appliances, including the following: basic safety precautions • Read and follow the specific "Precautions to Avoid Possible Exposure to Excessive Microwave Energy" on page 2. should be followed, • Do not immerse power cord or plug in water. • To reduce the risk of fire in the oven cavity: • This appliance must be grounded. Connect only to properly grounded outlet. See Grounding Instructions section on page 8. -- Do not overcook food.
SPECIAL NOTES ABOUT MICROWAVING ARCING If you see arcing, press the STOP/CLEAR pad and correct the problem. Arcing is the microwave term for sparks in the oven. Arcing is caused by: • Metal or foil touching the side of the even. • Foil not molded to food (upturned edges act like antennas). • Metal, such as twist-ties, poultry pins, or gold-rimmed dishes, in the microwave. • Recycled paper towels containing small metal pieces being used in the microwave.
SPECIAL NOTES ABOUT MICROWAVING (continued) FOODS (continued) • Hot foods and steam can cause burns. Be careful when opening any containers of hot food, including popcorn bags, cooking pouches and boxes. To prevent possible injury, direct steam away from hands and face. • Do not overcook potatoes. They could dehydrate and catch fire, causing damage to your oven. • Cook meat and poultry thoroughly--meat to at least an INTERNAL temperature of 160°F. and poultry to at least an INTERNAL temperature of 180°F.
SPECIAL NOTES ABOUT MICROWAVING MICROWAVE-SAFE COOKWARE (continued) (continued) THE VENT FAN • Plastic cookware--Plastic cookware designed for microwave cooking is very useful, but should be used carefully. Even microwave-safe plastic may not be as tolerant of overcooking conditions as are glass or ceramic materials and may soften or char if subjected to short periods of overcooking. In longer exposures to overcooking, the food and cookware could ignite.
Grounding Instructions WARNING Improper use of the grounding plug can result in a risk of electric shock. Consult a qualified electrician or service technician if the grounding instructions are not completely understood, or if doubt exists as to whether the appliance is properly grounded. If the outlet is a standard 2-prong wall outlet, it is your personal responsibility and obligation to have it replaced with a properly grounded 3-prong wall outlet. Ensure proper ground exists before use.
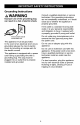
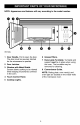
NOTE: Appearance and features will vary according to the model number. 950 Watts 1 Door Handle. Pull to open the door. The door must be securely latched for the microwave to operate. 2 Door Latches. 3 Window with Metal Shield. Screen allows cooking to be viewed while keeping microwaves confined in the oven. 4 Touch Control Panel. 5 Cooktop Lights. 6 Grease Filters. 7 Removable Turntable. Turntable and support must be in place when using the oven. The turntable may be removed for cleaning.
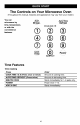
The Controls on Your Microwave Oven (Throughout this manual, features and appearance may vary from your modeL) You can microwave by time, temperature, or with the ,Ce:tVreen:en ce /Add' Auto/Time Defrost _0 S_. minutecook 1-6 _ Q @ ®®® ®®® rime eooi_, di _o ff Power Time Features Time Cooking Press Enter COOK TIME I & II (Press once or twice) Amount of cooking time. AUTO/TIME DEFROST (Press twice) MINUTE COOK Amount of defrosting time. POWER Starts immediately for 1-6 pads only.
GUIDE ON MICROWAVE GUIDES Before you begin, check the guide located on the inside front of the oven IN BOOK • Cooking • Time Defrost when you open the door.
CHANGING POWER LEVELS / Variable power levels add flexibility to microwave cooking. The power levels on the microwave oven can be compared to the surface units on a range. High (power level 10) or full power is the fastest way to cook and gives you 100% power. Each power level gives you microwave energy a certain percent of the time. Power level 7 is microwave energy 70% of the time. Power level 3 is energy 30% of the time.
TIME FEATURES COOK TIME _rne Cook Time I Allows you to microwave for any time up to 99 minutes and 99 seconds. @ ® ® ® ® ® ® ® ® Power level 10 (High) is automatically set, but you may change it for more flexibility. You may open the door during Cook Time to check the food. Close the door and press START to resume cooking. 1 Press COOK TIME. 2 Enter the cooking time. 3 Change the power level if you don't want full power. (Press POWER. Select a desired power level 1-10.) 4 Press START.
Cooking Guide for Cook Time NOTE: Use power level High (10) unless otherwise noted. In 1V2-qt.oblong glass baking dish, place 1/4 cup water. 1O-oz.package 6 to 9 min., Med-High (7) 5 to 7 min. 1 lb. cut in half 1O-oz.package 9toll min. 6 to 8 min. In l_/_
5 to 7 min, In 1-qt. casserole, place 2 tablespoons water. to 5 ears 3 to 4 min, _erear ear 5 to 6 min, 3 to 4 min, _erear In 2-qt. oblong glass baking dish, place corn. If corn is in husk, use no water; if corn has been husked, add 1/4 cup water. Rearrange after half of time. Place in 2-qt. oblong glass baking dish. Cover with vented plastic wrap. Rearrange after half of time. 10-oz. package 5 to 7 min, In 1-qt. casserole, place 3 tablespoons water. 9 to 12 min. 5 to 7 min, In 1-qt.
TIME FEATURES TIME DEFROST ® ® ® ® ® ® Allows you to defrost for the length of time you select. See the Defrosting Guide for suggested times. Power level 3 is automatically set, but you may change this for more flexibility. You may defrost small items more quickly by raising the power level after entering the time. However, they will need more frequent attention than usual. ® ® ® .
Defrosting Guide I min, 3 to 5 min, 6 to 8 min, 5 to 7 min, Place block in casserole. Turn over and break up after half the time, 3 to 6 min, _e++ + + 2 to 5 min, iii!ii i ii! if!!ii i i! Place unopened package in oven+ Let stand 5 minutes after defrosting. Place unopened package in oven. Microwave just until franks can be separated+Let stand 5 minutes, if necessary, to complete defrosting. Turn meat over after half the time. Use power level 1. to+m+n. 5 to 7 min, +2tot6min. per lb.
TIME FEATURES MINUTE CONVENIENCE POPCORN COOK This is a quick way to set cooking time for 1-6 minutes. / PoPcorn ® rninu_ CGGk 14 ® ® ® ® FEATURES ® ® ® (less time) (more time) Use only with prepackaged microwave popcorn weighing 1.75 to 3.5 ounces. Press one of the Minute Cook pads (from 1 to 6) for 1 to 6 minutes of cooking at power level 10. For example, press the 2 pad for 2 minutes of cooking time.
CONVENIENCE AUTO FEATURES REHEAT The Auto Reheat feature reheats servings of many previously cooked foods. Reheat 1 Press AUTO REHEAT. ® 2 Select food type 1-(; for one serving (see Auto Reheat Guide below). The oven starts immediately. ® START 3 Press 2 or 3 to change the serving size. NOTE: The serving size may be changed or added after the oven starts. Press number pad 2 or 3. The serving size for food type 6 cannot be changed.
CONVENIENCE FEATURES J_utornme AUTO _mst DEFROST ® ® ® The Auto/Time Defrost feature gives you two ways to defrost frozen foods. Press AUTO/TIME DEFROST once for Auto Defrost or twice for Time Defrost. Use Auto Defrost for meat, poultry and fish. Use Time Defrost for most other frozen foods. ® ® ® ® ® ® Auto Defrost automatically sets the defrosting times and power levels to give even defrosting results for meats, poultry and fish weighing up to 6 pounds. 1 Press AUTO/TIME once.
DISPLA Y ON/OFF OTHER FEATURES YOUR MODEL MAY HAVE COOKING COMPLETE REMINDER To remind you that you have food in the oven, the oven will display "END" and beep once a minute until you either open the oven door or press STOP/CLEAR. To turn the clock display off, press and hold 0 for about three seconds. CLOCK KITCHEN Press to enter the time of day or to check the time of day while microwaving. Kitchen Timer operates as a minute timer and can be used at any time, even when the oven is operating.
VENT FAN OTHER FEATURES YOUR MODEL MAY HAVE START/PA USE ® The vent fan removes steam and other vapors from surface cooking. START Press once for high fan speed, twice for low fan speed or a third time to turn the fan off. In addition to starting many functions, START/PAUSE allows you to stop cooking without opening the doer or clearing the display. CHILD SURFACE LIGHT @ LOCK-OUT Press to turn the surface light on or off. Press once for high, twice for low or three times to turn the light off.
Term Definition Arcing Arcing is the microwave term for sparks in the oven. Arcing is caused by: • metal or foil touching the side of the oven. • foil that is not molded to food (upturned edges act like antennas). • metal such as twist ties, poultry pins, gold-rimmed dishes. • recycled paper towels containing small metal pieces. Covering Covers hold in moisture, allow for more even heating and reduce cooking time. Venting plastic wrap or covering with wax paper allows excess steam to escape.
HELPFUL HINTS HOW An occasional thorough wiping with a solution of baking soda and water keeps the inside fresh. TO CLEAN THE OUTSIDE We recommend against using cleaners with ammonia or alcohol, as they can damage the appearance of the microwave oven. If you choose to use a common household cleaner, first apply the cleaner directly to a clean cloth, then wipe the soiled area. NOTE: Be certain the power is off before cleaning any part of this oven.
LIGHT BULB REPLACEMENT LIGHT Cooktop Light BULB REPLACEMENT Oven Light I Replace the burned-out bulb with a 40-watt incandescent bulb (WB36X10003), available from your nearest Sears Parts & Repair Center. Call 1-800-4-MY-HOME _. Replace the burned-out bulb I with a 40-watt incandescent bulb (WB36X10003), available from your nearest Sears Parts & Repair Center. Call 1-800-4-MY-HOME _, I 1 To replace the bulb(s), first disconnect the power at the main fuse or circuit breaker panel or pull the plug.
THE VENT FAN REMOVING AND CLEANING THE FILTER Charcoal Fiffer (on some models) To remove, slide it to the rear using the tab. Pull it down and out. Reusable Grease Filters (on all mcdels) To clean the grease filter, soak it and then swish it around in hot water and detergent. Don't use ammonia or ammonia products because they will darken the metal. Light brushing can be used to remove embedded dirt. The vent fan has 2 metal reusable grease filters.
CHARCOAL FILTER To Install The charcoal filter cannot be cleaned. It must be replaced, Order Part No. WB2X9883 available from your nearest Sears Parts & Repair Center, Call 1-800-4-MY-HOME Charcoal Filter To install a new filter, remove plastic and other outer wrapping from the new filter. _. If the model is not vented to the outside, the air will be recirculated through a disposable charcoal filter that helps remove smoke and odors.
PROBLEM CAUSED BY SOLUTION Microwave will not start • A fuse in your home may be blown or the circuit breaker tripped. •Replace fuse or reset circuit breaker. • Power surge. • Unplug the microwave oven, then plug it back in. • Plug not fully inserted into wall outlet. • Make sure the 3-prong plug on the oven is fully inserted into wall outlet. •The cooktop light is located below the oven floor. When the light is on, the heat it produces may make the oven floor get warm. .This is normal.
THINGS THAT ARE NORMAL • Steam or vapor escaping from around the door, • TV-radio interference might be noticed while using the microwave Similar to the interference caused by other small appliances, it does not indicate a problem with the microwave. Plug the microwave into a different electrical circuit, move the radio or TV as far away from the microwave as possible, or check the position and signal of the TV/radio antenna. • Light reflection around door or outer case.
Microwave Hood Combination Warranty ® FULL ONE YEAR WARRANTY ON MICROWAVE HOOD COMBINATION For one year from the date of purchase, if this Kenmore Microwave Hood Combination fails due to a defect in material or workmanship, Sears will repair it free of charge. FULL FIVE-YEAR WARRANTY ON THE MAGNETRON For five years from the date of purchase, if the mangnetron in this Kenmore Microwave Hood Combination should fail due to a defect in material or workmanship, Sears will repair it free of charge.
Master Protection Agreements Congratulations on making a smart purchase. Your new Kenmore _product is designed and manufactured for years of dependable operation. But like all products, it may require preventive maintenance or repair from time to time. That's when having a Master Protection Agreement can save you money and aggravation. Once you purchase the Agreement, a simple phone call is all that it takes for you to schedule service.
LEA TODAS INSTRUCCIONES DE SEGURIDAD ANTES DE USAR ESTE APARATO. A Por su seguridad, la informaciSn contenida en este manual debe seguirse para minimizar el riesgo de incendio, explosi6n o para evitar daSos a la propiedad, lesiones personales o p6rdida de vida. PRECAUCIONES PARAEVITAR No Intente operar este homo con la POSIBLE puerta abierta ya EXPOSICION A UNAEXCESIVA ENERG[ADE MICROONDAS. que esto podria resultar en una exposiciSn a energia microondas daSina.
Instrucciones deseguridad importantes Problemas y soluciones comunes del microondas Problemas y seluciones ......... Cosas nermales de su home de rnicreendas ............... Precauciones para evitar posible exposici6n a una excesiva energia de microondas ............... 32 Instrucciones de seguridad importantes ............... 34-38 Instrucciones de toma de tierra ...38 Soporte al consumidor Numero de modelo y de serie .... Garantia .................... Contrato de protecci6n maestra...
iADVERTENCIA! Cuando use electrodomdsticos, incluyendo las siguientes: debe seguir precauciones • Lea y obedezca las precauciones especificas en la secciSn de Precauci6nes para evitar posible exposici6n a una energia excesiva de microondas en la pAgina 32. • Este electrodom_stico debe estar conectado a tierra. Con6ctelo s61o a una toma de corriente con toma de tierra. Vea la secci6n de Instrucciones de toma de tierra en la p&gina 38. • No monte este electrodom_stico sobre un fregadero.
NOTAS ESPECIALES SOBRE EL USO DEL MICROONDAS FORMACION ELECTRICO DE ARCO Si ve que se forman arcos electricos, presione el boton STOP/CLEAR y resuelva el problema. Arco el6ctrico es Io que, en la terminologia de los microondas, describe las chispas en el homo. El arco el6ctrico se produce cuando: • Hay un metal o papel de aluminio tocando el lateral del homo. • El papel de aluminio no estg. envolviendo bien la comida (hay bordes doblados hacia arriba que act6an como antenas).
NOTAS ESPECIALES SOBRE EL use DEL MICROONDAS (continuaci6n) COMIDAS UTENSILIOS DE COClNA PARA MICROONDAS (continuacibn) • No caliente la comida del beb_ en jarras de cristal, incluso si est&n destapadas. AsegSrese de que los alimentos de los alSos est_n bien cocinados. Remueva la comida para distribuir el calor de forma pareja. Tenga cuidado de que el also no se queme al calentar la leche de fSrmula. El contenedor puede parecer m&s frio de Io que realmente est& la f6rmula.
NOTAS ESPECIALES SOBRE EL USO DEL MICROONDAS (continuaci6n) UTENSILIOS DE COCINA PARA MICROONDAS (continuaci6n) • No todofilm p!_.sflcopuede usarse en homes microandas. Revise el uso adecuado del paquete. • Pueden usarse papel toella, papel encerado y film pt&sticopera los recipientes de forma que retengan la humedad y pare prevenir salpicaduras. AsegSrese de proveer una forma de ventilaciSn para que el vapor pueda escaper del film pl_stico.
NOTAS ESPECIALES SOBRE EL USO DEL MICROONDAS (continuaci6n) EL VENTILADOR EXTRACTOR (continuacibn) del microondas est& funcionando. Para minimizar el funcionamiento del extractor autom_tico, use utensilios de cocina de tamaSo adecuado y use el fuego r&pido en las unidades de la cocina (fogones) s61o cuando sea necesario. • Nunca deje las unidades de la cocina (fogones) bajo su microondas sin atenci6n cuando se est6 trabajando a altas temperaturas.
NOTA: El aspecto y las caracteristicas varian segdn el ndmero de modelo. 950 Watts 1 Mango de la puerta. Tire de ella para abrir la puerta. La puerta debe estar debidamente cerrada para que el microondas funcione. 2 Enganches de la puerta. 3 Ventanilla con cobertura metdlica. La pantalla permite que usted pueda vet Io que cocina, al tiempo que mantiene las microondas confinadas en el homo. 4 Panel de visualizaci6n de toque. 5 Luces de la estufa. 6 Filtros para grasa. 7 Plato movible.
Los controles del horno microondas (En este manual, las caracterfsticas Ueted puede cocinar en el microondas por tiempo, temperatura o con las funciones de conveniencia. y el aspecto de su modelo pueden variar.) 3_)Asdd_. Auto)Time Defrost minute cook 1-6 ®®® ®®® ®®® Cook Power TimB j di Funciones ff del tiempo Cocci6n por tiempo Presione Entre COOK TIME I & II (cocci6n por tiempoI & II) (Presbne una o dos veces) Cantidad de tiempo de cocci6n.
GUIA EN EL DEL MICROONDAS GUiA EN EL LIBRO • Cocci6n Antes de empezsr, revise la gufa que se encuentra al interior del horno cuando • Tiempos para descongelar se abre la puerta, • Recalentamiento Popcorn Beverage .... autom_tico Auto Reheat Aut0/_me Defrost Funciones de conveniencia Presione Entre Opcion POPCORN (rosetasde maiz) iOomienza inmediatamente! M_s/menos tiempo porcion BEVERAGE (bebidas) iComienza porcion inmediatamente! AUTO REHEAT Tipo de atimentos 1-6 (recslentarautem.
Cambio el nivel de potencia Power Losnivelesde potenciavariablesampliansus posibilidades decocci6nen el microondas.Los nivelesdepotenciaen el homode microondas puedensercomparados conlasunidades de superficieee un rango.Alto(nivelde potencia 10) o a capacidad m_ximaesla formam_isr@ida de cocinary le daun 100%depotencia.Cada nivelde potenciale proporciona energia microondasunciertoporcentaje deltiempo. El eivelde poteecia7 esenergiamicroondas 70%deltiempo.
Las funciones de tiempo COOK TIME (Cocci6n pot tiempo) Cook•_ _m _ @ ® ® ® ® ® Cook Time I (Cocci6n por tiempo I) Le permite cocinar por cualquier lapso hasta 99 minutos y 99 segundos. El nivel de potencia 10 (Alto) est& ajustado autom&ticamente, pero usted puede cambiarlo si desea mayor flexibilidad. Usted puede abrir la puerta durante el COOK TIME (cocci6n por tiempo) para inspeccionar el alimento. Cierre la puerta y presione START (inicio) para reiniciar la cocci6n.
Guia por Cook Time (Coccidn por tiempo) NOTA: Use el nivel de potencia maxima (High) (10) a no ser que se indique Io contrario. Esp_rtagos De6a9 min. Med-Nto(7) De5a7 min. Paquote e En platosde homearoblongosde 1Vzcuartos, coloque1/4 de unatazade agua. Cazuelasde 1 cuarto. 10 onzas 1 lb.,cortados por la mitad Paquetede 10 onzas De9a11 min. Encazuelas de1_ cuartos,coloque1/2taza Paquetede 10 onzas De6a8 min. 1 manojo De17 a 21 min.
/ffMz (_#_g__d_)I0 Paquete de onzas De5 a 7 min. Encazuelas de 1 cuartodelibras, coloque2 cucharadas deagua. De1 a 5 mazorcas Paquete de I 0 onzas De3a4 min, Coloqueel maizen un platode hornear pormazorca oblongode 2 cuartos,Si el maizest_en mazorcas no useagua,si hasido desgranado agregueI/4 de agua.Cambie de posici6ndespu6s detranscurrido la mitad deltiempo. De5a6 min, Coloqueel maizen un platode hornear oblongode 2 cuartos. De3a4 min, Cubraconunaenvolturapl&stica.
Las funciones de tiempo A.
Guia de descongelamiento ! min. De3a5min. De 6a 8 rain. ,5 a 7 rain. Coloque los pedazosen unacacerola.Volteey desmembredespots de transcurrido lamitad del tiempo. De 3 a6 rain. De 2 a 5 rain. De2a5min. De 5 a 7 rain. De 12 a 16 rain. Coloqueel paqueteno abierto en el homo. D_jelo descongelarpor 5 minutos. Coloqueel paqueteno abierto en el homo. Cocineen el microondas bastaque se puedanseparar.D6jelos reposar pot 5 minutos, si es necesario,para completar la descongelaci6n.
Las funciones de tiempo MINUTE (Cocci6n a/ minuto) COOK Las funciones conveniencia POPCORN Esta es una forma rapida de ajustar el coccion por tiempo de I a 6 minutos. ® ® (Rosetas de mafz) POpcorn minute cook 1_ ® ® de ® ® ® (menos tiempo) Presione uno de los botones de Minute Cook (cocci6n al minuto) (de 1 a 6) para un cocci6n por tiempo de 1 a 6 minutos en el nivel de potencia 10. Por ejemplo, presione el bot6n 2 para 2 minutos de cocci6n por tiempo.
Las funciones conveniencia de AUTO (Recalentar autom.) REHEAT _uto Reheat ® La funci6n de AUTO REHEAT (recalentar autom_tica) recafienta de 1 a 3 porciones de alimentos a servir que ya ban sido cocinados. ® START 1 Presione AUTO REHEAT (recalentar autom.). NOTA: El tama_o de la porcion puede cambiar despues de que el homo inicia. Presione los botones 2 6 3, El tama_o de la porcion para los alimentos tipo 6 no cambian.
Las funciones conveniencia de u_.f,=st ® ® ® AUTO DEFROST (Descongelaci6n Autombtica) La funci6n Auto/Time Defrost (descongelaci6n autom_tica/de tiempo) le permite dos formas de descongelar alimentos. Presione AUTO/TIME DEFROST una vez para Auto Defrost (descongelaci6n autom_tica) o dos veces para Time Defrost (descongelaci6n de tiempe). ® ® @ ® ® ® ( START Use Auto Defrost para carnes, aves y pescados y Time Defrost para ]a mayoria de los dem&s alimentos congelados.
DISPLA Y ON/OFF Otras funciones que su modelo podria tener Recordador terminada (Encendido/apagado de coccion Para recordarle que usted tiene alimentos en el homo, el homo mostrar& "END" y har& un pitido una vez por minuto hasta que usted abra la puer_adel homo o presione STOP/CLEAR (apagar/borrar). CLOCK Para apagar la pantalla del reloj, presione y sostenga 0 por aproximadamente tres segundos. Para volver a visualizar el reloj, repita.
VENTILADOR Otras funciones que su modelo podria tener START/PAUSE ® finicio/pausa) El ventilador absorbe el vapor y otros humos provenientes de la superficie de la estufa. START : Presione una vez para velocidad alta del ventilador, dos veces para velocidad baja o una tercera vez para apagar el ventilador. Ademg.s de iniciar muchas funciones, START/PAUSE (inicio/pausa) le permite detener la cocci6n sin operar la puerta o sin borrar la visualizaci6n.
Tdrmino Definicibn Arco electrico El arco el_ctrico es Io que, en la terminologia de los microondas, describe [as chispas en el homo. El arco ei_ctrico se produce cuando: • hay un metal o papel de aluminio tocando el lateral del homo. • el papel de aluminio no est& envolviendo bien la comida (hay bordes doblados hacia arriba que actt3an come antenas). • hay algt3n metal, come cintas de cierre con metal, pinches de polio, o plates con decoraci6n de ore.
Consejos practicos Como limpiar Para mantener el interior fresco p&sele un paso con una soluci6n de agua y bicarbonato s6dico de cuando en cuando. No recomendamos el use de limpiadores con amoniaco o alcohol, ya que pueden dahar el aspecto del homo microondas. Si opta per usar un limpiador casero, primero aplique el limpiador directamente en un paho limpio, luego limpie el drea sucia.
C6mo reemplazar Luz de encimera las bombillas C6mo reemplazar Luz del horno Reemptace la bombilla quemada con una bombilla incandescente de 40 vatios (WB36X10003), disponible de su Sears Parts & Repair Center (Centre de las piezas y reparaci6n) ceracano. Llame al 1-800-4-MY-HOME% Reemplace la bombilla quemada con una bombilla incandescente de 40 vatios (WB36X10003), disponible de su Sears Parts & Repair Center (Centro de las piezas y reparaci6n) ceracano. Llame al 1-800-4-MY-HOME ®.
Ventilador extractor Como quitar y limpiar Filtro de carb6n vegetal (en aigunos modelos) los filtros L' Para quitarlos, usando las lengLietas, deslfcelos hacia atr&s. Estire hacia abajo y afuera. Filtros de extractor reutilizables (ent_los losmc6elos) La ventilador extractor tiene dos filtros de metal reutilizables. Los modelos que hacer recircular el aire de nuevo a la habitaci6n usan un filtro de carb6n vegetal.
Filtro de carbon vegetal C6mo instalar el filtro de carb6n vegetal Para instalar un nuevo filtro de carb6n vegetal, retire el pl&stico y cualquier otro envoltorio del nuevo filtro. El filtro de carb6n vegetal no puede limpiarse. Debe cambiarse por otro. Pida el recambio No. WB2X9883, disponible de su Sears Parts & Repair Center (Centro de las piezas y reparaci6n) ceracano. Llame al 1-800-4-MY-HOME ®.
Problema El homo no se pone en mamha Posibles causas Qu_ hacer • Puede que se haya fundido un fusible de su casa o que haya saltado el diferenciaL • Cambieel fusibleo reconecteel diferenciaL el homomicroondasde la corriente • Apag6n de corriente. • Desenchufe y vu_lvaloa enchufar. • El enchufe no est_ completamente insertado en ]a toma de corriente de la pared.
Cosas normales microondas de su homo • Pueden notarse interferencias en la TV/radio cuando el microondas est& en marcha. Esto es parecido alas interferencias causadas por otros electrodom_sticos pequeSos, no es indicativo de ningt3n problema con el microondas, Enchufe el microondas a otro circuito el6ctrico, mueva la TV tan alejada del microondas como sea posible o revise ]a posiciSn y la seSal de la antena de la radio o TV, • Sale vapor de agua de alrededor de la puerta.
Garantfa para la combinaciGnde campana y homo microondas ® GARANTiA COMPLETA POR UN Al_lO DE LA COMBINACI6N Y HORNO MICROONDAS DE CAMPANA Por un aSo a partir de la fecha de compra, siesta combinaci6n de campana y homo microondas marca Kenmore falla debido a un defecto material o de mano de obra, Sears Io repararg, sin costo.
Contrato maestra de protecci6n Felicitaciones per su compra inteligente. Su nuevo producto Kenmore ester disefiado y fabricado para muchos aSos de operaci6n confiable. Sin embargo, al igual que todos los productos, puede requerir de mantenimiento o reparaci6n preventivas en cualquier momento. Es ahi cuando el contrato de protecciSn maestra te puede ahorrar dinero y motestias. Una vez adquiera el contrato, solo necesita una Ilamada telef6nica para programar el servicio.
Your Home For repair-in your home-of all major brand appliances, lawn and garden equipment, or heating and coolingsystems, no matter who made It, no matter who sold It! For the replacement parts, accessoriesand owner's manualsthat you need to do-it-yourself. and itemslike garage door openers and water heaters. 1-800-4-MY-HOME _ (1-800-4694663) Callanytime,dayornight(U.S.A.andCanada) www.seara.com www.$eara.