Use & Care Guide Manual de Uso y Cuidado English / Espafiol Models, Modelos: 407.53571 I enmore Dehum°di er with externa_ Deshumiditlcador con bomba ÷xterna Sears Brands Management Corporation Hoffman Estates, IL 60179 U.S.A. www.sears.com www.kmart.com www.kenmore.
Package Contents ................................... ..........2 Warranty ........................................................... 2 Safety instructions............................................3 Electrical Requirements ..................................4 Installation ........................................................ 4,5 Key Features .................................................... 5 Control Panel ................................................... 6 Water Disposing Options .................
IMPORTANT CAUTIONSFOR USING YOUR DEHUMIDIFIER. To reduce the risk of fire, elect_cal shock_injury_or damage to the dehumidifiers, these safety precautions mustbe followed: Safety • Do not place the power cord near a heater. • Do not use an electrical outlet near flammable or combustible materials such as gasoline, propane, paint thinners, etc. • Do not disassemble or modify dehumidifier parts or components. shock and failure. It may cause electric Plug in the power cord properly.
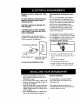
OBSERVE ALLLOCAL CODES AND ORDINANCES. RECOMMENDED GROUNDING METHOD For your personal safety, this appliance must be grounded. This appliance has a power supply cord with a 3-prong grounded plug. To minimize possible shock hazard the cord must be plugged into a matching grounded electrical outlet that complies with the latest edition of the National Electrical Codes and all local codes and ordinances.
AUTOMATIC CHOOSING THE PROPERLOCATION • Use the dehumidifier: • in the basement to help prevent moisture damage. • tn the kitchen, laundry room, bathroom, and spa/exercise areas that have excessive moisture. • SHUT OFF When the bucket is full, or when the bucket has been removed, the compressor will automatically stop. The fan will continue to run to dehumidify for 3 minutes. Then the Bucket Full indicator will flash and you wil! hear a ten second audible alarm.
(8) (s) (g) (2) POWER ON/OFF(1) Once the unit is plugged in, the POWER INDICATOR (10) will light. Pressing the POWER button once will turn the unit ON and illuminate the digital display (9). The fan will operate for 3 minutes to draw air through the dehumidifier to properly sense relative humidity. The display will show the humidity level of the room in 5% increments, down to a minimum of 25%. Pressing the Power button again will turn the display OFF and the unit will cease operating.
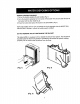
OPTION 1"EMPTYING MANUALLY 1. Pull out the bucket, grasping the side handles. (Fig. 1) 2. Carry the bucket by grasping the front corner of the bucket with one hand and the back of the bucket with the other hand( Fig. 2) 3. Empty the bucket and replace the bucket in the dehumidifier. (Fig. 3) NOTE: Dehumidifier will not work and settingscan not be changed when the BUCKETFULL indicator light is flashing or without the bucket properly installed.
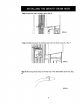
Step 2= Open the drain connector door. (Figl 6) I I ] 1 l (FIG. 6) Step 3= Install and secure the drainage joint onto the drain connector. (Fig. 7) (FIG. 7) Step 4= Place large hose clamp on the fiat end of the dehumidifier drain hose. (Fig. s) / (FIG.
Step 5- Insert the drain hose onto the drainage joint so that it is fully seated. (Fig. 9) (FIG. 9) Step 5; Secure hose by pushing large hose clamp towards the drainage joint. (Fig. lo) ! r _'__ (FIG. 101 Step 6. Place bucket in the dehumidifier for operation. (Fig. 11) (FIG.
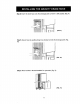
OPTION 3: EXTERNALVERTICAL PUMP INSTALLING THE _RNAL PUMP Step 1: To install Dehumidifier Drain Hose, refer to Gravity Drain Using Dehumidifier Hose instructions starting on page 9. Step 2= For optimal operation, it is recommended that the pump is placed on a fiat and level location. Attach the water pump to a wall or other perpendicular fiat surface with the included screws for security. (Fig. 12) Step :3. Remove red cap from drain hose connector on pump.
Step 4= Insert pump drain hose onto pump connector until it is fully seated. Secure hose by pushing small clamp forward towards the pump. (Fig. 14) \ \ ! /t (FIG. 14) Step 5. Secure hose by pushing small clamp forward the pump. (Fig. 15} towards fi tt (FIG. 15) Step 6. Insert the angled end of the dehumidifier drain hose into the water pump tank. (Fig. 16).
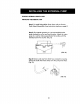
NOTE- Make sure the drain hose is lower than the horizontal plane of the drain on the dehumidifier as seen in the illustration below. Drain hose should be as short as possible and all kinks in the drain hose should be eliminated for proper pump operation. i i 3ft. Dehumidifier Drain Hose i ! | (FIG, t7) NOTE- If you need to cut the dehumidifier drain hose, only cut on the fiat end of the hose. Do not cut the angled end as it is designed for insertion into the pump. 4 CUT DO NOT CUT J X 1.
CLEANING THE AIR FILTER After 250 hoursof operation the FILTER RESETindicator will light up to remind you to clean and change the air filter. it is recommended to periodically check the filter for excessdirt even if the FILTER RESETindicator is off. 1. To remove the air filter, press the two filter tabs and pull the filter holder away from the back of the unit. ....2. Remove the filter and clean with warm, soapy water. Rinse and allow the filter to dry before placing back in the unit. 3.
Problem Dehumidifier does not start. PossibleCauses Solutions The dehumidifier Make sure the dehumidifier's is un- p[ug is pushed com- plugged. pletely into the outlet. The fuse is blown / circuit breaker is tripped. Check the house fuse / circuit breaker box and Dehumidifier has reached the user set humiditylevel or the bucket is full. The dehumidifier Bucket is not in the proper position, The bucket must be in place and securelyseated for the dehumidifier to operate. Power Failure.
i.I....... ,,,...,r ............. Problem Dehumidifier runstoo much Posdble Causes Solutions The area to be dehumidified is too large. The capacity of your dehumidifier may not be adequate for the room size. Doors and windows are open. Close all doors and windows to the outside. Frostappears on the coils The dehumidifier has recently been turned on or the room temperature is below 41°F. Thisis normal. Frostwill usuallydisappear within 60 minutes.
Error Code Error Type F1 Ambient Temperature Sensor Malfunction Possible Cause Corrective Action ,,ll H 1. Sudden Change in the surrounding temperature. 1. 2. 3. 2. Faulty Sensor F2 Pipe Temperature Sensor Malfunction 4_ Removal iiml 53571 ITEM # Moisture , 70 Pints per day per 24 hours (32.9 Litersper day) PowerConsumption (W) 745 Watts BucketCapacity 17 Pints(8 Liters) PowerSource 115V / 60 HZ RatedCurrent (Amps) 7,3A SoundPressureLeveldB(L/M/H) 45/47/49 dB(A) Weight 47.
Pump capacity 304 pints per day per 24 hours ,,,,,u,,,,,, Vertical Height 16 ft. Pumping i,l,,,,, L Power Source 115v / 60 HZ Rated Current (Amps) ,12A Dehumidifier Drain Hose Diameter .50 in.
Master Protection Agreements Congratulations on making a smart purchase. Your new Kenmore® product is designed and manufactured for yearsof dependable operation. But like all products, it may require preventive maintenance or repair from time to time. That's when having a Master Protection Agreement can save you money and aggravation. The Master Protection Agreement also helps extend the life of your new product.
Contenidos de la Caja .............................................19 Garanffa ................................................................... 20 Instrucclones de Seguridad.....................................20 RequisitesEl_ctficos............................................... 21 Sacando la Bomba del Contenedor. .....................22 Instalaci6n ................................................................ 23 Caracter/sficas Importantes ..................................24 Panel de Control.......
PRECAUCIONES IMPORTANTES CUANDO USE SU DESHUMIDIFICADOR. Para reclucir el riesgo de incendior descarga el_=trlca, lesiones o dafio a los estas precaucJones de seguridad se deben seguir: Seguridad • No coioque el cable el_ctrico cerca de un calentador. ° No use un tomacorriente cerca de materiales combustibles o inflamables como gasotina, gas propano, disolvente de pinturas, etc. • No desarmar o modificar partes o componentes det deshumidificador.
OBSERVE TODAS LAS ORDENANZAS Y METODO DE CONTACTO TIERRA RECOMENDADO CODIGOS LOCALES. Para su secjuridad personal, este electro domestico debe tener contacto tierra. Este electrodom_st|co tiene un cable de suministro eI6ctrico con 3-clavijas con contacto BAJO NINGUNA ClRCUNSTANCIA, REMUEVA O QUITE LA PATILLADE CONTACTO TIERRJ_DEL CABLEDE SUMtNISTRO ELECTRICO. tierra.
Paso 1=Saque el contenedor del deshumidificador (Fig. 1) Paso 2: Localice la manija. Saque la manija del contenedor tirando tigeramente de un lado del soporte de-la manija y ievante la manija. (Fig. 2) Paso 3: Quite la cinta adhesiva protectora. Empuje las cejillas traseras del contenedor hacia adentro y levante el cobertor del contenedor. Saque la bomba, mangueras, y la bolsa que contiene las abrazaderas ba, y el conector de drenaje.
Antes de la instalaci6n, saque la bombay los accesorios Iocalizados dentro del contenedor del cleshumidificador ELIGIENDO LA UBICACION ADECUADA Use el deshumidiftcador: (ver pagina 5). lnstale el deshumidificador sobre un piso nivelado y Io suficientementefuerte para soportar la unidad con el contenedor de acjua Ileno. O en el s6tano para ayudar dafios por la humedad.
Deshumidificador Cable de Suministro El_ctrico Manguera de 16 pise para Bomba de Drenaje Manguera de 3 pies para Drenaje del Deshumidiflcador Contenedor Bornba Vertical 1 Ruedas Compartimlento para Filtro Lavable Panel de Control Manija I Cable de Suministro El_ctrico 24 Puerta de Conector para Drenaje Continua
(1.0) (11) (4) (5) (2) (3) POWER (ENCENDIDO/APAGADO) (I) Cuando la unidad esta conectada, el indicador POWER (10) se encender6. Presionando el bot6n de POWER una vez eneender_= la unidad (ON) iluminado la pantalla digital(g). La pantalla mostrara el ntvel de humedad en la habitaci6n en incrementos del 5% hasta ltegar a120%. Presionado el bof6n de POWER de nuevo apagara la pantalla digital (OFF) y {a unidad dejara de funcionar.
OPCION b VACLAR MANUALMENTE 1. Saque el contenedor de aguat acjarrando 2. Lleve/transporte el contenedor las manijas de los tados. (Fig. 1) de agua acjarrando la esquina frontal con una mano y ta parte trasera del contenedor con la otra mano. ( Ficj, 2) 3. Vacfe el contenedor y col6quelo de nuevo en el deshumidificador. (Fig. 3) NOTA_ El deshumidificador no funclonara cuando la luz indicadora de contenedor Ileno (BUCKET FULL) esta encendtda o si el contenedor no esta colocado apropladamente. (Fig.
Paso 2= Abra la auerta det conector de drenaje. (Fig. 6) i 1 I ! i i := = (FIG. 6) Paso 3: Instale y asegure la uni6n de drenaje al conector i de drenaje. (Fig. 7) l • Uni6n de Drenaje (FIG, 7) Paso 4: Coloque manguera la abrazadera de drenaje grande para manguera del deshumidificador. al extremo final piano de la (Fig. 8) 9 ...... _ _ j" S I 2 (FIG.
Paso 5: lnserte ia manguera de drenaje a to uni6n de drenaje para que este completamente asentado. (Fig. 9) II !I ii !!ili ili!_:,_,-41i(FIG. 9) Paso 6= Asegure la manguera empujando la abrazadera hacia la uni6n de drenaje. (Fig. 10) grande para manguera (FIG. 10) Paso 7-- Coloque el contenedor en el deshumidificador para su funcionamiento. (Fig. 11) (FIG.
OPCION 3: INSTALANDO LA BOMBA EXTERNA Paso 1: Para instatar ia Manguera de Drenaje del Deshumidificador, refi_rase alas instrucciones de Drenaje por Gravedad Usando la Manguera del Deshumidificador en ia pagina 9. Paso 2: Para el optimo funcionamiento, se recomienda que la bomba sea colocada sobre una superficie plana y nivelada. Atornille la bomba de agua a una pared o alguna otra super..... Écie plana perpendicular usando los tornillos para mayor seguridad. (Fig. 12) ii Tomillos ' ii (FIG.
Paso _- Inserte la manguera de drenaje de ta bomba en el conector de la bomba hasta que este completamente asentada. (Fig. 14) Paso 5: Asegure la manguera empujando la abrazadera pequefia hacia adelante en direcci6n de la bomba.(Fig. 15) J ...... I!FI Jr (FIG. 15) Paso 6.. Inserte el extremo angulado de la manguera de drenaje dei deshumidiflcador en el tanque de la bomba de agua. (Fig. 16). (FIG.
NOTA= Aseg0rese de que la manguem de drenaje esta mas aba]o del piano horizontal del drenaje en el deshumidificador como se muestra en la ilustraci6n de abajo. La manguera de drenaje debe ser Io mas corta posible y los dobleces se deben eliminar para el funcionamiento apropiado de la bomba. Manguera de 3 pies para Drenaje del Deshumidiftcador (FIG. 17) NOTA= Si usted necesita cortar la manguera de drenaje, solamente corte del extremo piano de ta manguera.No ser insertado en la bomba.
LIMPIANDO ELFILTRO DE AIRE Despu6s de 250 horas de usa el indicador de reajustar el filtro (FILTER RESET)se encender6 para recordarle a usted de limpiar y/o cambiar el filtro de aire. ADVERTENCIA • Desconecte el cable de suministroei6ctrico del tomacorriente antes de efectuar cualquier mantenimiento. Se recomienda revisar peri6dicamente el fittro par exceso de polvo y suciedad aunque la luz indicadora de reajustar filtro (FILTER RESET) este apagada.
,,,,, Soludones PoslblesCausas i i ..... El deshumidiflcador enchufado no esta 1,, i l ll.i i i .i,.,, circuito se disparo • en los fuslbles da_ados .. i.. i IH El deshurnidiflcador ha otCanzado el nivel configurado par el usuarlo o el contenedor esta lieno. , .m H. Revise la caja de fusibles y remplace reinicie el circuito. El fusible esta fundido/et .i H.. Aseg(irese qua el enchufe esta insertodo comp|etamente el tomacorr[ente.
,/, ,,./,,u,,,.,, Soluciones Posibles Causas Problema i..i i_lmt Deshumidificador sobrecargado i/i ..i.tl ,i.H. J ii Hay hielo/escarcha en las bobinas ii. Puertas y ventanas est=_nabiertas. Cierre todas las puertas y ventanas. El deshumidificadorfue recientenente encendido o la temperatura del cuarto es menos de 41°F. Esto es normal, El hielo usualmentese desaparece dentro de 60 minutos, i i.i..
,,, , ,,,,,,,, C6cligo por Error • H, i. i iill F1 Acd6n Correctlva Poslbles ¢ousas Tipo de Error Falla en el Sen- 1. Cambio repentino en la temperatura sor de Temperatura AmbienambientaL tal 1. 2. nos de temperatura. 3. ii1,1,1i F2 4. Falla en el Sensor de Temperatura de la Bobina de Evaporaci6n 2. Sensor Defectuoso iiiii iii ii Desconecte la unidad.
Altura Vertical de Bombeo 16 pies LI Fuentede Poder 115V / 60 HZ .12A Corriente (Amperios) Di6metro Interno de la Manguera Deshumidificador de Drenaje del .50 in. / 13 mm Di6metro Interno de la Manguera de Drenaje de ta Bomba 36 .
Acuerdo de Proteccibn M&ster Felicitaciones por hacer una compra inte/igente. Su nuevo producto Kenmore® esta diseSado y fabricado para darle aSos de uso confiable. Pero como todos los productos, podria requedr mantenimiento preventivo o reparaciones de vez en cuando. Es ahi cuando el poseer el de Acuerdo de Proteccibn M_ster le puede ahorrar dinem y evitar molestias. El Acuerdo de Protecci6n M_ster tambi6n le ayuda a extender la vida _til de su nuevo producto.
You:r Home managemylife www_managemytife.c om For repalr-:in.yoorhome-of all major brand:_l_ces, lawn and:garden-equipment, or heating _nd?_oling __ no matter who made it, no matter who Sold :it] For:the.replacement p_, acce_ories and owne#s: manuals-that you need to:do-ib¥outself. For Sears professional i.s_allation ofliome._pl!ances and: _ms l_e g_ge door openers and watei'-h_ers, I:,800_MY-HOM_ Carl anytime_ day or night www._;e_rs.