
Double Oven - Kitchen Range User Manual


'ARNING
,RESlJ_E 11tE RISK OFFIRE, ELECTRtoAL SHOCK, ORINJURYTO PERSONS,OBSERVETHE
U<mllds unit only In the mm'r_ intended by the meryJleC_rm,. If you ha',,i questS-a, monist lhe
manufacbJr_adthe addmu or telephone_ tk_d in thewarranty+
8e4_ m'_<::ingo+"_',elmlng u,nlt, swlv_ power off il ram,lee panel and lock se_k:e _ _ _
ix_w hornbeings_,_tc_ed_ Kddomaly.
Inaldldon wod_and etocttk_dwkklg mt_t bedone by a qualifiedperson(s)kl acooldancevdth811
applc_e codesand _, toctodk_ flr_mted constructioncodesandstm-Jdan;_s.
Sumdom ak b needa4 f_xproporcombusttonande_ of gamintl_ the flue (chknney)
of fL.q4buntingequIpmeqtto preventbackdraffirlg,Foltowthe heatingequipmentmanufacturer's
_d salary_andar_ such as6_osepublbhedbythe NationalF_ Protectk_Assoc_on
and the Arnedcan Society for Heal_ng,Ralrlgemliofl and Air _ing Engineers
), and thelocal codaauthodaes.
Whencut6ngo( drillingintowaltorceiling,donotdamageeleclricatwtringand otherhiddenutilitk_.
Ouctedfans mustalwmysbe venteclto the outdoors.
TOreducethe r;akof tim, useDillymetal duclv._'k
this urdtmustbe grounded.
_E THE RiSK OF A RANGE TOP GREASE FIRE:
<eep fan, filtersand grease_ surfaces clean.
Mwaystom hood ONwhen cooldngat highheat.
,MI hlgh rangeseeingson rangeonlywhen necessar/. Heatoqstowiyon _w to medkJmseff_.
'::,_:*_'tleavlp_ u,-,adondedwhen_kl_.
J.kmtysusecool.ram and utensMsappmpdate forthe _oe end8mountof tood beingpredated,
WARNING
ltlRE,TO REDUCETHE R_K OF tNJURY TO PERSOMS INTHE EVENT OF A RANGE TO_ GR_ REOBSERVETHE FOLLOWING:*
1. SMOTHER F1JCdESw_ a ¢_m_e.rddoglid,¢ooldasheet,or metaltroy,_en tom oltI_,_el_,_
CAREFUt.TOPREVENTBUFFS, fithel_'_.,es donotge outk_4_etely, EVAC_JATEAND CAIJ_
THE FIRE DEPARTMENT.
2, NEVER FICK UP A FLAMIN_ PAN - Youmey bet_Jmed.
3. DO NOT USEWATER, indnding we_dishckxtteeor towels - sviokmtsteamexploslo_wlu_uit.
4. Use s exlk_ulsherOi_.Y il:
A.You knowyou havee Ctoss/_JBCex':lngelshe_end you alreadyknowhow tooperateR.
S. "i_eIke is sinai andoot_l_ in thearea whereIt staded.
C. "n_etim dopertme*_isbeing_lto_
D,you canI_ght_e tim w_hyou_bec_ to a_ o_l_.
"Based o_"KRchenFIreufety T_" I_,shed byNFPA.
CAUTION
I. ForgeneralventHat_ ueeoNy.Donotusetoexhausthazardousorexptoslv_rm_,dalsa_ v_.
2+ To avoid motorbearing damage and noisy end_crun_dancdo Impellers. keep d=yw_ spray,
construcdondust,etc.off untt.
4, Pleese roads_'_ _ _ _ forfurther into_me_ end t_l_tmm.
)PERATING INSTRUCTIONS
;WITCHES
_e blower and the tight are €ontmlted by rotary
_ftcbes on the controf panel. The blower switch
s _ofid state speed control which turns "on" in
_eckx:kw_e diceofk)n. Tbe blower speed starts at
i_ lind dials down to obtatn efficient vapor
mtovel at the quidtost sbaed. The Ught swfich has
I_+ "rum it clockwise to the first poalhon
x normal lighting. Continue to the second posi-
on for a "night light".
:LEANING
Iwsys disconnect the electricity from the range
o_d bathm sanltdng, Kee9 your range hond dean
y mdng a miM de_ergent that is suitedte for clean-
_g painted surfaces. The power unit is designed
) he easily removed for cleaning. Be care_l
> band or damage the fins on the blade as this
,ouM put them out of balance.
Jumleum I_s m_ be washed in the _,
ut extremely caustic cleaning agents should be
_0k_ed as they will discokx the aluminum.
tenticss installations also use Clean Cooking
I Filters. Clean Cooking System Filters are
_ *md_d_e. Repface the filtors wbenever _ blue
_ bacomes _ clrty or discolered. Clean
_ookleg System I Filters will last up to tweh,e
_o_he with normal use.
_IGHT BULB REPLACEMENT
"he light bulb (not supplicd with hood) should be
"5watt maximum. The lens covering the bulb is
emoved by pressing the two extending tabs
ogetber until they release from the ret_ning clots,
TO REMOVE FAN ASSEMBLY
Be sure power Is disconnected. Remove filters.
Remo_e two screws holding motor bracket to range
hood and unplug tim assembly. Be careful not to
_dlow fan Msembly to drop when screws are
removed.
CONVERTING TO VENTLESS
1. Use a thin blade toof, such as a table knife, to
carefully pry off the cover plate located in the
center section of the control pared+ Discard the
Cover.
2. Order a #50183 Venfiess Fiher Kit, which con-
talcs one Clean Cool€rag System I filter, from
any Sears retail or cataleg More. Place the
Clean Cooking System I Filter under the
aluminum fiher, with the blue side next to the
fan blede. Tum the fiite,-retainer clip so that the
high end of the clip holds beth filters in place.
3. Discard the damper/duct connecto¢ assembly
supplied with the hood. It will not be needed for
the ventless version.
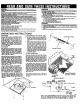
FILTER REMOVAL
Filters are removed by turning the filter retaining
blip to the side and lifting the filter or filters out. In
the vented version, tom the filter retaining clip to
one side and place the aluminum filter under the
embossed retaining tabs on the beck of the fan
housing. Turn the filter clip so that the low end of
the clip holds the single filter firmly in place.
In the wntles_s version, place both the aluminum
filter and the Clean Cool_ng System I Filter under
the tabe on the back of the fan housing. Make sure
that the blue side of the Clean Cooking System
Fltta¢is next to the fan blade. Turn the filter rntalne¢
clip so that the high end of the clip holds both filters
in place. Make sure that the Clean Cook:lngSystem
I Filter is next to the fan blade and the aluminum
filte_ is facing out.
NOTE: Make sure that the arrows on the filter re-
raining clip point toward the beck and the front of
the hood.
_COVERPLATE /j
(Clip in
high
ALUMINUM
FILTER
WIRING DIAGRAM
CLEAN COOKING
SYSTEM I FILTER
I
SQUEEZE
MOTOR
_IE Ea LIGHTSWITCH !_r/
MNO,LEX_BLKCONTROLIBLK!INTERNAL JUMPER
r-t.,j%_ L
.---, OR
WHT
LAMp
.... _ BLK
; _ _3Nd
{ : WHT
TAPED, HOOD
LEADS WIRING ,_'
Box
Note - If any of the original wire on the hood has to be replaced, it
should be replaced by wldng having equivalent insulation and
temperature rating (105°C Thermoplastic AWM, U.L. Listed).