USE & CARE MANUAL STOCK NO. 85951 KNOW YOUR UNI1 Read this booklet so you will be abale to enioy all the features in your Kenmore Microwave Oven: Sears Best Record in space provided below the Model No. and the Serial No. found on the label on the left side of the control panel. Kenmore MICROWAVE Model. Serial No. OVEN Use and Care No. Retain this information for future reference. P/N 12831 Sears, Roebuck and Co., Chicago, IL. 60684, U.S.A.
YOUR The Sears appliance. SAFETY FIRST Kenmore Microwave Oven. lhough simple to use, is no', a toy. Respect Become familiar with microwave energy, its uses and limitations. PRECAUTIONS TO EXCESSIVE TO AVOID POSSIBILE MICROWAVE ENERGY it as an electric cooking EXPOSURE (a) DO NOT ATTEMPT to operate this oven with the door open since open-door operation can result in harmful exposure to microwave energy. It is important not to defeat or tamper with the safety interlocks.
IMPORTANT When using electrical SAFETY appliances WARNING-To basic safety . Read all instructions precautions reducetheriskofburns, electric shock, fire, injury to persons excessive microwave energy: I. INSTRUCTIONS before or exposure to using the appliance. Read and follow the specific "PRECAUTIONS TO AVOID POSSIBLE EXPOSURE TO EXCESSIVE MICROWAVE ENERGY" found on Page 2. 3. As with most cooking appliances, close supervision is necessary to reduce the risk of a fire in the oven cavity.
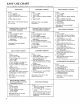
TABLE OF CONTENTS General Instructions • Location of Model Number Label ........................................................ 5 • Installation ............................................................................ 6 • Setting "Time of Day". 6 ................................................................. • Names of Oven Parts .................................................................. 7 • Oven Control 8 Panel .................................................................
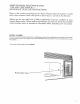
SEARS KENMORE MICROWAVE OVEN "USE AND CARE MANUAL"-MICROWAVE OVEN USE INSTRUCTIONS Enjoy a new cooking experience from Sears. Please read this booklet. It takes only a few minutes--time well spent to learn how to use all of the features. Advice on the use and care of Sears appliances is always available at your nearest Sears store. When seeking information, be sure you have the complete model number which is located on the plastic label. See below for its location.
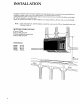
INSTALLATION Complete Installation Instructions are included in the separate instruction manual. If you have any question on installation, please contact your Sears sales person or local Sears Service Center. A mounting space of 33" or more from the surface of cooktop to the bottom of kitchen top cabinet, and at least 30" wide is required to mount the oven. When the Oven is first turned on after installation, the Display Window will flash until you touch CLEAR.
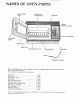
NAMES OF OVEN See-through door PARTS Easy-clean acrylic finish Grillwork system "Oven control Oven door handle Metal rack Glass tray Hood bottom cover Exhaust filters Temperature Please read "Requirements For Installation" section in Installation rest of contents from carton. Your Oven will be packed with the following: Glass Tray .................................. Metal Rack .................................. Temperature Probe .......................... Cookbook ...........................
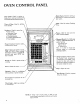
OVEN CONTROL PANEL Hold Warm--Used Id Warm. Cooked kept warm. Stop Time--Used in setting a Delay-Start cooking. be finished at the preset stop time. Time of Day--Used Time of Day. Time--Used in setting Numbers--Used to enter the: • Time of day. • Delay-start time. • Cooking times. • Cooking powers. • Cooking temperatures. • Food weight. Power Control--Used cooking power levels. \ to select ,Pause--Used tween cooking % \ Clear--Clears all entries except TIME OF DAY.
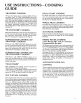
USE INSTRUCTIONS--COOKING GUIDE "HI-POWER" COOKING "HI" gives the highest power cooking possible with your microwave oven. It is the recommended setting for cooking foods with high moisture content or for cooking foods that need fast cooking to maintain their natural flavor and texture. Your Kenmore Microwave Cooking cookbook will tell you which foods are cooked best using the highest microwave cooking power ("HI"). For detailed directions on "HI" (maximum power) cooking, see Page 13.
EASY USE CHART Your state new solid control TIME OF system TIME "This "locks" clock running. you Io use your DAY To set: I,Touch CLEAR. 2. "]'ouch TIME OF DAY. 3. Touch numbers for correct day. 4, Touch allows i, microwave oven "HI-POWER" time o( OF DAY,* in the time and starLs the To set: 1. Touch 2 Touch 3. Touch time. 4 Touch in many ways. COOKING "MULTI-POWER" To set: CLEAR. TIME. numbers for desired cooking 1. Touch 2, Touch CLEAR. TIME. 3. Touch time. numbers START.
RECALL To Recall AND CHANGE OF SETTINGS a Setting To recall (check) a setting before you start the oven, follow the dil:ec!ions below. • To check the setting for a given stage, touch MEMORY/RECALL one or more times until the correct stage light and indicator light turns on. The set TIME or TEMP CONTROL for that stage will show in the display window. • To check the cooking power level, touch POWER CONTROL. To recall (check) a setting while the oven is operating, follow the directions below.
REGULAR TIMER Your oven also has a timer that can be used for noncooking functions. When used as a regular timer, the oven is not running. The timer is simply counting down in seconds. For detailed instructions on using this timer, see below. To I. 2. 3. 4. use the regular timer feature: Touch CLEAR. Touch TIME. Touch correct numbers for time. Touch POWER CONTROL. 5. Touch "0" (power level 0). 6. Touch START. The time will begin counting down in the display window with no cooking or heating in the oven.
"HI-POWER" COOKING I. Touch CLEAR. and a beep tone will be heard. The CLEAR erases all previous senings. 2. Touch TIME. The light_ above TIME and below COOK 1 will go on. C0" will show in the display window.) 3. Touch the correct numbers on the control panel to set the cooking time. The time set will show in the display window at the top of the control panel. For example: • To set 30 seconds, ,,0 EXAMPLE: Fresh fish can be cooked quickly on "HI" (maximum power) for 6 minutes. To do this.
COOKING GUIDE FOR "MULTI-POWER" SETTINGS The "'Multi-Power" feature lets you cook at the best power level for the food being cooked. Cooking directions can be found in the cookbook. POWER LEVEL POWER SETTINGS MICROWAVE OUTPUT POWER EXAMPLES I0 WARM • Softening cream cheese. • Keeping casseroles and main dishes warm. 155 20 LOW • Softening chocolate. _ • Heating breads, rolls, pancakes, tacos, tortillas and French toast. • Clarifying butter. • Taking the chill out of fruit.
"MULTI-POWER" COOKING Many foods need slower cooking (at less than full power) in order to give you the best results. In addition to "HI" there are ninety-nine multi-power settings. The cookbook tells you which power setting is recommended for the food being cooked. To Cook with "Multi-Power" I. Touch CLEAR. 2. Touch TIME. The lights above TIME and below COOK 1 will go on. ("0" will show in the display window.) 3. Touch numbers for the desired cooking set will show in the display window. 4.
"TEMPERATURE CONTROLLED" The temperature probe is used to judge doneness when cooking or reheating food. Set the desired food temperature with the TEMP CONTROL and the desired power level with the POWER CONTROL. When "Hold Warm" is set. after completing the cooking cycle the oven will hold the food warm up to 100 minutes. TEMPERATURE SETTING & DISPLAY TEMPERATURE Temperatures from 90°F to 200°F can be chosen and set in the oven. The temperature should be set in onedegree increment.
"TEMPERATURE CONTROL" POINTS TO REMEMBER DO DO • Place the parl of temperature the reheated. • Check part meat probe or in the Avoid that of the • Remove the touching first inch food to be the sensor center inlo the of life • thickest food probe from the oven "TEMPERATURE Refer to "Meats" • MEAT oven with the COOKING the temperature probe operating the oven.
REHEATING FOODS • Place the temperature probe sensor into the food to be reheated with the first inch of the sensor in the center of the food. • Plug the temperature the oven wall. probe into the socket on • Select "multi-power" setting as shown below. • The microwave oven will stop cooking when the set temperature is reached and then it will "Hold Warm", when "Hold Warm" is set. the side of • Remove the temperature probe from the oven after use. • Cover the food if desired.
TEMPERATURE COOKING CONTROLLED "HI-POWER" The "Temperature Controlled Meat Cooking Guide" and "Reheating Guide" on Pages I7 and 18 will show you which multi-power setting and dc_leness temperature are recommended for the food you are cooking. When cooking with the temperature controlled settings, the timer is not used. 1. Place the temperature probe into the food with the first inch of the sensor in the center of the food. The probe should be in a level direction or on an angle as shown.
TEMPERATURE COOKING CONTROLLED "MULTI-POWER" The "'Temperature Controlled Meat Cooking Guide" and "Reheating Guide" on Pages 17 and ]S will show you which multi-power setting and temperature setting are re_:ommended for the food you are cooking. I. Place the temperature first inch of the sensor step 1 on page 19. probe into the food with the in the center of the food. See 2. Plug the temperature probe into the socket on the side of the oven. See step 2 on page 19.
AUTOMATIC DEFROST Three defrost sequences are preset in tile oven. The "Amo Defrost" feature provides you with the best &,frosting method for frozen foods. "'Amo defrosting charT'" on pages 23 and 24 will show you which def,ost sequence is recommended for lhe food you are defrosting. AUTO DEFROST SEQUENCE SEQUENCE LIST DEFROST 1 (DEF 1) • BEEF ............. eLAMB ............. • PORK ............. eVEAL ............. oVARIETY MEAT • CHICKEN ......... • CORNISH HENS DEFROST 2 • BEEF .. .. ...
AUTOMATIC EXAMPLE: 1. Touch DEFROST To defrost 2 pounds of Ground (Cont'd) AUTO Beef CLEAR. K_nn_orl -- [ Auto t_'¢i_,_ 300 1 [-_-lE_3 r"=q r-r7r-_CX3 Ex3r'-_E3D r-TqrTnr-_n 2. Touch "DEF 1". The light below AUTO DEFROST will go on and "dEFI" will show in the display window. _0 _" -- _4mmo,-e Auto _cl_ ------7--_ 300 _C_3CE3 r'_t-_CZ3 r'_r-_CE3 Touch START.
AUTO DEFROSTING CHART This chart shows which defrost "Auto Defrost" fealure. SEQUENCE DEFROST " # 1 is recommended for your foods and some special directions Remove thawed porti'ons wilh Turn over. Return remainder to oven. beef fork atpause. Round steak Flank steak Tenderloin steak Chuck roast Use a microproof roasting rack, Turn over at pause. Cover warm areas with alurninum Stew beef Remove thawed portions with fork at pause. Separate remainder. Return remainder to oven.
AUTO DEFROSTING SEQUENCE DEFROST FOOD # 2 CHART Use a microproof roasting rack. Turn over at pause. Cover warm areas with aluminum foil. LAMB Leg Use a microproof roasting rack. Turn over at pause. Cover warrn areas with aluminum foil. Use a microproof roasting rack. Turn over at pause. Cover warm areas with aluminum foil. Use a microproof roasting rack. Turn over at pause. Cover warm areas with aluminum foil. Use a microproof roasting rack. Turn over at pause.
MULTI-STAGE COOKING Multi.Stage cooking allows you to set temperature and then in a second, a temperature. The cooking process can The stages are set before .cooking and I. the oven to cook in one stage at a certain pov,'er level for a chosen time or third and a fourth stages at a different power leve! for a chosen time or be set for five memory stages when Auto Defrost is included as the first stage. will follow automatically wh¢,n oven is started. Touch CLEAR. 2. Touch TIME or TEMP CONTROL.
MULTI-STAGE Second Sta_le power level 70) (3 COOKING 17. Touch POWER CONTROL and number "'0". "0" will show in the display window. minutes: 6. Touch PAUSE. The light below COOK 2 will go on. The display window will show ,,0 (Cont'd) The fourth I Auto ll,_,_, 3CO CE3EZOI'TI 7. Touch TIME. _ E3Dr"_q 8. Set 3 minutes by touching "'3", "0" and "0". "300" will _r-;-q(2_] = I:EDr'_-q, show in the display window. 9. Touch POWER CONTROL and numbers "7" and "0". "70" will show in the display window.
DELAY START COOKING Delay Start cooking cooking time. by starting can be done the cooking automatically and finishing at a presettifig delay time for the chosen 6. Touch POWER CONTROL. 7. Touch numbers for cooking power lev.el. 1, Touch CLEAR, 2. Touch STOP TIME. • The light at fight of DELAY START goes on. A display window will read "0:00". 3. Touch numbers for the time of day to finish cooking.
WHOLE (See MEAL COOKING Cookbook for detailed explanation) Whole Meal cooking lets you cook T_o or more diif_,r,m! foods at the same time, nor be removed at the same time. unless needed. oven will stop between stages for time Io add or remo,:'e food. I. Place the Metal Rack in guides tim,.' Food_ nosd nol be pIao.'d By using PAUSE ralher than MEMORY lh_.' same on the side wall of oven cavity as shown. 2. Place food into the oven. 3.
RESET Auto RECIPE COOKING Recipe 300 plus 3 Customer Programmable Recipes 300 recipes shown in the cookbook have been stored in this oven. By touching the recipe number corresponding to preset recipe, cooking can be done. These 300 recipes have been preset, so you can not erase or substitute them. You can program 3 more favorite recipes in Recipes # 301-303. See page 31 in this manual for programming new recipes. • To cook one steps below. of 303 preset recipes, simply follow the I.
PRESET RECIPE COOKING (Cont'd) 4. Touch START, The second stage will begin. "600" will show in the display window. The oven will begin to cook at "'HI" power level and the time will begin to counl down in the display window. When the 6 minutes are over, a tone will sound and the oven will stop. 7. "PAUS" will flash in the display window. At pause, stir in broth, wine, salt and pepper. Cover by following the instructions in the cookbook.
PRESET Use RECIPE COOKING of Quantity • To increase Quantity (Cont'd) key of Preset Recipes. The times, temperature-and power levels for the 300 preset recipe cookings can not be changed. However the amount of food cooked in some preset recipes can be increased up to 5.9 times the Base Quantity which is preset in the oven.
UTENSILS MATERIALS TO USE IN YOUR MICROWAVE OVENPROOF MATERIALS TO AVOID IN YOUR MICROWAVE OVEN USING OVEN GLASS Ovenware (treated for high-intensity heat), such as utility dishes, bread dishes, pie plates, cake plates, liquid measuring cups, casseroles and bowls without metallic trimming. METAL UTENSILS Metal utensils are not recommended because the metal shields the food from microwave energy on the bottom and on the sides, causing uneven cooking results.
CARE AND CLEANING Wipe the microwave inside and out. and the hood bottom cover outside with a soft cloth and a mild detergent solution. Then rinse and wipe dry. Use a chrome cleaner and polish on chrome, metal and aluminum surface This should be done on a weekly basismore often if needed. Never use rough cleaning powders or pads. II REMOVABLE PARTS • probe Temperature _'_g__Te_re Probe: it must_bu:remo_ed-:Irom ! the sockei! liquid from sensor with damp cloth.
• Stirrer shield The oven insidetop (stirrer shteid)can be gently wiped in place or removed for washing at the sinkl Excessiveoil spatterson the inside top (stirrer shield) will make them difficultto remove, if left for many days. Wipe them with a wet paper towel especially after cooking chicken or bacon. The stirrer shield sets in slots along the sides and in the rear of the oven and is held by three tabs in front. Carefully pull the front edge down and forward to remove.
• Charcoal filter replacement (Required when unit is not Vented iO outSlde) The hood ventilation filters th_ air a_d discharge_ it back inid I_itche_i_rough ihe charcoal Filter_Stocl No. 84126 which may be 6rdered at a Sears retail store Or Sears cataiog, if the exhaust ai_"isnot vented to the outside of house. The Charcoal Filter.behind needed.
QUESTIONS AND ANSWERS OPERATION Q.What A. There Q.Why is wrong when the oven light will not glow during cooking or when the oven door is open? may be several reasons why the oven light will not glow. Perhaps: • TIME has not been set. • The light bulb has burned out. • START has not been touched. does steam come out of the grill work? A. Steam is normally produced out the grill work. during cooking. The microwave Q. Will the microwave oven be damaged A. Yes.
QUESTIONS AND ANSWERS (Co,-,t'd) FOODS Q.Whal is wrong when baked foods have a hard, dry, brown spot? A. A hard, dry, brown spot shows overcooking. Q.Why do eggs sometimes Shorten the cooking or reheating time. pop? A. When baking, frying or poaching eggs, the yolk may pop due to steam build-up inside the yolk membrane. To prevent this, simply pierce the yolk with a toothpick before cooking it. CAUTION: Q.Why Never microwave are scrambled cook eggs in the shell.
BEFORE CALLING FOR SERVICE You can often correct operating problems yourself. If your microwave oven fails to work properly, operating problem in the chart below and try' the solutions marked for each problem. If the microwave oven still does not work properly, contact the nearest Centers are fully equipped to handle your service requirements. Sears Service Center.
SEARS "WE SERVICE SERVICE WHAT WE SELL" "We Service What We Sell" is our assurance Service is nationwide.
SearsBest USE & CARE MANUAL Kenmore MICROWAVE STOCK NO. 85951 OVEN WARRANTY FiJLL ONE YEAR WARRANTY ON MICROWAVE OVEN FOR ONE YEAR FROM THE DATE OF PURCHASE, IF THIS KENMORE MICROWAVE OVEN FALLS DUE TO A DEFECT IN MATERIAL OR WORKMANSHIP, SEARS WILL REPAIR IT, FREE OF CHARGE. FULL FIVE YEAR WARRANTY OF THE MAGNETRON FOR FIVE YEARS FROM THE DATE OF PURCHASE, IF THE MAGNETRON IN THIS KENMORE MICROWAVE OVEN FAILS DUE TO A DEFECT IN MATERIAL OR WORKMANSHIP, SEARS WILL REPAIR IT, FREE OF CHARGE.