Use & Care Guide Model No. 153.586320 153.586310 153.586400 153.586500 153.586510 153.586410 30 Gallon Tall 28 Gallon Short 40 Gallon Tall 50 Gallon Tall 50 Gallon Medium 40 Gallon Medium Kenmore Electric Water Heater ® For potable water heating only. Not suitable for space heating. INSTALLER: Affix these instructions to or near the water heater. OWNER: Retain these instructions for future reference.
SAFE INSTALLATION, USE AND SERVICE Your safety and the safety of others is extremely important in the installation, use and servicing of this water heater. Many safety-related messages and instructions have been provided in this manual and on your own water heater to warn you and others of a potential injury hazard. Read and obey all safety messages and instructions throughout this manual.
GENERAL SAFETY 3
TABLE OF CONTENTS SAFE INSTALLATION, USE AND SERVICE....................................................................................................................................... 2 GENERAL SAFETY............................................................................................................................................................................. 3 TABLE OF CONTENTS...................................................................................................................
PRODUCT WARRANTY KENMORE LIMITED WARRANTY 4. Damage to or failure of this appliance resulting from installation not performed by Sears authorized service agents, including installation that was not in accord with electrical, gas or plumbing codes. WITH PROOF OF SALE, the following warranty coverage applies when this water heater is correctly connected, installed, operated and maintained according to all supplied instructions.
INTRODUCTION Thank You for purchasing a Kenmore water heater. Properly installed and maintained, it should give you years of trouble free service. It is strongly suggested that this new water heater be professionally installed, contact the local Sears Service Center or any Sears store. They will arrange for prompt, quality installation by Sears authorized contractors.
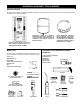
MATERIALS AND BASIC TOOLS NEEDED Materials Needed To simplify the installation Sears has available the installation parts shown below. You may or may not need all of these materials, depending on your type of installation. E X PA N S I O N TA N K S F O R T H E R M A L EXPANSION CONDITIONS AVAILABLE IN 2 GALLONS , AND 5 GALLONS CAPACITY THROUGH LOCAL SEARS STORE OR SERVICE CENTER.
INSTALLATION INSTRUCTIONS Removing the Old Water Heater The water passing out of the drain valve may be extremely hot. To avoid being scalded, make sure all connections are tight and that the water flow is directed away from any person. 4. Check again to make sure the electrical supply is turned “OFF” to the water heater. Then unplug the water heater (cord set) or disconnect the electrical supply connection from the water heater junction box. FIGURE 5. 5.
• Sensors mounted in the metal drain pan that turn off the water supply to the entire home when water is detected in the drain pan. • Water supply shut-off devices that activate based on the water pressure differential between the cold water and hot water pipes connected to the water heater. Mineral buildup or sediment may have accumulated in the old water heater. This causes the water heater to be much heavier than normal and this residue, if spilled out, could cause staining.
Water Piping meter with a check valve, etc... in the cold water supply; means must be provided to control thermal expansion. Contact the local utility or Sears Service Center on how to control this situation. NOTE: If using copper tubing, solder tubing to an adapter before attaching the adapter to the water inlet connection. Do not solder the water supply lines directly to the cold water inlet. It will harm the dip tube and damage the tank.
Temperature-Pressure Relief Valve Explosion Harzard 7HPSHUDWXUH SUHVVXUH UHOLHI YDOYH PXVW FRPSO\ ZLWK $16, = &6$ DQG $60( FRGH 3URSHUO\ VL]HG WHPSHUDWXUHSUHVVXUH UHOLHI YDOYH PXVW EH LQVWDOOHG LQ RSHQLQJ SURYLGHG 'R QRW SOXJ EORFN RU FDS WKH GLVFKDUJH OLQH )DLOXUH WR IROORZ WKLV ZDUQLQJ FDQ UHVXOW LQ H[FHVVLYH WDQN SUHVVXUH VHULRXV LQMXU\ RU GHDWK This heater is provided with a properly certified combination temperature - pressure relief valve by the manufacturer.
drain unless a 6 inch (153 mm) air gap is provided. To prevent bodily injury, hazard to life, or property damage, the relief valve must be allowed to discharge water in quantities should circumstances demand. If the discharge pipe is not connected to a drain or other suitable means, the water flow may cause property damage. The Discharge Pipe: • Shall not be smaller in size than the outlet pipe size of the valve, or have any reducing couplings or other restrictions. • Shall not be plugged or blocked.
Wiring • The length in any ground return path does not exceed 6 feet (1.82 m). • The circuit conductors contained therein are protected by overcurrent devices rated at 20 amperes or less. • The conduit or tubing is terminated in fittings approved for grounding. For complete grounding details and all allowable exceptions, refer to the current edition of the NEC - National Electrical Code NFPA 70. 4. A standard 1/2” conduit opening has been made in the water heater junction box for the conduit connection.
Wiring Diagram STANDARD WIRING FOR 2 WIRE LEAD WATER HEATERS NON-SIMULTANEOUS OPERATION 240 VOLT DOUBLE ELEMENT A-6 FIGURE 12.
SERVICE AND ADJUSTMENT Temperature Regulation The lower thermostat is factory set at a position which approximates 120°F (49°C), and is adjustable if a different water temperature is desired. Read all warnings in this manual and on the water heating before proceeding. HOTTER WATER CAN SCALD: Water heaters are intended to produce hot water. Water heated to a temperature which will satisfy clothes washing, dish washing, and other sanitizing needs can scald and permanently injure you upon contact.
The upper and lower thermostats are adjustable if a different water temperature is desired. Read all warnings in the Temperature-Regulation section before proceeding. 1. Turn “OFF” the electric power to the water heater at the junction box. years and annually thereafter until the condition of the anode rod dictates its replacement. NOTE: Artificially softened water requires the anode rod to be inspected annually.
Temperature-Pressure Relief Valve Operation Draining and Flushing The temperature-pressure relief valve must be manually operated at least once a year. The water heater should be drained if being shut down during freezing temperatures. Also, periodic draining and cleaning of sediment from the tank may be necessary. The temperature-pressure relief valve must be manually operated at least once a year.
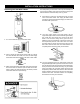
Thermostat Removal/Replacement 9. Replace the insulation to cover the thermostat. 10. Replace access panel, then turn the electric power on. Element Cleaning/Replacement NOTE: These instructions are written for element cleaning and element replacement for the lower element. If it is necessary to clean or replace the upper element, then repeat these instructions. To remove the element from your tank in order to clean or replace it: 1. Turn “OFF” the electrical power to the water heater at the junction box.
FIGURE 25. 8. Clean the area around the element opening. Remove any sediment from or around the element opening, inside the tank. The water passing out of the drain valve may be extremely hot. To avoid being scalded, make sure all connections are tight and that the water flow is directed away from any person. 9. If you are cleaning the element you have removed, do so by scraping or soaking in vinegar or a de-liming solution. 4. Remove the screw securing the access panel, then remove the panel.
Never use this water heater unless it is completely full of water. To prevent damage to the tank and heating element, the tank must be filled with water. Water must flow from the hot water faucet before turning “ON” power. 14. Check element for water leaks. If leakage occurs, tighten element or repeat steps 2 and 3, remove element and reposition gasket. Then repeat steps 10 through 14. FIGURE 29. 18. Replace access panel. 15.
Service • Follow Filling the Water Heater instructions in the Installation Instructions section. Before calling for repair service, read the Start Up Conditions and Operational Conditions found in the Troubleshooting section of this manual. • Check for leaks. • Turn “ON” electric power to the water heater. If a condition persists or you are uncertain about the operation of the water heater, let a qualified person check it out. Contact Sears Repair Services at 1-844-553-6667. FIGURE 31.
TROUBLESHOOTING Start Up Conditions THERMAL EXPANSION As water is heated, it expands (thermal expansion). In a closed system, the volume of water will increase. As the volume of water increases, there will be a corresponding increase in water pressure due to thermal expansion. Thermal expansion can cause premature tank failure (leakage). This type of failure is not covered under the limited warranty.
Do not remove the anode leaving the tank unprotected. By doing so, all warranty on the water heater tank is voided. 2. Remove the screw securing the access panel, then remove the panel. “AIR” IN HOT WATER FAUCETS 3. Fold the insulation back to expose the thermostat. 4. Reset the high limit by pushing in the red button marked “RESET”. HYDROGEN GAS: Hydrogen gas can be produced in a hot water system that has not been used for a long period of time (generally two weeks or more).
LEAKAGE CHECKPOINTS Never use this water heater unless it is completely full of water. To prevent damage to the tank and heating element, the tank must be filled with water. The water must flow from the hot water faucet before turning “ON” power. A. *Condensation may be seen on pipes in humid weather or pipe connections may be leaking. B. Small amounts of water from the temperature-pressure relief valve may be due to thermal expansion or high water pressure in your area. C.
REPAIR PARTS LIST KENMORE 6 ELECTRIC WATER HEATERS 4 MODEL NUMBERS 153.586320 153.586310 153.586400 153.586500 11 30 Gallon 30 gallon 40 Gallon 50 Gallon 12 10 13 15 NOTE:A UPPER ELEMENT: These water heaters are equipped with factory installed 4500 watt elements. 16 20 19 3 18 9 LOWER ELEMENT: These water heaters are equipped with factory installed 4500 watt elements. 2 ELEMENT ORDERING INFORMATION: If a replacement 4500 watt, 240 volt element is needed, order part no.
REPAIR PARTS LIST KENMORE 6 ELECTRIC WATER HEATERS 6 6 MODEL NUMBERS 153.586510 153.586410 50 Gallon Medium 40 Gallon Medium 13 14 16 NOTE:A UPPER ELEMENT: These water heaters are equipped with factory installed 4500 watt elements. 22 21 18 5 20 11 LOWER ELEMENT: These water heaters are equipped with factory installed 4500 watt elements. 4 ELEMENT ORDERING INFORMATION: If a replacement 3800 watt, 240 volt element is needed, order part no. 9000225 replacement element. 19 23 9 7 Key No.
NOTES 27
NOTES 28
NOTES 29
NOTES 30
NOTES 31
.HQPRUH § )RU 6HDUV +RPH 6HUYLFHV LQ KRPH UHSDLU RI DOO .