Use & Care Guide Manual de Uso y Cuidado Guide d’utilisation et d’entretien English / Español / Français Models/Modelos/Modèles: 253.6000*, 6002*, 6008*, 6030*, 6040*, 6041*, 6050*, 7008*, 7030*, 7040*, 7050* Kenmore ® Top Mount Refrigerator Refrigerador Superior Réfrigérateur à compartiments superposés * = Color number, número de color, le numéro de couleur P/N A04720801 (1606) Sears Brands Management Corporation Hoffman Estates, IL 60179 U.S.A. www.kenmore.com www.sears.com Sears Canada Inc.
Record Model/Serial Numbers Important Safety Instructions Please read and save these instructions. Safety Precautions Do not attempt to install or operate your unit until you have read the safety precautions in this manual. Safety items throughout this manual are labeled with a Danger, Warning, or Caution based on the risk type. This Use & Care Guide provides specific operating instructions for your model. Use your unit only as instructed in this guide.
Important Safety Instructions • Refrigerants must be evacuated by a licensed, EPA certified refrigerant technician in accordance with established procedures. WARNING Please read all safety instructions before using your new appliance. For Your Safety • Do not store or use gasoline or other flammable liquids in the vicinity of this or any other appliance. Read product labels for warnings regarding flammability and other hazards. • Do not operate the unit in the presence of explosive fumes.
Important Safety Instructions • Never unplug the refrigerator by pulling on the power cord. Always grip the plug firmly, and pull straight out from the receptacle to prevent damaging the power cord. • Unplug the refrigerator before cleaning and before replacing a light bulb to avoid electrical shock. • Performance may be affected if the voltage varies by 10% or more. Operating the unit with insufficient power can damage the motor. Such damage is not covered under the warranty.
Warranty Information KENMORE LIMITED WARRANTY FOR ONE YEAR from the date of sale this appliance is warranted against defects in material or workmanship when it is correctly installed, operated and maintained according to all supplied instructions. WITH PROOF OF SALE, a defective appliance will receive free repair or replacement at option of seller. For warranty coverage details to obtain free repair or replacement, visit the web page: www.kenmore.
Master Protection Agreements Congratulations on making a smart purchase. Your new Kenmore® product is designed and manufactured for years of dependable operation. But like all products, it may require preventive maintenance or repair from time to time. That’s when having a Master Protection Agreement can save you money and aggravation. The Master Protection Agreement also helps extend the life of your new product.
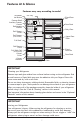
Features At A Glance Features may vary according to model Ice Maker Ice Bucket Freezer Shelf Auxiliary Freezer Control Refrigerator Control Ice Tray Fixed Door Bin Door Rack Dairy Door Deli Drawer Cover Deli Drawer Upper Door Rack (Some Models) Full Shelf Deli Drawer Cover Fixed Door Bin Full Width Deli (Some Models) Crisper Cover Door Rack Crisper Drawers Toe Grille IMPORTANT Cleaning your Refrigerator Remove tape and glue residue from surfaces before turning on the refrigerator.
First Steps This Use & Care Guide provides general operating instructions for your model. Use the refrigerator only as instructed in this Use & Care Guide. Before starting the refrigerator, follow these important first steps. NOTE For additional instructions on garage installation, refer to “Setting the Temperature Controls” section. Location Installation • Choose a place that is near a grounded electrical outlet. Do not use an extension cord or an adapter plug.
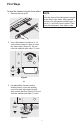
First Steps To level the cabinet using the front rollers: 1 Remove the toe grille. NOTE Raise the front of the refrigerator enough so the doors close freely when opened halfway. The refrigerator should slope ¼ inch to ½ inch from front-to-back. Then level the refrigerator from side-to-side. 2 Use a flat-blade screwdriver or ⅜ inch socket wrench to raise or lower the front rollers (Figure 2). Do not raise the cabinet more than 9/16 inch.
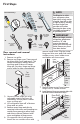
First Steps NOTE Tools Necessary: or PhillipsTM Head Adjustable Wrench Socket Wrench Set Top Hinge Cover Front Screw Top Hinge Cover Rear Screw or 3/8" (10mm) Fixed Wrench Top Hinge Screw Bottom Hinge Screw Door removal and reversal instructions: IMPORTANT Before you begin, turn the refrigerator temperature control to “0” and remove the electrical power cord from the wall outlet. Remove any food from door shelves. remove inside screw.
First Steps 9. Unscrew bottom hinge pin using 17. Position top hinge on opposite side of adjustable wrench. Move hinge pin to cabinet from which it was removed. other hole in hinge and tighten with Insert top hinge screws and tighten adjustable wrench. hinge to cabinet. Check door gasket for open seal condition (gap between 10. Reverse door handles (see instruction gasket and cabinet flange). Remove on next page). the hinge cover from between the 11.
First Steps Handle Installation/Removal 18. Should open seal condition exist, try to massage the gasket to make sure it is seated into the channel. IMPORTANT There are instructions for two handle styles on the following pages. To ensure proper installation of both handle styles, review these instructions and pictures thoroughly prior to handle installation. Additionally, before installing handles, make sure the door swing is correct. See the Door Removal/Reversal instructions in this Use & Care Guide.
First Steps To remove refrigerator handle: 1. Remove two screws attaching handle to top of refrigerator door. 2. Rotate handle towards the side of the door and push down to release it from the mounting screw. 3. Remove mounting screw from door and install on other side, moving hole plugs from corresponding holes to opposite side. Handle Style 1 (Plastic Handles) To attach freezer handle: 1.
First Steps Handle Style 2 (Metal Handles) 2. Install the 2 screws into the bottom of the handle. To attach refrigerator metal handle: 3. Tighten the set screw on the rounded 1. Place rounded part of handle onto part of the handle until the handle is mounting screw on face of door and flush with the door, and then tighten align the 2 holes in top of handle with another ½ turn. the 2 holes in top of door.
Connecting Household Water Supply To Refrigerator To Connect Water Supply Line To Ice Maker Inlet Valve: To avoid electric shock, which can 1. Disconnect refrigerator from electric cause death or severe personal injury, power source. disconnect the refrigerator from 2. Place end of water supply line into sink electrical power before connecting a water supply line to the refrigerator. or bucket. Turn ON water supply and flush supply line until water is clear. Turn OFF water supply at shutoff valve.
Setting the Temperature Controls Cool Down Period Adjusting the refrigerator control will change temperatures in both compartments. The auxiliary freezer control can be left at the factory pre-set (Mid Position) or adjusted as desired; it has no effect on electrical power to the refrigerator. To ensure safe food storage, allow the refrigerator to operate with the doors closed for at least 8 hours before loading it with food.
Setting the Temperature Controls CAUTION Do not install the refrigerator where the temperature will drop below 55°F (13°C) or rise above 110°F (43°C). The compressor will not be able to maintain proper temperatures inside the refrigerator. IMPORTANT If you install your refrigerator in a garage or other unheated area, you may experience freezer temperature problems during the winter months when temperatures dip below 55°F (13°C).
Optional Features Door storage CAUTION Door bins, shelves, and racks are provided for convenient storage of jars, bottles, and cans. Frequently used items can be quickly selected. Do not clean glass shelves or covers with warm water when they are cold. Shelves and covers may break if exposed to sudden temperature changes or impact, such as bumping. Tempered glass is designed to shatter into many small, pebble-size pieces. This is normal. Glass shelves and covers are heavy.
Optional Features Crisper Humidity Control (some models) Crispers (some models) The crispers, located under the bottom refrigerator shelf, are designed for storing fruits, vegetables, and other fresh produce. Wash items in clear water and remove excess water before placing them in the crispers. Items with strong odors or high moisture content should be wrapped before storing. The crisper humidity control, present on the crisper drawers of some models, allows you to adjust the humidity within the crisper.
Food Storage & Energy Saving Ideas Food storage Ideas Fresh Food Storage • The fresh food compartment should be kept between 34°F and 40°F with an optimum temperature of 37°F. • Avoid overcrowding the refrigerator shelves. This reduces the circulation of air around the food and results in uneven cooling. Fruits and Vegetables • Storage in the crisper drawers helps preserve the fruit and vegetable quality for longer time periods.
Ice Service If your refrigerator has an automatic ice maker, it will provide a sufficient supply of ice for normal use. During the initial startup of your refrigerator, however, no ice will be produced during the first 24 hours of operation. Air in new plumbing lines may cause the ice maker to cycle two or three times before making a full tray of ice. With no usage, it will take approximately one to two days to fill the ice container.
Normal Operating Sounds Understanding the sounds you may hear Following is a list of major components in your refrigerator and the sounds they can cause: A Evaporator Refrigerant through the Your new, high-efficiency refrigerator evaporator may create a boiling or may introduce unfamiliar sounds. These gurgling sound. sounds normally indicate your refrigerator B Evaporator fan You may hear air is operating correctly.
Care & Cleaning Protecting Your investment IMPORTANT Keeping your refrigerator clean maintains appearance and prevents odor build-up. Wipe up any spills immediately and clean the freezer and fresh food compartments at least twice a year. When cleaning, take the following precautions: • Never use CHLORIDE or cleaners with bleach to clean stainless steel. • Do not wash any removable parts in a dishwasher. • Always unplug the electrical power cord from the wall outlet before cleaning.
Care & Cleaning Care & Cleaning Tips Part Interior & Door Liners What To Use Tips and Precautions • Soap and water Use 2 tablespoons of baking soda in 1 quart of warm water. Be sure to wring excess water out of • Baking soda sponge or cloth before cleaning around controls, and water light bulb or any electrical part. Door Gaskets • Soap and water Wipe gaskets with a clean soft cloth. Drawers & • Soap and Use a soft cloth to clean drawer runners and tracks.
Care & Cleaning Vacation and Moving Tips Short • Leave refrigerator operating during vacations of 3 weeks or less. Vacations • Use all perishable items from refrigerator compartment. • Turn automatic ice maker off and empty ice bucket, even if you will only be gone for a few days. Long • Remove all food and ice if you will be gone one month or more. Vacations • Turn off automatic ice maker and turn water supply valve to closed position.
Before You Call TROUBLESHOOTING GUIDE Before calling for service, review this list. It may save you time and expense. This list includes common occurrences that are not the result of defective workmanship or materials in this appliance. PROBLEM CAUSE CORRECTION AUTOMATIC ICE MAKER (some models) Ice maker is not making • Ice maker wire signal • Move wire signal arm to the any ice. arm is in the “up” or “down” or ON position (side OFF position. mounted).
Before You Call PROBLEM CAUSE CORRECTION ODORS IN REFRIGERATOR Interior is dirty. • Interior needs to be cleaned. • Food with strong odors is in refrigerator. OPENING/CLOSING OF DOORS/DRAWERS Door(s) will not close. • Door was closed too hard, causing other door to open slightly. • Refrigerator is not level. It rocks on the floor when moved slightly. Drawers are difficult to • Food is touching shelf move. on top of drawer. • Track that drawers slide on is dirty.
Before You Call PROBLEM CAUSE CORRECTION TEMPERATURE TOO COLD IN REFRIGERATOR (FRESH FOOD) OR FREEZER Freezer temperature • Freezer control is set • Set freezer control to a warmer too cold. Fresh too cold. setting. Allow 24 hours for Food temperature is temperature to stabilize. satisfactory. Fresh Food temperature • Fresh Food control is • Set fresh food control to a too cold. Freezer set too cold. warmer setting. Allow 24 hours for temperature is temperature to stabilize. satisfactory.