
Owner's Manual


76
7
D
E
2
B
3
4
5
6
2
C
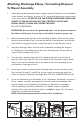
Installation of Mounting Assembly
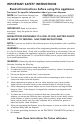
READ COMPLETELY BEFORE STARTING
NOTE: Pay close attention to the order of the mounting assembly parts, as they have been
correctly assembled by the factory.
1. Disassemble the mounting assembly from the disposer by turning the lower
mount ring until it disengages from the ramps on the mounting
ring and the sink ange assembly can be removed. Loosen the 3 mount
screws until the mounting ring can be moved up to the backup ange. Use a
at blade screwdriver under one end of the snap ring to remove it from the
sink ange. Remove the mounting ring, backup ange and ber gasket
from the sink ange. Note the sequence of these parts as they are stacked in
the correct re-assembly sequence. Keep these parts together and set aside.
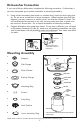
2. Clean the area around the sink drain where the disposer is to be mounted.
Evenly apply ½” thick rope of plumber’s putty around ange (see A).
Position the sink ange (2) in the center of the sink drain opening. Push the sink
ange down rmly to make a good seal (see B). Note: Excess putty will be
squeezed out during the installation and should not be cleaned up until
the end
DO NOT move or rotate the sink ange once seated or the seal may be
broken. Note: Some sink manufacturers may recommend “Non- Staining”
plumber’s putty; check your sink care instructions.
3. Using a towel in the sink to prevent scratching, place a weight (such as the
disposer) on the sink ange to hold it in place until the sink ange assembly is
secured from the underside of the sink.
4. Reassemble the ber gasket, (3) backup ange (4) and mounting ring,
(6), making sure the ber gasket is on top of the backup ange,
and that the backup ange is on top of the mounting ring (see C).
They must be in this order! From underneath the sink ange, place the
gasket/ange/ring assembly, gasket on top, onto the sink ange (see D).
5. Holding all 3 parts up against the sink, pull the snap ring (7) open and press
rmly into the groove on the sink ange until it snaps into place (see D).
Once in place, it will hold the mounting ring up.
6. Insert 3 mounting screws (5) into mounting ring and tighten screws evenly
and rmly against the backup ange (see E). Use shorter screws if the
sink is more than 3/8” thick. DO NOT OVERTIGHTEN!
Trim off excess putty in the sink.
NOTE: Shorter screws should be available at your local hardware store.
NOTE: Read Operating Instructions at the end of installation.
2
A