
Full Product Manual


f.'|,@,:
fi,,r,-;r-tr-i..r..::r/.?.,'.;
tt
+,
::,'
.
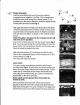
r-*'"F[cni6hiiCmbly
Start by assembling the lower
frame
by
pushing
swagged
pieces
together.
See
Fig.
1
for
arrangement.
Keep the
tubes
that accept the
vertical tubes
(C)
all
pointed
up in the same direction.
Build
the upper
frame
at this
point
and set
it aside Fig.2.
Plan
gate placement.
Hinge
post
(B)
location
will deter-
mine
the
gate placement.
Position
hinge
in
door
open-
ing
and hooks
should
point
aboirt
45 degrees
outward.
This
will
allow
the fabric to attach ts the
outside
of the
frame.
NotqThe
gate
is
designed
to
be installed
on the
left
side
oJa corner
position.
:
lnsert all 5
vertical
tubes
(C)
into
the
lower
frame
Fig.3
&4. You may need
to tap
the
verticaltubes
(C)
into
the
lower
frame.
Do
not hammer directly on
the tube,
use a
block of wood to
protect
the tube.
With allverticaltubes
(C)
and hinge
post
(B)
in
place,
pick
up the assembled upper frame and
place
it
on the
vertical
tubes
(C).
Fig.
5
This
step will require 2
people
Gate lnstall
The
gate
comes
completely
assembled
with
hinges
pre-attached
Fig.6.
Simply drop the
gate(A)
hinge
pins
down in
to
the
hinge tube
on the
hinge
post
(B).
Push
d
cotter
pin
(E)
into
each of the hinges and bend
back
with
pliers
around the hinge
pin.
Latch
is already
pre-
assembled on the
latch
post
(A).
Notc: Latch can be
opened from
the inside
the
kennel as
well.
Next, installthe latch
post
(A).
Latch
post
must
be
placed
on the
left
side of the hinge
post
(B)
and
to the
tatch
side
of the
gate.
This
post
clamps to the
upper and
lower frame
and can be
slid
to
adjust
the
gate
opening.
Fio. T
@/N
'x->
b-,-