INSTRUCTION MANUAL VHF FM TRANSCEIVER TK-2102/ TK-2107 UHF FM TRANSCEIVER TK-3102/ TK-3107 KENWOOD CORPORATION © B62-1163-10 (K,M) 09 08 07 06 05 04 03 02 01
THANK YOU! We are grateful for your purchase of this KENWOOD transceiver. We believe this easy-to-use transceiver will provide you with dependable and reliable communications. KENWOOD MEANS WIRELESS Founded more than 50 years ago, KENWOOD’s Car and Home Audio products are in demand around the world. KENWOOD is also a major developer and producer of wireless and digital wireless communications products.
PRECAUTIONS • Refer service to qualified technicians only. • Do not operate the transceiver or charge a battery pack in an explosive atmosphere (gases, dust, fumes, etc.). • Turn OFF the transceiver while taking on fuel or while parked in a gasoline service station. • Do not modify or attempt to adjust this transceiver for any reason. • Do not expose the transceiver to long periods of direct sunlight, nor place it close to heating appliances.
CONTENTS UNPACKING AND CHECKING EQUIPMENT ................... 1 Supplied Accessories ...................................... 1 PREPARATION .................................................. 3 Charging the NiCd Battery Pack .......................... 3 Installing/ Removing the Battery Pack .................. 5 Installing the Antenna ..................................... 6 Installing the Belt Clip ..................................... 6 Installing the Cover over the Speaker/ Microphone Jacks...................
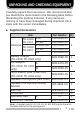
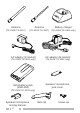
UNPACKING AND CHECKING EQUIPMENT Carefully unpack the transceiver. We recommend that you identify the items listed in the following table before discarding the packing material. If any items are missing or have been damaged during shipment, file a claim with the carrier immediately.
Antenna Antenna Battery charger (TK-2102/ TK-2107) (TK-3102/ TK-3107) (TK-2102/ TK-3102 only) AC adaptor (K market) AC adaptor (M market) (TK-2102/ TK-3102 only) (TK-2102/ TK-3102 only) NiCd battery pack (KNB-15A) Speaker/ microphone jack cover (TK-2102/ TK-3102 only) Speaker/ microphone locking bracket 2 Belt clip Screw set
PREPARATION ■ Charging the NiCd Battery Pack The battery pack is not charged at the factory; charge it before use. Initially charging the battery pack after purchase or extended storage (greater than 2 months) will not bring the battery pack to its normal operating capacity. After repeating the charge/discharge cycle two or three times, the operating capacity will increase to normal. ◆ DO NOT RECHARGE THE BATTERY PACK IF IT IS ALREADY FULLY CHARGED.
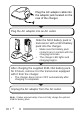
Plug the AC adaptor cable into the adaptor jack located on the rear of the charger. Plug the AC adaptor into an AC outlet. Slide the NiCd battery pack or transceiver with a NiCd battery pack into the charger. • • Make sure the battery pack contacts are in contact with the charging terminals. The charger LED lights and charging begins. After charging the supplied KNB-15A battery pack for 8 hours, remove it or the transceiver equipped with it from the charger.
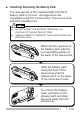
■ Installing/ Removing the Battery Pack The average life of the supplied KNB-15A NiCd battery pack is 8 hours. Average times are calculated using 5% transmit time, 5% receive time, and 90% standby time. ◆ DO NOT SHORT THE BATTERY TERMINALS OR DISPOSE OF THE BATTERY BY FIRE. ◆ NEVER ATTEMPT TO REMOVE THE CASING FROM THE BATTERY PACK. Match the four grooves of the battery pack with the corresponding guides on the back of the transceiver.
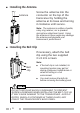
■ Installing the Antenna Antenna Screw the antenna into the connector on the top of the transceiver by holding the antenna at its base and turning it clockwise until secure. Note: The antenna is neither a handle, a key ring retainer, nor a speaker/ microphone attachment point. Using the antenna in these ways may damage the antenna and degrade your transceiver’s performance. ■ Installing the Belt Clip If necessary, attach the belt clip using the two supplied 3 x 8 mm screws.
■ Installing the Cover over the Speaker/ Microphone Jacks Speaker/ If you are not using a speaker/ microphone microphone, install the cover jack cover over the speaker/ microphone jacks using the supplied 3 x 6 mm screw. Note: To keep the transceiver water resistant, you must cover the speaker/ microphone jacks with the supplied cover. ■ Installing the Optional Speaker/ Microphone Insert the speaker/ microphone plugs into the speaker/ microphone jacks.
GETTING ACQUAINTED (TK-2102/ TK-3102) Antenna LED indicator Lights red while transmitting. Lights green while receiving a signal. Flashes red when the battery voltage is low while transmitting. Speaker Microphone Channel switch Toggle this switch to select channel 1 or channel 2. Power switch/ Volume control Turn clockwise to switch ON the transceiver. To switch OFF the transceiver, turn counterclockwise until a click sounds. Rotate to adjust the volume level.
TK-2102/ TK-3102 OPERATION 1 Switch ON the transceiver by turning the Power switch/ Volume control clockwise. 2 • 1 2 A beep sounds. Adjust the volume by pressing and holding the Monitor key, then rotating the Power switch/ Volume control. Toggle the Channel switch to select your desired channel. • 1 2 When you receive an appropriate signal, you will hear audio from the speaker. To make a call, press and hold the PTT switch, then speak into the microphone using your normal speaking voice.
GETTING ACQUAINTED (TK-2107/ TK-3107) Antenna LED indicator Lights red while transmitting. Lights green while receiving a signal. Flashes red when the battery voltage is low while transmitting. Speaker Microphone Channel selector Rotate to select channels 1 ~ 16. Power switch/ Volume control Turn clockwise to switch ON the transceiver. To switch OFF the transceiver, turn counterclockwise until a click sounds. Rotate to adjust the volume level.
TK-2107/ TK-3107 OPERATION 7 Switch ON the transceiver by turning the Power switch/ Volume control clockwise. 9 11 5 13 3 • 16 1 7 9 11 5 13 3 1 16 A beep sounds. Adjust the volume by pressing and holding the Monitor key, then rotating the Power switch/ Volume control. Rotate the Channel selector to select your desired channel. 7 9 11 5 • 13 3 1 16 When you receive an appropriate signal, you will hear audio from the speaker.
AUXILIARY FUNCTIONS ■ Time-out Timer The purpose of the Time-out Timer is to prevent any single person from using a channel for an extended period of time. If you continuously transmit for 10 minutes, the transceiver will stop transmitting and a tone will sound. To stop the tone, release the PTT switch. You can press the PTT switch again to resume transmitting.
■ Monitor When no signals are present, the squelch on the transceiver automatically mutes the speaker so you will not hear background noise. To manually deactivate the squelch, press and hold the Monitor key. This is useful when you want to adjust the volume level, or when you need to hear a weak signal. • The LED indicator lights green while the Monitor key is pressed. ■ Quiet Talk (QT) and Digital Quiet Talk (DQT) Some channels may have pre-programmed QT/DQT tones.
OPTIONAL ACCESSORIES You can use the following accessories with your transceiver: • KNB-14: • KNB-15A: Long Life Battery (7.
TROUBLESHOOTING GUIDE Problem Solution No power. • The battery pack may be dead. Recharge or replace the battery pack. • The battery pack may not be installed correctly. Remove the battery pack and install it again. Battery power dies shortly after charging. • The battery pack life is finished. Replace the battery pack with a new one. Cannot talk to or hear other members in your group. • Make sure you are using the same frequency and Quiet Talk tone as the other members in your group.
FREQUENCY CHART Model Name: TKSerial Number: Channel 1 2 3 4 5 6 7 8 9 10 11 12 13 14 15 16 16 Transmit Frequency Receive Frequency QT/DQT