COMPACT Hi-Fi COMPONENT SYSTEM C-515BT C-313 INSTRUCTION MANUAL © B60-5807-08/02 (E, X) B60-5807-08_02_English.indd 1 09.6.
Before applying power ¤ Caution : Read this page carefully to ensure safe operation. Units are designed for operation as follows. Australia ........................................................... AC 240 V only Europe .............................................................. AC 230 V only Safety precautions WARNING : TO PREVENT FIRE OR ELECTRIC SHOCK, DO NOT EXPOSE THIS APPLIANCE TO RAIN OR MOISTURE.
I 6. Power Sources – This product should be operated only from the type of power source indicated on the product. If you are not sure of the type of power supply to your home, consult your product dealer or local power company. 7. CAUTION – Polarization – This product may be equipped with a polarized alternating-current line plug (a plug having one blade wider than the other). This plug will fit into the power outlet only one way. This is a safety feature.
Before use Contents Caution : Read the pages marked ¤ carefully to ensure safe operation. Using the D.AUDIO .......................................18 Playback of Digital Audio Player...................................... 18 Using the Bluetooth audio ..........................19 Before applying power...................................2 Before use (Pairing function) .................................. 19 Playback of Bluetooth audio ............................................. 19 Safety precautions ......
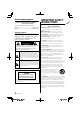
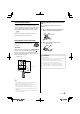
How to read this manual The description in this manual is based on the C-515BT, and the C-313 is not equipped with the selectors and functions related to iPod and Bluetooth. The descriptions of the functions available only with the C-515BT are marked with the following symbol. Changing the battery of the remote control unit Use a commercially available button battery (CR2025). 1 C-515BT Insert something narrow like a paperclip into the hole 1 and pull out the battery tray.
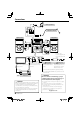
Connections AM loop antenna FM indoor antenna Right speaker Left speaker To AC wall outlet • Insert the plug firmly all the way into the AC wall outlet. To TV with video (composite) input terminal Connect the audio output of the VCR, etc. to the [AUX IN] terminals on the rear of the main unit. Video cord Power cord Two types of power cords are provided. Select the one designed for the country in which this unit is used. Connect a subwoofer (SW-40HT (separately available), etc.
Connecting the FM antenna 1 Connect the lead to the [FM 75Ω] terminal. 2 Find the location that gives the best reception. 3 Secure the antenna as high up as possible. FM 75Ω • The antenna supplied with the system is a basic antenna for indoor use. For stable signal reception, the use of an outdoor antenna (commercially available) is recommended. Disconnect the indoor antenna first before connecting an outdoor antenna.
About MP3 and WMA The playable MP3/WMA file (hereafter called Audio file) and the media format have the following limitation. The Audio file, which is not conforming to the specification, may not play normally.
About USB device Handling discs Notes on use of the USB device Handling precautions This unit can play audio files stored in the flash memory and digital audio player that have a USB port (these devices are referred to as USB devices in this document). Hold a CD taking care not to touch the played surface. (The side without the printed label is the playback side.
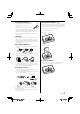
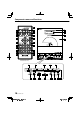
Component names and functions 21 SLEEP DISPLAY BACKLIGHT CONTRAST USB/SD CD Bluetooth D.AUDIO/iPod AUX SOUND STOP X-BASS 20 1 2 BAND TUNER 14 15 19 3 18 4 5 VOLUME ENTER 16 17 17 MUTE 16 6 PAIRING STEREO/MONO ABC DEF 15 7 RANDOM GHI JKL MNO FOLDER P.CALL MEMORY REPEAT PQRS TUV WXYZ TIMER SET P.
1 1 button 11 PTY/CLEAR button To switch the system on or to standby mode. To carry out PTY search. To delete the track/file number entered during track/ file search. [STANDBY/TIMER] indicator Red lighting: Ordinary standby mode Orange lighting: Timer standby mode 2 2 12 FILE SEARCH button To select a desired file in audio files. Source buttons To select the source you want, or to turn the system on to the selected source. 13 TUNER BAND button 14 TIMER ON/OFF button To switch the timer on/off.
Basic function Switching the system on Sound control Press , TUNER BAND, CD/USB/SD, D.AUDIO/iPod/ Bluetooth (C-515BT), D.AUDIO (C-313), AUX button. The [STANDBY/TIMER] LED will go out. The system will switch to the last selected source or the selected source. The sound control system feature enables you to enjoy special sound effects; preset equalizer settings and bass enhancement, providing the best music reproduction.
Using the CD/USB device/SD card Preparation Removing the USB device Inserting a disc 1 Press the 1 Press CD/USB/SD button once or more to select "CD". 2 Remove the USB device. 2 Press [0] button to open the CD door. button to select standby mode. Inserting an SD card 1 Press the 2 Insert the SD card into the SD card slot until it clicks. button to select standby mode. Insert the SD card so that the label side faces up and the side with a cut comes on the right.
Using the CD/USB device/SD card Select one of them with the 4 or ¢ button. Playing a CD/ audio file Press 6 button to start playback. The track/file number and elapsed playing time of the current track/file appear on the display. Basic opertions Operation type To stop playback To interrupt playback To search for a particular passage during playback Operation Press STOP 7 button. Press 6 button. Press again to resume playback. Press and hold 4 or ¢ button for more than 2 seconds.
To clear the program Changing the display information Press P.MODE button. The icon "PGM" disappears from the display. Press DISPLAY button in play or pause mode. Every time the button is pressed, the display changes in the following order: For CD : ⁄ • "P" represents PROGRAM. • The program is automatically cleared as soon as the CD door is opened. • The function of program setting cannot be used in PLAY/ PAUSE mode. Random play You can play all the tracks/files in random order.
Using the radio Tuning in radio stations Manual preset 1 Press TUNER BAND button to select the desired waveband: FM or AM. You can store up to 30 for FM and 10 for AM radio stations in the memory. When a preset radio stations selected, the preset number appears on the display. 2 Press and hold 4 or ¢ button to tune in to the desired frequency. 1 Press TUNER BAND button to select the desired waveband: FM or AM. 2 Press 4 or ¢ button to tune in to the desired frequency.
Using RDS (Radio Data System) Program type table RDS is a system that transmits useful information (in the form of digital data) for FM broadcasts along with the broadcast signal. Tuners and receivers designed for RDS reception can extract the information from the broadcast signal for use with various functions, such as automatic display of the station name.
Using the iPod C-515BT Using the D.AUDIO Inserting an iPod Playback of Digital Audio Player 1 Connect a iPod to the iPod dock. 2 Kenwood digital audio player can be connected to play audio files in it. Press D.AUDIO/iPod/Bluetooth button once or more to select "iPod". The icon "iPod" appears on the display. 1 Playing an iPod Press 6 button to start playback.
Using the Bluetooth audio C-515BT You can listen to audio files stored in Bluetooth audio player. Using the AUX Playing an external component An external component can be connected to AUX IN of this unit and played back. Before use (Pairing function) You need to register your audio player and cell-phone before using it with this unit. 1 Press D.AUDIO/iPod/Bluetooth button once or more to select "Bluetooth". 2 Press PAIRING/STEREO/MONO [PAIRING] button.
Clock/timer operation Clock setting Timer setting 1 Press TIMER SET button. 2 Press MULTI CONTROL C or D button to select "CLOCK" and press ENTER button. "CLOCK SETTING" appears on the display. The system can switch on to CD, USB, TUNER or iPod automatically at a preset time, serving as an alarm to wake you up. 3 Press ENTER button. The hour indication will start flashing. 4 Press MULTI CONTROL A or B button to set the hours and press ENTER button. The minute indication starts flashing.
8 Switch the system to standby mode. The STANDBY/TIMER indicators also light orange. ⁄ • When reached the preset timer, the selected source will play or switch to standby mode after the timer has been activated. • The MULTI CONTROL C or D button can be used to move across the setting items. To activate/deactivate the timer Press TIMER ON/OFF button. If activated, the icon "TIMER" appears on the display. ⁄ • The timer off will not be activated if the starting and stopping time are the same.
System setup Adjusting the display brightness (BACKLIGHT) The brightness of the display backlight can be adjusted and how the display backlight and illuminations of this unit are lit can be selected. Setting Auto Power Save (A.P.S.) A.P.S. stands for Auto Power Save, which is the function that switches this unit OFF when it has not been controlled for more than 30 minutes while its power is ON and the CD and other inputs are in stop mode. 1 Press BACKLIGHT/CONTRAST button. 1 Press TIMER SET button.
In case of difficulty Resetting the Microcomputer The microcomputer may malfunction (unit cannot be operated, or shows an erroneous display) if the power cord is unplugged while the power is ON, or due to some other external factor. If this happens, execute the following procedure to reset the microcomputer and return the unit to its normal operating condition. When the power is off (standby mode), press and hold down the [SOUND] button on the main unit for more than 2 seconds.
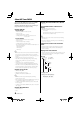
General information Maintenance Cleaning the cabinet • Use a soft cloth slightly moistened with a mild detergent solution. Do not use a solution containing alcohol, spirits, ammonia or abrasive. To install this unit and/or speakers on a wall Prepare commercially available woodscrews. 9 mm Cleaning discs • When a disc becomes dirty, clean it with a cleaning cloth, wipe the disc from the center out. Do not wipe in circular motion.
Specifications Main unit Amplifier section Rated output power C-515BT......................20 W + 20 W (1 kHz, 10% T.H.D., at 8 Ω) C-313 ...........................10 W + 10 W (1 kHz, 10% T.H.D., at 8 Ω) D.AUDIO/ AUX (Sensitivity/ Impedance) .... 300 mV/10 kΩ SUBWOOFER PREOUT (Level/ Impedance) ..........1 V/10 kΩ Tuner section FM tuner section Tuning frequency range......................87.5 MHz ~ 108.0 MHz AM tuner section Tuning frequency range...........................
• Declaration of Conformity with regard to the EMC Directive 2004/108/EC • Declaration of Conformity with regard to the R&TTE Directive 1999/5/EC Manufacturer: Kenwood Corporation 2967-3 Ishikawa-machi, Hachioji-shi, Tokyo, 192-8525 Japan EU Representative's: Kenwood Electronics Europe BV Amsterdamseweg 37, 1422 AC UITHOORN, The Netherlands Svenska Härmed intygar Kenwood att denna C-515BT stär l överensstämelse med de väsentliga egenskapskrav och övriga relevanta bestämmelser som framgår av direktiv 1999/
• Windows Media is a trademark of Microsoft Corporation registered in the U.S. and other countries. • The SDHC logo is a trademark. • The Bluetooth word mark and logos are owned by the Bluetooth SIG, Inc. and any use of such marks by Kenwood Corporation is under license. Other trademarks and trade names are those of their respective owners. • iPod is a trademark of Apple Inc., registered in the U.S. and other countries.
For your records Record the serial number, found on the back of the unit, in the spaces designated on the warranty card, and in the space provided below. Refer to the model and serial numbers whenever you call upon your dealer for information or service on this product. Model B60-5807-08_02_English.indd 28 Serial Number 09.6.