KDC-4060RG KDC-4060RA CD-RECEIVER INSTRUCTION MANUAL © B64-1106-00 (EF)
English Contents Before use Other features Safety precautions ........................................................................3 Handling Compact discs................................................................5 Buttons and Display ......................................................................6 Audio Control Setting ..................................................................20 Clock Display...............................................................................
Safety precautions 2WARNING To prevent injury and/or fire, take the following precautions: • Insert the unit all the way until it is fully locked in place. Otherwise it may fly out of place during collisions and other jolts. • When extending the ignition, battery or ground cables, make sure to use automotivegrade cables or other cables with an area of 0.75mm2 (AWG18) or more to prevent cable deterioration and damage to the cable coating.
English Safety precautions Cleaning the CD Slot NOTE • If you experience problems during installation, consult your Kenwood dealer. • If the unit does not seem to be working right, try pressing the reset button first. If that does not solve the problem, consult your Kenwood dealer. As dust can accumulate in the CD slot, clean it occasionally. Your CDs can get scratched if you put them in a dusty CD slot.
Handling Compact discs Playing a CD that is dirty, scratched or warped can cause the sound to skip and the unit to operate incorrectly, resulting in worsened sound quality. Take the following precautions to prevent your CDs from getting scratched or damaged. Cleaning CDs If a CD has become dirty, wipe it off gently using a commercially available cleaning cloth or a soft cotton cloth, starting from the centre of the disc and moving outward.
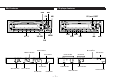
English Buttons and Display Basic operations Tuner features 4 u/d CD ¢ FM AM FM 35Wx4 DISP ATT AM AUD AUD ATT ¢ 4 SCN RDM CD CD EJECT EJECT PWR OFF 35Wx4 DISP REP TI VOL ADJ CLK MENU SCN RDM PWR OFF REP LOUD TI VOL ADJ ATT TUN / PWR OFF #1~6 CLK TUN MENU LOUD MENU LOUD / MENU Preset Station Number LOUD indicator ST indicator Frequency Band display AUTO indicator ATT indicator MONO indicator LO.
RDS features CD player features 4 ¢ FM CD / 38 / EJECT AM AUD AUD SCN RDM CD EJECT EJECT PWR OFF 35Wx4 DISP CD 35Wx4 DISP REP TI VOL ADJ ATT CLK MENU RDM MENU PWR OFF REP TI VOL ADJ ATT TI / VOL ADJ #1~6 SCN LOUD RDM DISP SCN REP CLK 4 MENU LOUD ¢ CLK 3 indicator EON indicator NEWS indicator REG indicator PTY indicator 8 indicator TA indicator Track number TP indicator AF indicator SCN indicator RDM indicator TI indicator —7— Track time REP indicator CD-IN ind
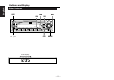
English Buttons and Display Other features ¢ 4 AUD AM FM AUD CD EJECT 35Wx4 DISP SCN RDM PWR OFF REP TI VOL ADJ ATT u/d CLK CLK MENU LOUD MENU Clock display —8—
Basic operations (See page 6) Power Turning on the power: Press either the CD or TUN button. NOTE Turn the power on before completing the following procedures. Turning off the power: Hold down the PWR OFF button for one second or more. Loudness This function amplifies low and high tones when the volume is turned down. The LOUD indicator lights up, when the loudness function is on. Turning Loudness On/Off: Press the LOUD button to switch the loudness on and off.
English Basic operations (See page 6) Menu System To accommodate a greater number of functions, a menu system has been employed for making settings. Press the MENU button to enter the menu mode and then display the function to make the setting. Details on each setting are explained separately in the corresponding function page. 1 Hold down the MENU button for one second or more. "MENU" is displayed when the menu mode is entered.
Tuner features (See page 6) Selecting Tuning Mode NOTE If the frequencies stored at the preset numbers receive stations which were not originally memorized when traveling long distances, the preset number is not displayed. In such cases, pressing the 4/¢ button to use preset station seek will receive channel 1. • Manual Tuning Press the ¢ button to increase the frequency by one step. Press the 4 button to decrease the frequency by one step.
English Tuner features (See page 6) Monaural Reception When poor stereo reception is experienced, this function will reduce noise and improve listening conditions. 1 Hold down the MENU button for one second or more. "MENU" is displayed and the menu mode is turned on. 2 Press the ¢ button repeatedly until the monaural reception function appears in the display. Press the 4 button to search in the other direction.
RDS features (See page 7) RDS (Radio Data System) AF (Alternative Frequency) Function RDS is a digital information system that lets you receive signals besides those of regular radio programmes, such as network information being transmitted from radio stations. When listening to an RDS station (ie, a station with RDS capability), the programme service name of the station is displayed along with the frequency, advising you quickly which station is being received.
English RDS features (See page 7) Restricting RDS Region (Region Restrict Function) You can choose whether or not to restrict the RDS channels, received with the AF function for a particular network, to a specific region. When the Region Restrict Function is on, the region is restricted and the REG indicator is turned on. Turning Region Restrict Function On/Off: 1 Hold down the MENU button for one second or more. "MENU" is displayed and the menu mode is turned on.
Auto TP Seek Function When the TI function is on and poor reception conditions are experienced when listening to a traffic information station, another traffic information station with better reception will be searched for automatically. This function is on, when unit is first powered on. Turning Auto TP Seek Function On/Off: 1 Hold down the MENU button for one second or more. "MENU" is displayed and the menu mode is turned on.
English RDS features (See page 7) News Bulletin Function with PTY News Timeout Setting NOTE If you choose the "20M" setting, further news bulletins will not be received for 20 minutes once the first news bulletin is received. Setting the interval at the "00M" factory default indicates no News Timeout will be made, meaning that additional news bulletins will continue to be searched for. You can arrange to have news bulletins interrupt your current listening source, including other radio stations.
18.Children’s programmes(CHILDREN) ↔ 19.Social Affairs(SOCIAL A) ↔ 20.Religion(RELIGION) ↔ 21.Phone In(PHONE IN) ↔ 22.Travel(TRAVEL) ↔ 23.Leisure(LEISURE) ↔ 24.Jazz Music(JAZZ) ↔ 25.Country Music(COUNTRY) ↔ 26.National Music(NATION M) ↔ 27.Oldies Music(OLDIES) ↔ 28.Folk Music(FOLK M) ↔ 29.Documentary(DOCUMENT) ↔ Music(MUSIC) ↔ Speech(SPEECH)↔ (Speech.....1~9,16~23, 29, Music.....10~15, 24~28) • You can select the type of programme directly by pressing a preset button.
English CD player features (See page 7) Playing CDs Switching Display for CDs Playing CDs: If no CDs are inserted, insert one in the slot with the label facing up. (If a CD is already inserted, press the CD button). The CD-IN indicator lights up when a CD has been inserted. The 3 indicator lights up when a CD is being played. Pausing and Restarting CD Play: Press the 38 button to make the disc pause. The 8 indicator lights up. Press the same button again to start play again.
Track Repeat Function Random Play Function Repeat playing the current track. Play all the tracks on the current disc in random order. Turning Repeat Play Function On/Off: Press the REP button to switch the repeat play function on and off. The REP indicator lights up when the repeat play function is turned on. The track number currently being heard blinks in the display. 1 Press the RDM button to switch the random play function on and off.
English Other features (See page 8) Audio Control Setting Clock Display Adjust various parameters of sound quality. Display the time. 1 Press the AUD button to enter the control mode. Switching to Time Display: Press the CLK button repeatedly until the clock is displayed.
DSI (Disabled System Indicator) Theft Deterrent Faceplate A red indicator blinks on the unit after the faceplate is removed, warning potential thieves. The factory default for this function is "ON". The faceplate of the unit can be detached and taken with you, helping to deter theft. Turning Disabled System Indicator On/Off: 1 Hold down the MENU button for one second or more. "MENU" is displayed and the menu mode is turned on.
Accessories English External view 2CAUTION Number of items 1 ..........................................1 2 ..........................................2 3 ..........................................1 4 ..........................................1 2CAUTION The use of any accessories except for those provided might result in damage to the unit. Make sure only to use the accessories shipped with the unit, as shown above. Installation Procedure 1.
Connecting Cables to Terminals FM/AM antenna input Antenna Cord (ISO) Rear left output (White) Antenna Conversion Adaptor (ISO–JASO) (Accessory4) Rear right output (Red) Fuse Connector Function Guide Pin Numbers for ISO Connectors External Power Connector A–4 A–5 A–7 A–8 Speaker Connector B–1 B–2 B–3 B–4 B–5 B–6 B–7 B–8 Cable Colour Wiring harness (Accessory1) Functions Battery cable (Yellow) Yellow Blue/White Red Black Purple Purple/Black Gray Gray/Black White White/Black Green Green/Black Battery
English Connecting Cables to Terminals Installation 2WARNING Connecting the ISO Connector (see p.23) The pin arrangement for the ISO connectors depends on the type of vehicle you drive. Make sure to make the proper connections to prevent damage to the unit. The default connection for the wiring harness is described in 1 below. If the ISO connector pins are set as described in 2 or 3, make the connection as illustrated.
■ Removing the hard rubber frame ■ Removing the Unit 1 Engage the catch pins on the removal tool and remove the two 1 Refer to the section “Removing the hard rubber frame” and locks on the lower level. Lower the frame and pull it forward as shown in the figure. 2 Remove the Hex-head screw with integral washer (M4×8) on then remove the hard rubber frame. the back panel. 3 Insert the two removal tools deeply into the slots on each side, Lock as shown.
English Troubleshooting Guide What might appear to be a malfunction in your unit may just be the result of slight misoperation or miswiring. Before calling service, first check the following table for possible problems. PROBLEM The power does not turn on. POSSIBLE CAUSE SOLUTION The fuse has blown. After checking for short circuits in the cables, replace the fuse with one having the same rating. No ACC position on vehicle ignition. Connect the same cable to the ignition as the battery cable.
Specifications Specifications subject to change without notice. Audio section FM tuner section Maximum output power..................................................35 W × 4 Output power (DIN 45324, +B=14.4V) ............................20 W × 4 Tone action Bass: ............................................................100 Hz ±10 dB Treble: ..........................................................10 kHz ±10 dB Preout level / Load ................................................