KDC-BT41U KDC-BT31U KDC-4751SD CD-RECEIVER INSTRUCTION MANUAL © 2010 Kenwood Corporation All Rights Reserved. B64-4799-10_01_E_English.
CONTENTS Safety 3 Maintenance Preparation 3 How to attach/detach the faceplate How to reset your unit Remote controller Basic Operations 4 Muting upon the reception of a phone call (KDC-4751SD only) Getting Started 6 Canceling the display demonstration Setting the demonstration mode Adjusting the clock Initial settings before operations Listening to the Radio 8 Listening to a Disc/ USB/ SD/ iPod 10 Start playing a disc Start playing a USB device or iPod Removing the USB device or iPod Start pl
Safety Preparation WARNING Stop the car before operating the unit. How to attach/detach the faceplate Important to know... To prevent a short circuit, never put or leave any metallic objects (such as coins or metal tools) inside the unit. ■ Caution: Adjust the volume so that you can hear sounds outside the car. Driving with the volume too high may cause an accident. ■ Condensation: When the car is airconditioned, moisture may collect on the laser lens. This may cause disc read errors.
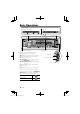
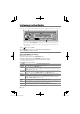
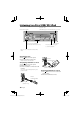
Basic Operations Display window KDC-BT41U/ KDC-4751SD KDC-BT31U Volume knob Detaches the faceplate The following indicator lights up when... ST: A stereo broadcast is received. RDS: Radio Data System service is available. TI: Traffic Information function is turned on. IN: A disc is in the unit. EQ: [SYSTEM Q] is set to an EQ mode other than [NATURAL]. (page 26) B.BOOST: [BASS BOOST] is set to [1] or [2]. (page 26) : Indicates that the Music Search mode is selected now.
When you press or hold the following button(s)... Main unit General operation ■ Turns on. ■ Turns off if pressed and held. ■ Selects the available sources (TUNER, USB or iPod, SD, CD, AUX, STANDBY), if SRC the power is turned on. • If the source is ready, playback also starts. “iPod”, “SD” and “CD” are selectable only when an iPod is connected, an SD card is inserted or a disc is loaded. Volume knob ■ Adjusts the volume level. ■ Selects items. (turn) Volume knob ■ Confirms selection.
Getting Started Canceling the display demonstration The display demonstration is always turned on unless you cancel it. Adjusting the clock 1 Press the volume knob to enter [FUNCTION] mode. 2 Turn the volume knob to select [SETTINGS], then press to enter. When you turn on the power (or after you reset the unit), the display shows: [CANCEL DEMO] \ [PRESS] \ [VOLUME KNOB] 1 Press the volume knob. [YES] is selected as the initial setup. 2 Press the volume knob again to confirm. [DEMO OFF] appears.
Initial settings before operations Press SRC to enter [STANDBY] mode. Press the volume knob to enter [FUNCTION] mode. Turn the volume knob to select [INITIAL SET], then press to enter. Turn the volume knob to make a selection, then press to confirm. See table below for selection. 5 Hold to finish the procedure. Item Selectable setting (Preset: *) PRESET TYPE NORMAL/ NORM *: Memorizes one station for each preset button in each band (FM1/ FM2/ FM3/ MW/ LW).
Listening to the Radio Hold to turn on or off the Traffic Information function (not applicable if “MW/LW” is selected). ■ Hold for about 2 seconds to memorize the current station or the selected Program Type. (Refer to [PTY SEARCH] on the table below to select the Program Type.) ■ Press briefly to recall memorized station (or Program Type after entering the PTY search mode). 1 Press SRC to select “TUNER”. 2 Press BAND repeatedly to select a band (FM1, FM2, FM3, MW/LW).
Item Selectable setting (Preset: *) AUTO TP SEEK/ ON *: Automatically searches for a station with better reception when the traffic information’s reception is poor. ATP SEEK ; OFF: Cancels. ■ [NEWS SET/ AF SET/ REGIONAL/ AUTO TP SEEK/ ATP SEEK] is selectable only when the source is “FM”. If other playback source is selected, these settings are selectable under [TUNER SET] item.
Listening to a Disc/ USB/ SD/ iPod Ejects the disc. (“NO DISC” appears and “IN” indicator goes off.) Detach the faceplate ■ ■ USB terminal Press to select track/file. Hold to fast-forwards/reverses. Press to pause. Press again to resume playback. Press to select next folder of Audio File/ iPod. Start playing a disc 1 Press SRC to turn on the power. 2 Insert a disc into the loading slot. Apple iPod (commercially available) Playback starts automatically.
Start playing an SD All Random Play • Function of KDC-4751SD. 1 Press SRC to turn on the power. 2 Press the Release button to Detach the faceplate. 3 Hold the SD card with the label side up and the notched section on the right, and insert it into the slot until it clicks. 4 Reattaching the Faceplate 5 Press SRC to select “SD”. Press and hold number button 3 (ALL RDM). Pressing this button again plays songs in the normal mode starting.
Alphabet Search for iPod • Function of KDC-BT41U/ KDC-4751SD. 1 Press to enter Music Search mode. “SEARCH” appears. 2 Turn the volume knob to select a category, then press to confirm. 3 Press again to enter alphabet search mode. “SEARCH <– – –>” appears. 4 Turn the volume knob to select the character to be searched for. 5 Press 4 / ¢ to move to the entry position. You can enter up to three characters. 6 Press the volume knob to start searching.
Adjust [SETTINGS] mode settings While listening to an iPod or KENWOOD Music Editor media ... 1 Press the volume knob to enter [FUNCTION] mode. 2 Turn the volume knob to select [SETTINGS], then press to enter. 3 Turn the volume knob to make a selection, then press to confirm. See the following table for selection. 4 Hold to finish the procedure. Item Selectable setting (Preset: *) SKIP SEARCH 0.5% */ 1%/ 5%/ 10%: Sets the ratio of skip when searching for a song in Music Search mode.
■ Connecting a cable whose total length is longer than 5 m can result in abnormal playback. ■ A USB connection cable, CA-U1EX (optional accessory) is required for connecting a USB device. About SD card (KDC-4751SD only) ■ This unit is capable of playback of SD/ SDHC memory cards complying with the SD or SDHC standard. SD card (≤2 GB), SDHC card (≤32 GB) ■ A special adapter is required to use a miniSD card, miniSDHC card, microSD card or microSDHC card. ■ The MultiMedia Card (MMC) cannot be used.
Listening to the other external components Preparation : Make sure [ON1] or [ON2] is selected for [BUILT-IN AUX/ BUILTIN AUX]. (page 7) 1 Press SRC to select “AUX”. 2 Turn on the external component and Auxiliary input jack start playing. 3 Turn the volume knob to adjust the volume. Portable audio device (commercially available) 3.5 mm stereo mini plug (commercially available) English B64-4799-10_01_E_English.
Operation of Hands-Free Phoning Function of KDC-BT41U/ KDC-BT31U ■ ■ Press to enter Bluetooth mode. Press to answer an incoming call. ■ Press and hold for about 2 seconds to memorize the current phone number. ■ Press briefly to recall memorized phone number. Getting Started Before use the cell-phone, you need to connect cell-phone to this unit. 1 Press and hold to enter easy pairing mode “PAIRING” is displayed. 2 “SEARCHING” is displayed. Search for the Bluetooth device.
■ To return to the Phone Book mode, press . 5 Press the volume knob to start searching. 6 Turn the volume knob to select a name and category. ■ To move to the next character, press 4 / ¢. 7 Press the volume knob to make a call. ■ To use the Phone Book, it must be downloaded to this unit in advance. Refer to (page 18). ■ During search, a non-accent character such as “u” is searched for instead of an accent character such as “ü”.
During a Call Downloading the Phone Book Disconnecting a Call Press or SRC. Switching to the Private Mode Press number button 6 to switches between Private talk (“PRIVATE TALK”/ “PV TALK”) and Hands-free talk (“HANDS FREE”/ “HF TALK”). To download automatically If the cell-phone supports a phone book synchronization function, the phone book is downloaded automatically after Bluetooth connection. ■ Setting on the cell-phone may be required.
Bluetooth Setup Function of KDC-BT41U/ KDC-BT31U Easy Pairing function 1 Press and hold to enter easy pairing mode “PAIRING” is displayed. ■ Any of the following is displayed depending on cell-phone registration condition: – “SEARCHING”: When registering a cellphone for the first time. – “(cell-phone name)”: When a cell-phone has already been registered. – “DEVICE FULL”: When maximum of five cell-phones have already been registered.
Registering Bluetooth Device (Pairing) Registering from Bluetooth devices 1 Press SRC to turn on the power. 2 Start registering this unit by operating the Bluetooth device. By operating the Bluetooth device, register the hands-free unit (pairing). Select “KENWOOD BT CD/R-3P1” from the list of connected units. 3 Input the PIN code (“0000”) in the Bluetooth device. Check that registration is complete on the Bluetooth device. PIN code is set to “0000” as the default. You can change this code.
Setting a Voice Command Registering Phone Book Name Type Registering Phone Book Name 1 Press to enter Bluetooth mode. 2 Turn the volume knob to select [SETTINGS], then press to enter. 3 Turn the volume knob to select [VOICE TAG], then press to enter. 4 Turn the volume knob to select [PB NAME EDIT]/ [PB NAME EDT], then press to enter. 5 Search for the Phone Book name to register Select the name to register with reference to 5 in (page 16).
Bluetooth Setup 1 Press to enter Bluetooth mode. 2 Turn the volume knob to select [SETTINGS], then press to enter. 3 Turn the volume knob to make a selection, then press to confirm. ■ See table below for selection. Repeat step 3 until the desired item is selected/activated. ■ Press to return to the previous item. 4 Hold to finish the procedure. ■ To exit Bluetooth mode, press .
Item Selectable setting (Preset: *) BT F/W UPDATE/ Display the firmware version and update the firmware. BT UPDATE MIC GAIN –3 — 0 * — +3: Adjust the sensitivity of the built-in microphone for a telephone call. Adjust the voice of caller. Setting to “+” increases the voice volume. NR LEVEL –3 — 0 * — +3: Reduce the noises generated by surrounding environment without changing the built-in microphone volume. Adjust the voice of caller when it is not clear. Setting to “+” increases the noise reduction.
SMS (Short Message Service) Function of KDC-BT41U/ KDC-BT31U Press to enter Bluetooth mode. Downloading the SMS Display the SMS 1 Press to enter Bluetooth mode. 2 Turn the volume knob to select ¤ [SETTINGS], then press to enter. 3 Turn the volume knob to select [SMS DOWNLOAD]/ [SMS DL], then press to enter. 4 Start downloading ■ During downloading: “DOWNLOADING” is displayed. ■ After completion of downloading: “COMPLETE” is displayed. 5 Hold to finish the procedure. ■ To exit Bluetooth mode, press .
■ To exit Bluetooth mode, press . The unopened message is displayed at the beginning of the list. Other messages are displayed in the order of reception. ■ The SMS that has arrived when the cellphone is not linked with Bluetooth cannot be displayed. Download the SMS. ■ The short message cannot be displayed during downloading the SMS. ■ Unread messages are prefixed with an asterisk (*). ■ English B64-4799-10_01_E_English.
Function settings 1 Press SRC to select a source other than “STANDBY”. 2 Press the volume knob to enter [FUNCTION] mode. 3 Turn the volume knob to select [AUDIO CONTROL/ AUDIO CTRL] or [SETTINGS], then press to enter. 4 Turn the volume knob to make a selection, then press to confirm. ■ See table below for selection. Repeat step 3 until the desired item is selected/activated. ■ Press to return to the previous item. 5 Hold to finish the procedure.
Item HPF REAR LPF SUBWOOFER/ LPF SUB-W SUB-W PHASE SUPREME SET VOLUME OFFSET/ VOL OFFSET Selectable setting (Preset: *) THROUGH *: All signals are sent to the rear speaker. ; 40/60/80/100/ 120/150/180/220 (HZ): Frequencies lower than the specified value are cut off. THROUGH *: All signals are sent to the subwoofer. ; 50/60/80/100/120 (HZ): Frequencies higher than the specified value are cut off.
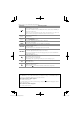
Installation/connection Part list: A Faceplate ...................................................................(×1) B Escutcheon ..............................................................(×1) C Mounting sleeve...................................................(×1) D Wiring harness .......................................................(×1) E Removal tool ..........................................................
■ Reception may drop if there are metal objects near the Bluetooth antenna. Bluetooth antenna unit For Good Reception To assure good reception, note the following: ■ Communicate with the cell-phone within the line-of-sight distance of 10 m (30 ft). The communication range becomes shorter depending on the surrounding environment. The communication range also becomes shorter when there is an obstacle between this unit and the cell-phone. The above maximum communication range (10 m) is not always assured.
Wiring connection FM/AM antenna input (JASO) USB connector Antenna Cord AUX input (Stereo) Use the mini-plug (3.5 mm ø) cable which is stereo type and does not have any resistance. Rear output/ Sub Woofer output switchable (page 7) R L Fuse (10A) Wiring harness D If no connections are made, do not let the wire come out from the tab.
Installing the unit 1 3 Connect the wiring harness to the unit. Other wiring connection has been completed earlier. (page 30) C 2 1 B D A 2 2 Before attaching, make sure the direction of the escutcheon is correct. (Wider hooks on the bottom side.) 1 3 C 4 5 B Dashboard of your car Bend the appropriate tabs to hold the mounting sleeve firmly in place. A Removing the unit 1 Detach the faceplate A.
Installation the Microphone Unit (KCA-MC10 ; optional accessory) (KDC-BT41U only) 1 Check the installation position of the microphone. 2 Remove oil and other dirt from the KCA-MC10 installation surface. 3 Install the microphone. 4 Wire the microphone cable up to the hands-free box with it secured at several positions using tape or the like. ■ Install the microphone as far away as possible from the cell-phone.
Troubleshooting Symptom Sound cannot be heard. “PROTECT” appears and no operations can be done. The unit does not work at all. Radio reception is poor. / Static noise while listening to the radio. “IN” flashes. CD-R/CD-RW cannot be played back and tracks cannot be skipped. Disc sound is sometimes interrupted. “NA FILE” appears. “NO DISC” appears. “TOC ERROR” appears. “ERROR 99” appears. “COPY PRO” appears. “READ ERROR” appears. “NO DEVICE” appears. “NO MUSIC” or “ERROR 15” appears. “NA DEVICE” appears.
Symptom Correct characters are not displayed (e.g. album name). Remedy/Cause This unit can only display letters (upper case), numbers, and a limited number of symbols. Bluetooth Symptom Remedy/Cause The hands-free talk volume is low. The hands-free talk volume can be adjusted independently. Adjust it during hands-free talk. [MIC GAIN], [NR LEVEL] and [EC LEVEL] of (page 22). No beep is heard at reception of an No beep is heard depending on the type of your cell-phone.
Specifications FM tuner section Frequency range (50 kHz space): 87.5 MHz — 108.0 MHz Usable sensitivity (S/N= 26 dB): 1 μV/ 75 Ω Quieting sensitivity (DIN S/N = 46 dB): 2.
Information on Disposal of Old Electrical and Electronic Equipment and Batteries (applicable for EU countries that have adopted separate waste collection systems) Products and batteries with the symbol (crossed-out wheeled bin) cannot be disposed as household waste. Old electrical and electronic equipment and batteries should be recycled at a facility capable of handling these items and their waste byproducts. Contact your local authority for details in locating a recycle facility nearest to you.
■ The “AAC” logo is a trademark of Dolby Laboratories. The Bluetooth word mark and logos are owned by the Bluetooth SIG, Inc. and any use of such marks by Kenwood Corporation is under license. Other trademarks and trade names are those of their respective owners. ■ SDHC Logo is a trademark of SD-3C, LLC.
Declaration of Conformity with regard to the EMC Directive 2004/108/EC For KDC-BT41U/ KDC-BT31U Declaration of Conformity with regard to the R&TTE Directive 1999/5/EC Manufacturer: Kenwood Corporation 2967-3 Ishikawa-machi, Hachioji-shi, Tokyo, 192-8525 Japan EU Representative’s: Kenwood Electronics Europe BV Amsterdamseweg 37, 1422 AC UITHOORN, The Netherlands B64-4799-10_01_E_English.
English Hereby, Kenwood declares that this unit KDC-BT41U/ KDC-BT31U is in compliance with the essential requirements and other relevant provisions of Directive 1999/5/EC. Français Par la présente Kenwood déclare que l’appareil KDC-BT41U/ KDC-BT31U est conforme aux exigences essentielles et aux autres dispositions pertinentes de la directive 1999/5/CE.
B64-4799-10_01_E_English.